Important points
To build a mini-steam room in a small balcony space, you should calculate all the dimensions in advance, as well as change the insulation and install the electrical wiring. During construction, it is important to consider the positive and negative nuances of ventilation and waterproofing of the loggia.
Also, to equip a sauna on the balcony, you will most likely have to change the entire floor covering, ceiling and walls.
Brick, stone and other heavy materials that create excess load on the load-bearing slabs in the house are not suitable for interior decoration of the balcony. Wood is suitable for the steam room. To keep the room as warm as possible, it is important to choose the right insulation.
Before equipping a sauna on the loggia, it is necessary to carry out repair work (read more in the article “Do-it-yourself loggia repair”). The first thing you should do is remove all things from the balcony, and also remove the old finish, if any. For proper regulation of heat transfer for a steam room, the best place is the main wall of the house. To protect the steam room from possible emergency situations, it is better not to make it too large.
Optimal dimensions of the steam room:
- width 800 cm;
- up to 210 cm in height.
Balcony insulation for sauna
Return to content
Floor
The optimal insulation for a balcony is polystyrene foam. This material almost does not conduct heat and does not absorb moisture, which is a determining factor when there is a sauna on the balcony.
Floor insulation is carried out as follows:
- Wooden logs made of timber with a cross section of 25-40 mm are secured to the floor using dowels. The height of the beam must correspond to the thickness of the insulation. At the attachment points, the waterproofing is restored with liquid sealant.
- Expanded polystyrene sheets are laid between the joists. They can be glued to the waterproofing or left unattached.
- The seams between the joists and the insulation are treated with sealant.
Another layer of waterproofing can be laid on top of the polystyrene. From above everything is sewn up with wooden clapboard or boards.
You can also read detailed instructions on floor insulation.
Return to content
Walls
The same foamed polystyrene, foam glass, penofol or mineral wool mats can be used as insulation for walls. The latter option is more convenient and practical, since the wool is easy to cut to the required size and, after laying, it does not require sealing the seams between adjacent mats.
To fasten the insulation to the walls, create a frame from a wooden beam of small cross-section or a metal profile. The distance between the slats is 40-50 cm.
Pieces of insulation cut to size are placed into the cells of the frame. They can be left unsecured, because... elastic cotton mats will be held in place by their own expansion, and the external finish will protect them from falling out of the sheathing cells. If you need to lay mats of a large area, they are secured with special fastening nails.
1 - insulation; 2 - diffusion film; 3 - lining
A layer of vapor barrier is applied on top of the insulation. This will not allow moisture to penetrate inside the insulation and condense there, which reduces the quality of insulation and creates a danger for the walls of the balcony.
Instead of stone wool, the walls can be insulated with polyethylene foam. This rolled material has the same thermal conductivity as cotton wool and is thinner. A layer of aluminum foil is applied to one side of the material. It acts as a vapor barrier and reflects heat back into the balcony room.
Place penofol with aluminum foil inside the balcony. They are fastened with wooden slats nailed from the outside.
After laying the insulation, the walls are sheathed with wooden lining or PVC panels.
Return to content
Ceiling
The insulation of the balcony ceiling is carried out in the same way as the walls.
However, in the case when the neighbors above have a well-insulated balcony, then it is possible to lay insulation of a smaller thickness. Otherwise the technology will be the same:
- a frame is filled with slats or a metal profile;
- insulation is laid;
- a vapor barrier sheet is attached;
- the ceiling is covered with finishing materials (moisture-resistant plasterboard, plywood, PVC panels or lining).
Return to content
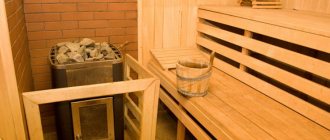
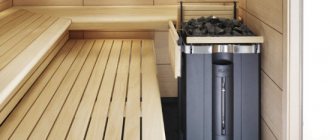
Compact sauna on the balcony: main advantages
You can build a sauna on the balcony in your apartment with your own hands - it’s not difficult if you put in a little effort. The dry steam room is heated by an electric fireplace. To heat it, you do not need to use firewood or other types of fuel. After relaxing in the sauna, no ash will form on the floor or in the stove. Additional advantages:
- inexpensive arrangement in a short period of time;
- the effect of a real steam room;
- small dimensions;
- the room heats up in a matter of minutes;
- the ability to warm up at home, rather than in public saunas;
- the steam room does not disturb the neighbors at all;
- You can steam at different times of the day.
Arrangement of the ceiling on the loggia for the sauna
Increased attention should be paid to the vapor barrier of the bathhouse ceiling, since the hot air in the cabin rises upward, where it settles in the form of moisture. If this is not done, then the sauna in the apartment on the balcony will be a source of dampness for the neighbors (read: “How to build a sauna with your own hands in an apartment - where to start”).
Work on finishing the ceiling surface is carried out in stages:
- 5-centimeter-thick bars are stuffed in increments of 40 centimeters.
- In the spaces between them, waterproofing material is attached.
- Install the insulation by pressing it with a wooden strip and nailing it.
- The vapor barrier membrane is fixed in two layers.
- Finish the surface with clapboard.
An assistant will be required to carry out work on thermal protection of the ceiling.
Safety regulations
Opponents of installing saunas on balconies usually say that this design is unsafe. But if you follow all safety standards, you can protect yourself and your loved ones from unforeseen situations:
- Entrust the electrical installation and installation of lighting on the loggia to professional craftsmen. It is also important to monitor the entire process personally.
- The outer walls of the steam room should fit tightly to the insulating material. The booth should not border the street.
- It is recommended to make a separate outlet for the stove. It is not safe to run wires inside the mini-sauna.
- Measure a distance of about 3 centimeters between the floor and the door.
- It is better to use an electric oven with automatic settings. After working for 8 hours, the stove will turn off automatically.
- To avoid accidentally getting burned, it is advisable to cover the stove with a special screen.
- A stove-heater consumes a lot of energy, so it is better to connect them to the panel via its own cable.
- It is important to isolate the stove-stove from the wooden covering of the floor and walls. For insulation, choose high-quality heat-resistant materials.
- It is advisable to make the door inside from wood. If the handle is metal, you can get burned on it.
- The booth must have a lighting fixture with a heat-resistant coating and water protection level IP54.
- After visiting the sauna, it is necessary to thoroughly dry and ventilate.
- The total weight of the stones in the oven should be up to 15 kilograms.
- For doors you need to use special glass, which is sealed with rubber inserts when closed.
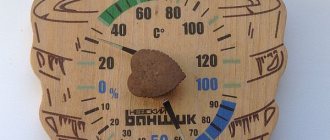
After the sauna on the balcony has been erected, it needs to be heated well. Open the door and turn on the heater for 60 minutes. The next day, dry for longer, up to 2 hours. Make the temperature no lower than 90 degrees. After this treatment, you can start steaming.
Construction of a shelf for a sauna
The structure must be firmly attached so that two people can sit on it comfortably. There is no need to glue seats to the walls. The best solution is to use special racks. To save space, you can install special pull-out shelves.
Step-by-step equipment process:
- Beams 8 centimeters thick are attached to the floor.
- Boards with rounded edges are installed on them using galvanized fasteners. The layer of wood must be at least 5 centimeters. Boards should be installed of high quality and well polished.
- It is important to maintain a distance of 1.5 centimeters between the boards so as not to impede air circulation.
- The shelves are coated with a special oil coating.
- High-quality tree species, such as linden and poplar, are suitable for the structure.
Selecting materials for a balcony sauna
It is better to select and purchase the necessary materials in advance, since in the case of sauna insulation, accurate calculations are important. Correcting mistakes on the fly and changing the plan of action is a bad idea.
As for hydro- and vapor barriers, as well as insulation, you won’t have to come up with anything new. You can safely use:
- Polystyrene foam or polystyrene foam, etc. for outdoor work;
- Mineral wool for internal insulation;
- Foil vapor barrier;
- Thick waterproofing film;
- Polyurethane foam and various sealants.
The main thing when choosing materials is to pay attention to their quality and fire safety.
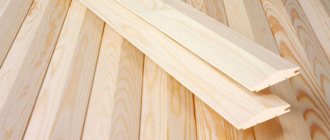
As for finishing materials, the best solution for a sauna is wood. Moreover, for the steam room it is better to choose larch lining with a 10% degree of shrinkage. For the rest, conifers are well suited - when heated, they will give off a pleasant aroma to the room.
Legitimacy of the idea
After enterprising citizens began installing mini-saunas in their apartments, representatives of the housing office and the fire inspectorate unanimously banned this installation. But according to regulatory documents, such installation can be carried out.
In fact, when installing a sauna, the balcony is not structurally rebuilt. Even if a partition is made, it will not be considered a major repair. Theoretically, there are no violations. Before installing a steam room at home, it is recommended that you familiarize yourself with the types of documentation:
- “Architectural and planning solutions for multi-apartment residential buildings” (SP 31 - 107 - 2004);
- “Residential multi-apartment buildings” (SNiP 31 – 01 – 2003).
It is recommended to contact the Management Company for registration to obtain a list of services from which you can obtain permission to install a mini-steam room. But if the neighbors don’t mind and security measures are followed, you don’t have to collect documentation.
Fire safety
In a steam room installed in an apartment building, only an electric stove is allowed. Its power should be up to 4.5 kW. In this case, there must be a ventilation system. It is prohibited to discharge steam into the ventilation shaft inside the house, since this load was not provided for during construction. The fire inspector will also require the installation of a special dry pipe that automatically supplies water in the event of a fire. The dry pipe must be connected to the fire alarm system.
Installation of an infrared sauna
1. Preparatory work is carried out as described above. That is, a balcony or loggia must be waterproofed, insulated and sheathed. 2. Remove the electrical wiring. 3. There is no need for special ventilation for the infrared sauna; it is well ventilated by opening the door. 4. The cabin box is assembled in the usual manner (the same as for a Finnish sauna). 5. Infrared emitters must be purchased at a specialized store. Mount them vertically. Five heaters are enough for a single sauna. The placement of the emitters should ensure uniform coverage of the room: two pieces are installed on the back wall, two on the sides and one on the floor.