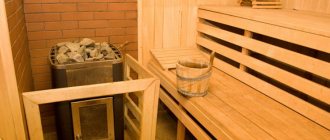
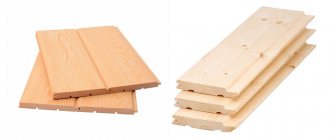
Wood selection
The modern range of linings is distinguished by its diversity. The choice of wood type for the interior decoration of a bathhouse depends on external features, technical characteristics of the material and personal preferences.
The material for installing the lining in the steam room is chosen from deciduous trees, which will release useful substances during the heating process. This material has a beautiful, even structure and is resistant to high humidity and high temperatures.
Due to the oils contained in the wood, softwood lining is recommended for use in the design of showers and dressing rooms.
How to protect the lining and frame from moisture
When choosing products to ensure moisture resistance, you must remember: the high temperature conditions of the steam room do not allow the use of any “chemicals”. During the evaporation process, harmful substances will be released. Therefore, for this room you can only use:
- natural oils, such as flaxseed;
- wax;
- drying oil;
- antiseptics followed by coating with ship varnish.
The following compositions have similar properties: Eurotex Saura, Usadba (U409). As for varnish mixtures, they are chosen to be water-based:
- Acrylic. When heated, they emit an unpleasant odor; they are used only for the dressing room.
- Alkyd. They protect against high humidity and hot steam, but have an unpleasant odor.
- Water-based. They are odorless and do not emit harmful substances when heated; they can be used in a steam room.
- Polyurethane. They protect wood from fading and are used for interior and exterior surfaces.
- Acrylic-polyurethane. They prevent the development of mold and fungi and give the wood a pleasant shine.
The choice of means for impregnation depends on the capabilities of the owner. But in the steam room it is better to avoid all and any chemicals. Natural flax, lavender, and rose oils will require a lot of consumption, but will not lead to dire consequences. And to prevent rotting, you need to inspect the lining once every 6-8 months and treat the affected areas with antiseptics. In this case, a deep impregnation composition intended specifically for steam rooms, baths, and saunas is suitable.
External characteristics
Depending on the purpose, the outer surface and shape of the wooden material can be made in various variations.
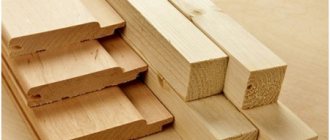
For the external cladding of a bathhouse, it is rational to choose wood in the form of a beam or a wide board. This form allows for perfect joining of individual elements, which prevents moisture from entering the cracks. External cladding of the bathhouse with wood that imitates a log will somewhat complicate the process of caring for the surface of the material.
Particular attention should be paid to how to attach the lining to the wall in the bathhouse. It is more rational to nail the lining to the frame using nails, since the use of special fasteners will incur additional costs.
Installation of lining in a bathhouse
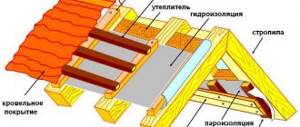
Before sheathing the steam room, the cladding is secured. To do this, the beam is attached to the wall with galvanized screws. Then, having determined a straight vertical line with a building level, install the sheathing beam on it. The first slats are installed from the corner, and subsequent slats are installed in increments of 50-60 cm, moving to the next corner. A layer of waterproofing is placed under the slats and, if desired, the slats are treated with a protective non-flammable agent. It is imperative to understand in advance how to sheathe a steam room in a bathhouse, and only then begin work.
The next layer will be a layer of non-flammable insulation (mineral or basalt wool), which has excellent water- and vapor-proof properties. The main thing is to ensure a tight fit of the insulation. If necessary, additional sealing is carried out with polyurethane foam or self-adhesive tape.
A vapor barrier layer of foil or regular film is laid on the mineral wool, which is secured with staples from an industrial stapler. At the final stage, the lining is laid vertically or horizontally.
When installing the sheathing and laying the insulation, mark the place where the ventilation holes will be. The most effective ventilation will be when placing one hole near the stove near the ceiling, and the second at a height of 15-30 cm from the floor. For the air duct, 100 mm corrugated aluminum is used.
The finishing of the steam room begins from the ceiling, and the first board is attached at the entrance (for more details: “How to decorate a bathhouse with clapboard correctly - the master’s recommendations”). For installation, clamps are used and a finishing nail is used only for the last board. The lining is fastened exclusively using a hidden method.
This choice is dictated by the following circumstances:
- Heating, twisted metalware through and through, which can burn the skin;
- Possibility of rust appearing on hardware when exposed to wet steam;
- Not aesthetically pleasing in appearance when the mount is open.
The wooden paneling is secured using clamps or self-tapping screws. The kleimer, as the fastening bracket is called, is made of galvanized iron and screwed to the sheathing with self-tapping screws. The advantage of clamps is that there is no damage to the lining sheets during installation. The height of the clamps depends on the type of materials and for eurolining it is 4 mm, and for wooden lining the height is up to 5 mm.
The boards are then nailed to the sheathing battens in the middle. The next board covers the already nailed board with a ridge, and is also attached to the sheathing batten. When using finishing nails, they are nailed strictly at an angle. All subsequent boards are attached in the same way. At the same time, the level constantly checks the correct placement of the boards. Before nailing the last board, measure the width and cut it if necessary.
For horizontal installation, you can nail the boards starting from the top or bottom. Laying horizontally begins from the ceiling by attaching the first batten to the sheathing with the groove down. Then the boards are positioned as close to each other as possible, like a designer, with the tongue of the top board fitting into the groove of the bottom panel.
After completion of all work, the final decoration of the surface is carried out using special corners and ropes. The slopes of the doorways are finished with clapboard cut to the required size and framed with platbands. For additional protection from moisture, the mounted lining is finished with a special wax or water-based compound.
Classification
Creating an ideal wall surface in a bathhouse is possible through the use of high-quality materials. To know how to secure the lining in a bathhouse, it is necessary to distinguish by what characteristics it is divided.
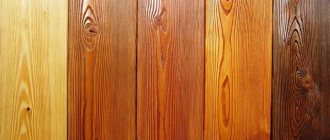
Grade “Extra” and “A” are distinguished by high quality, an ideal smooth surface without various types of external damage, the same texture and color. Grades “B” and “C” do not meet the technical requirements, because there are visible external errors in the material on the surface (knots, deformations, various damages).
About the advantages of the material
The lining known to everyone today was previously used exclusively for covering cars. This is where its name comes from.
The lining differs from classic edged boards, because on its long sides there are grooves that allow for maximum contact between the wooden panels.
It was thanks to this feature that the clapboard-lined wall turned out without gaps, cracks and was quite beautiful in appearance.
Of course, progress does not stand still, and today there are many types of lining suitable for a particular room.
Finishing a bathhouse with clapboard is the most popular due to a number of advantages inherent in it.
This material is able to “breathe” because it has a minimum level of humidity in the composition (about 12%).
However, in the process of attaching the lining to the bathhouse, it should be taken into account that the external cladding requires dry weather, and the internal cladding requires a warm room.
In addition, the lining is a completely unique panel, because it can be used to cover walls, ceilings, and floors.
When covering a bathhouse with clapboard, the inside surfaces are smooth and neat.
Information. It is worth noting that, in addition to other advantages, the lining perfectly absorbs noise.
In rooms with clapboard cladding from the inside of the bathhouse, it is cozy, warm and atmospheric. Additional treatment of wood with special substances will increase its service life several times, as well as make it more moisture and heat resistant.
So, let’s summarize the main advantages of these wooden panels:
- Aesthetically beautiful appearance;
- Excellent noise and thermal insulation properties;
- Long service life, especially with additional processing;
- With the help of lining, you can perfectly hide imperfections in the surface of walls, floors or ceilings, as well as various communication networks;
- Fastening and processing panels of this type is absolutely quick and easy;
- Environmental friendliness of the material.
Preparing walls for cladding
The first step is to prepare the walls. The surface of the wall is leveled and cleaned of dirt, mold and other imperfections. Then they are primed with antiseptic agents.
At the second stage, hydro- and thermal insulation is carried out. For waterproofing, multilayer polyethylene film is used. Various types of insulation materials are used to insulate walls.
At the last stage, a special frame is constructed onto which the lining will subsequently be attached.
Beam fastening methods
The main method of installing timber and its fixation is installation using the tongue-and-groove system. This connection is durable and designed for long-term use. But the wood is prone to shrinkage, which leads to a change in the geometry of the beam, so nails and dowels are used as additional fasteners. Moreover, nails began to be used relatively recently, in contrast to dowels, which have been used since time immemorial. The use of nails is cheaper, which builders could not help but notice, and easier, which led to their widespread use. There are too many requirements for dowels, and their installation is associated with certain difficulties.
Installation methods
Prolonged exposure to moisture and high temperatures on the lining leads to inevitable damage to the material. The duration of operation depends on the method of laying the lining. The methods of fixing eurolining in a bathhouse determine the nature of the installation work.
Vertical stripes look very attractive. With this installation option, the joints between the planks are almost invisible.
Horizontal laying of lining has a number of advantages:
- visible changes in the surface and structure of the material are hardly noticeable;
- detection and replacement of lining strips damaged by moisture is much easier and faster;
- visually increases the area of the room;
- The vertical arrangement of the frame slats promotes proper circulation of air masses, which increases the rate of removal of excess moisture.
Fastening the lining at an angle gives the room individuality and additional attractiveness. As a rule, diagonal trim decorates individual elements in the steam room. A combined finishing style is very common.
Wall fixation options
The functionality of the bathhouse and its attractive appearance depend on the method of fixing the lining. Therefore, you need to think about how the planks will be laid and what this will lead to.
How to sheathe vertically?
With the vertical method of fastening the lining, a visual effect of increasing the height of the walls is created. In this case, there are no visible gaps between the boards; the wall is solid, monolithic.
Condensed moisture flows well along vertically installed boards , which prolongs the life of the entire wall.
But there are negative sides. For example, with long-term use of a bathhouse, the boards begin to rot, and from below, where it is most damp.
Important
With the vertical method of fixation, the board that has rotted from below will have to be replaced entirely, which is inconvenient and costly.
How to make fasteners horizontally?
If the height of the room allows, then it is best to mount the lining horizontally. Advantages of the horizontal fastening method :
- This method of fastening visually expands the space.
- Boards that have rotted from below can be easily replaced without dismantling the wall.
- With the horizontal method of fastening, the sheathing on the wall is made vertically, the air rises freely, ventilating the area of the wall hidden behind the lining. And this significantly extends the life of wooden walls.
Methods of fastening the lining should be mixed - where necessary, fasten the planks vertically, and where more practical, horizontally.
Options for fixing the lining
The differences in how to correctly nail the lining in a steam room onto one or another surface determine the technology for carrying out installation work. As a rule, the lining is attached to a wooden frame or sewn onto concrete (brick) walls. There are several methods of fastening.
Through fastening with nails or screws
The fastest and easiest way to attach. During the work process, holes are drilled on the bar, equal in diameter to the thickness of the nail head. After which the lining is nailed to the wall so that the nail is completely embedded in the plank, creating the integrity of the surface.
The disadvantage of this method of fastening is the heating of the metal rod and nail head under the influence of high temperatures. Prolonged exposure to moisture and heat on a nail leads to the formation of rust, which disrupts the aesthetic appeal of the steam room.
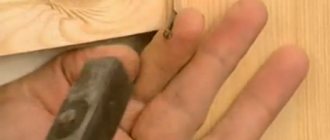
The sequence of actions on how to properly nail the lining in a bathhouse is shown in the photo.
Through fastening with nails or screws with masking
This method is chosen if the mounting is made on a concrete wall. A recess is drilled and the paneling is secured to the wall with a thin finishing pin. Then the protruding part is cut and sanded. The result is a neat, unnoticeable fastening.
Installation of lining in this way in a steam room was made possible thanks to the use of a stainless steel pin. Because a part made of wood was deformed and reduced in size under the influence of high temperatures.
Concealed fastening through a groove
Fastening using this technology involves the use of an additional hole (groove) in which the nail head will be hidden. To do this, it is necessary to drill a recess at an angle with a larger diameter than the width of the cap.
The final result depends on how to correctly nail the lining in a bathhouse using this method. Carefully driving the nail into the groove will ensure a smooth surface without visible unevenness or damage. This requires high professionalism and work skills.
Hidden fastening through the shelf
This method of fastening is only possible for eurolining and softline profiles that have a sufficient flange width. A specific configuration feature allows you to hide the head of a driven nail or the head of a screw with the next strip of lining.
Making this fastening does not require any special skills, and the resulting connection will meet all standards of beauty and quality.
Concealed fastening with clamps
It is the fastest and most reliable method of fastening. Before attaching the paneling in a bathhouse using this technology, you need to purchase special fasteners (clasps). Each lining is inserted into the groove of the previous plank. A clamp is placed on the free edge, which is subsequently attached to the frame using a nail or screw.
Regardless of how you install the lining in the steam room, you should take into account the individual characteristics and technical characteristics of the room. The correct choice of material, preparatory work and installation will undoubtedly become the basis for a high-quality and beautiful finish of any bathhouse.
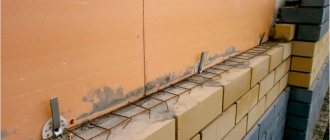
Fasteners for walls made of building blocks
Foam blocks are good for everyone: they are easy to build with, warm, do not conduct sound, and are inexpensive. But the attachment to the foam block is specific. This is a fastener similar to the usual dowels, but with an increased surface of the spacer elements.
For fastening in walls made of building blocks, a dowel-nail is used. It consists of two parts: the actual metal nail with a shallow thread and a plastic expansion dowel. To install it, a hole of appropriate diameter is drilled in the wall into which the dowel is inserted. A nail is driven into it. If dismantling is necessary, the nail can be unscrewed like a screw.
The shapes of dowel inserts are different. They largely determine how strong the resulting connection is.
If we talk about the shapes of plastic tabs, those with screw threads are held in the wall much stronger than with spacer elements. But. Only subject to 100% compliance with installation recommendations. Even turning the dowel once in place leads to the destruction of the adjacent foam concrete. As a result, the mount simply pops out of the wall.
Dowel-nails from Sormat
You can also use special Confix concrete nails from Sormat. The front part of these nails has a specific shape, due to which it is firmly held in the wall. To install such a nail, a hole of the required diameter is drilled, then a nail is driven into it.
Another variety of Sormat nails is the PKN quick-fixing nail. This product looks like a tube with a longitudinal hole. These nails are held quite firmly in the wall due to elastic force.
Sormat nail - PKN - used for fastening in lightweight concrete walls
For fastening into gas or foam concrete, it is recommended to use special screws for lightweight concrete Sormat KBRM, which have a special shape and coating that prevents them from rusting. These screws can be used to securely secure the clapboard sheathing.
There is another type of anchors for foam blocks (gas blocks, expanded clay concrete and other cellular concrete) - Fischer chemical anchors.
Chemical anchors - a new product on the market
To install this fastener, a cone-shaped hole is made in the wall using a special drill. A special glue is poured into it, a certain period of time is waited for the mass to partially harden, after which the anchor is inserted. Fasteners can be used only after the composition has completely hardened. The reliability of fixation of this type of fastening for foam blocks depends on how well the two components “grasp”: glue and foam concrete. And this characteristic strongly depends on the quality of the adhesive composition. Therefore, the choice of manufacturer is very important.
A good anchor for traditional foam blocks
There are quite a lot of types of fasteners and new types appear every day, so choosing the right one will not be difficult.
Advantages and disadvantages
Pros of finishing nails:
- light weight - 1000 pcs. nails with a length of 20 to 50 mm weigh from 350 to 800 g;
- decorative - a cap driven flush with the surface;
- corrosion resistance (except for black ones).
The pros of finishing nails outweigh their disadvantages
Cons of finishing nails:
- impossibility of dismantling without damaging the sheathing elements - a small nail head cannot be picked up with tools without damaging the lining;
- the need to use a puncher.
Compliance with GOST
GOST finishing nails for lining
Let’s immediately determine why we need molding finishing nails for lining. Their main difference from traditional nails is their smaller head.
The use of classic nails with a standard head worsens the decorative effect.
The nails must be finished off with a hammer
According to GOST 4035-63 “Round molding nails”, the permissible smallest head diameter is 2.0 mm with a nail length of 50 mm.
The lining is fastened with nails either into a tenon or into a groove. And in order not to interfere with the connection, the nail heads should be recessed into the wood. The most convenient way to do this is with a doboynik.
Using dowels
Pins are a more expensive and time-consuming method of fixation. But due to the larger contact area with the beam, they reduce its movement during shrinkage. A dowel is a rod made of hard wood - oak or birch. The first option is expensive, so birch is used more often. Before installing the dowel, a hole is drilled. It should match the diameter of the rod as much as possible so that it does not fit in freely. Otherwise, you will have to additionally use a sealant. Pins are more powerful than nails - their diameter is 30 mm and length 300 mm.
As you can see, the use of nails has its advantages over dowels. It is important to ensure that when installing them, there is complete exclusion of contact with moist air, and then the bathhouse will last as long as possible.
Advantages of using metal fasteners
Practice shows that it is much easier for an experienced carpenter to work with nail fasteners. This is due to a number of reasons.
- When purchasing high-quality oak dowels, the purchase price may exceed the price of a similar number of nails.
- If, in order to save money, you make dowels yourself, it will take considerable time and does not guarantee that the fasteners made will be the same diameter and strictly cylindrical in shape, which will complicate installation. In addition, the geometric parameters of wooden dowels change under the influence of external temperature and humidity and significantly depend on the material from which they are made.
- There is a high probability of dowels cracking when driving in (accordingly, their volume must be made in excess).
- Nails are distinguished by precise length and diameter, which remain unchanged in all weather conditions.
- The cost of purchasing them is lower than the cost of producing a similar number of oak (and even birch) dowels.
- The nail is easy to install and does not require adjustment to each hole.
- Construction time is reduced by minimizing labor costs.
- The likelihood of marriage is significantly reduced.
Conclusion. If the work is carried out by professional carpenters, the use of nails is more profitable and appropriate. This does not negatively affect the quality, reliability and durability of the bathhouse.