Bathing procedures have a beneficial effect on the entire body, but you don’t always have time to visit a public steam room. Therefore, many are interested in how to make a sauna in an apartment, although until recently even thinking about this seemed unrealistic. Today, despite the need to obtain a special solution, a small bathhouse in an apartment with your own hands is no longer feasible. Let's consider all the stages of realizing a “hot” dream.
Advantages of baths, their microclimate
The sauna in the bathroom (photo below) can be different. Regardless of the choice, a bath in your own bathroom has a number of advantages. The procedures can be carried out at any convenient time. This is a great advantage for those who cannot find a few free hours in their busy schedule to visit the bathhouse.
Preparatory work and heating up a small sauna happen quite quickly. In this case, energy consumption will be minimal. It is difficult to build a spacious bathhouse in an apartment or your own house, but a mini-option will be acceptable. It is worth considering that building a sauna in the bathroom of your home is relatively inexpensive. There is no better place for this in the apartment.
Before starting construction work, you need to determine what microclimate in the steam room will be acceptable for the owners of the house. There are three main options. If desired, you can create a steam room where the microclimate can be chosen in accordance with your wishes and mood at a particular moment. The following varieties are distinguished:
- Dry (Finnish) sauna. The air here is heated to record levels. The temperature is 90-110ºС. The humidity will be very low. It does not exceed 10%. This microclimate causes the body to intensively produce sweat. Very deep layers of the epithelium are warmed up, metabolic processes are accelerated. At the same time, increased burning of fat deposits occurs, and toxins are removed from the body.
- Wet sauna. Here the air heats up to a temperature of 70-90ºС, but the humidity will be higher. It is 25-40%. To ensure the required level of humidity, water is poured over the hot stones, which are located in a special compartment of the furnace.
- Steam sauna (hammam). This is a bath with the lowest temperature, which is up to 60 ºС. The air must be saturated with water vapor. To do this, you will need to use a special steam generator. You can add not only water to it, but also herbal infusions. This will allow you to take inhalations directly in the sauna. The microclimate in such a sauna is comfortable for almost everyone, including children and the elderly. Almost everyone feels very good at a temperature of 40 ºС and 100% humidity. With such a microclimate there is no stress on the body. Therefore, you can attend such procedures at least every day; the procedure has practically no contraindications.
When creating a microclimate in a steam room, you need to adhere to the “rule 110”. This means that the humidity and temperature combined should not exceed 110. This is true for dry and wet saunas. So, for example, if the temperature in the steam room is 90 ºС, then the humidity should be 20%.
Types of saunas
First of all, it should be said that for a sauna it does not matter what material it is built from - brick, wood, cinder block or any other material. Moreover, it is not necessary to build a separate building for a Finnish bathhouse, since it can be equipped directly in the cottage, for example, in the basement. The main thing is to organize ventilation and properly equip the steam room.
All existing saunas can be divided into three types:
- The simplest saunas are essentially one steam room, so they cannot be called comfortable. The simplest saunas are not very common, but they are a good option when you want to have a Finnish sauna in a small country house, but there is no opportunity to build a separate building.
- Simplified sauna - in addition to the steam room, it has all the basic elements, such as a shower and a changing room.
- A fully equipped sauna is, of course, the most comfortable option. As a rule, such baths are installed in separate buildings. They include:
- Veranda;
- Locker room;
- Steam room;
- Waiting room;
- Pool.
Often, saunas of the latter type include a relaxation room, billiard rooms and other premises.
Individual project or ready-made solution?
The sauna in the bathroom in the photo below looks very harmonious. Before starting construction and repair work, the owners must decide which steam room option will be preferable. You can build a sauna according to a special project. In this case, you need to purchase the appropriate building materials and make a bathhouse from scratch in the bathroom.
Today there is an opportunity to take a simpler path. In specialized hypermarkets you can purchase a ready-made booth. It contains a heating element (usually an infrared fireplace). You can choose a booth with the appropriate dimensions. They are made from boards or more budget building materials. It will be easy to install a ready-made steam room at home yourself. It's even easier than installing a shower stall.
It is worth considering one nuance. The legislation of the Russian Federation stipulates that before building a sauna in an apartment in the bathroom, you must obtain permission for this. To do this, you need to prepare a project that meets all construction requirements, and then approve it with the State Fire Service.
To obtain permission, you will need to change the wiring if it does not meet the requirements of the heater, as well as provide certificates for construction materials. After this, the project must be approved by the Housing Inspectorate. If the home is managed by a Homeowners' Association, its management will need to be informed about future construction.
Next, you need to obtain permission from the sanitary station, whose representatives will check whether the norms and requirements of the sanitary and hygienic area are met. This authority is also provided with design documentation and quality certificates.
After this, you need to contact the Rospotrebnadzor Office. The house or apartment will be visited by a commission consisting of representatives of the State Architectural and Construction Supervision Inspectorate. They inspect the finished sauna and then give an opinion on the possibility of its operation. Arranging a mini-sauna is part of the home renovation procedure, so it must be carried out in accordance with established requirements.
How to get a sauna?
To become the proud owner of a device that produces beneficial dry steam, owners of living space have three options:
- buy a ready-made device;
- order the production of a sauna with individual characteristics;
- make a mini-model with your own hands.
Ready-made saunas are convenient, relatively inexpensive, but not too varied. The most popular models are supplied by Tylo (Sweden) and Harvia (Finland).
In the spacious bathroom you can install a fairly large sauna, which can comfortably accommodate several people
Such devices consist of individual modules and come with detailed instructions that allow you to assemble the device yourself, saving on installation costs.
The model can be disassembled and transported to a new place, for example, to a country house. However, using ready-made models in an apartment is not always convenient, since the parameters of the place where the sauna will be installed must be a multiple of the module width, which is usually 80 cm.
All that is needed to get a custom-made sauna is desire and the availability of the required amount of funds. Specialists will independently develop a project in accordance with the customer’s wishes, produce the necessary elements, deliver components to the site, assemble and connect the device to communications.
This is the most expensive sauna option for an apartment or private house.
A mini-sauna can be very small in size. Ready-made models in the form of a barrel-shaped chamber with an oven inside are available for sale.
Making a small sauna with your own hands is not too difficult. The materials for such a device are quite accessible, and complex construction skills are not required. However, you need to carefully study the instructions for making a sauna and take into account the recommendations of experienced craftsmen.
Infrared sauna
One of the best solutions for a small space is an infrared sauna in the bathroom. These booths are sold ready for use. They should not be confused with panel or film varieties. This is due to the characteristics of the heating element. In the presented saunas, special panels or film produce thermal energy in the infrared spectrum. Such cabins are capable of raising the temperature to no higher than 70ºС. Heat transfer occurs by convection. Infrared rays are involved to a lesser extent.
Real infrared saunas in the bathroom have many advantages over film or panel types of cabins. In the latter, it is impossible to change the humidity level. In this case, the heating level will be low. A real infrared sauna has efficient, high-temperature heaters. They emit many times more heat. Thus, infrared heaters in a sauna produce heat at a level of 230-290 ºС. This creates a special microclimate in the steam room. Moreover, the temperature here is provided to a greater extent by infrared rays, and not by convection.
Experts say that the health effect in panel and film booths is minimal. In true infrared saunas, this is achieved by maintaining high temperatures. Thermal cabins are not able to provide the required level of heating. Therefore, they are not recommended for installation in the bathroom. It is better to install a real infrared sauna or build a sauna with a heater.
These types of baths allow you to carry out procedures with maximum benefit for the body. In this case, metabolism accelerates and many chronic ailments are cured.
Pros and cons of a sauna in an apartment
An undeniable advantage of a sauna is the healing and relaxing effect of the procedure, which cannot be achieved in a standard bath. Hot procedures are beneficial for almost all human organs, relieve fatigue and nervous tension.
The availability of bath procedures, a simple and quick heating system helps keep the body in good shape and carry out regular disease prevention.
Positive effects:
- cleansing the body of waste and toxins;
- stimulation of blood circulation and microcirculation;
- strengthening the immune system;
- acceleration of metabolism;
- relaxation of the nervous system.
Installing a sauna in an apartment building is possible only after obtaining permission from several authorities.
It is issued only for apartments located in 1st category buildings. These are monolithic or brick houses with reinforced concrete floors. In this case, the area of the apartment must be no less than the established standards. For example, a two-room apartment of at least 54 m2.
Permission is issued only for installation in non-residential premises of an apartment - a corridor or a bathroom. It is allowed to install only a prefabricated structure with a size designed for no more than 2 people.
If the characteristics of the apartment correspond to these indicators, then you need to prepare a redevelopment project.
Finishing with deciduous wood is allowed only.
The project must be submitted to several authorities:
- management company;
- Rospotrebnadzor department;
- fire service of the Main Directorate of the Ministry of Emergency Situations;
- State Inspectorate for Architectural and Construction Supervision;
- SES;
- housing inspections.
Red tape with documents is not the only disadvantage. To install a sauna you will have to work hard and invest in finishing materials, possible relocation of communications and partitions. But the results are worth it.
Dimensions and design
The interior of a bathroom with a sauna needs to be carefully planned. To do this, you need to create a preliminary sketch and drawing according to which the reconstruction will be carried out. Please note that the size of the cabin may vary. The smallest are single-person saunas, in which you can only sit. Similar double cabins also have small dimensions.
According to experts, it is much more comfortable to take bath procedures in a sauna, the size of which is 200x160 cm or 200x200 cm. Here you can lie down on a shelf and take procedures with the whole family. The height inside the cabin should be 200 cm. In such a cabin you can install a stove and wooden shelves. They can be located in two or even three levels.
When choosing materials, it is important to listen to the advice of experts. The interior decoration is best made from natural wood. When heated, it will release substances into the air that have a healing effect on the respiratory system and heal the body.
It is best to take care of arranging a sauna at the stage of building a house. In this case, the bathroom must have significant dimensions. It is necessary to consider what plumbing fixtures should be installed in the room. Perhaps here, in addition to the sauna, you will need to install a bath or jacuzzi. They need sufficient space. If you plan to install a shower stall, you can provide a smaller area for the bathroom.
In an apartment, one of the best options would be to equip a finished sauna with a shower. For a bathroom with small dimensions, this solution allows you to use the space rationally. In this case, you do not need to select a shower cabin to match the style of the sauna. They will fit together perfectly.
Cabins that are equipped with rectangular glass doors are very popular. The walls can also be glass. But on the sauna side they must be made of heat-resistant glass. This design solution is suitable for decorating a modern interior style.
However, it is more comfortable to take procedures in a booth made of natural wood. In this case, you need to harmoniously fit it into the existing interior. The design of a bathroom with a sauna needs to be thought through to the smallest detail before renovation begins. Wood is suitable for eco-style. If you plan to install a sauna in the bathroom, you need to plan the entire interior in advance.
How to make a sauna from a bathtub?
A small bathroom can be converted into a sauna using the principles outlined above. To do this, the room should be carefully sealed, and dampers should be placed on the ventilation ducts. The bathtub is turned into shelves using a wooden board of a suitable size. The door should also be sealed, providing it with good protection against heat loss. And increasing the thermal insulation characteristics of the bathroom should also be considered and, if possible, implemented.
After this, you can select a stove and install it in a suitable location. Of course, the cost of heating even a small room will be higher than when using a mini-cabin, but it is still worth considering this option if there is no other opportunity to arrange a sauna in the apartment.
The procedure for carrying out construction work
Making a sauna in the bathroom with your own hands will require a lot of effort and time. But the result, if all the work is done correctly, will exceed all expectations. When the project is drawn up and a construction permit is obtained, the necessary materials need to be purchased.
The walls that will separate the steam room from other rooms are assembled using frame technology. The ceiling should not be higher than 2 m. Otherwise, heating will require more energy resources. Thermal insulation must be used during construction work. It is best to use mineral wool in such conditions. Its thickness should be from 5 to 10 cm.
You also need to purchase vapor and waterproofing. The first of these materials will protect the insulation from getting wet. Waterproofing is used when arranging the floor. This is especially important if the sauna is installed in an apartment on the second or higher floors. The canvases will need to be laid without tension, fastening them with construction tape.
The decoration inside the cabin will look harmonious if lining is used for this. The sheathing should be 10-12 mm thick. The wood will need to be treated with an antiseptic and fire retardant. You also need to use heat-resistant varnish. This will significantly increase the life of the finish.
A sauna in a small bathroom will require a minimum amount of building materials. They are purchased with a small reserve in accordance with the prepared plan. There must be a distance of at least 2 cm between the film and the lining.
The outside of the frame can be covered with wood. But in the bathroom you will need to think through the design down to the smallest detail. Instead of finishing the external walls with clapboard, you can cover them with moisture-resistant plasterboard. Ceramic tiles are subsequently laid on it. You can choose any material used to decorate the walls in the bathroom.
How to make such a sauna yourself?
To make a sauna in an apartment with your own hands, you need to take into account a number of nuances at the design stage. When performing a set of works, you should take into account some points that can significantly increase the efficiency of the sauna and its service life.
What should you consider when designing?
At the very beginning, when drawing up a project, you need to think about the placement of the sauna and its size. Usually they focus on the parameters of the place where the sauna will be installed. It should be taken into account that part of the space may be needed for the normal operation of the ventilation system.
Proper installation of the thermal insulation layer should be planned to increase the efficiency of the sauna and reduce heating costs. Proper vapor barrier will increase the service life of the device.
Another important point is a suitable oven. According to building regulations and simple common sense, you should not make such a device yourself. You should select an industrial heater model with suitable power. The models of sauna stoves are quite varied; you should give preference to a reliable device from a trusted manufacturer.
For one person, a sauna size of 2X0.7 m is considered suitable, but for a mini-sauna these parameters can be varied. The ceiling height should be at least 2.3 m; any lower would simply be inconvenient. You should also not make the ceiling too high, since this will increase the volume of the room and more electricity will be needed to heat it. The distance between the top of the mini-sauna cabin and the ceiling can be used as a mezzanine.
Features of furnace installation
For a small sauna, an electric stove with a power of approximately 5 kW is quite suitable. Household electric furnaces, which are installed in houses without gas supply, have approximately the same characteristics. In this case, an extension cord is connected from the electric furnace to the sauna heater.
To avoid overloads, it is recommended not to use both powerful electrical appliances at the same time: it is better not to turn on the electric furnace while the sauna is running and vice versa.
To heat the air in the sauna, only industrial stoves should be used. The use of homemade devices, especially with an open spiral, is unacceptable and dangerous
If a gas stove is installed in the house, then most likely the local electrical network is not designed for increased loads; it is designed for only 3-4 kW. In such a house, it is best to supply power to the sauna directly from the electric meter. Use an electrical cable with a cross section of 4-8 mm. The sauna stove must be grounded and an RCD must be installed.
In such homes, it makes sense to use an infrared heating source, which consumes less electricity than a traditional electric heater, but still produces enough heat.
An infrared sauna in an apartment with gas heating will help solve the problem of increased electricity consumption. In apartments with electric stoves, this option will reduce heating costs
You should not keep the sauna stove constantly connected to the power supply. After bath procedures, the stove is turned off and the extension cord is removed. It is best to place the electrical cable not on the bathroom floor, but in a special tray. The part of the cable that is located inside the sauna cabin must be protected with a special thermostatic hose from exposure to high temperatures, or use a special heat-resistant cable that is laid under the casing.
The use of exposed electrical wiring is strictly prohibited. The oven is placed at least 50 cm from the floor on a special thermostatic stand.
Thermal insulation, vapor barrier and ventilation
The better the thermal insulation of the cabin, the more efficient the sauna will work. Not only the walls, but also the ceiling of the sauna are covered with a layer of protective material. It is not recommended to use any type of polystyrene foam in combination with heating to high temperatures, but ordinary mineral wool is quite suitable. A layer of thermal insulation is placed under the interior lining of the sauna.
Vapor-permeable polyethylene film is necessary to protect the insulation from moisture. Contact with even a small amount of water vapor can damage the insulation, and replacing it will require serious repairs to the entire structure.
An interesting cladding option could be special panels made from natural cork. They have a good ability to retain heat; in this case, additional thermal insulation is not needed.
The lack of good ventilation in the apartment can affect the sauna in the saddest way. Even wood coated with a protective layer has some hygroscopicity. If the sauna is located in a poorly ventilated area, the likelihood of fungal damage increases significantly.
Frame assembly process
Making a sauna yourself is not so easy, it can take a lot of time. It is recommended to use only high-quality materials to ensure that the device is of high quality and reliable. Here is a sample work plan:
- First, a frame of the sauna in the form of a box is made from 60X60 mm timber.
- The outside of the frame is covered with clapboard; it is best to use larch or other coniferous wood, but high-quality wood from deciduous trees is also suitable.
- A layer of vapor barrier is placed under the sheathing, then thermal insulation is laid.
- Lay the electrical wiring, which should be located under the casing.
- Then they make the interior lining of the cabin and install the internal equipment: shelves, wooden floor gratings, etc.
- Mounting lamps.
- Install the stove-heater and connect it to the electrical network to check the operation of the device.
- Install a sealed door.
The process of making a sauna is presented in detail in the video:
The frame timber can be fastened with industrial plastic dowels. Wooden fasteners may become deformed under the influence of temperature changes. The supporting beams are installed vertically, and the outer and inner cladding boards are fastened horizontally so that the structure is stable and reliable.
The frame of a mini-sauna for a bath is made of timber, while the supporting beams should be positioned vertically to properly distribute the load
The boards are laid with a slight overlap to prevent moisture from penetrating under the sheathing. Installation of cladding material is carried out in the direction from bottom to top.
You need to leave a small gap, about 4 mm, between the vapor barrier layer and the wooden sheathing so that condensed moisture does not get on the wood.
The heads of the nails that fasten the boards together must be carefully sunk into the wood so that sauna visitors do not get scratched by them.
The door to the sauna can be either hinged or sliding, but it must be hermetically sealed. For a sauna with a heater, a wooden door is suitable, and for infrared heating you can use glass
The sauna floor is usually a tiled bathroom floor, on which protective grilles are placed. The door should be small, for example, 70X190 cm, to reduce heat loss. Of course, it must be hermetically sealed. For this purpose, a special three-stage joint is made.
The inside of a wooden door is insulated with foil. For a sauna with an infrared heat source, you can install a beautiful door made of heat-resistant glass. At the end of the bath procedures, it is recommended to thoroughly ventilate the sauna room. Then the wood of the inner lining will be better preserved.
Useful little things for the sauna, such as footrests, wooden headrests, back supports, shelves and other items, can be purchased ready-made at hardware stores or made yourself.
For sauna use only lamps with heat-resistant glass. All switches should be installed outside. To prevent accidental burns from the hot glass of a lamp in a small sauna, protective wooden grilles are placed on them.
Only lamps with good protection against moisture should be installed in the sauna. You need to cover them with special grilles to avoid getting burned.
Comfortable wooden headrests, footrests and other useful accessories will make your stay in the sauna very pleasant and comfortable.
The choice of heat and vapor barrier
A sauna in a bathroom in a house or apartment requires the use of insulation. Otherwise, the heat will quickly leave the cabin, so you will need to waste more energy resources. It is best to use mineral wool as insulation. This is a non-flammable material that does not release harmful, toxic substances into the environment. Cotton wool should be purchased not in rolls, but in slabs. They are tougher, so it is more convenient to work with them. It is also worth noting that dense slabs hold their shape better and will not slide down over time.
Professionals do not recommend using polystyrene foam or expanded polystyrene when arranging a mini-sauna in the bathroom. These are synthetic materials that can burn. At the same time, they release toxins into the environment when heated. It is prohibited to use this type of insulation for a sauna, since the maximum ambient temperature level should not exceed 75ºC.
Also, you should not use glass wool when arranging a sauna. It is impossible to completely remove small pieces of glass fiber after repair. It will get on the skin, eyes and respiratory tract, causing irritation and burning.
The vapor barrier must have a foil layer. It will reflect heat, returning it back to the steam room. This reduces the sauna warm-up time. It is worth considering that foil is torn, so it is more convenient to use for these purposes a two-layer film, the basis of which is craft paper. You can also use foil, which is covered with a layer of special insulation. In this case, the vapor barrier can be ordinary. The metal side should be facing inward.
Do-it-yourself steam room: work order
A sauna in the bathroom of your apartment will require a significant investment of money and time. You will have to seriously prepare for the work: purchase building materials, choose a high-quality and economical stove.
The decision to make a sauna according to an individual project will allow you to take into account the characteristics of your home and the wishes of family members.
Depending on the area, you can choose different sauna options
Work order:
- The walls that will separate the sauna from the other part of the room are assembled following the example of creating frame partitions;
- In order for the heating process to be as fast as possible and energy costs to be reduced, it is not recommended to make the sauna ceiling at a height of more than two meters;
- Installation of thermal insulation is required, and the most suitable material is mineral wool 5-10 centimeters thick;
- To protect the insulation from moisture, a vapor barrier film is used. The canvases are laid overlapping without tension and secured with a construction stapler, the joints are taped;
- For wooden cladding of the interior of the sauna, clapboard or block house is used. The thickness of the skin should be 10-12 millimeters. The wood is treated with antiseptics (inorganic, organic or mixed) to increase its service life in rooms with high humidity, and then, if desired, coated with heat-resistant varnish;
- It is necessary to leave a ventilation gap of at least 2 cm between the vapor barrier film and the lining;
- The frame of the sauna is covered from the outside with the same wooden paneling. However, in order not to disturb the overall style of the room, you can cover the sauna with plasterboard and put on it ceramic tiles or other material that is used to decorate the walls of your bathroom.
Stage 1 of work: frame assembly
Insulation with mineral wool slabs
The final stage is clapboard covering
Tips for choosing materials for heat and vapor barrier
Experts recommend using slabs rather than roll materials. They are much more convenient to work with, they are denser, keep their shape and do not move down. However, you cannot use foam boards or extruded polystyrene foam boards for a sauna; their operating temperature does not exceed 75 ° C. Also do not install glass wool insulation. Even if you properly seal the insulation, microscopic pieces of glass cannot be completely cleaned from the bathroom after renovation. The fragments can get into the skin, eyes or respiratory system.
It is recommended to use aluminum foil as a vapor barrier. The heat-reflecting effect of this material reduces the time required to warm up the steam room. However, the thickness of the foil is only 50 microns; you must work with it carefully, since the sheet breaks easily. It is more convenient to use a two-layer film based on craft paper; it is much stronger. There are also special insulation for saunas, one side of which is already covered with foil. They need to be installed with the metal side facing the inside of the room.
How to make a floor
Just like the walls and ceiling, the floor in the sauna also needs to be insulated. Mineral wool cannot be used for this purpose, as it compresses under load, and the floor will “walk” and the tiles will crack. The best option is extruded polystyrene foam, which is placed under a layer of concrete and tiles, where it is not exposed to high temperatures. The operating procedure is as follows:
- Lay insulation boards on the sauna floor, pre-cut to the required dimensions;
- Glue the joints, fill the gaps with foam;
- Fill the surface with floor screed solution;
- After the concrete has hardened, lay the ceramic tiles on the adhesive.
There is no need to install waterproofing under the sauna floor, since polystyrene foam does not allow water to pass through. Wooden gratings are placed on the passages to prevent slipping. In places where water drains into the sewer, a trap receiver with a siphon is installed.
Laying insulation boards
Shelves and benches
Beds or seats are made from hardwood. The resin contained in pine or spruce lumber appears on the surface of the boards when exposed to high heat. Sitting on a sticky bench is unpleasant, there is a risk of getting burned or hopelessly ruining bath towels or mats. Linden or aspen lumber is considered the best for arranging a sauna; such boards do not heat up too much.
Shelves usually have two tiers, the first at a height of 50-60 cm from the floor, and the second another 40 cm higher. So that you can not only lie down, but also sit, the upper shelf is made removable, foldable or narrower than the lower bench.
Sauna shelves and benches made of hardwood
Sauna door
In order for the room to warm up faster and stay warm longer, it must be closed. A transparent door will allow you to avoid installing a lamp in the sauna. However, you cannot use ordinary glass; it is better to purchase a ready-made door made of tempered glass that can withstand high temperatures and not deform. If you installed light in the sauna cabin, you can install a solid wooden door.
The width of the doorway should be at least 60 cm, so as not to create unnecessary obstacles to exiting the sauna.
Sauna door with heat-resistant glass
Also, for safety reasons, do not install locks from the inside. In addition, the door should open outward and not interfere with leaving the room. Avoid metal objects in the sauna interior: the handles on the door should be wooden, they will not burn your hands. It is also useful to protect the stove with handrails to prevent accidental touching of it due to the small size of the room.
If the size of the apartment bathroom is small, there is often not enough space to open the sauna door. Consider alternative options, such as installing a sliding door. When there is no room for it, a hinged one can be the ideal solution: two narrow panels open on the sides.
Ventilation required
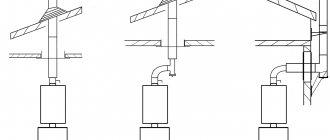
A channel for air flow is made below, near the floor. It is best to place a hole with a diameter of 5-6 cm as close to the stove as possible. For air outflow, a second hole is needed in the upper part of the opposite wall of the cabin or on the ceiling of the sauna. The area of the exhaust duct should be at least twice as large, that is, about 9 cm in diameter. Such circulation saves heat: hot air entering the bathroom from the sauna warms this room too. And not cold, but warm air enters the steam room.
Scheme of natural low-efficiency ventilation
Particular attention should be paid to the ventilation of the bathroom if you have installed a sauna in it. The exhaust duct should go outside, if possible, or into a common ventilation riser for the house. It is useful to install an electric fan that turns on when a certain air temperature in the bathroom is reached.
Floor arrangement
When considering how to make a sauna in the bathroom, you need to pay attention to the floor technology. It will also need to be insulated (like the walls and ceiling). Mineral wool is not suitable for flooring. This material will compress under load. Therefore, it is necessary to use polystyrene foam for these purposes. It is covered with a 3 cm layer of screed, and then finished with tiles. In this case, the material will not be exposed to high temperatures.
First you need to completely remove the old flooring, right down to the ceiling. Sheets of expanded polystyrene are laid out on a surface cleared of construction debris. They are placed close to each other. Gaps and joints are filled with polyurethane foam. If you are installing a sauna in the bathroom of an apartment, you need to cover the floor with waterproofing before pouring the screed. Otherwise, you can ruin the decoration of your neighbors’ bathroom.
Next, a cement-sand mortar is prepared, to which it is advisable to add a plasticizer. The concrete must cure properly. To do this, cover it with film and periodically water the surface. This way the screed layer will not crack.
The drying process of the screed takes approximately 3-4 weeks. You cannot start finishing earlier. A few days after pouring the concrete, it will be possible to walk on it, as the top layer will become strong enough. Relief ceramic tiles should be laid on the floor. You can also use decking boards for these purposes.
When arranging the floor, it is necessary to provide for a drain. A slight slope of the floor is made in its direction. A drain is installed on the drain hole. Wooden gratings should be laid on the floor. This will protect you from injuries while using the sauna.
Home sauna stoves
Arranging a mini-bath in an apartment requires studying another important point. You will have to choose a quality heater that will heat up quickly and retain heat for a long time. It's not that hard to do. It is necessary to carefully study the technical characteristics of the stove and compare them with the parameters of your steam room.
Stove-heater for home sauna
Depending on the type of material from which the stove is made, it can be brick or metal. It is clear that for home mini-baths it is more convenient to use the latter, since it is compact, lightweight, and does not create additional pressure on the supporting structures. This necessary attribute for any bath can be:
- Wood-burning;
- Gas;
- Electric.
The first option is more often used for steam rooms in individual buildings, while the second requires additional permits. Electric stoves are ideal for a sauna equipped in an apartment.
You need to decide what kind of microclimate you want to create in your sauna. This determines whether the stove should have an open or closed heater. If you like high humidity and plan to water the stones with herbal solutions for inhalation, pay attention to the options where the stones will be open.
Before making a choice, you need to carefully study such criteria as the power of the unit and the steam generation rate. All these characteristics are indicated in the technical documentation, which is always provided when making a purchase.
You can make a sauna stove yourself
Shelves
When building a sauna in the bathroom with your own hands, you need to pay attention to creating shelves inside the steam room. They are made from natural hardwood. If you purchase pine or spruce boards for these purposes, you may get burns during the operation of the room. At high temperatures, resin will be released from them. It leaves burns upon contact with skin.
It is best to use linden and aspen wood to create shelves. They don't get too hot, making them comfortable to sit or lie on.
Most often they make two tiers of shelves. The first of them should be at a height of 50-60 cm. The second tier should be 40 cm higher than the first. The bottom shelf should be wider than the second. This will allow you, if desired, not only to lie down, but also to sit down. If the space in the steam room is small, the top shelf can be made folding or removable.
How is this sauna constructed?
The Finnish sauna is a sealed wooden box, which is heated by a special stove-heater. The difference between such a bath and a traditional Russian steam room is the complete absence of steam. Do not pour even a small amount of flavored liquid onto the stones of a heated oven.
The maximum that you can afford in such a sauna is to apply a small amount of aromatic oils to the surface of the wooden walls. It is much easier to endure the healing effects of dry air at high temperatures than contact with the same hot water vapor.
The sauna does not require a water supply for bathing procedures, nor does it require a sewer system for wastewater. To carry out sanitary and hygienic treatment of the sauna surface, it is enough to supply water from a hose or bring several buckets of water. But proper ventilation is very important for the health of those inside. Typically, ventilation holes are equipped with special valves to regulate air flow. Installation of forced ventilation is unacceptable here.
For the convenience of visitors, special shelves are installed in large saunas. The optimal distance between them is usually about 40 cm. You can lie or sit on the top shelf, leaning on the bottom one. The temperature at the top is higher than at the bottom. In such small-sized mini-saunas, a small seating area is installed for only one person, sometimes two.
Door
A sauna in a bathroom must have a door. In an open cabin, the temperature will not last long. One of the best options is to use a glass door. This material must withstand high heat. If you have a glass door, you can do without installing additional lighting.
It is worth noting that ready-made glass doors are available for sale, which can have different fittings and shades. This allows you to choose the best option in accordance with the interior design features of the bathroom.
The door may be wooden. In this case, you need to install light into the booth. The door must open outward. It should not interfere with leaving the premises.
Door handles should not be metal. They shouldn't get hot. If it is impossible to install a regular swing door due to lack of space, you can choose a booth with sliding doors. If there is not enough space inside the sauna in the bathroom, you need to enclose the heater with a special side. Otherwise, if you accidentally touch it, you can get a serious burn.
Where to install
The cabin cannot be installed in any room. The humidity inside many saunas significantly exceeds the indoor level; over time, this can cause the formation of mold and mildew in the home. Therefore, the room where the sauna is installed requires enhanced ventilation. Additionally, you need to think about waterproofing ceilings and walls.
To quickly heat the cabin to the desired temperature, you need about 1 kW of energy per 1 m2. Therefore, even the smallest cabin will require a minimum of 3 kW of electricity.
Separate electrical wiring with a minimum cross-section of 2.5 mm2 and grounding is required.
In an apartment building there are several rooms close to these conditions or with the possibility of alteration without damaging other rooms.
Bathroom
All communications are already installed here: water, sewerage and ventilation. The decoration of the room is made of moisture-resistant and practical materials. It is easier to install a sauna in a bathroom than in other rooms. Cons: small room size, may require relocating communications.
Sauna cabin on the balcony
Balcony
The main advantage: it does not take up space inside the apartment. Disadvantages: a large amount of work on connecting communications, insulating and re-equipping the premises. Installation on a balcony will be expensive.
Installed booth on the balcony
Pantry
A small sauna can easily fit inside a high closet located near the bathroom or toilet. It should be taken into account that the size of the pantry will decrease significantly after installing thermal insulation. All communications will also be required.
The size of the sauna storage room will depend on the size of the room
Attic and basement
In apartment buildings, it is possible to allocate part of these premises for the personal needs of residents. Pros: no living space is used.
Disadvantages: in addition to the steam room, you will have to equip a shower and connect all communications. In some houses this is not possible.
In the attic or basement you can install a sauna along with a shower and bathtub
Sauna type
There is a classification of household steam rooms for use in an apartment according to several criteria:
- steam room mode - hammam with high humidity and low temperature, sauna with exactly the opposite characteristics, bathhouse as a golden mean between them;
- location inside the apartment - for the bathroom, storage room, balcony/loggia;
- equipment - with or without shower;
Sauna with shower.
- type of heating device - electric heater, infrared oven.
Additionally, home sauna manufacturers have their own classification, sometimes differing in details:
- design – finishing material, front door, shelves;
- design - island type, built-in, with a decorative facade;
- size – single, double;
- configuration – straight, angular;
Corner
- heater - with ceramic, salt, carbon emitters, built-in steam generator, Finnish, infrared, combined;
- class – Premium, Standard, Economy.
Combination stoves are considered the most convenient. In them you can switch bath, hammam, sauna modes, changing the humidity and heating temperature. IR heaters are absolutely safe, even for heart patients, the elderly and children. They do not heat the air, but act directly on the body and have a healing and preventive effect.
Steam generators are used in bathhouses and hammams; they produce portions of dispersed air saturated with moisture without dousing hot stones with water.