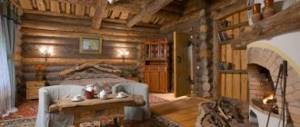
Foundation for a chopped bathhouse
Construction work begins with studying the site, carrying out all the necessary calculations and designing a bathhouse. In our case, given that this will be a log house, a simple preliminary design is sufficient, which will include the main parameters of the future building. As soon as the size and shape of the structure are indicated, the exact location for the bathhouse on the site is determined, you can begin to build the foundation.
Everyone knows the appearance of a strip foundation - these are concrete strips on which load-bearing walls rest. The base of the strip foundation should be 10 cm wider than the wall - this will be more reliable and stable.
First you need to mark the area:
Clear the area of debris, mark the place where the first corner of the building will be located, drive a peg and mark it with a triangle or any other way. On one side of the mark, measure the length that, according to our calculations, the longitudinal wall of the structure has. On the other side, measure a distance equal to the transverse wall in the center lines. Having determined the points where the walls will end, drive in the second and third pegs. Calculate the place opposite the first corner of the bathhouse, drive another peg there and move the triangle. Ideally, you should get a rectangle, the difference between the diagonals of which does not exceed 2 cm.
After marking, we begin digging a trench. If the soil on your site is sandy, then it is enough to dig a ditch 50-60 cm deep, if the soil is clay, you can deepen the ditch. After you have dug a trench, you need to surround it with an edged board, strengthening the edges - this will be formwork. As a rule, for such work, edged boards with a section of 150 by 25 mm are used. When installing, please note: the height of the formwork should exceed the height of the foundation by 10-15 cm. For wet or clayey soil, it is better to prepare a good sand cushion.
Edged boards are the best option for formwork: this material has a flat surface, which can significantly reduce the cost of subsequent front finishing of the finished foundation.
For more information on other types of foundations for a steam room (and the features of their purpose and construction), see our specialized article about foundations for baths.
Preparatory work before construction
The construction of a bathhouse from a log house is carried out in several stages:
- selection of material and preparation of tools;
- construction of a foundation for a log house;
- cutting and assembling walls;
- Finishing work.
Before starting work, you need to decide on a log construction project and the choice of a place for a bathhouse on your land plot. The bathhouse should be located near the house, preferably next to a pond. It is not recommended to build it next to the road.
Choosing material for the log house
| Characteristics | Log | timber |
| Peculiarities. | Hand-hewn logs are durable because their fiber structure does not change. When receiving a rounded log, part of the trunk is cut off, as a result of which the integrity of the fibers is sometimes compromised. At the same time, a rounded log is considered more durable than timber. | An important property is humidity. Timber with natural moisture has an affordable price, but causes a lot of trouble in construction: as a result of uneven shrinkage, it can become deformed. Profiled timber (dried in chambers) does not change the geometry of the walls as a result of shrinkage; caulking of the log house can be avoided. Glued laminated timber is the most expensive; problems rarely arise when using it. |
| Environmentally friendly. | Environmentally friendly material. | The environmental qualities of laminated veneer lumber depend on the adhesive composition. |
| Construction time and complexity of work. | The construction of a log house takes from 3 weeks to 2 months. But you need to wait for shrinkage for at least 6 months. It is not recommended to build a log bathhouse yourself without sufficient experience. | It is constructed within 2–6 weeks and depends on the moisture content of the timber. You can build a log house from timber yourself. |
| Shrinkage of the log house. | Shrinkage up to 10%. | A bathhouse made from laminated veneer lumber gives minimal shrinkage (up to 2%), from profiled timber – up to 5%; from timber with natural drying – 10%. |
| Finishing work. | Repeated caulking, sanding, etc. is required. Finishing is not necessary. | From ordinary timber, caulking and finishing are required. |
Having low thermal conductivity, chopped baths retain heat well. Therefore, there is no need for their additional insulation. Properly prepared materials for the log house will allow the bathhouse to last for decades without reconstruction or repair.
Advantages and disadvantages of chopped logs
The advantages of this material include resistance to biological corrosion and strength. It also has high heat-protective properties due to the presence of natural layers of the trunk. After cutting, logs are slightly susceptible to cracking and absorption of moisture.
The disadvantages include:
- high cost of manual harvesting;
- increased complexity of construction work;
- the diameter of the log decreases from the butt part to the top, as a result of which the joining of the crowns becomes difficult;
- long shrinkage.
To prepare chopped logs, pine or spruce is used. Larch is used for the lower crowns. The standard length of a chopped log is usually 6 m, although larger sizes can be found - up to 12 m. Logs can have a diameter of 24–26 cm or more. The highest quality tree is considered to be pine cut down in winter, since then it has low humidity and is less infested with bugs. Log processing involves removing knots and removing bark using an ax and a scraper.
Advantages and disadvantages of rounded logs
Currently, they have begun to use elements that are identical in cross-section. The advantages of this log include the following indicators.
- Ideal and beautiful surface with natural wood color.
- The elements are easily and quickly folded into a durable structure.
- There are practically no gaps between the crowns due to the tight fit.
- The diameter of the logs is the same along the entire length.
The disadvantages include the need to use impregnations, shrinkage during the year, flammability and high cost. Such a log may also become covered with cracks.
Larch is used to produce rounded logs. Other coniferous tree varieties are also used. The diameter of the logs varies in the range of 160–320 mm.
Advantages and disadvantages of timber
The following types of timber are used in construction: profiled, glued and non-profiled. In order to choose a good timber for the construction of a bathhouse, it is necessary to take into account such characteristics of the material as humidity and uniformity. Due to the processing, the timber lacks natural protection. That is why cracks can appear on it in the most unexpected places.
The length of the elements can reach 6 m. They are easy to construct and do not require a powerful foundation. The advantages of timber include its low price and the ability to make it yourself from logs using a band saw.
How to calculate the material correctly
When calculating the material for a log house, it is necessary to take into account some points: the dimensions of the bathhouse, the number of future rooms, the number of floors, the dimensions of the material itself - timber or logs. Calculations are made using two formulas: the first one calculates the amount of material, and the second one determines the volume. You need to choose the one that best suits your situation. You can also use an online calculator.
To calculate the amount, for example, of timber for the construction of a bathhouse:
- the height of the bath must be divided by the thickness of the material = a;
- divide the length of the perimeter of the log house by the length of the timber = b;
- a x b x number of load-bearing walls = number of beams for construction (in pieces).
To determine the volume of wood for building a bathhouse, you need to multiply the length of the perimeter of the building (P) by the height (H) of the building and the thickness of the beam (D):
R x N x D = volume of material in cubic meters.
It is necessary to take into account the perimeter (the sum of the lengths of all walls) of the bathhouse, and not its area. Otherwise, you will have to buy additional material, which will lead to unnecessary expenses on transportation costs.
Selection of tools for making a log house
To cut, you need to acquire tools: both manual and electric, which will make the work easier and significantly speed up the process.
- Carpenter's axe.
- Drill.
- Electric planer.
- Square.
- Chisel.
- Hacksaw.
- Plumb line, level, tape measure, marker.
- Chainsaw.
- Scriber.
- Mallet.
- A special compass is a carpenter's line.
- Non-stretch cord.
After selecting tools and preparation, they move on to building a bathhouse from timber or logs. There are Russian, Canadian and Norwegian versions of felling.
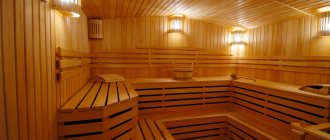
Wood selection
Properly selected wood is half the success. As a rule, log baths are built from deciduous and coniferous trees, the distinctive feature of which is strength and moisture resistance. It can be larch, pine, spruce or oak. For the construction of a bathhouse, it is recommended to choose well-dried logs with a diameter of 200x250 mm. Wood moisture content should be within 10%. Read more about choosing 100% timber for a bath in our special article.
The basis of a chopped bath: we install the lower crown
The lower crown stands on the foundation, in close proximity to the ground and gets wet more than other crowns during precipitation. Before laying the first, lower crown, it is necessary to waterproof the foundation to prevent the walls in the lower part of the building from getting wet. To do this, it is enough to lay 2 or 3 layers of bitumen waterproofing material between the foundation and the logs.
The lower crown, which is called the frame, is made from thick logs. For greater reliability and durability of the structure, the frame is often made from a species that is highly resistant to rot and moisture - larch or oak.
The first crown can be laid in one of the two ways described below.
- First way. Two logs are placed on the foundation parallel to each other, having previously cut off 4-5 cm from each for a tight fit. Insulation is laid between the log and the waterproofing - it can be tow, jute or moss. Two more logs are also laid parallel to each other on the two free sides, strengthening them on the first hewn logs.
Advantage: the logs undergo minimal processing and remain intact, if you do not take into account the removal of 4-5 cm, which makes the flashing durable and strong.
Disadvantage: the appearance of too large gaps between the foundation and the logs, which must be sealed with bars, bricks or log particles. Alternatively, you can pour a foundation with different levels of perpendicular sides.
- Second way. Four logs are selected for the crown. Two of them are cut off by half, the remaining two - by 4-5 cm. With this installation, there are no gaps between the crown and the foundation. At the joints, the logs are joined using the corner joint method.
Advantage: no gaps and tight fit to the foundation.
Disadvantage: part of the log is removed, which violates its integrity and makes the wood less durable.
Important: To reduce the risk of rotting of the lower crown, it is advisable to treat that part of the hewn logs that come into contact with waterproofing materials with an antiseptic before laying.
Repairs inside the bathhouse
During the reconstruction, it will definitely be necessary to replace the logs in the steam room and washing department. The removed floorboards are numbered and marked, after which they are sent for discarding, replacement or partial repair of the boards. Lag beams cannot be repaired; they are replaced along with the backfill insulation.
The condition of the drain lines must be checked; most often, they also need to be changed completely.
If the walls of the bathhouse are lined and insulated from the inside, then you will need to selectively remove several pieces of lining or tongue-and-groove boards. As a rule, the walls inside the bathhouse are well preserved and cannot be repaired. The insulation has to be repaired and replaced.
In very old bathhouses, the walls could be insulated with clay backfill, jute cloth, adobe slabs made of clay, rye straw and horse manure. The last option of insulation is the most labor-intensive and time-consuming, since before repairs the blocks have to be molded and dried in the sun for a long time before the material can be laid on the walls of the bathhouse.
For faster repairs, you can use modern materials. The first layer on the walls of the bathhouse is foil foam, a counter-lattice is installed, and magnesite or gypsum fiber boards are laid. The last stage of repair is to sew on a vapor barrier and hardwood cladding.
Of course, this renovation option will not be able to recreate the effect of a clay pot for which old bathhouses are famous, but the steam room will be warmer than the old one. But, on the other hand, thoughtless repairs with wall insulation with baked clay chips, jute or adobe can lead to an obviously unsuccessful result.
Walling
As soon as the lower crown is ready, you can start building the walls - you need to lay the logs horizontally, forming the crowns. At this stage, special attention should be paid to the corner connection of the walls, on which the solidity of the entire building depends.
Types of corner joints of logs
There are two ways to connect logs - a corner with a remainder and a corner without a remainder.
Angle with remainder - logs are connected in such a way that when connected they protrude beyond the walls of the structure by 20-30 cm.
Advantage: easy to manufacture, does not require additional insulation and is practically not blown through.
Disadvantage: material consumption is 10% more than with the “corner without residue” method.
Angle without rest: logs are connected to each other with wooden locks cut at the ends. In this case, the remains of the logs do not protrude beyond the walls of the building.
Advantage: aesthetics.
Disadvantage: high labor costs and the need to additionally insulate the walls from the outside. In addition, if the logs are not held together with dowels when joining “without remainder”, then the log house will be less stable.
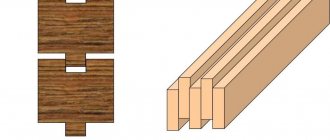
There are many types of corner joints with a remainder, but the two most common methods are:
Angle angle: in our case, this type of notch was used when laying the lower crown. In the upper and lower logs, recesses of the same size are selected, into which the logs then go. This method is rarely used nowadays, because it is too difficult and time-consuming to adjust the size of the recesses and make the joints airtight. As a rule, logs are connected “in a circle” if it is necessary for all the tops of the crown to be located in the same plane.
“Bowl” angle: a simple and practical method used in the construction of walls, which even an amateur can master. The top log fits into a recess in the bottom log, cut into a bowl that replicates the seat of the incoming log.
The most suitable option for a bathhouse is considered to be cutting into a bowl “in the tail”: a protrusion is left at the base of the bowl along the lower log, and a recess is selected in the upper log that is suitable in size to the protrusion.
Formation of walls
Having chosen one of the corner connection methods, you can begin to form the walls of the bathhouse, horizontally laying the crowns in the desired sequence. The grooves formed during installation between the crowns are filled with insulation. Traditionally, tow or moss is used for these purposes.
During the assembly process, you need to mark out places in the walls for windows and doors. Crowns can be made from individual pieces of logs or simply sawed logs in the designated places. It is advisable to do this right away, because if you cut out the windows later, the logs may become stuck, the partitions will drop and large gaps will appear between the covering log and the upper level of the partitions. When the frame is installed, you need to cut openings for the door and windows in the designated places using a chainsaw.
Important: windows and doors must be floating so as not to interfere with the natural changes in the dimensions of the log house during shrinkage. To do this, spikes are formed in the lower and side parts of the opening, 6-8 cm wide and 4-5 cm high. Windows and doors are installed in door and window frames.
The process of cutting a log bathhouse
When the first crown is exposed, it must be secured in the corners with dowels, so that when the logs are subsequently rolled onto the upper crowns, the dimensions along the axes of the log house will not be disrupted. To do this, the corner is drilled with a wood drill; its diameter can be in the range of 25-32 mm. In this case, it will be convenient to make the hole diameter 26 mm, and buy a standard round dowel, 25 mm in diameter.
The bowl is cut out with a chainsaw; it is advisable to select a model that is quite powerful, but small in size and weight. Stihl ms230-250 saws are very popular among carpenters; they develop high speeds, have a rather narrow bar and chain - so they are less likely to be thrown out of the cut. And the power-weight ratio is optimal.
To begin with, cut out the middle of the bowl as much as possible, after which, at high speed, smooth out the unevenness along the line. The saw does not require pressure; you need to clean the bowl with light, confident movements.
Subsequent crowns are placed in the same way, but a longitudinal groove is added between the logs of the wall, which is needed to tightly join them together. The groove is taken out with a special tool - a pick. It is a cross ax with slightly curved edges.
Slots 2-3 cm deep are made with a saw along the groove lines, transverse notches are made between them after 5-10 cm, after which the excess wood is cut out with a pick. Cleaning is done with a saw. For a more convenient fit, most often, intermediate - rough - cups are first selected in logs, and with their help the log is adjusted in height. With this method, a smaller line spread is required, drawing becomes convenient and accurate.
Photo of the process of cutting a log house.
During the cutting process, one must not forget about adjusting the wall logs vertically, otherwise the corner may go inward or outward and spoil the appearance of the structure. To do this, mark the middle at the end of the log, draw a vertical line through it along the level and align it with the same line of the lower log. The method eliminates horizontal deviations of corners and walls.
Since it is inconvenient to work with a log house above one and a half meters, it is usually made of two or more parts (boxes). To do this, the upper crown of the first box is drilled in the corners, like the first, marked at the ends of the height (the distance from the bottom of the log house to the top crown, the same at all ends, so as not to get confused) and diagonals, and removed to the ground. At the bottom, they assemble it onto dowels, level it along the diagonals and heights using a hydraulic level, and continue to build the frame. If there were openings (windows, doors) on the bottom frame, it is better to cover them with a removable crown, this will simplify the alignment process.
Photo of cutting the top box of a bath house.
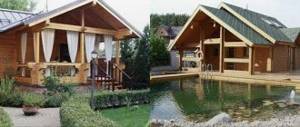
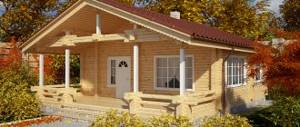
Roof for a bath
The optimal solution for a log bathhouse is a gable roof, which, although it will cost more than a single-pitch roof, will look neater. Under the roof you can arrange a room for storing bath accessories and drying brooms.
The figure shows that the greater the angle of inclination of the slope, the less load it is subjected to during snowfalls.
As a roofing material, you can choose roofing felt, slate, ondulin, corrugated sheets, and metal tiles. Any material within the financial capabilities of the bathhouse owner will do. The angle of inclination is selected depending on the selected roofing material.
Attention ! We have a detailed article on building a roof for a bathhouse here.
Is it worth building a log bathhouse yourself?
A log house is a wooden structure assembled from specially processed logs or beams. One closed row of logs is called a crown. Currently, there are several ways to build a sauna log house.
- Contact a special company. Taking into account the requirements of SNiP, specialists will correctly calculate the load on the load-bearing elements, take into account the shrinkage of logs, etc.
- Hire cobblers - an independent team of carpenters. But this can add problems, since they usually build a bathhouse according to sketches proposed by the owner, and not according to the project. As a result, mistakes are made in choosing a foundation and in structural calculations.
- Erect with your own hands. You will have to study a lot of relevant literature, delving into a lot of subtleties. But a log bathhouse will be of high quality and will cost much less.
Before you start building a chopped bathhouse, you need to master the technology of work and choose the material: timber, wild or rounded logs. It is important to know: a log house is cut with an axe. When processing a log with this tool, the capillary fibers can no longer absorb moisture, as they become clogged. Consequently, the chopped bath does not get wet, which means it retains heat well and is not subject to putrefactive processes. This is how our ancestors processed wood, thanks to which the log houses stood for more than a century. And this is how real masters work today.
However, recently log houses have been sawed with a chainsaw. That is, using an analogy, they build a building called a “cut down”. At the same time, the wood fibers remain open and constantly absorb moisture. As a result, the moisture content of such a log is higher than that of wood processed with an ax. Consequently, the wood is more susceptible to infection by fungi, which significantly reduces the service life of the bathhouse, and its thermal conductivity increases.
To save time and make work easier, you can use a chainsaw without cutting a few millimeters to the marking, and make the final cut with an ax.
Floor in a chopped bath
A wide selection of modern materials allows you to make the floor not from wood, but from more durable and moisture-resistant materials. A wooden floor quickly gets wet and dries slowly, as a result of which the process of rotting begins, unpleasant odors and microbes are released, which is harmful to health.
The best option for a bathhouse is a concrete floor covered with tiles.
Please note that the floor is made only after the installation of the sewer system.
Specifics of making plywood bath decorations
If it is difficult to make a wooden bath panel, then you can use plywood as an alternative.
Such decorative elements, if properly designed, will perfectly complement the interior of the steam room. To make the product yourself, follow the following instructions:
- We draw on paper the pattern with which we want to decorate the bath room.
- We transfer the drawing onto plywood using carbon paper.
- We drill holes in closed fragments with a drill.
- We cut out the pattern.
- We cover the product with several layers of colorless varnish.
- We attach a fastener made of galvanized metal.
If desired, some elements of the design can be burned out. By combining these two methods, you can create an original decoration for the steam room.
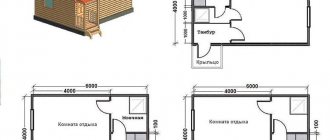
Layout of a chopped bath
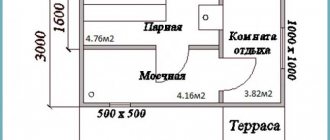
At the design stage, it is necessary to designate which rooms will be in the bathhouse and how to rationally distribute the total area between them.
As a rule, a bathhouse includes several rooms:
— vestibule, with an optimal area of 1 m2: the main function of the vestibule is to prevent humid or frosty street air from getting inside, otherwise condensation will freeze on the front door and it will be impossible to open it;
- locker room or rest room: according to the recommendations, the standard locker room area is determined at the rate of 2-4 m2 per person; if a small bathhouse for 4-6 people is being built, it is enough to allocate 8-10 m2 for this room;
— washing room: according to the standards, 2.7 m2 per person is allocated for this room, some owners combine a washing room and a steam room;
— steam room: according to the standards, 2-3 m2 are allocated per person to make it comfortable to steam, the area can be calculated with some margin.
We offer you several options for planning a bathhouse.
In the presented material, we outlined the basics of constructing a chopped bathhouse. If you have patience and, with a little work, understand the intricacies of the construction business, then soon you may have your own bathhouse - a source of health and good mood. Read more about the specific aspects of bathhouse planning here.
Preparing a working design for a wooden bath
The construction of a log bathhouse is a labor-intensive and responsible process that is carried out in stages. The initial stage is preparing the bathhouse project.
A typical project includes:
- choosing a suitable location for development;
- layout of the number of floors and interior spaces of the bathhouse;
- layout of the location of window and door openings;
- selection of heating, ventilation equipment and lighting devices;
- selection of construction and finishing materials;
- development of premises design;
- calculation of construction costs.
Finished projects are presented in the public domain, but to receive an individual sketch, you should contact the design office.