How did our grandfathers wash in the bathhouse? A large vat for water was built into the oven. While the heater was heating, water was heated in the vat; its volume (about 50 liters) was enough for the whole family. Cold water was taken from another container. People steamed and then washed in the same room, which was not very convenient. It was difficult to wash in the overheated and steamy steam room.
Steaming and washing at the same time is not very comfortable
It is not surprising that nowadays bathhouse owners want to increase the comfort of taking water procedures and divide the process of steaming and washing into different rooms.
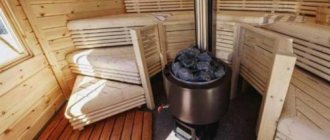
A steam room separate from the shower room is aesthetically pleasing and convenient.
Issues with warm water are solved in two ways: using a separately installed electric boiler and using a heat exchanger that takes heat from the stove. We will not consider the first method; there is nothing interesting or complicated in it. In addition, heating a large amount of water requires a significant amount of electrical energy, and its cost is currently constantly increasing.
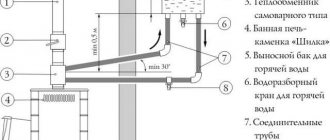
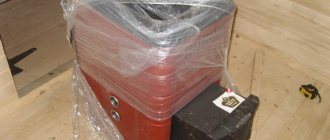
Water heater in the bath
Let's talk about heat exchangers, give step-by-step instructions for building some of them and practical advice on engineering problems of heat exchangers.
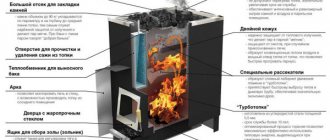
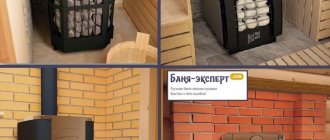
Sauna stove with heat exchanger
Heat exchanger in a sauna stove
Types of heat exchangers
The generally accepted classification of technical units divides all products into types, which in turn have their own subtypes. There can be a huge number of subtypes of heat exchangers; each bathhouse owner, by making minor changes to the design or manufacturing materials, can create his own personal subtypes. And according to the main design features, heat exchangers are divided into the following types:
At the location of the warm water tank
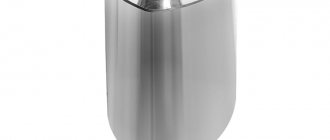
Bath tank
Wood-burning sauna stove with hanging tank
Tank with simple heat exchanger
Remote tank
Tanks can be placed in a steam room, shower room or in the attic. Each location has its advantages and disadvantages.
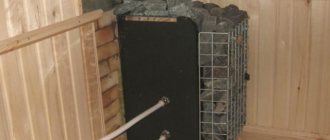
The first option is a tank in the steam room. Advantages - the length of water pipes is significantly reduced, and this has a great positive effect on the rate of heating of water. We will talk about these and many other features of the functioning of heat exchangers and the design requirements for their devices at the end of the article. The disadvantage is that an already small room “shrinks” even more.
Water tank in the steam room
The second option is a tank in the shower. In our opinion, the most optimal option, the disadvantage is that the length of the pipelines increases slightly.
Water tank in the shower - diagram
A common problem for the first two options is low water pressure. The fact is that the height of the bathhouse rarely exceeds two meters. If we subtract the height of the water tank from this value (approximately 50 centimeters), then the maximum height of the water intake pipe is reduced to 1.5 meters. What does it mean? This means that it is impossible to install a stationary shower; you will only have to wash with a flexible hose. And then do not raise it above 1.5 meters. Even less, more or less tolerable water pressure will only be with a height difference of at least 10 centimeters.
These problems can be solved by moving the container for warm water to the attic of the bathhouse (option three) .
Water tank in the attic
But in this case, problems arise - the length of the pipelines increases and heat losses increase; the tank must be insulated. But that’s not all – there is a problem with adding water to the container. Not every bathhouse owner wants to carry buckets up the stairs. But running water does not exist everywhere. It is impossible to give universal advice to all readers on the location of the water tank; everyone must independently navigate, taking into account their own individual characteristics of the structure, the presence of utility networks, the climatic zone of residence and the maximum number of people washing at the same time.
According to the location of the heat exchanger
There are two options for placing the heat exchanger - in the stove or near the chimney (the chimney in this case should be made of metal pipes). Both options are workable, but have their own characteristics.
The first option, that is, an internal heat exchanger, allows you to heat the water relatively quickly, but there is a high risk of it boiling.
Heat exchanger inside a brick kiln
Internal heat exchanger in a metal furnace
In addition, there are great difficulties in carrying out periodic maintenance or replacement of heat exchangers.
Laying a furnace with a heat exchanger
There is generally a problem with replacement - you will have to disassemble the stove. As for maintenance, they can be done, but at the cost of considerable effort. The fact is that water forms scale inside the heat exchangers; one millimeter of scale reduces heat transfer by 10%, which is a significant loss. In many regions of our country, the water is solid (has a large amount of Ca ions), which is good for drinking water, but bad for all types of heat exchangers.
Heat exchanger made of stainless steel
For scale to form, it is not necessary for the water to boil throughout the entire volume. A small layer of water constantly boils near the overheated walls of the heat exchanger; the entire volume does not boil due to its continuous mixing by convective currents, but the calcium on the walls turns to stone. In some cases, after just a few years of using the sauna, the scale will reach such a thickness that this will noticeably affect the rate of its heating. The heat exchanger can only be cleaned with a concentrated solution of hydrochloric acid; commercially available special products are not very effective. Working with hydrochloric acid in violation of safety regulations has a negative impact on health.
Scale on the heat exchanger
The heat exchanger near the chimney does not have these disadvantages; the temperature of the pipe is not so high that the water near the walls of the heat exchanger boils. This advantage causes disadvantages - the heating time of water in the container increases significantly.
Heat exchanger for chimney
Sometimes there is another option for placing a heat exchanger - under the stones of the heater . You can, of course, place a heat exchanger there, but why then would there be stones in the steam room? Just look at them? The fact is that with this arrangement of the heat exchanger, the heating temperature of the stones will be insufficient for the formation of steam. And steam in a Russian bath plays a decisive role, and not only for warming up the body. Real lovers of Russian baths add an infusion of medicinal or fragrant herbs to the water for watering the stones. And if you add a little natural kvass or beer to the water (only natural, and not “churned up” from alcohol and paint), then the air in the steam room will be filled with the indescribable aroma of fresh bread. If you install a heat exchanger under the stones, you will deprive yourself of many pleasures.
Heat exchanger under stones
We have found out the general characteristics of heat exchangers and containers for warm water; now we can move on to a detailed consideration of the technology of their manufacture and installation. This topic is very large, it is worth breaking it into several parts. Let us consider separately the options for manufacturing containers, heat exchangers and methods of their installation.
Heat exchanger prices
heat exchangers
Making containers for warm water
There are several options for containers - from expensive stainless steel to cheap store-bought plastic ones. We will not consider these options; we will focus on the most successful, from our point of view, metal made from sheet iron. Its advantages are not only its relatively low cost (although this is important), but also the ability to make a tank that is ideally suited in terms of linear parameters to each room of the bathhouse. As for appearance, there is a large selection of durable paints; surfaces can be painted in any color or covered with self-adhesive decorative polyethylene film.
Simple water tank with lid
Table. Calculation of tank volume
| Stage | Description | Scheme |
| Find the volume of your tank | Multiply length (l), width (w) and height (h) | |
| Calculate filled volume (d) | For rectangular tanks, the filled volume is the same length and width, but less height. The new height is the filling height of the tank. | Tank fullness D |
Table. Making a tank
| Step, No. | Description of work |
| Step 1. Prepare materials. | You will need sheet iron with a thickness of at least 0.5 mm. We suggest making a rectangular tank, length 80 centimeters, height 40 centimeters, width 20 centimeters. The tank holds 64 liters of water, but you need to fill no more than 60 liters. You need to weld three metal pipes with threads into the tank; they are sold in stores. It is better to take the nominal diameter of the pipes at least 3/4 inch. This is the most commonly used diameter of pipelines and ensures normal natural circulation of water. To fully install the heat exchanger, you will need to have additional plumbing fixtures and fittings; we will talk about this below when considering installation issues. |
| Step 2. Mark the tank on a metal sheet. | You will need two plates 80x60 cm, two 40x20 cm and one 80x20 cm. We specially made the tank rectangular. The fact is that the distance between the inlet and outlet pipes should be increased as much as possible. This will allow warm water not to immediately mix with cold water; a significant difference in their temperatures will be achieved, which has a decisive influence on the speed of water flow in the pipelines. And not only the efficiency, but also the safety of using the heat exchanger largely depends on this criterion. |
| Step 3. Cut the blanks to size. | You need to use a grinder; when working with this tool, strictly follow the safety rules - it is very dangerous. Try to keep the cut as even as possible. Check the quality of cutting of each edge on a flat surface, eliminate large flaws. |
| Step 4. Assemble all the parts of the tank in pairs, making them absolutely identical. | Pay special attention to the corners, they should only be rectangular. |
| Step 5. Place the front part of the tank on a flat surface, and weld the side of the tank in several places with a short seam. | Do the same operation on the other side. Check their position; they will definitely move as the seam cools. |
| Step 6. Place the second large part on the welded sidewalls, check its position, and adjust the sidewalls if necessary. | Grab the elements. Make sure that the gap between the individual parts does not exceed 2–3 millimeters, otherwise during welding you will have to put wire in them, and this is undesirable. |
| Step 7. Place the structures upside down and grab the bottom. | Check and correct its position. |
| Step 8. If everything is fine, weld all the elements. | Monitor the quality of the seam; omissions are strictly excluded. You can “cheat” a little on the thickness of the weld seam; the container does not carry significant loads, but omissions are prohibited. |
| Step 9. Weld metal pipes into the bottom. | We have already said that the input and output should be removed from each other as much as possible. It is better to place the water intake pipe for the shower not in the middle, but closer to the drain; the water intake will speed up the circulation in the tank. |
| Step 10. Burn holes for the pipes. | For the pipes, you must first burn holes in the bottom of the tank; this can be done more conveniently by electric welding. |
| Step 11. Come up with a way to attach the tank to the wall. | You can weld special brackets to the back wall or install it on a stand. If you have the desire and the material, make a removable lid. |
| Step 12. Using a cylindrical grinder, clean all seams, pour water and check their tightness. | Seal holes if necessary. |
| Step 13. Prepare the front surfaces of the container for finishing. |
Video - Making a water tank (welding)
Video - Making a stainless steel tank
That's it with the water tank, you can install it in any room in the bathhouse. Now let's talk in more detail about heat exchangers.
Handmade production
To create a heat exchanger with your own hands, you need to stock up on metal sheets with a thickness of 2.5 mm or more. To equip a sauna stove with such a device, you will need the following set:
- tank built into the unit;
- water tank;
- pipes for connecting containers.
It follows that the heat exchanger for a heating device consists of two parts: an upper cylinder and a lower rectangle.
Having previously cut the metal blanks, they are welded. In this case, you need to try to connect the parts with the smallest gap. After the tanks are manufactured, the system is assembled. The choice of pipe diameter depends on the area of the room that will be heated. The length of the connection elements is no less important. The shorter the pipes, the higher the efficiency of the heat exchanger for a sauna stove.
Final assembly involves the following steps:
- A pipe is welded to the bottom of the apparatus.
- Through its hole, water is poured into a tank built into the stove.
- The rolled metal product is welded to the top of the heat exchanger.
The device is ready. The quality of all welding work can be checked using high pressure. To do this, you need a source of compressed air connected to the constructed system. If no leaks occur, then everything was done correctly. Otherwise, you will have to get rid of defects made during manufacturing.
A heat exchanger is a device that can be put into operation if it only heats water in a bathhouse. In the case of a full introduction of the unit into the heating system, it is necessary to take care of high-quality insulation of the room.
Heat exchangers - manufacturing features
The most important elements, the comfort of washing largely depends on their correct design and effective functioning. We will consider several options for heat exchangers and express our comments; the final decision is yours. One of the main problems of all types of heat exchangers is the inability to regulate the water heating temperature. The water in the tank may not be warm enough or too hot. You have to manually dilute hot water with cold water. But that’s not all – the risks of water boiling in the heat exchanger are very high. The system will not suffer much from steam, it is an open type, but for the heat exchanger such situations will not be “in vain”. What to do if the water in the heat exchanger boils? Putting out the fire in the stove? How can you regulate the water temperature at least a little? Constantly put one log into the firebox and take half a log out of it? We will answer these questions at the end of the article.
Let's start with simple heat exchangers and end with more complex ones.
Advantages of sauna stoves with a heat exchanger
The unit is used both for heating water and for creating high temperature, as well as generating steam in the bath. Let's list some advantages of the device:
- Long service life (25 years).
- Significant space savings due to the ideal combination of heating device and heat exchanger.
- The water in the device heats up faster than the air in the room.
- The storage tank can be installed in the washing room at some distance from the stove.
Heat exchangers near the chimney
The simplest, but very effective heat exchanger made of copper tube.
Copper tube heat exchanger
Depending on the diameter of the chimney, you need to purchase 1.5÷2.0 meters of copper pipe with a diameter of approximately 10 millimeters. The smaller the diameter of the tube, the larger the surface of its direct contact with the pipe, the faster the water heats up. But, on the other hand, the small diameter of the tube significantly reduces the speed of water flow, and this can cause it to boil. Taking into account both factors, we recommend taking a tube with a diameter of 10 mm.
Copper tube
Adapters should be put on the ends of the tube and flared. There are special devices for flaring.
Flaring
Flared copper pipes
Steel pipes can be connected to the ends of the tubes. Fittings are screwed to the nuts. The cone of the fitting should fit snugly against the flared end of the tube
Do the flaring carefully; the plane of the flared end must be even and smooth, otherwise there will be leaks at the junctions of the pipelines.
Prices for copper tubes
copper tubes
Video - Bending copper tubes
A more difficult to manufacture heat exchanger can be made from two metal pipes. The diameter of the first should be slightly larger than the diameter of the chimney, and the diameter of the second should be 5–10 cm larger than the first. How to make such a heat exchanger?
Step 1. Using a grinder, cut two pieces of pipe of different diameters, 20÷30 centimeters long. The ends of the pipes must lie in the same plane, be even and neat.
Example of tubes
Step 2. Cut two circles from sheet steel with the diameter of the larger pipe. In these circles, cut holes exactly in the middle with the diameter of a smaller pipe.
Cutting a circle from steel
The heat exchanger is almost ready
Step 3. Insert pipe sections into the holes and weld them. Weld carefully, do not skip a seam.
Step 4. At the top and bottom of the structure, weld metal pipes with threads at the ends; a hole needs to be made for each pipe. Check the heat exchanger for leaks.
Example of a finished heat exchanger
Heat exchanger for pipe
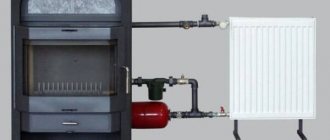
Heat exchanger for furnace
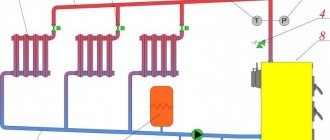
Connection diagram of the tank and heat exchanger
The structure is ready, you can install it on the chimney and install pipes. It is advisable to insulate both heat exchangers with mineral wool with a top coating of aluminum foil. This will greatly reduce unproductive heat losses and speed up water heating.
Varieties
There are several types of heat exchangers for equipping sauna stoves.
Depending on the design features, the following types of devices are distinguished:
- Coil , which is a fairly simple option. Both ends of the heat exchanger are removed from the tank to take in cold water and release hot water.
- Connection of two metal containers : a cylinder and a parallelepiped. When heated, the liquid from such a heat exchanger flows through pipes to its destination.
The second version of the device is considered the most common, because with its help not only the water becomes hot, but also all the rooms of the bathhouse are heated. This saves fuel and, accordingly, money.
Depending on their location, heat exchangers are divided into the following two types:
- hinged , that is, located on the chimney;
- built into the furnace design.
The first type of unit receives the necessary heat not from the stove itself, but from the smoke duct due to the heating of the emitted gases. The spacious box helps to quickly heat the liquid in the tank. It remains hot throughout the entire heating time of the sauna. One of the disadvantages of the device is its massiveness. Sometimes, when installing a chimney, a so-called samovar-type heat exchanger is first installed, and then a chimney pipe.
When assembling a water circulation system, you should stop using plastic products in the steam room. The high temperature of such a room affects the plastic, as a result of which this material begins to release substances that negatively affect human health.
The heat exchanger built into the furnace design has the form of a sealed flat tank with a capacity of up to 5 liters. Two pipes with threads cut at their ends are welded into this tank. They are connected to water pipes leading to a large volume remote tank (up to 100 l).
In the furnace, the heat exchanger is allocated a place between the convector casing and the device for burning flammable substances. In this case, the device does not come into contact with fire at all.
Before starting to fire the stove, it is necessary to fill the system with water, since the heated dry heat exchanger, under the influence of cold liquid, loses its tightness and begins to leak. In order to prevent the appearance of air pockets in the system, water must be pumped from below using a pump.
Heat exchangers for stoves deserve a lot of attention because of their ability to save on fuel, because their normal functioning requires heat accumulated from the combustion of wood. Thus, a built-in type device is heated by the energy used to heat the steam room and stones. The device, placed on the chimney, is powered by heat, which is directed into the pipe. Its efficiency and heating speed are increased due to the larger capacity of the device. In this case, the tank into which hot water is drained can be placed at a significant distance from the heating device.
Heat exchangers in the furnace
Heat exchangers in the furnace
With the help of such heat exchangers, the water will heat up much faster. Heat exchangers in a furnace can be made of tubes in the form of various geometric designs or be ordinary flat. The efficiency of flat-plate heat exchangers is lower. But they are much more durable and easier to manufacture.
Flat-plate heat exchanger
Heat exchangers must be installed simultaneously with the laying of the furnace. Taking into account the parameters of the firebox, the dimensions of the heat exchangers are selected. The pipe outlets can be either on one side of the furnace or on both. The option of cold water entering from below and exiting from above the plane of the furnace is allowed. In a word, there are a great many options both in terms of the heat exchanger material, type, geometry, linear dimensions and design features. It is impossible to give unambiguous universal advice; you must make your own decision, taking into account the characteristics of the sauna stove and the modes of use of the shower and steam room.
The heat exchanger is installed simultaneously with the furnace laying
To make a heat exchanger, choose durable, high-quality materials; welding seams must be made in accordance with the rules and characteristics of the materials. Keep in mind that in many cases it is impossible to fix a damaged heat exchanger in a furnace without disassembling it. It’s not worth explaining what it means to disassemble and reassemble a stove.
The easiest option is to purchase a factory-made metal sauna stove with a built-in heat exchanger. But such furnaces have one drawback - the low efficiency of the heat exchanger.
Furnace with heat exchanger
Installation of a sauna stove with a heat exchanger
- The unit is installed on a foundation previously sunk into the ground (40 cm). The constructed base should not protrude above the floor level.
- Around the stove, brickwork is made using clay mortar.
- The heat exchanger for the heating device is installed in the room adjacent to the steam room.
- A hole is made in the wall of the bathhouse to remove the firebox.
- Liquid is poured into the system, which is supplied through pipes wrapped with thermal insulation into a storage tank.
- A smoke channel is installed, the upper end of which passes through a hole in the ceiling and a metal sheet attached to it.
- The opening and all joints are thoroughly sealed.
Some general tips
When using heat exchangers, some problems arise that can “spoil your mood.” What are these problems and how can they be solved?
Temperature of heating water in the tank
Temperature of heating water in the tank
You need to “catch” the moment when it will be acceptable, but such a “moment” is almost impossible to catch. The fact is that while taking a shower, the stove continues to burn, and accordingly, the water temperature constantly rises. What to do? Putting out the fire in the stove? This, of course, is not an option.
We suggest solving the problem using a mixer. If there is a water pipe in the bathhouse, great; it will help not only create a comfortable temperature, but also, using simple automation, make filling the water container automatic. It will be possible to wash without saving water, and the risk of it boiling in the heat exchanger will be somewhat reduced. If there is no water supply, we recommend installing an additional container for cold water next to the warm water tank. It must be connected to the shower through a mixer.
Connection diagram
Water boils in the heat exchanger
Water boils in the heat exchanger
This happens especially often during installation of the heat exchanger directly in the furnace firebox. We guarantee that you will never be able to calculate the parameters of the heat exchanger in such a way as to completely eliminate such a phenomenon. The calculations are too complex and there are too many unknown and unregulated indicators. Calculations based on the speed of water flow can only be performed by a qualified design engineer who has an excellent knowledge of the laws of heat engineering, hydraulic engineering and installation. But the most important unknown quantity is the flame in the furnace.
No one will ever be able to say exactly how much heat a stove produces in each individual unit of time. It is impossible to quickly increase or decrease the flame intensity depending on the water temperature. We propose to solve the problem of boiling water using ordinary single-phase water pumps for heating systems. They are built directly into the pipeline, the power of the devices is 100÷300 W. Installing a circulation pump not only eliminates the risk of boiling, but also significantly speeds up the water heating time.
Circulation pump connection diagram
We hope that our information will be useful for bathhouse owners and will make it possible not to solve problems with heat exchangers, but to prevent their occurrence at the stage of manufacturing and installation.
Circulation pump prices
circulation pump
Materials for the tank
As a rule, tanks are made of stainless steel
Hot water containers are made from different metals. In the past, cast iron tanks were common. Over time, they were replaced by tanks made of lighter materials - steel and aluminum.
Stainless steel
This metal replaced heavy cast iron. The liquid in a steel container heats up very quickly. The material tolerates temperature changes well. Tanks do not require protection from high humidity. The only drawback is that the water does not retain heat for very long.
Cast iron
In earlier times, this was the only material used to make hot water tanks. Cast iron is good for durability, resistance to corrosion and temperature changes. The liquid in such a tank remains heated for a very long time. Nowadays, cast iron tanks are almost never produced due to their heavy weight, but it is possible to purchase a used tank at a more affordable price. Install a cast iron tank under the stove. For large-sized options, it is necessary to prepare the foundation. In addition to the weight, the downside is that it takes a long time to heat up the water.
Other metals
Wooden containers are used for warm or cold water
For the production of hot water tanks, enameled steel is used. The coating provides the product with protection from corrosion damage. The surface is easily cleaned of dirt, but it is important not to damage the integrity of the enamel layer, otherwise rust may appear on the container. On sale you can find tanks coated in different colors. Water heating tanks are also made from flexible and lightweight aluminum sheets. This design is easy to make at home. To protect the surface from corrosion, it is recommended to galvanize it.
Wood and plastic
The performance characteristics of these materials allow them to be used only for tanks with non-hot water. This especially applies to plastics that melt when exposed to high temperatures. If there is no running water in the bathhouse and there is a need for a container for warm or cold water, you can use products made of wood or polypropylene.
Plastic buckets or ladles should not be placed near the stove, otherwise they may become deformed.