Despite the huge number of heating devices on the market, a popular option is a long-burning solid fuel boiler.
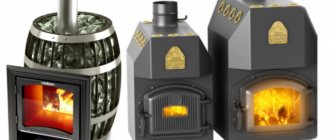
Homemade TT long-burning boiler
This unit can be used as the main source of heating in remote areas where gasification and electrification are not provided. Reliable, efficient and economical, it is an excellent solution for heating a country house, a cottage in the city or a summer cottage.
Unlike a conventional boiler, where the main heat comes from the flame itself, a long-burning TT boiler works on a completely different principle. This article will talk about how to properly make a long-burning solid fuel boiler with your own hands, and the drawings and installation diagram will help you not make mistakes and do everything technologically correctly!
Drawing of a simple long-burning boiler
This design of a solid fuel boiler is quite simple. The heat exchanger can be made of sheet steel in the form of a “water jacket”. To maximize heat transfer efficiency and increase the contact area with flame and hot gases, its design includes two reflectors (protrusions inward).
Drawing of a simple solid fuel boiler
In this design, the heat exchanger is a combination of a “water jacket” around the combustion chamber and an additional slot-like sheet metal register in its upper part.
Diagram of a boiler with a slot-type heat exchanger
1 - chimney; 2 - water jacket; 3 - slot heat exchanger; 4 - loading door; 5 - firewood; 6 — lower door for ignition and cleaning; 7 - grate; 8 - door for regulating air supply and cleaning the ash pan.
Is it possible to hide a gas boiler in a closet: decorating methods
Many owners of both private cottages and apartments in multi-storey buildings decide to disconnect from the heating plant and install autonomous heating. As a rule, a gas boiler is installed in the kitchen. An ordinary white unit can disturb the interior of the room, so they think about how to fit the boiler into the existing design.
A gas boiler can only be installed in non-residential premises, and the presence of a window and a door is mandatory!
The design of the part of the room where the boiler is installed needs to be thought out before installing the heating device.
How to hide a boiler:
- Homemade chipboard box for the boiler. Ideally, the front panel of the box should coincide as much as possible with the facade of the kitchen unit.
- Niche made of profile and plasterboard. The front part of the structure is also closed with a door to match the overall style of the kitchen.
- Finishing the boiler with film or special paint.
When installing new furniture, you need to discuss in advance the size and location of the cabinet for the boiler. The wiring of communications is also taken into account, which can be hidden if desired.
Floor-standing AGV can be installed in the corner of the kitchen according to the installation rules. It is also allowed to hide the floor-standing boiler in a cabinet-cabinet, while complying with the standards and safety rules.
3 advantages of a boiler with a built-in boiler:
Top combustion boiler
This unit differs from the previous ones - firstly, in its shape (it has a round cross-section and can be made from pipes of different diameters), and secondly, in the method of burning fuel in it (it is burned in it from top to bottom).
In order to ensure such a combustion process, it is necessary to provide air supply from above, directly to the combustion site. This function here is performed by an air supply telescopic pipe, which rises up when loading fuel and falls down after igniting the fuel. As it burns gradually, the pipe falls down under its own weight. A “pancake” with blades is welded to the bottom of the pipe to ensure uniform air supply. To ensure better fuel combustion conditions, an air heating chamber is located in the upper part. The air supply, and therefore the burning rate, is regulated by a valve at the entrance to this chamber from above. The heat exchanger here is made in the form of a “water jacket” around the combustion chamber.
Drawing of a top combustion solid fuel boiler
1 - outer wall (pipe); 2 - inner wall; 3 - water jacket; 4 - chimney; 5 — telescopic air supply pipe; 6 — air distributor (metal “pancake” with ribs; 7 — air preheating chamber; 8 — air supply pipe; 9 — supply pipe with heated water; 10 — air damper; 11 — loading door; 12 — cleaning door; 13 — pipe with water from the system (return); 14 — cable controlling the damper.
Types of boilers for baths
According to the type of fuel used, sauna boilers are divided into the following groups:
- solid fuel devices operating on wood, coal, peat, etc.;
Solid fuel unit combined with a stove-stove - electrical;
Electric boiler with hot water tank - gas;
Gas units for baths - boilers that run on liquid fuel - diesel fuel, kerosene, waste oil.
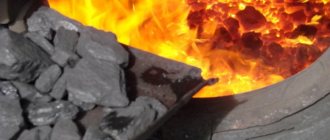
Diesel sauna boiler
When choosing a material there are also some nuances. Thus, cast iron boilers are rarely used, since they cannot be placed in a steam room, but only in a separate room. In the steam room itself you can put:
- iron cauldron;
Diagram of a boiler with a water tank - brick;
- iron, but lined with brick.
Bath cauldron made of metal, lined with brick
For hundreds of years, it was customary to build massive brick stoves in bathhouses, but thanks to modern technologies, today mostly compact metal models are made.
Note! Not everyone can afford to buy a factory-made unit, but if you have certain construction skills, you can make a boiler for a sauna with your own hands.
Prices for the range of solid fuel boilers
Solid fuel boilers
Boiler with pyrolysis combustion of solid fuel
The difference between this design is that solid fuel does not burn in it, as in a conventional one, but if there is a lack of primary air supply, it is “distilled” into wood (pyrolysis) gas, which is burned in a special afterburner chamber when secondary air is supplied to it. Such a presentation can be either natural or forced.
Scheme-drawing of one of the variants of a pyrliz boiler
1 — draft regulator with temperature sensor; 3 - firewood; 4 - bottom door; 5 - grate; 6 — air damper for primary air supply; 7 - ash pan; 8 — grate; 10 — cleaning; 11 - drain; 12 — thermal insulation of the body; 13 — return (coolant supply from the system); 14 — nozzle; 15 — secondary air supply; 16 — chimney damper; 17 - pipe with heated water; 18 — damper; 21 — loading door; 22 - afterburning chamber.
Materials and tools for installing the boiler
The main advantage of the decision to make a water heating boiler with your own hands is that this does not require special equipment, tools and parts.
It is quite easy to find available raw materials and materials, and almost all the tools are available to any owner of his own home (drill, wrenches, screwdrivers...).
To work you will need:
- sheet metal or large diameter pipe (option: metal barrel, old stove, etc.);
- steel pipes;
- radiators (if the coolant is water), profile pipes;
- hardware (nuts, bolts, etc.);
- dampers (you can buy them, find used ones, or make them yourself);
- door.
It is advisable to install the required minimum of automation on the boiler (temperature control and measurement sensors, for example, or a pressure gauge).
The materials used must be of proper quality (no holes, rust, etc.).
It’s a good idea to install a pump to force the coolant to move.
Shaft type boilers
As already mentioned, a feature of such boilers is the presence of two chambers: a large vertical loading chamber (shaft) and a chamber with a heat exchanger. The fuel is ignited from below in the first chamber and the flame enters the other through a hole, where it transfers its energy to the coolant through a heat exchanger.
Such boilers can be either with conventional fuel combustion or with pyrolysis. In the first case, all the necessary air is supplied through the lower door, and the combustion products, after passing through the heat exchanger, are removed into the chimney. In the second case, a limited amount of primary air is supplied to the combustion site, where the wood burns, releasing pyrolysis gas. In addition, such structures are equipped with an additional afterburning chamber, where secondary air is supplied and gas is burned. At the top of the heat exchange chamber there is a valve that opens when ignited and allows the flue gases to escape directly into the chimney.
Drawing diagram of a shaft-type boiler with an afterburner chamber
1 — primary air supply damper; 2 - lower door for ignition and cleaning; 3 - grate; 4 - firewood; 5 — loading door (can be located on top); 12 - pipe with heated water (supply); 13 — starting valve; 14 — chimney damper; 15 - heat exchanger; 16 — secondary air supply; 17 — afterburning chamber; 18 — return; 19 — drain; 20 - cleaning; 21 - damper; 22 — grate; 25 - ash pan.
Diagram of a shaft-type boiler with lining of the inner surface of the combustion and afterburning chambers
Options and designs of heating boilers
A homemade boiler for water heating is usually divided according to the type of fuel used into the following main types:
Wood boilers
DIY wood heating boiler
Boilers of these types are most in demand for self-production due to the simplicity of their design, the availability of the materials and tools necessary for the manufacture of such a boiler, and the possibility of freely purchasing the required amount of firewood.
- Advantages: simplicity and versatility.
- Disadvantages - rather low efficiency. The following scheme, in this regard, is much preferable.
The simplest version of such a boiler: a thick-walled pipe of large diameter, into which a pipe of smaller diameter is inserted, which is the firebox. The space between the pipes is filled with coolant.
Wood-burning boilers are universal. They can be heated not only with wood, but also with almost any solid fuel. (peat briquettes, coal).
Pyrolysis boilers
In the temperature range from 200 to 800 degrees, wood, the combustion process of which takes place with a lack of oxygen, decomposes into wood coke and pyrolysis gas.
As soon as a sufficient amount of atmospheric air is added to the latter, it ignites, releasing heat in large quantities. This increases the efficiency of boilers of this design to 92%.
One load of fuel (wood) can last a pyrolysis boiler for 12 hours, while for traditional boilers this figure does not exceed 4 hours.
There are practically no solid residues. The combustion of gases can be easily adjusted in automatic mode.
The downside that boilers for water heating a house of this design have is strict requirements for fuel humidity, no more than 30%. Otherwise, when mixed with water vapor, the pyrolysis gas will burn poorly.
Materials for the manufacture of a boiler of this design will cost significantly more. Than the first option. But the entire overexpenditure will be fully recouped in 2 - 3 heating seasons.
Waste oil boilers
The boiler is ignited, brought to operating mode, and oil begins to drip onto a special hot pan, which evaporates almost instantly.
The resulting gases, burning, heat the coolant. Instead of oil, you can use diesel fuel.
Electric boiler
The simplest design is a heating element inside a pipe standing vertically, to which the return is supplied from below and the supply from above. And natural water circulation.
Cons: boilers with a rated power of more than 7 kW are prohibited from connecting to 220 V networks. But 380 Volts are not available everywhere.
The second option for an electric boiler is an induction boiler. This is the simplest version of a homemade boiler of a similar design: a thick-walled plastic pipe on which at least a hundred turns of enameled wire are wound, connected to a portable welding machine with an output current of 15A.
Elements heated by eddy currents (cuts of steel wire, chopped rod, etc.) are poured into the pipe. We connect the return from below, the supply from above, supply water and you can turn on the power.
Do-it-yourself solid fuel boiler for ultra-long burning
A homemade heater will have the following design:
- The firebox is a “box” 460 mm deep, 360 mm wide and 750 mm high with a total volume of 112 liters. The fuel load volume for such a combustion chamber is 83 liters (the entire volume of the firebox cannot be filled), which will allow the boiler to develop power up to 22 - 24 kW.
- The bottom of the firebox is a corner grate on which the firewood will be placed (air will flow into the chamber through it).
- There should be a 150 mm high compartment under the grate to collect ash.
- The 50 liter heat exchanger is mostly located above the firebox, but its lower part covers it on 3 sides in the form of a 20 mm thick water jacket.
- A vertical flue pipe connected to the top of the firebox and horizontal flame pipes are located inside the heat exchanger.
- The firebox and ash pan are closed with sealed doors, and air is taken in through a pipe in which a fan and gravity damper are installed. As soon as the fan turns off, the damper lowers under its own weight and completely blocks the air intake. As soon as the temperature sensor detects a decrease in the temperature of the coolant to a user-specified level, the controller will turn on the fan, the air flow will open the damper and a fire will break out in the firebox. Periodic “shutdown” of the boiler in combination with an increased volume of the firebox allows you to extend operation on one load of fuel up to 10 - 12 hours with wood and up to 24 hours with coal. The automation of the Polish company KG Elektronik has proven itself well: a controller with a temperature sensor - model SP-05, a fan - model DP-02.
do-it-yourself solid fuel boiler with extra long burning time
The firebox and heat exchanger are wrapped in basalt wool (thermal insulation) and placed in the housing.
The process of making a boiler with your own hands.
First of all, you need to prepare all the necessary preparations:
- Steel sheets 4 - 5 mm thick for making a firebox. Alloy steel of heat-resistant grades 12Х1МФ or 12ХМ (with additions of chromium and molybdenum) is best suited, but it needs to be welded in an argon environment, so the services of a professional welder will be needed. If you decide to make a firebox from structural steel (without alloying additives), then you should use low-carbon grades, for example, Steel 20, since high-carbon grades may lose their ductility due to exposure to high temperatures (they are hardened).
- Thin sheet steel 0.3 - 0.5 mm thick, painted with a polymer composition (decorative cladding).
- 4mm structural steel sheets for the body.
- Pipe DN50 (fire pipes inside the heat exchanger and pipes for connecting the heating system).
- Pipe DN150 (pipe for connecting the chimney).
- Rectangular pipe 60x40 (air intake).
- Steel strip 20x3 mm.
- Basalt wool 20 mm thick (density - 100 kg/cubic m).
- Asbestos cord for sealing openings.
- Factory made door handles.
Welding of parts should be performed with MP-3S or ANO-21 electrodes.
The principle of a boiler for water heating
The principle of a boiler for water heating
Almost the entire variety of existing types of boilers, both factory-made and self-made, use a single principle in their work, which was discussed in the previous section.
It is implemented in two ways:
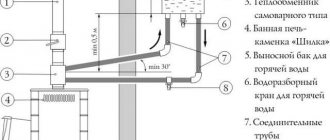
- A do-it-yourself water heating boiler can be made using the “samovar” method. The fuel burns inside a container filled with coolant. Most often, this scheme is implemented in the manufacture of a boiler for a Russian bath.
- A homemade water heating boiler made using the second method involves passing the coolant through the pipes of a heat exchanger (coil) through a firebox in which the fuel burns. As a variant of the same method, quite often the heat exchanger is placed immediately behind the firebox at the point where combustion products exit it.
As a rule, preference for one or another option is given taking into account the capabilities of the master in terms of acquiring the necessary materials.
But, in any case, we must not forget that a water heating boiler is a high-risk device and requires constant monitoring during operation.
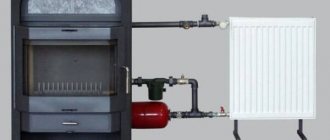
Therefore, boilers for water heating at home must have in their design a valve to relieve excess pressure, a pressure gauge and a thermometer to determine the temperature of the coolant.
DIY heat exchanger for a solid fuel boiler
First, the firebox is assembled from two side, one rear and one upper walls. The seams between the walls are made with full penetration (they must be airtight). A 20x3 mm steel strip is welded horizontally from below to the firebox on 3 sides, which will serve as the bottom of the water jacket.
Next, to the side and rear walls of the firebox, you need to weld short pieces of small-diameter pipe in a random order - the so-called clips, which will ensure the rigidity of the heat exchanger structure.
Now the outer walls of the heat exchanger with pre-made holes for the clips can be welded to the bottom strip. The length of the clips should be such that they slightly protrude beyond the outer walls, to which they need to be welded with a sealed seam.
In the front and rear walls of the heat exchanger above the firebox, coaxial holes are cut into which flame tubes are welded.
All that remains is to weld the pipes to the heat exchanger for connection to the heating system circuit.
Homemade sheet metal boiler
Advantages and disadvantages
Due to its large dimensions and complexity of the design, it is rational to use such a unit for heating a large cottage. But for a small dacha this option is not suitable, as it does not justify the cost-effectiveness.
pros
- high efficiency (about 95%);
- autonomy of the heating system;
- efficiency;
- reliability and durability;
- high efficiency;
- fuel availability;
- an environmentally friendly option for heating your home;
- versatility of fuel (coals, firewood, sawdust, pellets).
Read our material about which long-burning boilers are better.
Minuses
- cumbersome design;
- a special room must be equipped for the device;
- complexity of design and installation;
- the need for constant cleaning.
It is not necessary to buy a long-burning boiler ready-made, because its price is several times higher than conventional stoves. You can make such a design yourself if you have at least a little experience in construction and repair.
Appearance of a homemade structure
A homemade design, compared to a factory-made analogue, has a number of advantages:
- low cost;
- the ability to make the boiler universal for any type of fuel;
- possibility of improving the design and adding power.
The only difficulty is giving the boiler a cylindrical shape. It is very difficult to give metal such a shape without a rolling machine.
But there is a good solution. You can use empty propane tanks or any pipe of suitable diameter. You should choose pipes with a wall thickness of at least 5 mm.
For a village or a small dacha, you can build a small brick stove and enjoy its efficiency. But for a large cottage, this option will be less practical, as it will require a large supply of firewood for the winter. Caring for a conventional stove, compared to a long-burning boiler, is much more difficult, and large temperature changes in rooms remote from the stove do not allow organizing a comfortable microclimate in the house.
If you do not have enough money to create a full-fledged heating system for your home, or the construction of such a system itself is impractical, it would be much more reasonable in this situation to make a long-burning solid fuel boiler with your own hands and not worry about its safety and aesthetic appearance.
Safety regulations
Any violation of safety rules entails irreparable consequences. To avoid troubles of any kind, you must adhere to some rules:
- Do not exceed the recommended temperature inside the circuit.
- Do not install a shut-off valve on the supply pipe.
- Do not store firewood or any other fuel in the immediate vicinity of the boiler.
- Provide the room in which the boiler is installed with constant ventilation.
- A separate room must be allocated to place the boiler.
Devices with a power of up to 35 kW are allowed to be installed in a room, but provided that the location is fenced and the room is provided with constant ventilation. This is especially important in homes where small children grow up.
In addition to the topic, you can read how to install an electric boiler in a private house with your own hands.
Operating principle
The task of any boiler is to provide the room with heat, and if in order to maintain the optimal temperature in a house with a stove you have to constantly add it, then with the installation of long-burning units this need disappears. More precisely, the frequency of adding fuel is reduced, and the burnout period increases.
If you decide to purchase such a device, then you need to know what requirements a solid fuel boiler must meet:
- Increased firebox volume.
- Technical specifications about burning time, not less than 7 hours.
The first point is the main characteristic of such devices. The larger the chamber, the greater the fuel capabilities.
Depending on what operating principle underlies the boiler, they are divided into 2 categories:
- Devices with forced oxygen supply.
- Units with a top combustion system.
Useful tips for creating a boiler
All homemade heating systems work on the same principle: fuel burns and releases energy to the coolant. Most often, ordinary water is used for these purposes. The appearance of the equipment and its design features should depend on the availability of building materials and a certain type of fuel in the region.
What affects the efficiency of a homemade heater
Before you start assembling the device, it is worth finding out what primarily affects its efficiency.
There are two main factors:
- The larger the surface area of the heat exchanger, the faster the coolant will heat up.
- The fuel must burn for a long time and be completely used by the boiler. If the design of the device is flawed, the boiler will require more wood and produce less heat.
To ensure that no problems arise during the operation of a homemade device, even at the stage of developing the circuit, you need to take into account all the subtleties of its manufacture.
Step-by-step installation of equipment
Before starting installation work, you should remove all packaging elements and check that the unit is complete. The presence of all necessary parts can be checked according to the list in the attached operating instructions. If any elements are missing, you should immediately replace the heat generator from the supplier.
Photo from the site https://avtovelomoto.by
Carefully inspect the appearance of the boiler itself, as well as each element for installing the system. There should be no dents or signs of ongoing repair work on the equipment.
Check all the performance characteristics specified in the data sheet with those on the unit itself.
Before installation, it is worth flushing all existing pipes, since debris, dust or packaging elements may remain in them. Heating lines should also be cleaned.
To install a wall-mounted boiler in a wooden house, double-circuit appliances with a closed heating system are most often used. Therefore, it is worth describing in detail the installation work of just such equipment.
Stage 1. Installation of the wall mounting system
To properly hang the unit on the wall, you must use special brackets. They must support the weight of the boiler and its equipment, and, at the same time, keep it in one level position, avoiding tilts and distortions. Usually they are already included with the heating heat generator. Fasteners for strengthening them must be selected in accordance with the characteristics of the wall material.
Special markings must be applied to the wall, which will indicate the exact location of each element of heating equipment. This is done using a special paper stencil, which should be included with the equipment. It will help you mark the exact locations for the holes for the fasteners.
After the brackets are securely fastened to the wall, the boiler itself can be hung on them. For heating, in addition to the gas boiler itself, you will need to install pipes for supplying coolant.
Stage 2. Installation of pipes for the heating system
Since the heating system may vary, the number of connected pipes may vary. But, in any case, you first need to remove the plugs from the heating pipes.
To protect the boiler from dirt particles getting inside along with the water coming from the well (from the central water supply), it is worth connecting the return inlet with a strainer. If the tap water is too hard, you need to consider additional equipment to prevent scale from accumulating on the walls of the heating system. Otherwise, the heating boiler will serve for a much shorter period.
All connections must be made in strict accordance with all rules and regulations. It is imperative to reliably seal each fastener, not only for safety, but also to save gas. The sealant can be paint, tow, or modern materials for sealing threads. Experts also advise installing shut-off valves, both on the supply and return lines. This will greatly simplify equipment repair if any malfunction occurs. Also, the presence of taps will help correct the airing of radiator batteries.
Stage 3. Connection to the water circuit
Work on connecting water is the same as when installing heating pipes. They differ only in the diameter of the pipes and the use of taps.
The cold water supply must be equipped with a filter to prevent excess particles from entering the heat generator, which can damage all equipment.
Stage 4. Launch of the gas pipeline
The launch of a wall-mounted heat generator can only be carried out by an inspector from a gas supply organization with permission, because any mistake at this stage can turn out to be very disastrous. Before setting up the gas line and putting the boiler into operation, the correct connection is checked again by a specialist. Before starting the boiler, he will make sure that the installation standards for the gas boiler are met. The first launch is also carried out with it.
Stage 5. Connecting to the electricity network
This is only relevant for units with a closed chamber, since they run on electricity. Usually a standard three-wire circuit is sufficient. Experts advise connecting the boiler to electricity only with the help of a stabilizer, which will protect the system from power surges and will not allow the equipment to fail.
How to choose a stabilizer and what it is needed for, read by following the link