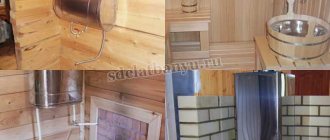
When we talk about a bathhouse, we of course mean steam, but what kind of steam can there be if there is no convenient access to water. You can’t do without it even in your soul. The main attributes of each bath are a stove and a container with water. Of course, you can buy or order everything you need, but you can make a sauna tank with your own hands. To do this, you will need to use only high-quality material that will not emit harmful substances during its operation and can cope well with temperature loads.
TOP 5 best water tanks for baths
| Photo | Name | Rating | Price | |
| #1 | Teplodar Parus | ⭐ 99 / 100 2 — votes | Find out the price | |
| #2 | Ferrum | ⭐ 98 / 100 | Find out the price | |
| #3 | MetalStroy | ⭐ 97 / 100 4 — votes | Find out the price | |
| #4 | Volcano | ⭐ 96 / 100 1 — vote | Find out the price | |
| #5 | Horizontal | ⭐ 95 / 100 4 — votes | Find out the price |
Which water tank would you choose or recommend?
Take the survey
Tank capacity: how to calculate correctly
Now about the sizes of containers for heating water. Most often this value is 20-100 liters, and volumes of 150 and 200 liters are also common.
Taking into account the standard indicator of 8-10 liters of boiling water per person, for domestic needs a tank with a capacity of more than 100 liters is rarely needed.
Larger tanks are made individually.
Before we move on to discussing the choice of a sauna tank, let us repent: we did not talk about other, less important, but also significant parameters - the shape of the tank, the thickness of its walls and much more. So it’s better not to limit yourself to reading just this article, but ideally to resort to expert advice.
Types of tanks
Water tanks of different configurations are installed. The method of heating water may also differ. When choosing a container, you should take into account all the nuances.
The purpose of the hot water tank in the bathhouse
Capacity
The volume of the installed tank depends on the number of people who can simultaneously be in the bathhouse and use hot water. On average, 10...20 liters of boiling water should be provided for each person (with a small reserve). Today, tanks with a volume of 50...100 liters are produced. As a rule, it is not advisable to install a tank with a capacity exceeding 100 liters.
The shape of the container can be any: square, rectangular, oval and even round products are produced. But first of all you need to pay attention not to this, but to the build quality of the tank and the manufacturer’s warranty.
The shape of the container can be any
Material
When choosing a container, you need to consider that it must be able to withstand high temperatures (up to 250 degrees) for a long time.
Metal tank for water in the bath
You should not try to save money and install tanks made of ferrous metals. This approach cannot be justified not from an aesthetic point of view, but mainly from practical reasons. Due to constant exposure to high temperatures, the metal will deform over time , and traces of corrosion will appear on it . This significantly reduces the service life of the tanks and the quality of the water in them.
- The most common tank option is stainless steel construction. The demand for such tanks is explained by their attractive appearance, durability, resistance to various types of external influences, high heating rate, ability to retain heat for a long time, relatively low weight, hygiene, high durability and ease of maintenance. The tank configuration may vary. But high-quality stainless steel costs a lot. And you need to take into account that today there are many counterfeit products on offer, which will soon rust.
Stainless steel tank for bath - Not so common, but there are tanks made of cast iron. They are not afraid of rust. However, it must be borne in mind that, despite the fact that the water in such structures will not cool quickly, it takes more time to heat it up. Due to the bulkiness of the tanks, you need to carefully consider their location. Today, not many companies produce cast iron tanks, and they are not very cheap.
Cast iron water tank for bathhouse - Enameled containers can be used, but they are not the best option.. Of course, such material does not corrode and is very hygienic. But low resistance to mechanical damage over time will inevitably lead to the fact that the metal with a fairly thin coating will become chipped (as a result of not very careful handling) and these areas will rust. It will no longer be possible to fix the problem.
Enameled container for water in the bath
Stainless steel tanks can be considered the optimal design option for installation in a bathhouse. If we talk about the type of steel, it is recommended to choose products made from AISI 304. It contains not only chromium, but also nickel, which increases the durability and reliability of the material.
Prices for a water tank in a bathhouse
water tank for bath
Location and design
Three methods are used to place the tank: traditional (directly near the firebox), on the chimney and remote . What is the difference?
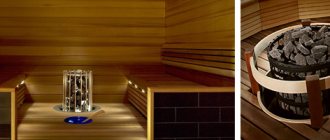
Bath stove with tank
Tank built into the oven
The reservoir can be located on the side or above the firebox. The water in it heats up quite quickly (exposed to open fire). To drain it, a ball valve is installed. Of course, this design does not involve pipeline laying work, which saves labor and material resources. However, using such a container is not very convenient; usually a tank of not very large capacity is installed, and its installation takes up useful space in the steam room, which usually is not very much. The best solution in small-sized baths is the top location of the tank. Since the metal will be in direct contact with the fire, the thickness of the tank walls must be at least 8 mm.
Water tank next to metal firebox
Reservoir on a pipe
If the ceiling height allows, you can install the tank on the chimney. Water is heated by hot gases passing through it. To simplify the installation process, it is possible to purchase a container with built-in chimney elbows. This tank can be fixed without much effort. By laying a pipeline from the tank, you can carry water to any point in the bathhouse, for which a pipe is connected to the bottom of the tank, ensuring the flow of liquid, for example, into the shower. Filling a tank installed in this way is not very easy due to the high location of the filler hole. It is best to use a hose lowered into a container for these purposes.
Reservoir on a pipe
Remote design
Thanks to the installation of a heat exchanger on the heater (on the chimney or directly on the stove) and natural convection, it is possible to place the tank in the washing compartment.
Water tank over brick firebox
The heat exchanger can be integrated into the oven (removable or non-removable), but you can easily install it yourself. It is a coil or container with a volume of several liters with pipes to create a circuit.
What material can I choose for the tank?
The classic option is a cast iron tank, which was used in ancient times. Its disadvantage is that it takes a long time to heat up, which takes a lot of energy, but due to the thickness of the material, the water maintains its temperature for a very long time. The advantages of cast iron are that it is very resistant to temperature loads, corrosion and mechanical damage. However, it is heavy, which may require special installation conditions.
Another option is metal tanks that are coated with enamel. The problem here is precisely the coating, which is susceptible to chipping and destruction, which increases the risk of corrosion.
The most successful of modern materials is stainless steel. It is not susceptible to moisture and has great resistance to high temperatures. In addition, stainless steel conducts heat well, which means heating will occur quite quickly. This material is quite easy to care for, since it is not susceptible to negative environmental influences.
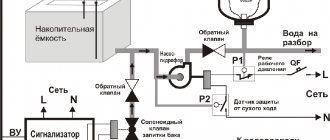
How does the system work?
Heat from the stove is transferred to the register or water jacket of the heat exchanger, which leads to an increase in the temperature of the coolant. Since the water in the tank has a lower temperature, pressure is created that promotes gravity flow of the liquid. Thus, hot water enters the tank, and cold water enters the heat exchanger through a pipeline, where it is heated (from the bottom point of the tank, water should be supplied to the bottom point of the heat exchanger, and from the top point of the heat exchanger, water should accordingly go to the top point of the tank). The minimum pipe diameter is 3/4 inch. The process continues until the temperature in the oven drops.
How to connect the water tank
Important! The tank must be higher than the heat exchanger, otherwise water circulation will not be ensured.
Without installing a pump, the total length of the pipes between the heat exchanger and the remote tank should not be more than 3 m. There is also a nuance in the principle of the pipeline design. It is necessary to create a slope to ensure natural circulation of the coolant: the pipes connecting the heat exchanger to the tank must have a slope of at least 25...30 degrees, and those delivering water from the heat exchanger to the tank must have a slope of at least 250 degrees.
Installing a heat exchanger allows you not only to do without a water heater in the tank, but also to transfer heat to all rooms.
DIY sauna tank
The heat exchanger must be chosen wisely. It should not reduce the performance of the heater by taking away a significant amount of heat from it. The maximum that it can take is 10% of the generated thermal energy.
If it is not possible to organize the movement of water by gravity, you can supplement the system with a circulation pump. This will increase its effectiveness. It will be possible to increase the length of the pipeline and reduce the slope. But the operation of this equipment is only possible from a 220 V electrical network.
Circulation pump pressure calculator
Go to calculations
Important! When operating water supply systems, remember that it is forbidden to heat the heater if the tank is empty. Otherwise, the welds may come apart. We also must not forget that in winter, water must be removed from the system (if the bathhouse is not heated), since when it freezes it can break the structure.
You cannot heat a stove with an empty tank.
Since when installing a water supply in a bathhouse, you often cannot do without a circulation pump, which ensures the movement of liquid in a closed circuit, the 5 best models are offered.
Construction stages
Making a barrel stove with your own hands is not at all difficult. First, prepare a place to install it.
Disassemble the floor and dig a pit of such a size that the stove will subsequently be in its center, and the distance between the heating device and the walls of the recess is 30 cm on each side.
The depth of the pit is 50 cm. Based on this figure, the approximate thickness of all levels is planned.
Backfilling the pillow under the foundation
Place a layer of broken brick or small crushed stone at the bottom of the pit and compact it tightly. Place large items at the very bottom. The more small stones fall into the space between the large ones after compaction, the more reliably the cushion will ensure the immobility of the foundation even against the backdrop of large temperature changes.
Laying the foundation
Fill the finished pillow with cement mortar. After the composition has dried, lay 2 layers of roofing material on it, then the same amount of brick. The bars of the first level are laid edgewise, the second - horizontally.
Recommendations for installation and connection of a remote tank to a heat exchanger
The task is to conduct hot water from a heat exchanger installed on the chimney to a hanging tank in the washing compartment located behind the wall. It is more comfortable to steam and wash in different rooms.
The liquid heated in the heat exchanger should flow by gravity into the tank. From there it can be spent on hygiene procedures, after which cold water is refilled into the tank, which goes through the pipeline to the heat exchanger for heating.
Connecting the water tank
The heat exchanger is equipped with pipes for connecting the circuit. The threads at their ends facilitate installation work.
Table. What will you need to connect?
| Name of tools and materials | Illustration |
| Bulgarian | |
| Hammer | |
| Screwdriver | |
| adjustable wrench | |
| Level | |
| Corrugated pipe | |
| Couplings | |
| Self-tapping screws | |
| Linen | |
| Plumbing paste | |
| Ball Valves | |
| Tee |
Prices for sanitary paste
plumbing paste
Step 1 . Pipeline exit points are measured, after which holes are drilled for hot and cold water pipes.
Holes are drilled
This is not always easy to do, given the thickness of the walls.
Hole for pipe
Step 2. Hanging a stainless steel remote tank. To do this, you need to tighten two self-tapping screws.
Self-tapping screws are screwed in
All measurements must be made using a level.
A building level is used
The tank is fixed using a wall mount.
Fixing the water tank
Step 3 . Connections between pipes and pipes must be sealed. You can use Tangit Uni-Lock thread or sealant for this. If these materials are not available, it is recommended to use plumbing paste and flax, which are not a problem to buy. The paste is applied to the thread, after which the fiber is wound (it must be carefully straightened).
The fiber is being wound
This connection is reliable. After this, you can tighten the nuts using an adjustable wrench.
The nuts are tightened
It should be noted that poorly performed sealing will lead to water leaks. The same must be done on the heat exchanger.
It is important to perform proper sealing
Step 4 . Pipeline connection. The heat exchanger is connected via a flexible stainless corrugated pipe. You can adjust it to size using a grinder.
A flexible corrugated pipe is used for connection
The second end of the hot line is connected to the (upper) pipe of the heat exchanger.
The second end of the hot line
It is necessary to provide an elbow at the bottom of the circuit and install a ball valve to drain water before the onset of winter (no liquid should remain in the pipes, heat exchanger, or tank in a cold room). This tap should be located at the lowest point.
Ball valve
A hot water outlet is also installed (supplied to the tap).
Draining hot water from the tank
The result is this design.
This is the final design
The heat exchanger looks like this: a pipe is connected to the upper pipe for discharging hot liquid, and to the lower pipe for supplying cold water from the tank.
Connecting hot and cold water
Step 6. All that remains is to fill the tank and test run the system.
It must be remembered that water should be poured into the tank before the stove starts heating. Otherwise, the entire system will simply break apart.
Video - Connecting a remote water tank in a bathhouse
Design options for water tanks for baths
Water tanks designed for use in a bathhouse can have different designs. There are 3 main options: a built-in tank, a remote container and a unit installed on a pipe. You can see the features of each type of design in the following table.
Table. Stainless steel water tank designs
| Construction type | Description |
| Built-in water tank | Installation of representatives of this category is carried out during the construction of a sauna stove, as a result of which the stove and tank become a single structure. Heating of water in a built-in stainless steel tank is carried out by the forces of fire, due to which the efficiency of the water tank itself is kept at a fairly impressive level. The key disadvantage of this design is the fact that a significant part of the heat is spent on heating the water in the tank, as a result of which the heat transfer directly from the sauna stove noticeably drops. Helpful note! Much easier to manufacture and use is a mounted/mounted tank installed on top of the heater. |
| Remote water tank | A more convenient and practical option compared to the previous model, especially if the tank is designed and installed for permanent use. If desired, a ready-made stainless steel water tank can be installed in the washing room of the bathhouse, connecting it with a pipe system to a furnace heat exchanger. The optimal material for making pipes is copper or brass. The only significant drawback of an external water tank is the likelihood of getting burned in case of careless handling - this situation is especially important if children go to the bathhouse. |
| Pipe water tank | A pipe water tank can be installed either directly above a sauna stove or in the attic space. In such designs, water is heated in the shortest possible time. At the same time, the heat transfer rates of the furnace unit do not decrease. The undoubted advantage of installing a water tank in the attic is the ability to “unload” the steam room by eliminating the container from its surroundings and providing more free space. |
The table does not include another possible option for installing the tank - on the side of the stove.
Stove with side tank
Stove with a side tank - photo
This method has been neglected for the simple reason that it is the worst. The water in such a tank will boil very quickly. If the steaming process drags on, the constantly boiling water will make the atmosphere in the steam room simply unbearable. Yes, and servicing such a tank is a complete inconvenience: in order to save space, the container is made high, but very narrow.