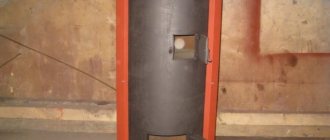
It is advisable to install such stoves in large baths that have a separate shower, rest room, locker room, etc. They will allow you to create a comfortable temperature in the remaining rooms while heating the steam room. Issues with choosing the type of boiler and its linear dimensions must be resolved during the design of the furnace, and all the features of its operation and design changes should be taken into account. It is almost impossible to accurately calculate the thermal power of a homemade boiler; there are too many individual factors.
How to make a stove with a built-in boiler
Brief overview of stove options with built-in boiler
Sauna stoves can be metal or brick, with a different heater arrangement, with a boiler for heating water for washing. There are no restrictions on size; specific parameters are selected taking into account the size of the premises, materials for constructing the bathhouse and the climatic zone of residence. Let's consider the design features of two types of furnaces with heating boilers.
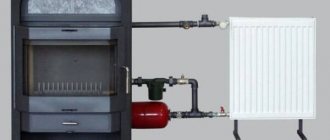
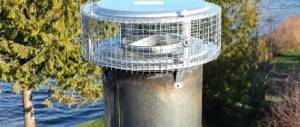
- The heating boiler is built into the chimney. Advantages: long service life, relatively low heating temperatures have a positive effect on the stability of metal structures. In addition, such an installation of the heating boiler does not affect the heating rate of the steam room, the heat from the firebox is completely transferred to the walls of the stove, and the heat transfer rates do not change. Disadvantage: low productivity and small contact area of the heating boiler with hot gases do not allow for efficient heating of large rooms.
Heat exchanger options for chimneys
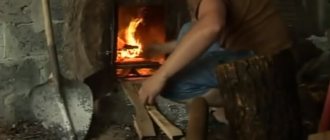
- The heating boiler is located directly in the firebox. Advantages - large rooms are heated, heating functions immediately after the furnace starts firing, and it becomes possible to use various types of heat exchangers. Disadvantages - direct contact with fire of the metal elements of the heat exchanger negatively affects their physical strength. The walls of the heat exchanger have a relatively low temperature, this promotes the appearance of moisture condensation, and a large amount of soot adheres to wet surfaces. A soot deposit one millimeter thick reduces the efficiency of the heat exchanger by approximately 10%. You have to clean it often or put up with insufficient water heating in the boiler. Another drawback is that the dimensions of the firebox increase and, as a result, the overall dimensions of the stove. Not every bathhouse has the opportunity to install large stoves.
Steel heat exchanger in a furnace
Installing a heat exchanger in the firebox. Photo
A few words should be said about the types of heat exchangers; this is a very interesting question; errors during the selection of an engineering design can have very dire consequences.
Flat-plate heat exchangers
A fairly common type, they are often used during the construction of stoves for various purposes, and not only for baths.
Flat-plate heat exchanger
Flat-plate heat exchanger
Advantages
The simplest to manufacture, the surfaces are easy to clean from adhering soot, can be installed in both vertical and horizontal positions, and have a fairly high efficiency.
The heat exchanger is flat, installed vertically
Flat boilers, unlike tubular ones, can have a large volume, which in some cases allows hot water to be drawn from the heating system for washing.
Built-in heat exchanger
An expansion tank with increased linear dimensions is installed, into which water is constantly added after the level drops below critical.
Open expansion tank for heating
The option is quite convenient and solves several problems at once. But there is one obligatory condition - in the bathhouse during the winter period the temperature in the bathhouse should not drop to minus values. If the condition is not met, then the water should be replaced with a frost-resistant coolant.
Coolant for heating systems
Flaws
They should be discussed in more detail; many builders do not pay due attention to them. The main disadvantage is that the heat transfer from the stove walls is sharply reduced. The fact is that flat heat exchangers are made in the shape of the letter P and are installed around the perimeter of the firebox, except for the door. This means that the outer walls of the stove have a low temperature, heating does not exceed +40÷50°. Such parameters significantly increase the warm-up time of the steam room; preparation for water procedures takes a lot of time. There are even stranger proposals - to increase the service life of the boiler, make a lining between it and the firebox.
Heat exchanger lining
We don’t argue that an additional row of bricks will protect the heat exchanger from the negative effects of direct flame. But at what cost? The time for the heating system to start operating effectively will increase significantly, and the heating of the steam room by the stove will decrease significantly. In order to steam in the steam room and heat the relaxation room and shower room, you will have to burn the stove for many hours. Don’t pay attention to the talk about the boiler keeping warm for a long time, there is no benefit from it. No one can cancel the laws of physics. Since a stove with a boiler holds heat for a long time, it means it takes just as long to heat up. Time is spent warming up a large mass of bricks. In addition, the outer walls of the sauna stove remain cold. This option can still be imagined when installing a stove for heating residential premises, but we categorically do not recommend using it for baths.
Do-it-yourself brick stove in a bathhouse
In residential buildings, the stove is heated constantly and increasing the heating time of the premises by several hours does not play any role. As, by the way, is the cooling time of the water in the boiler.
Practical advice. If you plan to install a flat boiler on the sides of the firebox in a sauna stove, then think about how you can speed up the heating of the steam room. There are several options. You can significantly enlarge the heater and place it directly above the firebox. Another option is to use a chimney to heat the premises. Make it only metal, slightly increase the length due to different elbows, etc. Let us immediately note that the listed options, in addition to positive aspects, also have negative ones. You need to navigate on the spot yourself and make informed decisions.
Safety rules for operating furnaces with a water circuit
To ensure proper operation of the stove and boiler, it is recommended to follow important safety rules, as well as recommendations for caring for the equipment:
- Water heating devices must be operated under human supervision. This applies to adding fuel and regularly cleaning the chamber from soot and ash.
- Safe operation of the stove requires control of the smoke exhaust ducts. Before starting the fire, it is necessary to check the technical condition of the channels and the position of the valves. When starting a fire, the valves must be completely open.
- Such a system is recommended for use in winter, when it is necessary to provide rapid heating of rooms and hot water supply. Using a stove with a water circuit in the summer only for cooking and heating water is irrational. In this case, it is recommended to choose more economical heat sources.
- An open fire leads to excessive heating of the stove structure, which can be the main cause of heat exchanger failure.
- When using a homemade heating system, you can install a pumping unit to inject liquid and devices to control pressure levels.
Tubular heat exchangers
Tubular heat exchangers (installed directly in the firebox)
The most successful solution can be of various sizes and shapes, from quite simple to complex.
Simple register
Such registers are manufactured in various sizes and can be installed on one side of the firebox, or on two or three. Heat exchangers are easy to maintain; in case of emergency, they can be removed from the furnace without dismantling the brickwork. Practitioners do not advise pursuing overly complex heat exchanger designs; such aspirations often bring results opposite to those expected.
Spider tubular heat exchanger
Very important. For the manufacture of heat exchangers, use only seamless pipes. It is quite simple to distinguish them from suture ones - they do not have a longitudinal welding line. Seam pipes may crack when heated, which results in a complete replacement of the heat exchanger with mandatory disassembly of the furnace.
Why do we recommend installing tube heat exchangers in the furnace? For two equally important reasons.
First. Pipe circumference C = π×d.
Circumference formula
Steel pipe GOST mm
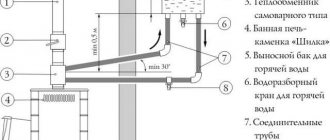
For example, a pipe with a diameter of 50 mm when unfolded has a circumference of 3.14 × 50 = 157 mm. It takes up only 50 mm of space in the firebox, and heats up to three times the surface area. In order for a flat heat exchanger to be as efficient as a tubular one, its dimensions must be three times larger. Everything is clear with this, but not everything is clear. The pipes cannot be fastened close to each other, and the gap between them reduces the effective heat exchange area, which significantly eliminates the advantage. But even with such a device, tubular heat exchangers are more efficient than flat ones.
Example of a tubular heat exchanger in a furnace
Second. Nobody remembers this reason, but it is of great importance. Due to the presence of gaps between the heat exchanger pipes, it becomes possible not only to clean the pipes from soot, although this is very important. There is another plus - the open fire directly heats the walls of the stove through the gaps, and the steam room warms up quickly. Flat heat exchangers completely isolate the walls of the stove from fire with all the negative consequences.
The existing gaps allow the stove to warm up faster
We hope that we will convince you to make tube heat exchangers, even if they are much more difficult to manufacture. If you don’t have enough experience to do it yourself, contact a qualified welder for help, and you yourself will install the finished product in the firebox. You can be sure that some increase in the cost of performing the work will be fully paid off due to the reliability and efficiency of the boiler.
If you have no experience, leave the welding to a professional.
Video - Boiler for solid fuel
Prices for different types of heat exchangers
heat exchanger
Installing a heat exchanger in the firebox
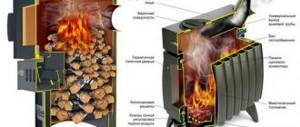
Boilers installed in the firebox have a variety of designs and do not require a large firebox volume. The spider model heat exchanger shown in the photo has a symmetrical two-sided structure and can consist of a different number of fins. It is quite compact. Through its openings, an open fire perfectly heats the walls of the oven.
Peculiarities
- possibility of heating large areas;
- several options for the structure of the boiler (in the form of a wide tank or flat container);
- flat boilers and tanks have a larger volume than pipe structures and allow some of the water to be used for sanitary needs;
- difficult, but nevertheless a real possibility of embedding into an already folded stove.
A tubular heat exchanger is the most popular solution for installation in a firebox. He can:
- have various simple and complex shapes and dimensions;
- installed on the outside of the firebox or on two or three sides;
- easy to remove from the oven for routine inspection and repair.
Choose seamless patterns. Their distinguishing feature is the absence of a longitudinal weld line. Seamless pipes often crack when heated.
Installation
The heat exchanger is placed on the bottom row of bricks in the firebox and lined with fireclay stone. The size of the structure is selected taking into account the parameters of the firebox. There should be enough space left for storing firewood. The registers should not touch the walls of the combustion chamber, but too much distance will not do any good. A hole is left in the firebox for the inlet pipe and then the roof is laid out.
Using old cast iron radiators as boilers
There are also such tips. Individual sections of radiators are assembled into batteries; the number of sections is not limited in any way. The batteries are embedded in the firebox and the heating of the bathhouse premises is solved. Everything is beautiful and at first glance quite convincing.
Using old cast iron radiators as boilers
What do professionals say about this?
- Firstly, cast iron radiators are very heavy, which significantly increases the load on small sauna stoves.
Cast iron radiator is very heavy
Some of them are built on floor beams; it is impossible to increase the weight of the structure. You need to make a concrete foundation, and this is expensive.
- Secondly, such radiators can only be installed in stone stoves, while tubular or flat heat exchangers for universal use can be installed in both brick and metal stoves.
Scheme of a stove with a cast iron radiator as a heat exchanger
Heat exchanger connection diagram
- Thirdly, cast iron reacts extremely negatively to open flames; engineers do not recommend installing boilers made of cast iron radiators in the firebox. Where then should they be installed, in the chimney? Big question.
- Fourthly. Cast iron radiators have many different fins to increase the heat exchange area, the surface is uneven, etc. Such design features contribute to the accelerated deposition of soot on them, its presence causes a sharp decrease in operating efficiency. In addition, cleaning the surfaces of radiators is not only difficult, but impossible.
Soot deposits quickly on cast iron radiators
Practical advice. If, after repairing an old heating system, you still have cast iron radiators, then take them to a scrap metal collection point, and buy metal pipes with the proceeds; do not try to save at a loss.
Cast iron radiator
Advantages
A boiler made of brick is considered a simple and effective heating structure, which is advisable to use for heating private houses. The advantage of such a structure is the possibility of making it yourself, which allows you to save a lot, as well as be confident in the quality of the materials used and the finished boiler. The manufacturing process itself consists of a minimum number of steps that do not require a large amount of welding work. Having purchased a ready-made heat exchanger, do not use welding. A brick boiler is multifunctional, as it can be used as a heating device for rooms. Additionally, as a hob for cooking.
In addition, such a boiler has the ability to maintain the required coolant temperature for a long time, allowing you to maintain a healthy and comfortable atmosphere in the room. A brick kiln allows you to burn even plastic or rubber waste. However, it is important to know that the firebox should not contain more than 1/3 of the total amount of fuel.
How to install a radiator in a stove
We will try to give step-by-step instructions for laying a furnace; it is impossible to give a detailed universal procedure; there are too many options both in size and type of heat exchangers, and in the characteristics of furnaces. But knowing the general principles, stages and features, it will be possible to make stoves according to individual drawings. Initial data. A brick stove with an overhead heater, a flat or tubular boiler placed in the firebox, a reinforced concrete foundation, a brick chimney or combined with a tubular one.
Oven base
Step 1. Make a boiler (heat exchanger) of the type you like, coordinate the dimensions with the dimensions of the stove and firebox. Bring bricks, blower and firebox doors, dampers, and heater elements into the room. Prepare the mortar for masonry. For masonry, you can use only clay and sand or add a little more cement for strength. Both options are almost equivalent, but we recommend the second one - it reduces the risk of mortar being washed out in the furnace seams due to water ingress.
Cast iron heat exchanger - photo
Step 2. Check the horizontalness of the foundation and level it if necessary. The horizontal spread is less than one centimeter - do not pay attention, such errors can be easily eliminated during brick laying due to the difference in the thickness of the mortar.
Scheme of laying the furnace and installing a heat exchanger in it
Step 3. Without mortar, lay the base of the stove with bricks, check again that the calculations made are correct. On the order of the base, you can already approximately mark the number of bricks for the firebox, the thickness of the walls, and the specific location of the boiler.
Example of laying the first rows
Step 4. Place the first row on the mortar, it will be continuous. The second row should already take into account the location and size of the blower.
Practical advice. There are options for modern stoves that can keep wood burning for a long time. In such designs, in most cases there is no ash pit with grates; the intensity of fuel combustion is regulated by the amount of air supplied through special vents. We do not recommend using this option for a bath. Prolonged combustion of fuel does not increase its heat transfer, but extends it over time. The oven will be warm for a long time, but never hot. And the steam room needs to be heated to a high temperature as quickly as possible.
Step 5. For the height of the ash pan, three rows of bricks are enough; the specific dimensions must be coordinated with the dimensions of the door. You should select the sides of the bricks for the grate; do this with a grinder with a diamond blade. It is better to lay the last row under the grates from refractory bricks. Make the entire inner surface of the firebox and the first few rows of the chimney from refractory material. If it’s not possible, don’t be upset. Practice shows that stoves made of ordinary bricks do not crumble for 5–8 years. And this is with daily heating. About how many times a year will the stove in the bathhouse be heated? Add to this the protection of the furnace walls by the boiler, perform simple arithmetic calculations, and the result will calm you down.
Beginning of laying the stove - part of the firebox is laid out and the grate is installed
The first rows of the stove are done, it’s time to start laying the boiler (heat exchanger). This is a more complex process and requires increased care.
Laying the boiler (heat exchanger)
The firebox of the stove must accommodate the boiler and be large enough to accommodate several stacks of firewood at the same time.
Step 1: Place the tank on the top row of bricks. Adjust its position so that you have to trim the minimum number of bricks. If you made the heat exchanger flat in the shape of the letter P, then try to place it as close as possible to the outer walls. At the same time, look at the position of the inlet/outlet pipes; their length should be approximately 5÷10 cm greater than the thickness of the firebox. Do not make a flat heat exchanger with a top heating surface, this will make it much more difficult to heat the heater to high temperatures. It will have to be done in the chimney, and it is quite difficult to achieve a high heating temperature in this place. In addition, the volume of stones is limited, which will certainly reduce the rate of heating of the steam room and the duration of maintaining the required temperature.
A heat exchanger is installed inside the fireclay core
Step 2. Start lining the cauldron with bricks. For a flat boiler, you can use ordinary red bricks; the heating temperature of the walls will be minimal. For tubular heat exchangers, it is better to use refractory material around the perimeter of the firebox. We have already mentioned one of the important advantages of boilers of this type - the outer surfaces of the stove can become very hot. This means that the sides of the firebox should be protected from thermal destruction.
Step 3. After two rows, start leaving a hole for the firebox door, standard sizes or adjust it yourself. The front wall of the firebox should also be made of fireclay bricks.
Step 4. If the stove is large, then make channels for cleaning and close them with doors; for small structures this is not necessary. Periodic cleaning can be done without any problems through the installation area of the heater. The stones are removed, the metal plate on which they were lying is removed, and access is opened to completely remove soot from the stove.
Step 5. Lay rows of bricks along the height of the boiler, constantly checking their position with a level. If you do the dressing correctly and observe the spatial position of the bricks, then the seams between them will always be the same in thickness. At the level of the firebox door, you need to put a metal strip to cover its upper part with bricks.
Step 6. Start preparing to install the heater. The heater can be placed on a thick (about 4÷5 mm) steel sheet; the dimensions must correspond to the dimensions of the firebox with the heat exchanger installed in it. If it is difficult to get such metal, then you can purchase a cast-iron cooking stove with a set of rings for closing the holes in the store.
Important. The dimensions of the hobs are standard and do not always correspond to the dimensions of the boiler you made. If the slab is a little larger, then there is no problem; make recesses in the bricks according to the thickness of the metal and place the slab. If it is smaller, then you need to narrow the gap above the firebox. This should be done in several rows, the specific amount depends on the size of the stove and firebox.
The bricks should not protrude more than one third of the length; only in this position can they be securely fixed in the next rows. Doesn't it work out that way? Then use metal plates or rods, embed them in the seam and place part of the protruding bricks on them. When laying the side surfaces of the firebox, make holes for the heat exchanger pipes.
Overlap
Step 7. Start laying the chimney. Its location should be determined before laying the furnace. The dimensions of the internal passage must ensure constant and sufficient traction.
Pipe and its parts
Ordering the otter and fluff of a chimney with a cross section of 270x140 mm
Choosing the chimney length
Important. Make sure that the chimney is not located under ceiling beams or rafters. This is a big mistake and it will take a lot of time to correct it.
A damper must be installed in the chimney. If you wish, you can not make the entire chimney out of brick, but install a metal pipe after the damper.
Prices for fireclay bricks
fireclay brick