How to increase the efficiency of a stove in a house or bathhouse
Many owners of private houses still do not give up the good old stove, sometimes using it for heating or burning garbage. There are also houses in which the stove is still the main source of heat during cold winters.
Be that as it may, the stove must burn well and also cope with the task of pumping hot air into the rooms. If the stove does not burn or the fuel does not completely burn out in it, then there can be no talk of any good efficiency.
In this case, we advise you to listen to our tips on how to increase the efficiency of the furnace several times. Perhaps this article from a construction magazine will help solve the problem with the operation of the stove once and for all.
Do-it-yourself metal sauna stove according to the drawing
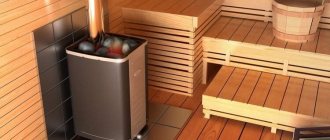
A bathhouse cannot exist without a stove.
It heats the room and maintains the optimal temperature. There are a large number of stoves on sale in a variety of models that meet all the requirements. However, the most popular are considered to be do-it-yourself drawings of metal sauna stoves, from which it is quite easy to make a device that is ideally suited to specific conditions. A do-it-yourself metal sauna stove is becoming increasingly popular, gradually displacing traditional brick products. Iron heating bath devices are widely used in our country. Their advantages include:
- Quick heating of the steam room, which is 1.5 hours. Metal gives off more heat than stone or brick.
- The possibility of carbon monoxide poisoning is excluded. The metal sauna stove draws all combustion products into the chimney.
- If you heat a sauna with damp wood, there is no possibility of smoke formation.
- The metal stove is very compact, so it is ideal for small baths.
- Judging by the drawings and diagrams of stoves made of this material, you can see that it is very easy to manufacture, and the costs for it are very small.
- A stove in a bathhouse can last a very long time, but this depends on the quality of welding and the thickness of the metal.
The disadvantages of iron stoves include:
- It cools too quickly, so it has to be heated all the time.
- The walls of the metal stove become very hot, and nearby objects can catch fire.
- Due to its small size, it is not suitable for use in large baths.
Factory-made sauna stoves are very different from each other in their design, not to mention home-made stoves. They can be of any shape and made of various materials, for example, steel sheets, barrels, pipes. A sauna stove can be made with your own hands in this way: in one room there is a firebox, and in another there is a stove.
Basically, metal structures consist of a firebox, a heater and a water tank.
The combustion process takes place in the firebox, so a door is made through which firewood will be loaded, and an air hole is made - a vent. The ash is removed through a special grate - an ash pan.
From the firebox, hot air enters the heater, which is filled with stones. To ensure optimal heat transfer, the stones are placed on a grate connecting the firebox and the heater. To spray the stones with water, a special door is made on the side of the stove. The hot air then rises to the water tank. Water is poured into the tank through the top, and a tap is welded at the bottom of the tank to drain it.
Required materials and parts:
- Steel sheet having a thickness of 8 mm.
- Metal pipe 5–10 mm thick.
- Square 10x10 mm.
- Doors for the firebox, vent and heater.
- Chimney.
- Grate.
- Tap water.
Required working tools:
- Bulgarian;
- metal scissors;
- welding machine;
- measuring tool.
Many do-it-yourself drawings of metal sauna stoves involve the use of ready-made elements. These can be grilles and doors. These elements are chosen because cast iron products are fixed differently.
To make a firebox, you need a metal pipe about 2 meters long, the walls of which should have a thickness of 5–10 mm. It is divided into two sections: for the firebox and heater (0.9 m) and for the tank (0.6 m). The remainder will be needed to make a ash pan and doors for the firebox.
A hole is made in the pipe for the blower, 0.2 m wide and 0.5 m high. Then a metal plate should be welded above it, on which the grate is laid. It's better to buy it in a store.
The furnace door should have dimensions of 20x25 cm. Rods are welded above it for the heater. Since the heater weighs a lot, the welded rods or square must have a size of at least 10 mm. In this case, the heater door should open into the steam room, and the firebox should be located opposite the entrance.
After this, the heater is filled almost to the top with special stones. It can be diabase or soapstone. Stones containing mica are prohibited. It contributes to the release of carbon monoxide, which is life-threatening.
It is also not advisable to put granite in the heater because of its large crystals, which begin to crumble under the influence of high temperatures. It is best to use stones with small, small crystals.
A metal chimney cover should be welded above the heater. After this, a water tank is installed, although in many baths it is not required.
DIY drawings of metal stoves stipulate that the location of the water tank will be above the heater. A plate 8 mm thick is welded above it, in which a hole with a diameter of 150 mm is made for the chimney. Then the chimney pipe and the pipe blank for the tank are welded to the plate. The hole for the pipe is made next to the rear wall of the structure.
The part of the tank on the chimney side is covered with a semicircle made of steel sheet, in which a hole is made for the chimney pipe. which is welded to it. The other part of the tank will fill with water. A special lid with a handle is made for it.
When creating drawings of an iron stove for a bath with your own hands, special attention is paid to the chimney, and specifically, to the places where it passes through the roof. This is necessary because during combustion the pipe heats up very much, and to prevent it from catching fire, it must be insulated. To ensure normal traction, it is placed at a certain height.
To install a metal stove in a bathhouse with your own hands, you must adhere to the following recommendations:
- It should be installed at a distance of 1 m from the walls.
- Place it next to the chimney.
- The structure should be installed on a foundation made of fire-resistant materials.
- The wall near which the stove is installed is covered with foil and insulation.
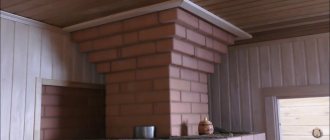
After installing a metal stove, it can be lined with brick. which will not only give it a beautiful appearance, but also protect it from accidental burns.
A very important detail. If you have made a metal stove in your bathhouse yourself, don’t forget that the floor under the ash pit should always be made of tin or tiles. generally made of non-flammable material.
Thus, having a drawing in hand and possessing metal carving skills and experience in handling welding, you can easily make a sauna stove with your own hands. It will work even better than a store-bought one.
Shuvalov Pyotr Vasilievich
A stove in a bathhouse is a mandatory attribute, since it is responsible for heating and subsequent maintenance of temperature. At the same time, there is a whole range of factory-made brick products or structures that best meet the necessary requirements. However, drawings of homemade metal sauna stoves are especially popular, which make it possible to make a small device that is ideal for specific conditions.
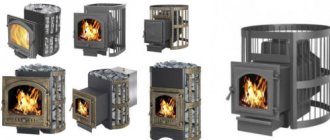
Amateur photo of a simple homemade metal stove
Now the bathhouse has become not only a place where you can wash yourself, but here visitors receive wellness treatments that heal the body and soul. Often those who like to take a steam bath in their own sauna building prefer to assemble a heating unit for it with their own hands. To do this, they may need drawings of a sauna stove.
For many years now, metal stoves have been competing with traditional heating structures made of bricks. They are installed both in private households and in bathhouse buildings.
The demand for metal units is explained by the presence of important advantages:
- heating for a short time;
- affordable price;
- high thermal conductivity;
- there is no need to build a high-strength foundation;
- simple installation process.
The last advantage is especially important for those who plan to make such a device themselves. But for this you need to be able to read the drawings of a metal sauna stove. You should also know that if such a unit is used irrationally or the technology for its manufacture is not followed, there is a high probability of a fire.
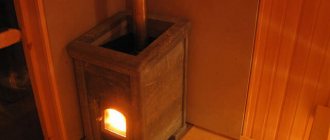
The simplest example of a DIY metal sauna stove design is considered to be a potbelly stove. It consists of a box equipped with a pipe and a door. Its main disadvantage is insignificant heat transfer with high fuel consumption. Therefore, now the potbelly stove is used extremely rarely.
Modern metal units have a higher fire safety class. They are made from sheet material, the thickness of which does not exceed 4-5 millimeters. They have a thermal chamber for filling stones (read: “How to place stones in a sauna stove correctly, which stones are best to use”). Often their design solution provides for the possibility of installing an additional water tank with a volume of up to 70 liters.
In order to ensure uniform heating of the air in the unit and reduce its fire hazard, the lining is made with fire-resistant bricks. If there is no need to create a particularly strong foundation for the furnace, it will be sufficient to have a large base, which can be a cement slab covered with tiles, or a metal sheet, or fire-resistant brick.
The performance of the unit and how convenient it is to operate depend on this parameter. As practice shows, stoves with a cylindrical shape and a shaped or horizontal design are in high demand.
But the most convenient to use are rectangular units. The reason for this is the presence of corner zones, which rarely become as hot as possible. As a result, there is an opinion that such a frame helps maintain the shape of the stove. In addition, the uniformity of heating of the unit depends on this parameter.
Proper heating also affects the stability of a metal heating structure. This is confirmed by the fact that the walls of round and cylindrical furnaces are reinforced. And although the high degree of stability of the rectangular structure is explained by the presence of cold corners, it still loses its original shape over time.
Stage 1. The metal structure being manufactured will have a closed heater and in order to use water and get steam it is necessary to open the door slightly. First, prepare materials and tools. To simplify the manufacturing process, you will need a diagram of a stove for a metal bath.
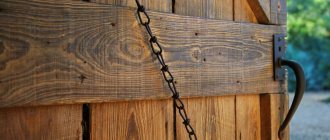
The wall behind the stove An option for protecting a wooden house from accidental fire
The wall behind the stove (more precisely, its protection) is a very important issue of fire safety. This issue is especially relevant if the house is wooden. And for good reason! After all, a negligent attitude towards such a place as the “stove wall” can lead to disastrous consequences.
To neutralize the dangerous effects from the main heater in a building on walls located close to it, various methods and construction technologies are used. Starting from the use of protective mastics and impregnations that are used to treat the wooden surface, and ending with the arrangement of so-called “fire-retardant shields”.
In the first case, the wall near the stove retains its original appearance. Those. a wooden house remains that way internally. This option will be useful when you want to preserve the image of wood in the interior. But there is one significant drawback. Over time, wood shrinks, becomes deformed and even cracks. And this leads to the formation of “weak points”. And to neutralize the possible risk of fire, the wall behind the stove requires periodic treatment of the wooden surface with protective agents.
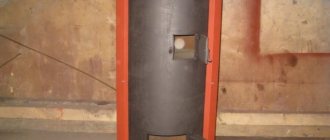
The second option is more durable and more reliable. He suggests that insulation of the walls from the furnace is carried out by installing a fireproof shield. Let's look at this option in more detail using an example.
The easiest way is to install a sheet of metal to the wall of a wooden house from the stove side. Yes - simple and fast. But this approach will clearly harm the interior of the house! In this case, decorative finishing of the wall behind the stove will be difficult. And, besides, the efficiency of such a design will not be the highest.
There are many options for arranging a shield. And here is one of them. The wall near the stove is lined with non-flammable thermal insulation to reduce the impact of hot air on the wood, and the top is covered with non-flammable sheet material to prevent the surface from igniting when a coal or spark hits it. It usually consists of a sheet of metal (not the best option), fireproof gypsum plasterboard, LSU, etc.
So, we've sorted out the materials. Next, let's look at an example of how a wall near a stove is insulated from harmful influences.
First of all, the wall behind the stove is prepared for work. We remove sawdust and other debris that is on it. This, of course, is not necessary, but it will not be superfluous.
Next, a metal profile and self-tapping screws are used. With their help, we equip the frame of the future “thermal shield”.
When the frame is ready, we install thermal insulation slabs of stone wool into it...
... and sew it up with LSU sheets.
31, total, today
Eight ways to increase efficiency
The efficiency of a wood-burning stove varies between 60-80%. It all depends on its design, the length of the chimney, the materials used for its construction and the firewood used. The efficiency increases significantly when using birch and oak logs with a humidity level of 13-15%. The higher the humidity, the less heat transfer and the more resin will remain on the internal surfaces.
You can increase the heat transfer of a potbelly stove and increase the efficiency indicator in the following ways - here is a list of them:
- Providing pyrolysis combustion of wood - it increases efficiency by 5-10%.
- Creating smoke circulation – the main task here is to maximize heat extraction from combustion products.
- Creating a natural convection system will improve the airflow of the potbelly stove, increasing heat transfer and accelerating the heating of the room.
- Fan blowing - as in the case of natural convection.
- Lining the potbelly stove with bricks retains heat and stabilizes the temperature.
- Increasing heat transfer through an air heat exchanger is a complex but very effective method.
- Increasing the length of the chimney is important if there is free space in the room.
Let's look at each method in more detail. All the modifications presented in the review can be done using the example of a simple rectangular potbelly stove.
It is quite easy to increase the efficiency of a potbelly stove - you just need to improve the heat extraction. In traditional stoves, it instantly evaporates into the chimney. As a result, the efficiency remains low, and the stove “heats the street.” In other words, you literally throw away about 30-40% of the wood, it goes to waste. The problem is solved in a simple way - you need to retain the heat inside the potbelly stove for as long as possible. For this purpose, two smoke circulations are organized in it. They allow you to increase resistance, causing heat to escape into the walls.
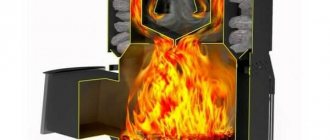
This problem is best solved at the initial stage of assembling the potbelly stove. Weld two pieces of sheet iron into it, as indicated in the drawing. They form two smoke circuits. Passing through them, combustion products will give off heat to the maximum. And only after that they will go up the chimney.
Scheme of a stove-stove.
Pyrolysis combustion
Combustion products are full of heat and contain flammable elements. Afterburning them with secondary air allows you to extract additional kilocalories. To achieve this, wood is burned with limited supply of primary air. The next task is to burn out what is contained in the combustion products. Pyrolysis gases burn releasing a large amount of thermal energy. It is absorbed and emitted by the metal walls of the potbelly stove. Due to this, we will be able to increase its efficiency.
To organize pyrolysis combustion, you will need smoke circulation from the previous section. At the level of the first turn, the supply tube is welded. Secondary air is supplied through it. In its presence, the pyrolysis products are burned out - the efficiency increases by 5-10% of the initial value. On a monthly basis, this will result in savings of several tens of kilograms of firewood. Be sure to provide for the supply of “secondary” if you have already made smoke circulation.
Increasing the efficiency of a potbelly stove with your own hands involves creating a convector. Natural convection improves heat removal and ensures quick heating of the room. By installing a stove with a convector in the garage, we will get an excellent heating device. Literally 15-20 minutes after ignition, a comfortable temperature will be established in the garage. Our task is the following - we need to create a convector that sucks in air from below and exhausts it from above.
The easiest way to increase efficiency is to equip your potbelly stove with a metal screen. It is a sheet of iron that wraps the stove on the sides and back like a shirt. The distance between the body and the sheet is from 3 to 5 cm. The sheet is welded onto metal spacers - make them from thin reinforcement.
Fins will help increase the efficiency of a potbelly stove. It can be done:
- From a profile rectangular pipe 20x40 mm.
- Made from a U-shaped metal profile.
- From a traditional round inch pipe.
We scald the back and side walls with the selected material. This will help increase the dispersion area. At the same time, we will get an effective convector.
Forced convection is more effective than natural convection. And it’s not so much a matter of efficiency, but rather the speed of heating the room. For these purposes, you need to use any fan – even a household one. We place it 50-60 cm from the stove, connect it to the power supply, turn it on and enjoy the result. A powerful air flow will effectively remove heat from the surface of the stove and distribute it throughout the room. The costs are minimal - you only need an old fan with a low noise level so that it does not put pressure on your ears.
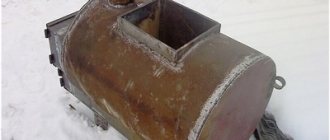
Quite an interesting way to significantly increase the efficiency of a traditional potbelly stove. To do this, we take the following steps:
- Take a small old gas cylinder or other metal container.
- We weld metal tubes between the bottom and the lid.
- We make cutouts in the side walls to suit the diameter of the chimney.
- We cut the chimney and weld the resulting module into it.
Such a non-trivial solution will significantly increase the efficiency of your potbelly stove.
The result should be a design like the one in the picture below. Next, all that remains is to install a fan opposite the module, blowing air through the tubes. This step will help increase efficiency by removing the heat remaining in the combustion products.
In other words, our task is to cool the combustion products as much as possible, removing all remaining thermal energy from them.
It cannot be said that this method allows you to radically increase the efficiency of a metal potbelly stove. It provides:
- Maintaining temperature when the flame goes out.
- Safety of using the stove.
- Creation of natural convection.
- More uniform heat transfer.
Increased efficiency can be achieved in other ways. As for the brickwork, which follows the contours of the rear and side walls, it only complements other technical solutions.
Increased efficiency is achieved by increasing the total length of the chimney. Moreover, it is not the vertical part that increases, but the horizontal one. The bottom line is that combustion products will heat the metal of the chimney, which is why most of the heat will be retained indoors. The gases at the outlet of the chimney will become much colder.
When increasing the length of the chimney pipe, it is necessary to place the potbelly stove at one end of the room, and place the chimney itself at the other end. The horizontal section of the pipe will connect the chimney to the stove and ensure efficient heat removal.
An additional way to increase efficiency is to retrofit the chimney with convection pipes. This step will increase the heat transfer area and create additional convection.
This step will increase efficiency by 1-2%. We will not touch the stove itself, but will cover the corner in which the potbelly stove is installed with galvanized iron. Thus, we will prevent some of the heat from escaping into the walls, directing it into the heated room. Fireproof thermal insulation can be laid between the iron sheet and the wall.
Manufacturing process
To begin with, it is necessary to say that there are a number of similar products that differ in their design and operating principle. Therefore, the drawings of stoves for metal baths are different. However, they all have approximately the same principle of operation (see also the article “Pipe sauna stove: manufacturing tips”).
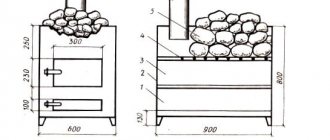
The simplest drawing of a sauna stove
- First of all, you need to make a firebox. Everyone determines its dimensions himself, but professionals advise making it the same height for a width of 0.5 meters.
- Many drawings of a homemade metal sauna stove involve the use of some ready-made elements. These include grilles and doors. At the same time, craftsmen advise choosing these parts made specifically from metal, since cast iron products will have to be fixed in a special way.
Project for the manufacture of a metal structure with a detailed indication of the necessary elements and their dimensions
- A typical drawing of a stove for a metal bath assumes that the firebox will consist of two sections. In the first of them, fuel is burned, and the second is needed to collect ash. Taking this into account, they are separated by a grill and made into separate doors.
- It is worth noting that the window of the ash collection sections is often used to create draft, which is necessary for combustion.
- If the drawing of a metal sauna stove involves the placement of a heater, then the upper part of the firebox is also made of a grate
Advice! To make a stove, you should use thick metal. This way the structure will not behave when heated, and it will be able to generate more heat.
Detailed drawing in correct format
- Above the firebox it is necessary to make a separate chamber with a door, which will be separated by a grille.
- Special stones will be placed in it to maintain the temperature for a long time.
- At the same time, the drawings of a metal sauna stove recommend making a closing window that can be used to supply water and create steam.
- It should be noted that ordinary stones are not suitable for such furnaces. This especially applies to material containing silicon or other inclusions.
- The top of this compartment is made with a hole for the pipe. It will remove smoke and at the same time heat the water.
The operating principle of such furnaces
- The liquid container is installed on top. At the same time, drawings of metal sauna stoves recommend that the stove pipe pass through its middle. This way the water will heat up both from the chimney and from the top surface of the sauna heater.
- Professional craftsmen recommend installing a tap on the bottom of such a tank. In this case, you need to purchase special devices, the price of which can be high, but they will be able to work for a long time under conditions of constant temperature changes.
Two options for creating horizontal devices
Special attention is paid to the lid of the container. It can be made of wood, but then you need to protect the area of contact with the chimney. At the same time, the installation instructions advise making small slits in it to allow free steam escape.
Advice! Such a structure is usually made of thick-walled pipe. This helps solve the issue of cheap materials, since such products can be found at recycling centers at similar prices.
Project of a metal stove for a bath with proper installation and organization of the chimney
When creating a drawing of a stove for a metal bath, special attention is paid to the chimney, namely to the places where it will pass through the roof. The fact is that the pipes during combustion have a fairly high temperature and in order to avoid fire they need to be additionally insulated. They must also be located at a certain height in order to create constant traction.
Proper organization of the chimney
When creating ovens with their own hands, many craftsmen advise purchasing ready-made products that are made specifically for these purposes to organize such passages. At the same time, they are quite often produced in the form of an integral complex with an outer pipe and a fungus.
You also need to think about a protective screen, the purpose of which is to prevent the impact of high temperatures on wooden walls. It is best to create them with a reflective surface to remove infrared radiation. These products are often sold ready-made and have a relatively low cost.
Factory-made products for organizing smoke removal have a good appearance and do an excellent job of their tasks.
In the video presented in this article you will find additional information on this topic. Also, based on the text presented above, we can conclude that the principle of making metal stoves is quite simple. At the same time, there are a lot of different designs that have their own specific features and characteristics (see also the article “Drawings of a metal stove for a bath with your own hands: how to build a heater in a steam room with high efficiency”).
Special attention should be paid to some factory products, which are presented in the form of doors, chimneys and grilles. They will significantly simplify the manufacturing process, which means it is worth developing drawings on their basis.
In order to increase fire safety when installing a homemade metal unit, you must strictly follow the rules for its installation, which are as follows:
- The distance between the wall and the stove must be at least 100 centimeters.
- It is necessary to provide additional protection and, for this purpose, place foil containing a layer of insulation on the wall closest to the heating structure. These measures make it possible to promptly prevent overheating of wooden elements and their subsequent fire.
- To insulate the chimney, it is better to make it from a sandwich pipe. It consists of two pipes of different diameters, between which there is a thermal insulation layer.
- When combustion products are planned to be discharged through a metal pipe, a special passage unit is installed at the point where the ceiling touches the chimney.
When the installation process of the unit is completed, you can finish it with brick, which will prevent the possibility of burns and give the appearance an aesthetic appearance. In this case, the stove can be placed closer to the wall.
The above-described design is considered one of the simplest to install and easy to operate.
It should be noted that the manufacture of a heating unit from metal cannot be called an overly complex process. In order to correctly carry out the assembly and subsequent installation, before starting work, it is advisable to find and view approximate drawings of iron sauna stoves with your own hands and choose the most suitable option.
Practical lessons
And now about each action in detail.
Some pioneers in bathhouse construction are wondering: how to determine the location of the pipe? To avoid further frustration, remember: this location is determined at the stage of drawing up the steam room design.
When marking, it is important to determine the vertical axis of the pipe. The beginning of the layout is the outlet pipe coming from the stove
The axis starting from this structural element, resting on the ceiling, is the center of the skylight that you have to make. If the steam room has an attic, then the axis extends all the way to the roof.
And don’t forget about the rule: the distance from the chimney to the ceiling is at least 13 cm.
Your photo tip for installing a pipe for a bathhouse
What dimensions should the ceiling trim for the chimney have? Many people think that these parameters depend on the materials from which the chimney is made
This is not so, the only important thing is that the structure does not touch the ceiling, but is not too far from it, since the hole will be difficult to repair, and besides, the heat that is so necessary in the steam room may subsequently evaporate through it
You probably already remember about the gap of 13 cm, now understand one more indicator - the thickness of the insulating sandwich should not exceed 5 cm. Are you afraid that the insulation will slip out and fall down? Don't worry, the iron sheet that you attach below will serve as insurance against such situations.
This is how the finished structure should look from the inside
Many people confuse the purpose of the insulating layer, thinking that it is done for beauty, to make it cozy inside. Not only that, its main mission is to protect the steam room from fire and cold. The ideal materials are fiberglass, asbestos, mineral or basalt wool.
However, insulating the hole is not enough; you need to additionally create a heat-reflecting screen around the chimney, which we already briefly mentioned above. A piece of polished stainless steel, ideally with a mirror coating, will do an excellent job as a screen. Creating the greatest possible reflective effect for infrared waves is your goal when installing an iron surface.
To reduce the opening, a ceiling-passage assembly is constructed, providing a kind of air gap, which serves as additional insurance against heat leakage from the steam room.
Construction assembly details
You already know the wisdom of the process, let's assemble the device? So, the cutting of the bath consists of:
- iron sheet;
- boxes;
- clamp.
The box is a kind of shell that protects the tree from fire
A galvanized box with parameters 40x40 cm is installed from the attic side. And from the inside of the bathhouse, an iron sheet is attached to it, the dimensions reaching 50x50 cm. The pipe at the lining is covered with a clamp in order to avoid stress on the stove. And only after that, insulation is placed into the hollow part of the body - usually the surface is covered with insulation and covered with expanded clay. Then you can install the final fragment - part of the pipe going through the roof to the street.
Types of fuel and types of stoves
Bathhouse appliances differ in the type of fuel used for their operation:
- Wood burning units. They appeared earlier than other types of metal furnaces. They require a considerable amount of firewood to release thermal energy, and they also need constant care. Typically, they are preferred by those bathhouse visitors who can wait until the room warms up and then slowly enjoy the fragrant steam and warmth coming from natural wood.
- Electrical devices. In this case, the design of a metal sauna stove consists of several main components: a body equipped with a heating element, and special heat-insulating elements.
- Gas units made of metal. They are rightfully considered the most modern and reliable designs; they are equipped with a thermostat to regulate power. The safety of gas appliances is ensured by a safety device that is instantly activated when the gas supply is turned off or reduced.
Products used
The following materials can be used for chimney insulation:
- mineral wool;
- glass wool;
- brick;
- slag slabs or heat-resistant cement mortar.
The insulation of a chimney depends on the material from which it is made. If the pipe is steel, then construction wool is used. The design consists of 2 parts (length does not exceed 1.5 m), which simplifies compaction of the insulating material. The size of the casing should be 12 cm larger than the diameter of the pipe.
The first part of the structure is first put on. Then the insulation is applied evenly. The second part of the chimney is installed. The building is insulated. The pipe is installed with a slight slope. The resulting gap is covered with cement mortar.
A steel chimney consists of 2 pipes of different sizes. A protective casing is placed on the smaller pipe (chimney). A thermal insulation layer is laid between the pipes. A pipe with a smaller diameter is placed in a structure with a larger diameter. The gap formed between the pipes is filled with construction wool.
A brick chimney is insulated using the following technology:
- applying the base;
- installation of reinforced mesh;
- sealing cavities and cracks with a solution;
- applying plaster in several layers (their thickness should not exceed 5-7 cm);
- complete thermal insulation;
- mineral wool is cut taking into account the size of the chimney;
- fixing the heat insulator with metal tape or wire;
- lining the pipe with ceramic or asbestos slabs;
- plastering the surface.
This method of thermal insulation allows:
- reduce heat loss by 2 times;
- seal the chimney;
- prevent the formation of condensation and destruction of the chimney;
- improve quality and safety.
Furnace insulation is a necessary procedure for a high-temperature furnace used to heat a home.