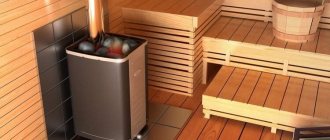
Homemade sauna stoves made from pipes are an excellent alternative to factory-made sauna stoves. In addition, many people cannot afford the purchase of powerful factory-made structures, in which case making a sauna stove from a pipe with your own hands will come in handy more than ever.
Making a sauna stove from a pipe only at first glance seems like a complex and large-scale process. In reality, it is enough just to have some skills in working with a welding machine, as well as the basic necessary materials.
Among other things, using part of an ordinary water pipe to equip the furnace is the most economical way. Such a mechanism will work perfectly in any room, regardless of its area.
Important! The pipe bath stove has an all-welded body, which completely eliminates the leakage of carbon monoxide, which means that the use of the structure is completely safe for the health of steamers.
Design selection
Homemade sauna stoves are made not only from pipes, but also from other suitable materials, for example, sheet metal and gas cylinders.
In most cases, metal sheets produce a rectangular body, which in many respects is worse than a round pipe body.
It should also be noted that it is difficult to install a stove using metal sheets, because in the process it is necessary to cut, make blanks and fasten them correctly. In the case of a sauna stove made from pipe 530, everything is much simpler, since here the work is carried out on a ready-made firebox.
Information. Round sauna stoves are much easier to clean and also have better heat exchange with the surrounding air.
Advantages of pipe 500
Let's take a closer look at the advantages of a cylindrical pipe over other possible materials for making a sauna stove.
So:
- The rounded cylindrical firebox is very similar to the ideal spherical one, due to which, from the point of view of heating engineering, it is superior to rectangular-shaped stoves;
- In most cases, thick-walled pipes are used for the manufacture of sauna stoves, which significantly increases the technical parameters of the design;
- Also, thanks to the thick walls of the water pipes used, the service life of the sauna stove is quite long. At the same time, the dimensions of the mechanism allow it to be moved and transported.
Of course, this design also has very significant disadvantages, which partly come from the same advantages, since processing pipes of similar thickness will require much more materials and more powerful tools.
Material characteristics
Before starting work on arranging a homemade stove, it is important to choose the right pipe itself.
Each of them has a marking, the constituent numbers of which determine the following:
- The way the pipe was made;
- Production standard;
- Pipe size;
- Steel grade.
In order to choose one or another version of the pipe, you need to find out the dimensions from its markings.
For example, the designation 500x10 tells us about the pipe diameter and wall thickness.
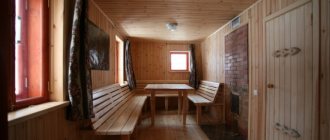
A homemade sauna stove made from a pipe of horizontal as well as vertical configuration should heat up as evenly as possible in the shortest period of time.
Of course, the amount of fuel spent in this case should be minimal.
The following sizes are considered the most suitable:
- The diameter of the pipe used must be no more than 550 mm;
- The optimal wall thickness is from 9 to 13 mm.
Attention! A stove with similar dimensions will allow you to warm up the room as quickly and efficiently as possible without consuming a lot of energy resources. In this case, the metal pipe will not be subject to changes in size due to critical temperature changes.
Blueprints
The first step in any construction process is drawing up drawings.
Thanks to the drawings of a stove for a bathhouse made from pipe 530, the places for installing all components are thought out in advance, that is, all possible risks are eliminated.
Information. You can make a drawing of a stove for a bath from pipe 400 yourself, but in this case you must have the necessary knowledge and skills for this.
Of course, if you do not have experience in such matters, you can use ready-made drawings or seek help from professionals.
What you will need
Making a sauna firebox without the help of a professional requires maximum preparedness, especially in terms of consumables and required tools. For this work we will need:
- A small piece of pipe;
- The main section of metal pipe, the length of which must be at least 150 cm and the diameter - 50 cm;
- Sheet of metal with a thickness of at least 12 mm;
- Metal rods. They are used to create grate bars. You can also purchase ready-made grate bars in specialized stores;
- Bulgarian;
- Metal doors. They can also be purchased ready-made or made yourself;
- Metal hinges, if the doors are made independently;
- Welding machine.
Important! In order to save money, it is recommended to purchase sections of pipes rather than whole ones.
Horizontal design and its manufacturing process
Before starting work, a larger pipe should be cut into two parts using a grinder.
The first section should be 60 cm long, and the second – 90 cm.
The larger piece will serve as a firebox, and the smaller one will serve as a water tank.
Next, let's move directly to the steps of making a stove from bath pipes:
- At the bottom of the larger pipe, it is necessary to make holes with a height of 5 cm and a width of 20 cm. They will be used to construct a blower;
- A metal plate is attached above the ash pit using a welding machine;
- It is necessary to leave space in the ashpit for attaching the stove grate. For it you need to prepare four ears;
- Next, a compartment for the furnace is made in the pipe;
- The completed firebox must be covered with a special metal door, for fastening which hinges are used;
- A smaller piece of pipe is fixed above the firebox, intended for use under the heater;
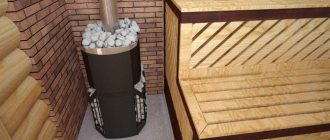
- Half the volume of the heater is filled with large stones;
- A metal rail is attached to the top of the sauna stove, and the same is done with the side of the stove;
- The top of the tank is covered with a metal sheet, leaving a connector for the chimney. You should also install a door for pouring water into the tank;
- Next, the chimney is attached by welding.
Vertical: manufacturing methods
The installation technology is not much different. So:
- A part with a height of 90 cm is cut off from the larger pipe;
- A metal circle of the same diameter as the pipe is attached to the bottom of the pipe. This forms the bottom of the oven;
- Connectors for the blower are also cut out at the bottom of the vessel;
- Attach the grate bars so that they are above the ash pan;
- A rectangular connector is cut out from the top of the grate, which will later serve as a place for the firebox;
- Installation of a place for stones;
- Each hole is covered with a metal door. They are attached to special hooks or loops;
- A hole is cut out on top of the stove for the chimney;
- As a result, the stove is carefully sanded and painted.
Determining the volume of the expansion tank and its selection
For normal heating operation, the expansion tank must have sufficient volume. There are two ways to determine it: you can calculate it using a formula, or you can use empirical data.
The volume of the expansion tank for heating is selected for each system
Empirical path
Let's start with the empirical method. Based on operating experience, it was concluded that if the volume of the expansion tank for heating is about 10% of the total volume of the heating system, this is sufficient. The question is how to determine the volume of the system. There are at least two ways:
- Count when filling (if it is filled with water and there is a meter, or when filling with coolant from canisters, you will know exactly how much liquid was pumped in).
- Calculate by volume of system elements. You will need to find information about how many liters fit in one meter of pipe, in one section of the radiator. With this data you can already find out the volume of the heating system.
Coolant volume in pipes of different diameters
Knowing how many liters of coolant are in your heating, it is easy to calculate the required volume of the membrane tank - it should be at least 10% of this figure. In the case of an open type tank, the actual volume can be at least doubled - there is less chance that the tank will be empty. At a minimum, you should add half - you will still underfill it by at least 1/3.
A membrane expansion tank for heating is usually taken without overestimating the calculated figure. The fact is that the larger the capacity, the more expensive the expander costs. And the price increase is significant. However, you should not take a smaller one - the pressure will “jump”, which will lead to early wear of components or even shutdown of the system. It is most likely that the heating will fail in cold weather, because in cold weather the coolant is hotter, which means its volume is larger. And it is at these moments that the volume of the expansion tank may not be enough. If you notice such symptoms and the calculation confirms that your membrane tank is of insufficient size, it is not necessary to change it to a larger one. You can put a second one. It is important that their total capacity is not less than the calculated value.
If there is antifreeze in the system
Heating antifreeze has greater thermal expansion than water. Moreover, different brands have different characteristics. Therefore, for this type of coolant, it is advisable to pre-calculate the volume of the expansion tank.
There are two ways: determine how for water, make an adjustment for greater thermal expansion. It depends on the percentage of ethylene glycol (antifreeze). For every 10% glycol, add 10% volume. That is:
- 10% ethylene glycol - must add 10% of the found volume of the water tank;
- 20% ethylene glycol - add 20%, etc.
This calculation is usually justified, but more accurate figures can be found using the formula (shown in the figure).
Formula for calculating the volume of an expansion tank for a heating system
Once you have decided on the volume, it's time to buy an expansion tank. But in the store they are in different colors. At a minimum, there are blue (cyan) and red. So, the membrane expansion tank for heating is always red . Blue ones are for plumbing, and for cold water. They are much cheaper, but the membrane there is made of rubber not suitable for high temperatures. So it will not last long in the heating system.
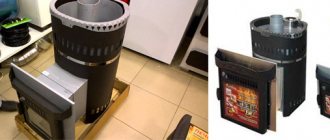
From a gas cylinder
In any metal furnace, the weak points are the seams, since they are the ones that begin to collapse first under the influence of temperature changes.
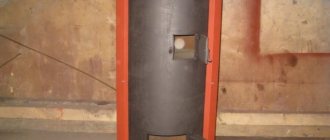
That is why the optimal way out of the situation was found - making a stove for a bath from a cylinder, as well as from a pipe. The number of seams in this case is minimal.
Among other things, the cylinders are an almost completely ready-made container for equipping a heater. You just need to cut a few holes and install doors on them.
The optimal solution for a small steam room
If your bathhouse has a relatively small steam room, you can take a small cylinder to make a stove. In most cases, cylinders with a capacity of 27 liters are used, since they have quite good dimensions: height - 50 cm, and diameter - 30 cm. Also, an excellent wall thickness of 6 mm will allow you to produce an excellent stove with good technical characteristics and a long service life.
Necessary materials for production
In order to make the most functional and economical sauna stove from a cylinder with your own hands, you will need:
- Water;
- Bulgarian;
- Empty cylinder;
- Metal mesh and stands;
- Welding machine;
- Scissors for cutting metal;
- Exhaust pipe;
- Steel hinges;
- Stones;
- Felt pen or marker;
- Hose.
It is best to use an empty propane tank as it has fairly dense metal walls. Thanks to these technical characteristics, it accumulates heat quite quickly and retains it for a long time.
Attention! The first thing you need to do when making a sauna stove from a gas pipe is to remove the remaining gas from the cylinder.
This is completely easy to do, just pour water into it. The fact is that water displaces remaining gases from the container. When the cylinder is completely filled, the water must be drained into a bucket. After this, we proceed to cutting the tap and creating the oven.
Step-by-step manufacturing instructions
- Holes for the pipe are made in the container, cleared of gas residues. For these purposes we use an angle grinder. In addition, you need to make holes in the end of the cylinder; it should be smaller in diameter than the chimney connector. It is necessary to cut a door in the center of the cylinder so that you can easily and simply add firewood, as well as clean the oven from the inside;
- Next, using the same grinder, you need to cut off the handles at the top of the cylinder;
- On one side you should drill many holes for the grate. A metal dome is fixed over the holes. It is attached by welding. This is how you get an ash box;
- Doors are attached to the box, as well as to the firebox, and at the back of the cylinder there is a pipe for the chimney.
How to use
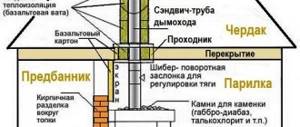
Care should be taken to route the chimney outside the bathhouse. This is a very labor-intensive and painstaking process, which in most cases requires the intervention of an experienced craftsman.
Next, you need to place firewood inside the stove and set it on fire. Large stones are placed on top of the cylinder, which will receive heat from the hot cylinder and transfer it to the room. In order to get a large amount of steam, you should periodically pour water over the hot stones.
Work principles
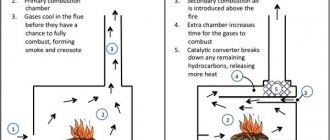
A DIY gas cylinder sauna stove generates heat due to the following elements:
- Blower is a channel at the bottom of the structure through which air is pumped. It provides sufficient oxygen for combustion and collects ash. The blower is equipped with a door that regulates the power of the furnace, increasing or decreasing the amount of incoming air;
- The firebox is the combustion chamber and the main source of heat. It is located at the top of the oven. Between it and the ash pit there is a grate on which firewood or coal is placed;
- A chimney is a channel for removing combustion products outside the room. It can be partially closed (using a wedge gate) to slow down fuel combustion and increase furnace efficiency.
Each of the elements described above takes part in the operation of a homemade sauna stove. The blower allows air into the firebox, creating favorable conditions for burning fuel. Wood or coal burns in the firebox, producing heat. This process is accompanied by the release of carbon monoxide and other components that are removed from the room through the chimney.
Using a throttle valve and a wedge-shaped solution, the power of the furnace is regulated. Well, the door in the firebox is used to load fuel and remove ash.
Independent arrangement from disks
If you are familiar with the technique of working with a welding machine, you can consider the option of creating a sauna stove from disks from a truck. To do this you need to prepare:
- Four rims from truck wheels;
- Metal sheets with a thickness of at least 5 mm;
- Brick, preferably fireproof;
- Clay mortar;
- Cement;
- Metal rods;
- Chimney pipe.
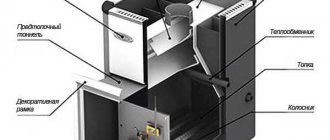
About the meaning of each of the four discs
To install the most functional disk sauna stove, you need to find four unnecessary rims from a truck. Each of them plays a role:
- The first disk is a cap for the combustion chamber;
- The second plays the role of a heater;
- The third disk is a heat exchanger that transfers heat to the steam room;
- The fourth disk will serve as a tank for water in which it will be heated.
Assembly steps
- Let's start with the water tank. To do this, two rims are fastened together by welding. It is also necessary to prepare a bottom of the same diameter as the rim and attach it to the bottom of the resulting structure. You need to cut a hole in the bottom for the pipe. The water tap is mounted on the side of the rim. The finished structure must be covered with a metal lid;
- You should not rush to place the water tank in the bathhouse, since first you need to check its tightness. To do this, the tank is filled with water and checked for leaks. If there are any, the water from the tank must be drained and the cracks removed using a welding machine. Only after this the finished tank is installed in the bathhouse;
- Next, the heater and firebox are installed. To do this, two car wheels are welded together. A metal mesh is installed in the middle of the resulting cylinder, on which stones are subsequently placed.
A small stove from a small cylinder
For a small steam room with a volume of 8-10 cubic meters, it will be enough to make a stove from a small gas cylinder. Usually 27 liter cylinders are used. The wall thickness at the bottom is remarkable - 6 mm. Without a tap, their height is 500 mm, diameter 300 mm. This makes a wonderful little stove.
First, the remaining gas must be removed from the cylinder. To do this, water is poured into it. Water gradually displaces all remaining gases. After the cylinder is filled, you can cut off the tap and begin making the stove.
First, using a grinder, carefully cut out a hole at the end where the faucet was for the firebox door. On one of the sides, which ended up under the long side of the cut hole for the door, we arrange a kind of grate. We take a drill and cut 10 mm, drill holes every 20 mm. There are 5 rows in total.
The ash pan holes should be at the “bottom”
We weld a piece of channel over the holes. In our case, its width is 140 mm. We weld the back wall to the front wall and attach a door. You will get an ash box. Its disadvantage is that in this version it is not retractable. If desired, the design can be improved by making a separate box.
We welded the channel
As a stand, a protective structure was welded to the channel, which closed the tap. Economical and quite reliable.
The stand is made of protective structure
Doors were attached to the ash pan and to the firebox, and a chimney pipe was welded closer to the back of the firebox (first welded, then the metal inside was cut out by welding).
The doors are in place
We carried out a test fire. If there is a high pipe - more than 2.5 meters, the traction is excellent.
Test kindling
As tests have shown, a steam room 2.5 * 2.5 * 2.3 m from 3°C to 25°C was heated in less than half an hour (almost without insulation, since the bathhouse was not completed). They stopped heating further, it needs to be improved: the heat is emitted too harshly.
Read how to make a sauna stove from sheet metal here.
Making from a barrel
Among other options, you can use a barrel to make a homemade stove. For example, a sauna stove made from a 200-liter barrel would look good; let’s look at the stages of its manufacture:
- The first step is to determine the required height of the barrel using a grinder;
- Next, the inner walls of the barrel are lined with refractory bricks;
- You can limit the combustion chamber using metal sheets or mesh. Remember that the minimum height of the combustion chamber is 60 cm;
- Stones are laid out on a sheet of metal or mesh;
- Next, you should weld a lid to the barrel and install special doors for ease of use.