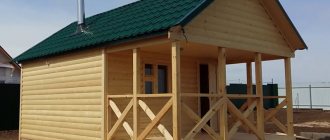
There is nothing better than shelves for organizing space in rooms, as well as for decorating the interior. Comfortable, functional, original in shape, they help to conveniently arrange a lot of things and give the rooms a more comfortable look. Making shelves on the wall with your own hands is not at all difficult, and you can use a wide variety of materials - wood, fiberboard, glass, pieces of tin, plywood.
DIY wall shelves
DIY wall shelves
Original shelf from an old TV
| Types of Wall Shelves | Description |
| Classic | This type of shelves is the most common due to its simplicity, aesthetic appearance and ease of installation. They represent a huge flight of fancy: from simple square to creative asymmetrical shapes |
| Corner | This type of wall shelves differs in the method of fastening - it is carried out on adjacent adjacent walls. Most often they are installed in utility rooms and bathrooms. |
| Hanging | This original way of creating a shelf involves attaching a simple structure to the ceiling using cables or vertical posts. |
| Floor-standing | This wall shelf is a floor support design. This type of product is especially relevant in hallways, as well as large rooms, where you don’t have to think about wasting space. |
| Open and closed shelves on the wall | Wall shelves can be designed, for example, with or without glass |
Making a simple wooden shelf
DIY wall mounted bookshelf
Wood is the most convenient material to work with. Wooden shelves come in simple, complex shapes, open and closed, vertical, horizontal and corner. Taking the basic option as a basis, you can assemble a shelf from several modules and give it the most incredible look. In order for the product to serve for a long time, you should choose the right wood: the boards must be perfectly flat, completely dry, without cracks, voids or traces of mold.
Wood for shelves
During the assembly process you will need:
- hacksaw;
- drill;
- building level;
- pencil and ruler;
- boards 16 mm thick;
- stain;
- wood varnish;
- sander;
- screws, brackets, dowels.
The example used is a simple rectangular shelf 250mm wide, 300mm high and 1100mm long.
Wall shelf diagram
Step 1. Marking
The boards are laid flat on the table and the measurements are transferred from the drawing. The height of the side walls should be 268 mm, since they will be located between the top and bottom: wall height + board thickness x 2 = 300 mm.
Step 2. Cutting the boards
If the markings exactly match the diagram, you can start cutting. It is best to use a jigsaw for this, then the cuts will be perfectly smooth and neat. You should end up with 2 long pieces and 2 short ones.
Step 3. Processing of blanks
Before starting assembly, each workpiece must be sanded, stained and varnished. If you plan to simply paint the shelf, the blanks are treated with an antiseptic primer - this increases their service life and makes the paint apply more smoothly.
Step 4. Assembling the product
The bottom board is laid flat on a flat surface. From the ends of the workpiece, retreat 8 mm and draw 2 straight lines parallel to the cuts. Now on these lines you need to mark two points at a distance of 5 cm from the edge, and drill holes there for the screws. The same is done with the top blank. When all the holes are ready, install the side blanks on the bottom board and tighten the screws. Place a second board on top and also fix the side walls with self-tapping screws.
Brackets are attached to the ends of the side walls, holes are drilled in the wall for dowels, self-tapping screws are inserted and tightened so that they protrude by about 5 mm. The dowels must be positioned strictly horizontally, so before drilling, mark a line using a level. Now all that remains is to attach the brackets to the fasteners and hang the shelf. If desired, the back wall of the product can be filled with a piece of plywood, and glass can be inserted in front.
To make such a simple shelf more original, you can replace one side wall with a stump of a thick branch. To do this, choose an even branch with a diameter of about 7-8 cm with smooth, clean bark, saw off a piece 28 cm long, and cut off all the side shoots. The chock is treated with a primer, dried and varnished. There is no need to remove the bark. After the varnish has dried, the workpiece is inserted between the upper and lower boards and screwed tightly with self-tapping screws.
To make such a simple shelf more original, you can replace one side wall with a stump of a thick branch
Based on this drawing, you can make various variations of wall shelves. For example, reduce the length to 400 mm and make 3-4 blocks at once. Then install them on top of each other in a checkerboard pattern and secure them together using metal plates. Or simply mount them on the wall separately, placing them at a short distance from each other.
Dimensions
Let's immediately divide it into frame and flooring, and we'll tell you separately about what to put a solid board on.
For frame
The most common size, which is often used to create frames, is a 50x50 mm block.
We came across a video in which the author says that he used a 40x30 mm block. In another, the racks in the places where horizontal jumpers were made were made from a 50x70mm block - so that 20 mm protruded, and the jumper lay precisely on these protrusions.
In other words, focus on the design itself. Somewhere you might actually need a block of rectangular cross-section that forms the necessary protrusion.
ADVICE! The more racks, the less load on one particular rack.
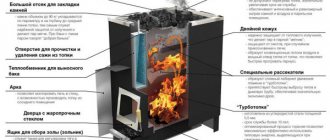
If you use a solid board, you must have an embedded beam placed behind the lining, to which the bracket will be attached.
A wide shelf without support on the floor (see separate material about floorboards) is best done either on a bracket or on two beams - one embedded behind the external decoration, the second - like a ceiling beam (more about the construction of the ceiling here, about the roofs of bathhouses - here), hanging from wall to wall with support on the walls. Timber can be used 100x100 or 150x150 mm. It should not protrude or be flush with the edge of the shelf, that is, the shelf hangs a little over this beam.
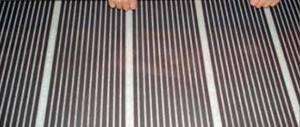
For flooring
We have already mentioned that the best material for covering the shelf frame is planken. Its width as a shelf board for baths will be 70-90 mm.
The flooring board should not be too wide
The thickness of the board primarily affects its rigidity, so where the frame itself is strong and the distance between the posts is not large, you can take the thinnest board - nothing will happen to it under load.
And if you lay the paneling not along the shelf, but across it, you can also make it from a thin board.
The opposite is also true - the greater the distance between the posts, or where the support goes only to the wall, the board should be thick.
Solid wood shelves were mentioned earlier. Its dimensions are as follows: 15 cm in width and 6-7 cm in thickness. Watch the video, which says that such a board is optimal for a Russian bath, because it holds heat well.
Corner wooden shelves
Often, to save space, shelves are made corner, and they can be mounted both in the inner and outer corners.
Corner wooden shelves
The blanks are made according to the scheme described above, only the upper and lower boards consist of two elements, with the ends cut at an angle. The process of making such a shelf is quite simple:
- the halves of the top board are coated at the ends with glue and clamped with clamps;
- repeat the same actions with the bottom board;
- when the glue dries, all workpieces are covered with stain or primed;
- Attachment lines are marked on the upper and lower workpieces and holes are drilled;
- insert the side walls and secure them with self-tapping screws.
Next, screw the brackets and secure the shelf to adjacent walls.
Corner shelf made of wood
| Wall shelf materials | Advantages and disadvantages |
| Wood: plywood, chipboard, MDF and others | This material is relatively easy to work with, it looks beautiful, natural and impressive, its service life is quite long, especially if pre-processed |
| Plastic | This material is the most versatile; it can imitate both wood and stone, while eliminating their shortcomings |
| Metal | Such wall shelves will be very strong, reliable and durable, but they will hardly fit into a classic interior. In addition, corrosion can also be a problem, so metal products will require special processing and conditions |
| Glass | Transparent wall shelves will create an atmosphere of lightness and comfort in your home. Of course, it will be quite difficult to make a glass structure with your own hands, but if you nevertheless decide to do all the work yourself, then you will have to work with glass for quite a long time and very carefully, especially if various cutouts are planned in the shelf design |
Original shelves for books
Shelves of non-standard shape are in increasing demand, so if you wish, you can try to assemble something original. For example, a bookshelf in the form of a simplified labyrinth is used.
To make it you will need:
- edged board 20 mm thick;
- wood glue;
- clamps;
- roulette;
- level;
- hacksaw;
- miter box;
- Sander;
- stain;
- furniture screws, self-tapping screws;
- decorative shelf holders.
If you have everything you need, you can start making the shelf.
Step 1. Marking
On the prepared boards, mark the cut lines with a pencil under a ruler. Measurements should be taken very carefully, since all horizontal parts have different lengths.
Step 2. Trimming the blanks
The ends of each workpiece are cut at an angle of 45 or 90 degrees. The diagram shows the first option, so you will need a miter box for sawing. It is very important to correctly install the miter box on the board so that the cuts are symmetrical. If the ends are cut off incorrectly, you will not be able to fold the shelf.
Step 3. Assembling the structure
The ends of the parts are smeared with glue, pressed tightly and additionally secured with slotted furniture screws. Ordinary self-tapping screws are not suitable here. Each joint will require at least 2 screws. Both parts of the shelf are applied to the wall, leveled and the attachment points are marked with a pencil. After this, holes are drilled for the dowels, brackets are screwed to the shelf with self-tapping screws and the structure is hung on the wall. Instead of brackets, decorative pelican shelf holders are often used.
Shelves of non-standard shape
Wall shelf size chart
How to do something yourself, with your own hands - home craftsman website
AN EXCELLENT TOOL FOR CRAFTS AND HANDCRAFTS AND EVERYTHING FOR THE GARDEN, HOME AND Cottage LITERALLY FOR FREE - SEE FOR YOURSELF. THERE ARE REVIEWS.
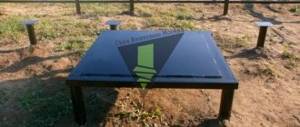
If the children's room is not too spacious, a folding table will be the ideal solution. Great corner for studying. Here you can do homework, draw, and make crafts. When folded, the table does not take up any floor space, and it requires no more wall space than a bookshelf.
Hanging shelf with straps
If you need a decorative shelf for small items, the following option is perfect - a board suspended on straps.
Hanging shelf with straps
To make a shelf you will need:
- 2 edged boards 300x750 mm, 30 mm thick;
- 4 leather belts, 75 cm long;
- 4 long screws with plastic dowels;
- 4 short screws;
- building level;
- ruler;
- sharp knife;
- drill.
Step 1: Preparing the belts
The cuts of the belts must be perfectly even, so if necessary they are trimmed with a knife. Fold each belt in half, press the ends to the table, step back 2 cm from the edge and drill a neat through hole with a drill. The same is done with the remaining three.
Step 2. Attaching the straps to the wall
Using a level, two points are determined on the wall at a distance of 60 cm. Holes are drilled and plastic dowels are inserted. The belt folded in half is applied to one of the holes and secured with a long screw - you get a large loop on the wall. Another such loop is attached nearby.
Step 3. Installing the shelf
A sanded board is inserted into the loops and aligned horizontally. To prevent the shelf from moving, the parts of the belts adjacent to the wall near the board itself are screwed with short self-tapping screws. Now another shelf is hung under this shelf, exactly repeating the steps described above. The result is a light and neat two-tier shelf. If desired, you can add another 1-2 tiers.
To make the shelves described above, you can use not only wood, but also plywood, as well as laminated chipboard sheets. The last option is used most often, since laminated chipboard is lightweight, high strength, practicality and durability. When assembling shelves from this material, all sections must be covered with a melamine edge to match the color of the sheet.
Wall shelves can open up new storage options or provide a cute backdrop for home decor. Small and large, book and kitchen, with hidden fastening and cantilever - almost any shelves can be made with your own hands, rather than bought in a store. In this material, we presented 3 simple and budget-friendly ways to make shelves for various purposes, as well as 70 photo ideas for inspiration.
Attaching the folding table to the wall
A photo collage, a lesson schedule, or sheets of notes for memory - the back of the cabinet on the wall side should be made of soft fiberboard to use the surface as a board for notes.
1. Fastening to the wall (8 mm dowel) was carried out using slats on the back side of the case. When marking, naturally, we used a building level.
2. The back wall made of soft fiberboard was simply inserted into the already hung case. It is not attached to the wall or to the body; only the shelves hold it up.
3. Thanks to the recesses for supports, the shelves cannot slip out and reliably fix the position of the fiberboard.
Universal hanging shelf
Hanging shelves on ropes have become very popular for good reason. They look much more impressive than regular shelves, and at the same time they are truly functional and versatile. They can be adapted for storing heavy items such as dishes or flower pots, as well as light accessories. And thanks to the side holders, the shelf can also be used to store books.
And now we propose to move on to practice and make such a universal shelf with your own hands.
- 4 wooden boards (2.5 cm thick and any desired length, for example, 1 m long as in our master class);
- Rope rope about 8 mm thick and 4 m long;
- Drill and feather drill with a diameter of 10 mm (the drill should be slightly thicker than a rope);
- 2 steel hooks and dowels for concrete with a diameter of 8 mm;
- Hammer and concrete drill 8 mm;
- Pencil.
- Using a drill and a feather drill, drill a hole in each corner of the board (draw the markings with a pencil first). Remember that the holes should not be located too close to the edges.
- Paint your board with paint/stain, and then, when the coating is dry, treat it with matte varnish or wax (this is not necessary, but it is advisable if you want to protect the shelf from wet cleaning and scratches).
- If you want to preserve the natural color and texture of the wood, then simply sand the board on all sides with coarse sandpaper or a sander.
- Install the steel hooks on the wall: first make marks using a level, then use a hammer drill with an 8 mm concrete drill to drill holes, insert 8 mm dowels into the holes and finally screw the hooks into them.
- Cut your 4-meter rope into 4 identical 1-meter lengths. Pass the ropes through the holes in the board, and then tie their ends on the back of the board with a knot as shown in the photo below.
- Now that you have a pair of ropes on each short side of the board, tie the ends of each pair into a knot and hang them on the hooks. Make sure the shelf hangs level and adjust the top knots if necessary. By the way, in the future you will be able to adjust the length of the ropes using the upper knots.
You can experiment a little with methods of attaching ropes and make not only shelves, but even hanging racks with your own hands.
- Shelf from a drawer
If you have an unnecessary drawer from a chest of drawers, then you can use it to make this beautiful shelf with dividers. You can store something in it that should always be at hand or in sight. - Box;
- Wax or matte varnish;
- Wooden board or plywood of small thickness;
- Wood glue or liquid nails;
- Shelf hinges;
- Two 8 mm dowels and screws for them;
- Hammer and concrete drill 8 mm;
- Phillips screwdriver;
- Jigsaw;
- Medium grit sandpaper;
- A piece of wallpaper for decorating the back wall;
- Wood putty.
Paint the desired color and brush;
- Use a jigsaw to cut the dividers out of the plywood/wooden board to the desired size, then sand them on all sides with sandpaper.
- If the drawer has handles, remove them and fill the holes with putty.
- Paint the box in 2-3 layers, allowing each layer to dry completely. If you want to achieve a distressed effect, rub the drawer in some places with sandpaper.
- Glue a piece of wallpaper cut exactly to size onto the back wall of the shelf. You can glue the wallpaper using wallpaper glue or any universal glue.
- Install the dividers using wood glue or liquid nails.
- Next, coat the box with wax or matte varnish to protect the top coating from damage and moisture.
- Nail or screw two metal loops onto the back of the shelf.
- Make two holes on the wall, having previously made markings using a level, insert dowels into the holes, and screw screws into them, but not all the way, but leaving about 5 mm. Well, that's all, now you can hang the shelf on the wall.
Reviews about our specialists
How to submit a request for a shelf canopy
You can use professional ones to hang a shelf in Moscow or perform any other household work at a convenient time. To do this, just call the number and describe your task. In accordance with it, a specialist of the required profile will arrive at the address on the agreed day, draw up an estimate, and advise on issues of interest. The second way is to use the feedback form by filling out the required information fields. We will call you back within a few minutes to confirm your application.
Shelf-hanger from... the back of a chair
If you have an old wooden chair, or rather the back of a chair, then you can use it to make a cute shelf with hooks. It can be hung in the kitchen to be used for storing kitchen towels and aprons, in the bathroom, and in the hallway.
This is how the back of the chair was before the alteration...
...and this is what I became after!
- Wooden chair back;
- A small board made of wood or plywood;
- Three metal hooks;
- Wood pendulum saw, grinder or jigsaw;
- 5 or more wood screws and a screwdriver;
- Drill and drill bit 3 mm;
- Medium-grit sandpaper (for removing old varnish/paint from the back of a chair) and coarse-grit sandpaper (for sanding a wooden shelf);
- Black paint (if you want to create a worn effect), white paint or any other desired color, brush;
- Wax or matte varnish;
- Wood putty;
- Wood glue.
- Cut the back of the chair to the desired size, after marking it.
Great board and more
Do you think that writing with chalk only gets you dirty? But there is also whiteboard paint that you can write on with washable markers. There are other options. For example, you can stick a poster on the surface, because a suitable frame is already available.
The mini chalk shelf also functions as a handle. It is convenient to grab onto it in order to release the support (table leg) from the magnetic lock when tilting.
Folding and unfolding the table is very easy - even a child can handle it. If you want to increase the dimensions indicated in the diagram, think carefully: the design may be too heavy for a child.