Home Buildings
Publication date: 09/05/2018
0
1682
- Features of floors in wet rooms
- Types of floors in the bathhouse
- Design options for different types of foundations
- Floor installation instructions
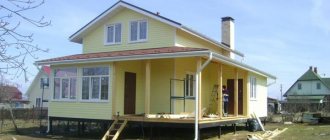
The floor in a frame bath differs from the floor in a timber or log bath. Making it in a frame structure is usually easier and even a novice builder can handle this work.
It’s easy to build a frame bath
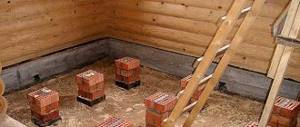
Installation of logs
First of all, the installation of a floor in a bathhouse begins with the construction of its frame, that is, the laying of logs. As a rule, a frame bathhouse is built on a columnar foundation or piles.
To connect the load-bearing elements of the base into one whole, a wooden or metal grillage is used. For a bathhouse on stilts, grillages made of steel channels or I-beams are more suitable. First of all, the installation of a floor in a bathhouse begins with the construction of its frame, that is, the laying of logs. If you decide to build a bathhouse on stilts with a metal grillage, then on top of it you need to fix a wooden beam with a section of 150x50 mm. It is easier to attach logs to it. The construction of the floor of a frame bath on a columnar foundation begins with laying a wooden grillage from beams with a cross-section of 150x50 mm. Not only are the logs attached to it, it is also the basis for the walls.
Depending on the dimensions of the bathhouse, intermediate beams in a wooden frame may be needed for laying the logs. In addition, additional support pillars will need to be installed under intermediate beams and long joists. They can be made from brick. The logs are attached to a wooden grillage and intermediate beams in increments of 40 cm.
How to properly slope the floor in a bathhouse
Important: all wooden structures are treated with antiseptics and fire retardants. It is better to make the logs under the steam room and washing room from moisture-resistant larch wood.
general information
One of these structures is a frame bathhouse, the construction of which does not take much time .
Such a structure does not require a particularly strong foundation - to build it, it will be enough to build a strip foundation, pour columns, or use the pile-screw method.
The technology for creating a foundation depends on the condition and moisture of the soil at the construction site. And also, depending on the future operating conditions of the structure, its reliable insulation should be ensured in order to ensure a long service life. Moreover, one of the most important stages in the construction of such a bathhouse is the installation of the floor .
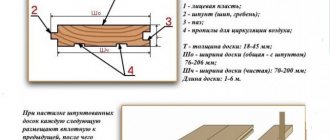
Bathroom floor design
Diagram of a wooden floor with insulation
After the logs are installed, you can begin constructing the floor of the frame bathhouse. If you decide to build a sauna with your own hands, keep in mind that the constructive floor cake must include the following layers:
- subfloor made of 0.6 cm thick oriented strand boards;
- waterproofing and wind protection coating (we will use Izospan “A”, but you can choose other materials);
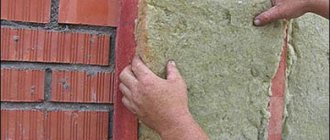
- a layer of thermal insulation (for floor insulation we use ecowool, you can use mineral wool);
- a protective layer of oriented strand board 1.8 cm thick;
- to effectively insulate the floor of a frame bath, the cake contains two layers of insulation (now for this purpose we will use extruded polystyrene foam 50 mm thick);
- then follows a layer of vapor barrier (Izospan “D”);
- after this, a reinforcing fiberglass mesh is laid;
- then a floor heating system is installed;
- cement-sand screed with reinforcement;
- ceramic tiles laid with special glue.
If you are building a frame bathhouse on stilts or a columnar foundation with your own hands, you should take a closer look at the features of each layer of the structural floor pie.
Advice: keep in mind that it is necessary to properly insulate not only the floor of the frame bath, but also its walls, as well as the ceilings.
Stage 5: Rafter system
As floor beams and rafters for a frame bath, you should use timber with a cross-section of at least 15x5 cm, pre-treated with an antiseptic. They must be placed on edge, and then fastened together with long screws and metal plates. When installing in a vertical position, it is important to secure the common screed with a ridge beam of the same cross-section.
We suggest you familiarize yourself with laying floor tiles in a bathhouse or sauna with your own hands
The beams are always released outside at a distance of 40 cm, which allows you to subsequently lay the roofing material correctly. Roof lathing is made from boards up to 25 cm thick, laid directly from the roof ridge.
When building a small frame bathhouse, the rafter system can be assembled on the ground, which is much more convenient if several people are working. As a roofing material, soft or metal tiles laid on a layer of thermal insulation and a wind-moisture-proof membrane are suitable.
Floor construction
We nail moisture-resistant OSB 0.6 cm thick to the bottom surface of the log.
It doesn’t matter what kind of frame bathhouse you build, on stilts or a columnar foundation, the floor insulation procedure follows the same sequence. Before you start building the floor, it is worth installing the frame walls of the bathhouse. There is no need to insulate the walls yet, but it is better to install a moisture and wind barrier. The construction of the subfloor proceeds in the following sequence:
- We nail moisture-resistant OSB 0.6 cm thick to the bottom surface of the log. Under the washing room and steam room, small holes should be drilled in the slab for ventilation. Don't forget to make a hole to install the drain pipe under the washing room. As a result, you will get a design that resembles the letter “W”.
- The next stage of building the floor of a frame bathhouse with your own hands will be laying Izospan waterproofing. It will also serve as a windbreak. We lay the waterproofing on top of the joists so that it sag into the gaps between them and evenly covers the OSB sheathing. The joints of the waterproofing film are taped. The waterproofing is fixed to the joists by stuffing wooden slats with a cross-section of 50x30 mm on top of them.
- If you plan to make a stove in the bathhouse, then install a supply vent in the place where it is supposed to be located in the floor between the joists. For these purposes, you can use a steel pipe or an old ventilation duct.
- When the waterproofing is laid, you can insulate the bathhouse floor with your own hands. We do it using ecowool, laying slabs between the logs. The surface of the heat-insulating material should be flush with the top edge of the joist. At the stage of laying the insulation, do not forget to lay the drain pipe in the washing room.
Laying vapor barrier film and insulation
Advice: if there are recesses under the walls of the structure, then insulation must be installed there as well. However, it is difficult to lay ecowool slabs there, so you can lay soft Rockwool insulation under the walls.
- Next, the floor is sewn over the logs with moisture-resistant oriented strand boards. In this case, it is important to ensure that the joining of the slabs falls on the logs. To fix the OSB between the joists and the bottom frame under the walls, it is worth attaching wooden blocks. We lay OSB with a gap of 0.2-0.3 cm between adjacent sheets. We attach them to the logs using self-tapping screws.
- When the waterproofing and the first layer of insulation are laid, you can make the second layer of insulation with your own hands. To do this, we lay sheets of extruded polystyrene foam 5 cm thick in a spaced pattern. In the place where the stove will be installed, laying thermal insulation material is not necessary.
- We waterproof the drain hole in the floor. To do this, we attach Izospan “D” film around the drain with double-sided tape. We install waterproofing using sealant, which is poured between the film and the pipe.
- A vapor barrier layer must be provided in the floor of a bathhouse on stilts and a columnar foundation. Its installation can be made using the Izospan “D” vapor barrier film. To do this, we attach it to sheets of polystyrene foam using a stapler. We lay the film with an overlap of 50 mm, sealing the joints with tape. To prevent rotting of the bottom trim, we place the film on the walls to a height of 100-150 mm and connect it to the vapor barrier material of the walls.
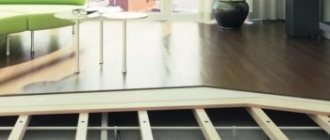
Heated floor installation
Laying and securing an electric heated floor to a mesh
The most optimal option for insulating the floor of a bathhouse on stilts or a columnar foundation would be to install a heated structure. This will help evaporate moisture from the floor after the procedure, quickly dry the surface and provide additional protection against fungus and mold. If you plan to do the work yourself, it is better to install heated floors using factory electrical systems. Such a floor should be installed in the steam room, relaxation room and washing room.
How to make a floor in a bathhouse with a drain
We work in this order:
- To facilitate the installation of electrical heating systems, a fiberglass reinforcing mesh with a cell size of 50x50 mm is laid on the vapor barrier material. We lay the mesh with a slight overlap and tie it together.
- We lay out the electric cable for heating on the floor in a “snail” or “snake”. We fix it to the grid.
- Then we install a warm floor sensor in the wall.
- We connect and connect all components of the system.
- After checking that the device is working properly, you can begin pouring the screed.
How does a ventilated flow floor work?
A poured floor is a classic, there’s nothing complicated about it. The boards are not laid end to end, but with small gaps. Water that gets on the floor seeps through these cracks into the subfloor. There she remains for some time. If the subfloor is not ventilated and remains cold, a damp smell appears, and gradually the floor boards begin to rot. In addition, there is heavy steam, stuffiness, and there is a feeling that you can’t breathe. Not much pleasant.
Of course, it is worth noting that such a nuisance is common both for poured floors and for ordinary wooden ones, with floorboards laid end to end. Wood, whatever one may say, absorbs moisture and as a result begins to rot.
The problem can be solved by including the floor and subfloor in the overall ventilation system of bathhouses. That is, you need to make sure that warm air from the steam room can get into the underground, warm up and dry the wet floorboards. Due to the design of the pouring floors (the presence of cracks), it is quite easy to “force” the hot air to fall into the underground and do your work there.
In my bathhouse this is implemented as follows:
- the sink and steam room use a pouring floor with a common subfloor in the form of a pallet;
- the walls of the sink and steam room are insulated and separated by a sealed partition;
- the stove is embedded in the partition between the sink and the steam room, the firebox is located on the sink side;
- air for the firebox is taken only from the sink (with doors and windows closed);
- outside air is supplied to the bathhouse through a ventilation duct located under the stove convectors; air access to the steam room through other channels is not provided.
When the furnace is fired and draft occurs, external air enters the convector through the ventilation duct, warms up and rises up to the ceiling of the steam room. Gradually it cools down, lowers and, under the influence of traction, passes through the cracks of the pouring floor into the subfloor.
I repeat that the subfloor in my version of the floor is a sealed pan and the heated air, having entered it, does not dissipate, but exits through the cracks in the floor into the washing room. Then it goes into the furnace firebox. Thus, the air moves along the circuit, blowing and warming the subfloor.
The following photos clearly illustrate technological solutions for the described ventilation scheme:
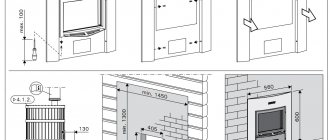
Partition between sink and steam room, stove built into the partition
Under the stove there is a ventilation duct through which outside air accesses the convector
Ventilation duct holes in grillage
There's nothing complicated about it. It is enough to install the stove between the sink and the steam room, and arrange a ventilation duct between the logs to supply air to the convectors of the stove. And poured floors with a sealed underground will be included in the ventilation system. Now I have come to the most important issue, which is what my photo report is devoted to - the issue of installing hot water floors.
Bathroom floor screed
Pouring a cement screed over a heated floor along the beacons.
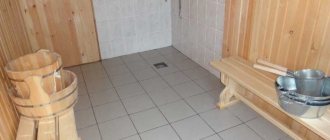
We make the screed from a cement-sand mortar or a ready-made dry construction mixture. Fiber fibers or construction reinforcing mesh can be used as reinforcement. The height of the screed is 3.0 cm. In the rest room and steam room we make the screed without a slope, and in the washing room we make the floor slope 10 degrees towards the drain hole. We work in this order:
- After laying out the reinforcing mesh on the floor, we install guide beacons (profiles for drywall). We place them on mortar piles and level them.
- Prepare the solution. We add plasticizers and fiber to the traditional cement-sand mixture.
- We lay the screed on the floor and level it according to the beacons using the rule.
- The next day we remove the beacons and fill the voids with solution. We rub the surface.
- During the first week, we spray the screed with water and cover it with film to protect it from cracking.
- After the screed has completely hardened, it can be primed and ceramic tiles can be laid. To lay the flooring we use a special moisture-resistant adhesive.
Video on how to insulate the floor of a frame bathhouse on stilts with your own hands:
Leaking and non-leaking floors
The floor in a frame bath can be equipped with both leaking and non-leaking types.
The first one is budget-friendly and very easy to install. But it is absolutely impossible to use a bathhouse with such a floor in winter, since it does not retain heat, it is constantly cold from under the boards, and there is no barrier between the floor and the ice cushion formed under the bathhouse.
The essence of a leaky floor is this: it is constructed from boards, between which decent-sized gaps are left to allow water to drain out as quickly as possible.
A non-leaking floor will allow you to take a bath in both the heat and winter cold. There are no cracks in it, there is another layer of the floor, the so-called rough one, there is a slope and a specially equipped drain.
Two types of materials are used for arranging bath floors: wood and concrete.
Ventilation in the bathhouse. You will read about this in our next article. And this article talks about bathhouses.