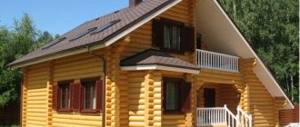
On warm summer days, there's nothing better than meeting up with family or friends for a barbecue. The barbecue is the main element of a well-equipped garden, allowing you to enjoy freshly prepared, gourmet meals outdoors. Today it is not only a functional device, but also an important design element of every external space, so it is worth considering a veranda for your home with a barbecue. However, it should be remembered that in addition to aesthetic qualities, the grill must first of all be practical, efficient and correctly installed. There are many models available that vary in size, installation, style and, of course, cost. Check out some examples to help you choose the perfect barbecue for your patio.
Designing a veranda with barbecue
Adding a veranda with a barbecue has its own characteristics. First of all, it will take up more space. The barbecue area can consist not only of a barbecue, but also of work surfaces and niches. The dining area with table and chairs should be no closer than 2 m from the brazier. The chosen design style should be in harmony with the main building and its surroundings. The most important thing is that heat comes from the barbecue, and fire safety measures must be taken into account .
For this reason, it is advisable to construct such an area using appropriate fire-resistant materials. As a rule, the stove is made of brickwork, stone or metal (usually cast iron). If you decide to make an entire barbecue area out of brick, you can include in the project the laying of a hob, a work table with a tabletop, a niche for storing firewood, and skewers. This complex needs to be built on the side where there is enough space.
BBQ area within the terrace
A member of our portal hotsad was looking for an elegant solution for a design that should include a Pompeian oven for cooking cabbage soup, porridge and pizza; barbecue for shish kebabs; sink and work table. At the same time, I didn’t want a huge “brick monster” to stand on the site—I wanted something compact and technologically advanced. At the same time, the structure must remain within the terrace to protect it from precipitation and be made of old brick and cobblestones. Hotsad is not a master of talking a lot, he is a master of doing a lot; The entire process of construction of the complex is shown in photographs.
Choosing the location and location of the barbecue on the terrace
When installing a barbecue stove on terraces and verandas, you must follow all fire safety rules. It is advisable that there are no trees, bushes, firewood or other sources of ignition near such a fire source. Playgrounds for children (swings, sandboxes, slides, etc.) should not be located nearby.
Did you know? It is believed that the word “barbecue” comes from the French “barbe a queue”, which translates as “from muzzle to tail” and means cooking a whole carcass on a grill or spit.
Another important point is the prevailing direction of air flow. They should not cause the fire to blow out or fan. In this case, a fence (wall) should be provided to protect from the wind. All these nuances must be provided for in the project.
The following factors must also be taken into account:
- The grill should be located in such a way as not to interfere with movement. It must be freely accessible.
- You should consider a place to store firewood or coal fuel.
- The cooking grate should be removable and located at table level for ease of use.
- It is necessary to organize good draft in the chimney to prevent excessive smoke. Thus, it is necessary to make an exhaust pipe of sufficient length.
Construction of a wooden veranda
The construction of a veranda includes different stages from making piles to lighting and zoning the veranda.
Installation of piles
The construction of the veranda is carried out in front of the main facade of the house . The optimal length is from 2.5 to 3 meters . First the foundation is built. It is important to consider the size of the future veranda and the type of soil. Calculate the mass of the building and the load-bearing capacity of the foundation based on the cross-section of its piles and the material. Based on this, choose at what distance from each other the supporting columns or piles will be located. It’s best to look online for exact numbers for specific soil types.
Attention! Before starting work, dismantle the porch, canopy and anything that may interfere with the construction of the veranda.
If the soil is sandy, you can get by with a columnar foundation for the veranda. If the soil is clay, in winter, due to heaving, small columns will be pushed out. In this case, you need to make a foundation on piles. They are placed in increments of 1-2 meters . Since you are planning to install a furnace, it is better to take the step more often. Screw piles can be used. Pits with a diameter of 30 cm are drilled deep, one meter (at least) . This is done so that the pile rests on denser layers of soil below the soil freezing depth.
Photo 5. Foundation for the terrace on metal piles. When choosing a base, you should take into account the characteristics of the soil.
We make formwork from roofing felt 20-30 cm higher than the depth of the pit and immerse it inside. Ready-made asbestos-cement pipes are also suitable for formwork. Then we build a frame from reinforcing bars and lay it in the hole. Fill with cement mortar, compacting it. In order for the concrete to gain the required strength, you will have to wait as long as indicated by the manufacturer.
By building a veranda, you can make your home more beautiful and unique, as well as expand its usable area. But how to build it? The easiest way is to add a veranda to the housing project before construction begins - in this case, it will have a common foundation with the house and will be stronger.
What are barbecues and grills made of?
First of all, materials for arranging a barbecue or barbecue area must be fireproof. The ideal option is natural stone. But its cost can be quite high, so it is better to use special refractory brick or metal.
Important! If the house is made of wooden material, then the stove should have a distance of 20–25 cm from the wall.
Fireclay brick masonry is well suited: it is made from refractory clay. You can use fireproof tiles, marble or basalt as decoration. Metal structures for grills (barbecues) are chosen if the veranda is relatively small in size. They are usually made of cast iron.
Video: terrace with barbecue stove
Walling
Walls, unlike the floor, are an optional attribute of attached verandas. Instead, it is quite possible to build a regular fence in the form of a railing. The veranda may not have any fencing at all - some projects for adding a veranda to the house involve the use of plants and hedges as a fence. If you plan to make full-fledged railings, walls and roofing, the next stage after the formation of the floor will be the construction of the frame.
A lightweight wooden frame is made like this.
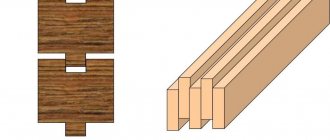
- Along the perimeter of the floor, beams are laid, connected to each other with a direct lock. Grooves should be made on them for attaching the racks in increments of about 50 cm.
- The racks are fixed in the grooves using metal brackets.
- The top of the racks is tied with timber.
- We make rafters for the roof.
A lightweight metal frame is erected in a similar way. If the foundation allows, the frame can be made of concrete or brick. The thickness of the load-bearing structural elements may differ from the characteristics of the walls of the main house. Roof supports must be at least 1.5 bricks thick, fence posts must be 125 mm thick.
Terrace walls can be finished using a variety of materials:
- wooden or plastic lining;
- metal siding;
- beam;
- decorative brick and much more.
The main thing is that the design of the terrace decoration matches the appearance of the house.
The walls of the veranda must be connected to the wall of the house in the same way as the foundations of the structures. For this purpose, steel embedded elements are used. They are fixed in the main wall using deep holes, and in the wall structures of the terrace they are laid at the construction stage and secured with cement-sand mortar.
If the veranda is made open, railings are erected instead of walls. They can also be made from wood, metal, WPC, brick or concrete. This type of fence consists of posts, balusters and railings.
Preparing tools and materials for work
The choice of tools and materials depends on the chosen extension project and the type of barbecue.
If you decide to make a brick grill, you will need the following materials:
- concrete;
- sand;
- fireproof (fireclay) brick;
- gravel;
- roofing felt for waterproofing;
- hob;
- lattice.
For the foundation you will need sand, crushed stone, and concrete. The same materials are used for the base of the veranda. Whatever type of floor you choose for the veranda (wooden or tile), fire-resistant material should be laid next to the barbecue. For wooden floors, you will need timber for strapping and joists, as well as boards. For tiled - more tiles, sand, gravel and concrete for a concrete base. For the roof you will need timber, waterproofing and roofing material.
It must coincide with the roof of the main building to which the veranda will adjoin. You should also stock up on nails and screws. Walls, exterior decoration or supporting pillars must be in harmony with the house to which the extension is being made. For walls you can use wooden beams, bricks, frameless glazing. Such extensions can be glazed with polycarbonate.
For an open summer veranda at the dacha, it is enough to install support pillars made of wood, brick or metal, on which the roof will rest, as for a gazebo. For a closed veranda you need to purchase glazing and frames, and an entrance door. Sliding systems look very good in such extensions. For a winter veranda you need to choose double or triple glazing and take care of thermal insulation materials (floor, roof, walls).
Did you know? Most scholars believe that the verb "barbecue" comes from the Spanish word "barbacoa", which refers to a method of preserving meat by drying or slow-frying it.
The tools you will need are:
- drill (for a pile foundation) or formwork for pouring concrete;
- shovel;
- mallet;
- hammer;
- saw;
- drill;
- plumb line;
- level;
- roulette;
- pegs with rope.
What materials are needed?
Wooden houses made from logs are 6 meters due to the peculiarities of manufacturing lumber. Therefore, below we will provide the necessary tools and an approximate calculation 6x3 m wooden veranda with a brick barbecue oven on a pile foundation with a corrugated roof.
To build a veranda you will need:
- drill if a pile foundation is proposed;
- shovel;
- drill;
- mallet;
- hammer, nails;
- self-tapping screws
Estimate
| Material | Cost, rub. (excluding delivery) |
| 300 kg of cement grade 200 | 850 |
| 1 t sand | 850 |
| 7 beams 100x200 | 6000 |
| 9 beams 50x50 | 1000 |
| 30 boards 25x150 | 5000 |
| 500 stove bricks | 25000 |
| Decor, lighting | 5000 |
| Total | 50000 |
Stages of constructing a veranda with barbecue
After choosing a project and drawing up a drawing, materials are purchased. Then construction begins. The place for the veranda is cleared and leveled. Using a rope and pegs, mark the perimeter and location of the grill. The main work begins with the construction of the foundation.
Foundation
For the attached objects of the house, it is best to make the same foundation as for the main building, so that they are like one complex. But in most cases, a columnar foundation is made under the veranda. It can be made of concrete. Before laying it, you should find out the occurrence of groundwater, the type of soil, and the depth of freezing of the ground.
Find out how to make a fireplace on your veranda with your own hands.
The construction of a columnar foundation consists of the following work:
- The markings mark the locations of the foundation pillars.
- In the designated places, holes are dug to the depth of soil freezing, but not less than 1 m.
- A 15–25 cm layer of sand is poured onto the bottom of the pit, and if the soil is of the sandy type, then a layer of gravel is made.
- At the bottom of the pit, insulation is made of bitumen or foam plastic.
- Then they install ready-made pillars for the foundation or make formwork and pour concrete with preliminary installation of reinforcement.
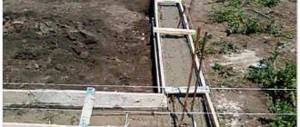
A grillage is attached to the reinforcement of the foundation pillars along the perimeter of the veranda, onto which the load of the extension will be distributed. It can be metal or wood. When building walls from slabs or bricks, it is better to make a strip foundation under them. To do this, they dig a trench, lay a layer of sand at the bottom, install formwork and reinforcement, and then fill it with concrete. The width of the trench should be 15 cm greater than the thickness of the walls being erected on each side.
Construction of walls
It is better to make the walls of a veranda with a barbecue from fireproof materials - brick, foam concrete or concrete blocks. When using wood, it will need to be well treated with fire retardants. Openings are left where windows and doors are installed. If the veranda is open, then support pillars should be made of brick, metal or wood. Such supports are also made for panoramic glazing.
Important! When building walls and installing supports, a plumb line and a level are used to set them in a strictly vertical direction.
Roof installation
The most convenient and simplest roof option for a veranda is a lean-to design. Rafters made of wooden beams rest on the wall of the house on one side, and are fastened under the slope on the other. They are sheathed, waterproofed and the selected roofing material is laid. A hole must be made in the rafters for a chimney from a brick barbecue.
Floor installation
It is better to do the floor after the construction of the furnace. The logs on which the board flooring is made are attached to the bottom frame (grillage). If an unedged board is used, the floor will need to be sanded to avoid unevenness. Then the floor is painted with varnish or paint . The area near the barbecue should be tiled, and the wood itself should be treated with special agents that impart fire resistance.
You will be interested to know how to build a brick veranda.
The floors of an open or summer veranda can be made entirely of tiles laid on a sand bed, cement mixture or leveled concrete. If funds allow, the floor covering, like the barbecue, can be made from clinker bricks of different colors. The evenness of the floor is checked by level at all stages of its installation.
Assembling the barbecue
A concrete foundation is made for the barbecue using the same technology as a strip foundation, only its depth is usually no more than 50 cm. The first row of bricks is laid without mortar. Then, from the corners of the furnace, refractory bricks are laid on cement with reinforcement of every third row. When erecting the walls of the barbecue, a level and plumb line are used to check their direction. It is recommended to do the masonry offset, that is, the joints should not be located on top of each other.
At the location of the grille, recesses are laid out for its installation or reinforcement (corners) are laid. It is better to lay out the upper part as for a fireplace, and bring the chimney above the roof level. According to the project, a whole barbecue area with a work table, a woodpile, a sink, and compartments for storing skewers can be laid out of brick . It is possible to provide for the presence of metal sheets inside the oven to facilitate its cleaning. When decorating a barbecue, you can use tiles, artistic modeling, forged elements, stone and mosaics.
Did you know? In a technological sense, barbecue is roasting meat over smoldering coals at a temperature of +110
°
…+120°С. With this method, myoglobin (a skeletal muscle protein) reacts with carbon monoxide from the coals: the meat develops an appetizing red streak and a smoky smell and taste.
Construction of barbecue
When constructing the hearth part, 2 types of bricks are used. Standard products are used for the construction of the first 6-8 rows. Their task is to be the basis of the oven. The firebox is lined with refractory bricks. If cement mortar is allowed to connect the lower rows, then in the firebox area the bricks are connected with a mixture of clay and sand. To prevent the mixture from cracking when heated, you need to know how to prepare it correctly. The optimal ratio of water, clay and sand is 2:3:1. Before starting bricklaying, it is recommended to take measures to protect the structure being built from moisture. Sudden rain can ruin the whole job. It is advisable to install a permanent roof or erect a temporary canopy from corrugated sheets or sheet iron.
You are offered step-by-step instructions for building a brick barbecue:
- Waterproofing is installed to prevent the brick from absorbing moisture from the concrete. One layer of roofing felt or other material with similar properties is sufficient.
- The bricks of the first row are laid out on the waterproofing. Using a marker, guidelines are applied for laying them on the solution. If trimming is necessary, it is done immediately, before mixing the solution.
- The masonry mortar is being prepared. To prepare it, take 1 part cement, 3 parts sand and 2 parts water. The laying of the first row begins. The second and subsequent rows are laid in a checkerboard pattern with an offset of half a brick.
- The base of the brazier is being built. To do this, several steel rods are used, laid on the top of the hearth. To fix the rods, you can use a grinder to make cuts in the brick.
- The clay solution is mixed. Refractory bricks are being laid. The first row must be laid out so that there are small holes for air. To make the stove stronger and more reliable, you can make a tie from a steel angle along the top.
The final stage is the installation of a chimney, if provided for by the project. The pipe should be made as high as possible. This way the draft will be better, and the quality of removal of combustion products will be higher. It will be much more convenient and comfortable to prepare food if you install a washstand near the cutting table.
Advantages and disadvantages of barbecue on the veranda
The veranda is usually a favorite resting place for many owners of private houses and cottages.
- If you equip a barbecue on it, then this extension will receive the following advantages:
- Proximity to the kitchen . You won't have to often run around for groceries, dishes, napkins and other kitchen items.
- Expanding cooking options . Here you can place additional equipment - a hob, a boiler. In addition, the grill can combine the functions of a grill, stove, smokehouse or fireplace. In addition, cooking in the fresh air is always more pleasant than in a small enclosed space.
- Availability of cooking equipment independent of electricity and gas . A barbecue will be useful in areas where there is no or interrupted electricity and gas supply.
- A beautiful grill can be an excellent decorative element. It makes the extension cozier and warmer.
- Expansion of space . If the veranda is made closed, then you can move the dining area into it or make it an excellent place for receiving guests, celebrating New Year's holidays and various celebrations.
- Bad weather will not spoil your barbecue preparation , since the veranda canopy will protect you from it.
We build the foundation for the structure
The foundation is the base of the veranda. Since it will house a permanent barbecue oven, it is important to make the foundation strong. Most often, a columnar type of base is made for the veranda. The pillars are bricks. It is necessary to create several supports at the corners and in the middle, maintaining a distance of no more than 60 cm. First, markings are applied on the ground using pegs and rope. After that, a pit is dug along it with shovels, the depth of which is not less than 1 m. The bottom is compacted and a 20 cm layer of sand is poured, after which it is compacted again. For sandy soil, gravel is used, in a layer of 10 cm. To perform waterproofing, bitumen is used.
What is special about columnar foundations?
- It is quick and easy to build.
- The base for the veranda is suitable for various soils.
- Even a non-professional can start building it.
- It is reliable, practical and inexpensive.
As for the depth of the pit, it is recommended to pay attention to the freezing point of the soil. The foundation should be lower. And in order not to make mistakes in the calculations and do everything correctly, we recommend drawing up a detailed plan with drawings and features.
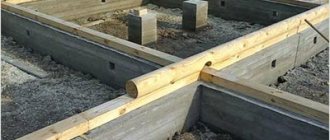
The final stage is the formation of pillars and the top trim. All pillars must be perfectly level relative to each other. Then the veranda itself with the barbecue will be level. That's why you need a level. All that remains is to lay 100x100 mm piles on the pillars. This will be the harness. The finished foundation of the veranda with barbecue is visible in this photo.
Types of terraces
A terrace means an open, closed or partially closed type of flooring on prepared supports. The structure can be:
- fenced;
- without fencing;
- single-level;
- multi-level;
- various shapes and types of support.
When constructing such sites, the same materials are used as in the construction of buildings and bridges. For a wooden terrace, the flooring is made of deck boards or its analogues, and the base is longitudinal logs supported by transverse beams. This structure can be laid directly on the load-bearing floor - this option is suitable for terraces located on the roof of a building.
The height and frequency of the support pillars can be changed, this allows you to place recreation areas in places with difficult terrain, for example, on slopes.
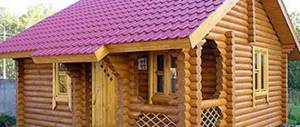
Recently, house designs with terraces and barbecues have become increasingly popular. This building is not only great for receiving guests, relaxing with the whole family in the open air, but also makes it possible to prepare delicious aromatic barbecue at any time, regardless of weather conditions. This is also a wonderful addition to the exterior of the building.
Attached directly to the house, and even with a cooking stove, it has a number of advantages:
- Proximity to housing. This is very convenient, especially when there are guests - you don’t need to carry a large amount of dishes far.
- You can install additional household appliances for cooking (cauldron, hob, grill, tank for heating water), this eliminates the need to cook directly in the kitchen in the house.
- Cooking on the terrace does not depend on the availability of electricity in the cottage.
- The decor of the barbecue area is created with your own hands, without serious material costs.
offers individual architectural design of houses at affordable prices. A team of experts will also help with practical advice on arranging personal recreation areas.
How to lay out a barbecue yourself?
You can assemble the barbecue yourself, armed with detailed instructions, or by ordering such a service from the seller. In any case, all work must be carried out at a temperature not below zero. If you have to work in such conditions, then wrap the furnace installation site in a large tent and maintain a positive temperature in it using heat guns - until the installation mixtures are completely dry.
So, the first thing you need to do is:
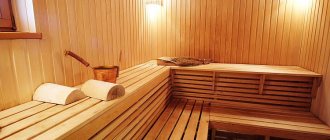
- Consider what place the barbecue will occupy in the landscape design of the bathhouse and where it should be placed: on the bathhouse terrace, in a separate gazebo or right next to the fence.
- Select a suitable and proven stove design.
- Find a good stove-maker, if he will lay the barbecue, or at least a mentor who will supervise your work.
- Get quality materials and parts.
Now let's calculate the foundation for the barbecue. So, a standard stove weighs from 200 to 2000 kg. That is why a foundation made of reinforced concrete is mandatory for it, and it must be at least 15 cm thick. It is extremely important that it is level; deviation is allowed no more than a centimeter over the entire length of the base.
Here's what you'll need to build a barbecue:
- Brick ШБ-5, about 1200 pieces.
- Glue "Hercules", at least 23 bags.
- Angular profile No. 45.
- Diamond wheels, 6 pcs.
- Thermal sealant, 1 pc.
- Garbage bags, 6 pcs.
See how you can build a brick barbecue with your own hands:
When purchasing material for building a barbecue, be sure to check the bricks - defects can easily be slipped in. But keep in mind that even with the most thorough check, you will still have to throw away about 3% during work - these will be the spoiled ones that you missed, and the trimmings that cannot be used.
You can learn how to lay bricks correctly and make perfect seams here:
Not just any brick is suitable for building a barbecue: only solid red M 125-175 and fireclay are designed for such thermal loads. Fireproof glue must be diluted with water in the proportions specified in the attached instructions.
If you have to cut a brick somewhere, take a square, a pencil, a tile cutter and a grinder. Next follow these instructions:
- Step 1. Take a brick and draw a line along the spoon. The distance from the edge is 16 mm.
- Step 2. Connect the ends of the drawn line with the corners.
- Step 3. Turn the brick over and lay it at an angle between the boards, press and carefully cut.
- Step 4. If necessary, remove the chamfers and wash the brick with a brush.
Before cutting, soak fireclay bricks for 5-10 minutes, and red bricks for more than 20 minutes. This is such a simple technology.
Note: a chamfer is a brick edge cut at a right angle. Basically, they are removed for the sake of the aesthetics of the stove or in order to hide some defects. This is why you may come across the term "chamfered brick".
Horizontal valves should be installed between 5-56, 21-22 and 25-26 rows, and vertical valves – between 7-9 rows. The thickness of the seam on the mixture should be 5-7 mm, and on the mortar 3-5 mm.
Here is another example of construction:
Pay special attention to the passage of the chimney pipe from the barbecue through the roof, namely thermal insulation. Even if you built such a stove yourself, still invite a professional to control this particular moment if you don’t want to accidentally burn the entire bathhouse. This is what the process itself should look like:
- Step 1. Plumb the corners of the pipe and carefully drill four holes. Keep the electric drill strictly vertical.
- Step 2. Now find the drilled holes on the roof, outline the perimeter, take an angle grinder and cut the required passage. The grinder disk is also held as vertically as possible, and then cut the sheathing with a jigsaw.
- Step 3. Continue laying out the pipe further.
- Step 4. Lay the prepared insulation.
- Step 5: Apply sealant and use a damp cloth to form a joint. It is not difficult!
Just 3 days after assembly, you will be able to light the barbecue and cook the first shish kebab for all the sauna lovers present.
Many who iron a barbecue oven for the first time are also interested in: is an ash pan necessary? Yes, such outdoor fireplaces can often be found, but practice shows that the ash pan is superfluous. It creates a strong air flow, and the meat does not bake or smoke, but burns. After all, a barbecue differs in many ways from a conventional oven, and even its chimney is lower, often without a smoke collector. As a result, traction is greatly reduced or completely absent. There is almost no air flow, and the ceiling of the combustion chamber is always smoked. Therefore, if while frying meat you suddenly need a little traction, just wave the same plywood over the coals, but the presence of an ash pan can ruin the whole picnic after the bath procedures.
Another common question is: does a barbecue need an additional smoker? In principle, this attribute can be useful, especially if a damper and a special box for burning sawdust are made. But don’t be upset if not only the meat or fish, but also the oven arch itself is smoked.
And finally, the last example of building a barbecue for a bathhouse:
We also offer you a couple of interesting video lessons on this topic:
Where to place the barbecue oven?
If you have chosen a stationary stove option for your site or yard, then carefully consider the place where you are going to place your unit. If you plan to place a barbecue area in a ready-made landscape design of the area near the house, then choosing a suitable place will be a little more difficult. When you are just starting to plan the arrangement of the surrounding area, you can choose a place, taking into account all the features of the unit’s operation and convenience for both owners and guests.
The stove should fit well into the overall outline of the home and landscape design, be combined with the architecture of the surrounding buildings and green spaces; it is advisable that garden paths approach the barbecue area.
Try to locate the barbecue area closer to the gazebo, permanent canopy or covered veranda. This precaution will help you in bad weather. In this case, it will be possible not to stop the party and continue the meal under the roof.
If you do not have a single building on your site with a roof that protects from bad weather and sunlight, then it is recommended to install a barbecue oven in a place where there is free space for installing a garden dining set - a table and chairs or armchairs.
By following some simple rules, you can choose a safe and practical place to place your barbecue:
- it is advisable to locate the barbecue area in a place where smoke from it will not fall into the playground or recreation area (check the wind rose for your area);
- It is not recommended to place an open-type barbecue oven in close proximity to the house (from the point of view of fire hazard);
- It would be better not to place the stove near trees, at least you need to ensure that there are no branches of bushes or trees nearby;
- It is not recommended to install the stove on the lawn (the grass will quickly be trampled); it is necessary to equip an area paved with stone, tiles or bricks. In some cases, it is possible to install a barbecue on a wooden platform or deck;
- do not place a barbecue area near your neighbors’ fence, this can not only provoke a conflict, but also attract uninvited guests to the smell of delicious dishes;
- Do not leave flammable substances near the barbecue area.
You will also need to take care of the lighting of the barbecue area. In this case, there is no limit to your imagination and possibilities - you can use wall-mounted street lamps, garlands, LED lights, battery-powered lamps powered by solar energy (note that their light is very dim).