Projects for bathhouses made of aerated concrete today can be found on the Internet in a wide variety and this is not surprising, because lightweight porous concrete is increasingly being used for the construction of buildings for specific purposes. Aerated block is traditionally considered a material for the construction of low-rise buildings, but many are afraid to use it in the construction of a bathhouse due to its hygroscopicity and vapor permeability.
Aerated concrete does have some features, but thanks to the use of the right finishing materials and the implementation of technological solutions, it is possible to easily eliminate the shortcomings of the material, leaving only the advantages that best suit the requirements of the bathhouse. A properly built bathhouse made of aerated concrete will last up to 85-90 years and will be economical and warm.
The main competitive advantages of aerated concrete blocks in the construction of any low-rise building are their low weight, large dimensions and good level of heat conservation of the blocks. The construction process is easy and quick, without the use of special equipment (even one person can handle it), which significantly reduces the amount in the estimate. As a result, the building turns out to be perfectly flat, heat-saving, durable and frost-resistant.
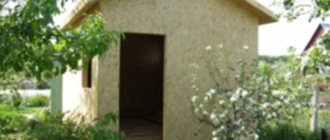
Gas block during the construction of a bathhouse
Aerated concrete bathhouse designs must take into account certain features of the material. After all, a traditional bathhouse is built from natural wood, which does not have a long service life, can rot and become covered with fungus, requires careful care, and is easily flammable. Aerated concrete does not have all these disadvantages, but it also has certain features.
Aerated concrete has a porous structure, large dimensions, ideal shape, and low weight. Thanks to the pores inside the concrete, it is possible to provide high heat/sound insulating properties, but they can also cause the destruction of the building. Aerated concrete is hygroscopic, the pores absorb water, under the influence of which they collapse. Therefore, a bathhouse made of aerated concrete blocks requires proper finishing inside and out.
On the other hand, it is thanks to the pores that heat is retained inside the building - aerated concrete demonstrates excellent heat-saving indicators, allowing you to save on heating in winter and creating an optimal microclimate in summer.
Advantages
A bathhouse project made of aerated concrete can include a variety of rooms and elements, and involve the construction of a small 5 by 4 building or a huge two-story building. Regardless of the specifics of the project and the scale of the bathhouse, before starting work, it is important to study all the advantages and disadvantages of the material.
Key advantages of aerated concrete:
- No shrinkage and, as a consequence, the risk of cracks and deformations.
- Speed of construction - due to the large blocks and low weight, the masonry proceeds quickly.
- Reduced installation costs due to the absence of the need to rent special equipment and the ability to do all the work yourself.
- Reasonable cost - the final estimate usually involves an amount that is 2-3 times less than a wooden bathhouse.
- The aerated block is completely safe for health and environmentally friendly - the material is made from natural raw materials, it does not emit toxins or other harmful substances.
- The foundation can be lightweight due to the low weight of aerated concrete and, as a result, a reduction in the total weight of the building.
- A low level of flammability is a very important parameter when choosing a material for building a bathhouse, where there is an increased risk of fire.
- Resistance to rotting and the spread of dangerous microorganisms.
- Easy care - provided the correct finishing is done, aerated blocks do not need to be treated, coated, etc.
- The vapor permeability of aerated concrete is excellent, so condensation will not accumulate inside and there will always be an optimal microclimate in the bathhouse.
- High heat/sound insulation properties, which is very important for a bath.
- Durability – a properly constructed aerated block building can last up to 100 years.
- The material lends itself perfectly to processing, so the most unusual and original project (in terms of architecture) can be implemented.
Flaws
Aerated concrete blocks also have certain disadvantages. There are not many of them and the impact on the operation of most of them can be minimized by finishing and technological solutions, but these features cannot be ignored.
Some disadvantages of aerated concrete blocks:
- Hygroscopicity – the ability to absorb moisture is high, so it is important to choose the right materials for interior/exterior decoration and ensure high-quality waterproofing.
- The need for vapor barrier is to avoid the accumulation of condensation inside the walls.
- Not very high strength - in order for the building to be reliable, it is important to make an armored belt and strengthen the masonry of the walls with reinforcement.
- The presence of lime and aluminum powder in the composition - if the production process is followed, these components do not pose a danger, but if the production is artisanal, the blocks may not be very environmentally friendly.
- The absence of a special woody aroma and “spirit” in the bathhouse - a gas block will never be able to create this special atmosphere, like natural timber.
Characteristics of aerated concrete
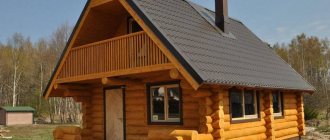
Gas blocks for baths
Why do experts recommend using aerated concrete blocks instead of wood? The answer is simple:
- You can build a bathhouse from this material yourself without hiring a team of builders.
- Prices for aerated blocks are lower for wood, and their service life is much longer.
- A structure made from aerated concrete is strong and reliable.
Among all the characteristics of a building material, there is one that stops many developers from using aerated concrete for a bathhouse. This is a high rate of moisture absorption by the material. This problem can be eliminated only by using good waterproofing material for interior decoration. Externally, aerated concrete walls are treated with special impregnations or primers to reduce water permeability.
Important! Experts do not recommend plastering or painting the outside of buildings made of aerated blocks.
Aerated concrete is able to perfectly retain heat inside a building and practically does not require the use of thermal insulation materials. For the construction of bathhouses, insulating wall blocks are used, which perfectly retain their technical characteristics under operating conditions.
Aerated concrete blocks do not become moldy and are not attacked by rodents. An important factor for building a bathhouse from aerated blocks is the fire resistance of the building material.
The low weight of the blocks does not require the construction of a reinforced foundation structure, which will save on construction time and materials. A building made of aerated blocks practically does not shrink. Operation of the building can begin immediately after completion of construction.
Aerated block bath projects
The most important stage in the construction of a bathhouse from an aerated block is the creation of a project that would exactly meet expectations and requirements and ensure maximum comfort in operation.
What must be taken into account in the project:
- The total area of the building, ceiling height, the presence and location of main and additional rooms, their size (footage), location of doors and windows.
- Location, entry/exit points of all communications (water, sewerage, electricity).
- Preliminary location of the boiler, plumbing, smoke/ventilation ducts.
- Locations of all elements in each room.
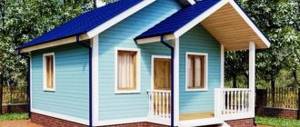
After the project has been created, you can use it to calculate the volume of materials and draw up an estimate. A bathhouse made from an aerated block can be made in a variety of options - from a small building with a minimum of premises to a two-story mansion, which acts more as a leisure center.
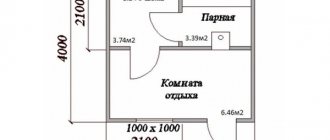
Small sauna up to 20 m²
Small baths are ideal in areas where it is not possible to place a very large building. The project necessarily includes all the necessary premises - a steam room, a washing room (shower room), an entrance hall (it can also be a rest room). The steam room is usually made small, so the sauna quickly heats up to the optimal temperature, which significantly saves fuel.
The shower room may include a cubicle or bathtub, and the rest room can accommodate a compact sofa, a small dressing room, a coffee table, etc. At the same time, such a bathhouse can accommodate up to 5 people. If only one or two people take a steam bath, then the rooms may be even smaller.
This is the simplest version of an aerated concrete bathhouse, which involves small financial investments, quick and simple construction, and minimal maintenance and operating costs. Ideal for small families, provided that you do not plan to steam in a large group. The optimal option is 3 by 4, 4 by 4, 4 by 5, 4 by 6 meters.
Over 30 m²
The design of such a bathhouse requires a large area, since in addition to standard rooms, many additional ones can be provided here - a terrace, a billiard room, a leisure area, etc. In addition, there is no need to skimp on the size of the premises - the bathhouse is designed for 8-10 people to be in it at the same time, so there should be enough space.
Usually the steam room is made of medium size (based on the number of people who will be here at the same time), the washing room (aka shower room) is equipped with a plunge pool and a compact jacuzzi. A small pool can be installed, a large comfort zone can be designed, the arrangement of which is carried out in accordance with the preferences and wishes of the owner.
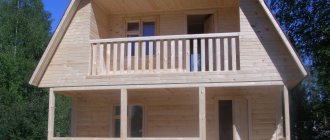
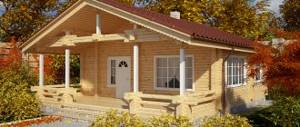
Project of a two-story bathhouse over 90 m²
This is the most expensive and luxurious version of the bathhouse project. A two-story bathhouse requires large rooms where you can comfortably accommodate a group. Much attention is paid to the arrangement of entertainment and recreation areas. The building may have a full second floor or an attic; large terraces are often added.
On the ground floor there is always a bathhouse itself with a shower, steam room, locker room, and toilet. The terrace may have its own canopy or a common roof. The enclosing partitions of the terrace are built from gas blocks, with a wooden or metal frame.
On the second floor they design a recreation area - there can be everything the owners want: most often there is a billiard room, hookah room, table tennis, gym, play area, bedroom, etc. It is advisable to design another bathroom so as not to go down to the first floor.
The layout of the heating and plumbing equipment for a bathhouse can be designed in different ways, it all depends on the layout of the bathhouse, the features and purpose of the premises, the installed equipment, etc.
User reviews
“We built a bathhouse from aerated blocks more than two years ago, although many friends dissuaded us from using this particular material for construction. We took the choice of blocks very seriously and gave preference to autoclaved aerated concrete, which we do not regret at all. We had to carefully work on waterproofing surfaces inside the premises and protecting the entire building outside, but the result is pleasing.” Vitaly Rusov, Voronezh.
“During the construction of the aerated concrete bathhouse, no difficulties arose. We ordered an individual project from specialists, and did the rest with our own hands. The result is excellent. Now every weekend we get together with friends and everyone likes our bathhouse” Alexander Petrovich, St. Petersburg region.
“We doubted it for a long time, but still chose aerated concrete for the construction of the walls of the bathhouse. The result has been pleasing for more than three years. There are no problems with operation. The building is dry, warm and very cozy. We recommend that everyone we know take advantage of our construction experience” Elena Demchuk, Pskov region.
DIY construction stages
You can build a bathhouse from an aerated block with your own hands - it’s quite possible to complete all the steps yourself, provided you have certain knowledge and are willing to comply with all technical requirements and standards.
Foundation
The foundation is usually made monolithic or strip. Tape is cheaper and is considered more reliable.
How to properly make a strip foundation:
- Cleaning and leveling the area, removing vegetation.
- Marking with pegs and cord.
- Digging a trench 30 centimeters wide and 50-80 centimeters deep.
- Filling the bottom of the trench with crushed stone and sand in a layer 20-25 centimeters thick.
- Creation of wooden formwork around the entire perimeter with a height of 75-80 centimeters.
- Installation of the reinforcing belt inside the formwork, connecting the rods with knitting wire.
- Making holes in the structure for communications, outlet pipes, etc.
- Filling the formwork structure with concrete mortar, waiting for drying time.
- Waterproofing work - usually lay rolled roofing felt impregnated with fusible bitumen.
Creating a monolithic base for a bathhouse:
- Leveling, cleaning and marking the territory.
- Digging a pit 80 centimeters deep.
- Filling the pit with sand with a layer of 15 centimeters, carefully compacting it.
- Fill the top with crushed stone with a layer of 15 centimeters, carefully compacting it.
- Installation of wooden formwork around the entire perimeter.
- Installation of reinforcing mesh over the entire area of the foundation.
- Filling the formwork with concrete mortar, waiting until it reaches full strength (28 days).
- Waterproofing with bitumen roofing felt after complete drying.
Walls
The walls are laid at an angle; they begin by checking the dimensions of the finished box. Then a cord is pulled between the corner blocks to make the first row of the wall as even as possible. The first row of blocks is placed on cement mortar, the dimensions and height are adjusted using a rubber hammer and a building level.
When the first row is ready, the solution is allowed to dry, then the laying is continued with special glue, applying it with a spatula, ladle or carriage. The blocks are placed with a dressing in half a stone, the glue seam should be a maximum of 7-8 millimeters thick, but 2-3 millimeters is better.
Be sure to strengthen every fourth row of masonry with reinforcement: a double groove is made in the upper part of the aerated block along the perimeter, a steel rod is placed in it, and filled with mortar. It is better to use a wall chaser - this way the work goes faster.
Installation of door and window openings is carried out with special blocks of a U-shaped configuration. A temporary support needs to be installed under the openings, and the block with the tray is filled with reinforcement and poured with concrete. Steel corner lintels are also used in the installation of openings. The corners are installed in place of the opening, extending beyond the edge by at least 10 centimeters on both sides. The metal corner is cut into the block so that its remaining part is equal to a third of the total width of the block.
The upper last row of blocks is reinforced with an armored belt, tightening the masonry from above and providing support for the roof rafter system. When installing the armored belt, special mortgages (studs) are installed, as well as wire twists on the anchors in order to securely fix the Mauerlat. This way you can protect the roof from the effects of strong winds and reduce the “windage” of the roof.
Roof
A gable roof is well suited for an aerated concrete house. It is relatively easy to make, following all installation rules.
How to install a gable roof:
- Installation of the rafter system (base, rafter leg, crossbar).
- Installation of front triangles.
- Creation of interval or continuous sheathing.
- Laying the attic floor with outlets for ventilation.
- Pediment cladding (if it was not laid in the masonry).
- Covering the frame with waterproofing.
- Performing a layer of any roofing material.
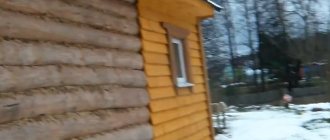
Exterior finishing
High-quality external finishing of a building made of aerated concrete requires compliance with certain rules. The main task of external finishing is to protect the material from moisture and sudden temperature changes, as well as to give the building an aesthetic appearance. First, the external walls are treated with a hydrophobic primer, then finishing is carried out in accordance with the instructions for the material.
The main types of external finishing for aerated concrete:
- Lining – wooden, plastic.
- Brickwork - face brick is used.
- Ventilated facade - panels, siding, facade tiles.
- Plaster using special mixtures.
- Block house – wooden, vinyl, metal.
- Facade putty.
Interior finishing
The interior decoration of the bathhouse must withstand high levels of humidity, exposure to steam, and be able to retain heat. To do this, the ceiling must be covered with a vapor barrier film. Before finishing the ceiling and walls, all surfaces are covered with waterproofing - liquid glass or foil film.
What materials are used for interior decoration:
- Siding - suitable for all rooms except the steam room.
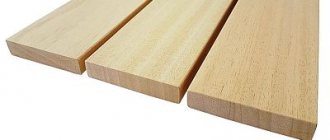
- Wooden lining - made of alder, linden, larch.
- Plastic panels - everywhere except the steam room.
- Ceramic facing tiles - suitable for all rooms.
First, the floors are finished, for which you can use floor tiles or wood. Warm water floors would be a good option.
Before finishing the ceiling, walls, and floors, you need to make a frame with a special waterproofing pad. Next, all surfaces are finished with the selected material.
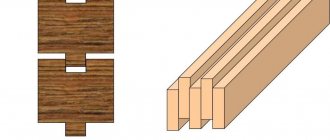
How to lay aerated concrete blocks
The classic method of laying walls and partitions is done “in one block” with the same dressing. However, where the soil is uneven and walls can sag, reinforcement for masonry is necessary or reinforcement with monolithic belts is required.
How the masonry is done:
- There is an alternation of laying two blocks with a spoon.
- Vertical ligation of blocks is performed. In this case, the dressing should be more than 1/5 of the thickness of the blocks themselves.
- A waterproof insulation is laid between the layers of blocks; the layers of blocks are fastened with dowels and there is no need for vertical ligation. The rows are tied with steel rods or glass fittings.
Step 1. How to waterproof under masonry
To begin with, before laying the initial row, be sure to waterproof the base of the bathhouse. Horizontal type cut-off insulation is made with any roll material, for example, roofing felt or mastic will do. A solution using dry mixtures is also suitable.
Step 2. Features of laying aerated block walls
Laying is usually done from the corners of the future bathhouse. For example, for Ytong blocks, a foundation width of no more than 25 cm will be sufficient, but do not forget that the block does not sag above the base by more than a third of the width.
Step 3. How to lay the first row
For laying the initial row, it is important to observe both horizontal and vertical surfaces. Do not forget about the position of the first row, because it will determine the evenness of the walls. First of all, you need to break down the position axes and find out the highest angle using a tool such as a laser level. This is important, since it is from the point of this corner that the entire bathhouse will begin to be built, or rather, the masonry of the first row. If you can’t measure angles accurately with a level, a hose level can help.
To install the first row of blocks, you need cement mortar, which will be used to secure the blocks. Cement and sand should be in a ratio of 1:3. It is better to apply the solution itself with a trowel. The blocks should be placed with their tongues facing outwards, this will make it easier to finish the building. First, the first block is placed on the mortar, then it is checked for strength with a special hammer, and its evenness is checked with a level. After this, subsequent blocks are placed at other levels.
To evenly place a horizontal row of blocks, you need to stretch a rope - it will serve as a special level. It is important to lay blocks starting from the top corner. If you cannot place the last block in a row due to the distance between the blocks, try sawing the gas block with a square or a hacksaw. After cutting, make a vertical notch on the edge of the block. Apply adhesive solution to this notch with a trowel and insert the block into a row. After this, level the blocks again with a level or rule.
Step 4. How to lay the second and subsequent rows
After laying the first row, wait at least 1-2 hours, this is necessary for the cement mortar to bind. After the time has elapsed, it is necessary to sand the surface of the blocks to excellent smoothness. Remove the resulting dust with a brush to ensure normal adhesion of the blocks and glue. You can prepare the glue yourself, or buy it ready-made. It is prepared simply: the dry mixture is poured into a container, water is poured in and everything is mixed with a drill until smooth. Usually the proportions of the mixture and liquid are written on the product packaging. Silicate glue is consumed approximately 5-10 kg per square meter of adhesive joint. It is important not to prepare too much glue, since it is recommended to use this solution within half an hour after preparation. The glue itself takes about four hours to cool and it is important to wait to apply the next layer.
Unlike silicate glue, polymer cement glue hardens much faster. At the same time, this glue must be applied to a maximum of three blocks so that it does not have time to dry. The second row is done in exactly the same way, but do not forget to check the evenness with a level and level with a rubber hammer. Wooden may not be suitable, since aerated concrete is a fragile material and can crumble under its influence. Next, the vertical notch is sawed again at the end and glue is applied; blocks that are shorter than 12 cm cannot be laid. Do not forget about bandaging the seams - the blocks should shift by 7-9 cm when notching the lower rows. The corners of the blocks are placed alternately horizontally and vertically, the tongues must be outward, and they must be sanded with a plane.
If construction takes place in winter, then during laying it is important to dilute the glue with warm water. But if the air temperature is below 15 degrees, it is advisable to stop construction altogether.
Step 5. How to lay partitions
Simultaneously with the construction of the walls of the bathhouse, it is important to lay the partitions in a timely manner. Through the row you need to make cuts in the wall blocks to place the partition blocks in them. The dressing should be no deeper than 13-14 mm. If masonry takes place during the rainy season, it is important to cover part of the blocks being laid with film.
Step 6. How to reinforce masonry
Wall reinforcement
When building walls, it is important to reinforce every third row of blocks. To do this, grooves or grooves are placed under the rods. To get them there you need to have a wall chaser. For ease of cutting grooves, you can take a regular board. This board is placed on the blocks, and the board should be equal to the distance between the groove rods, then the builder stands on the board and runs the wall chaser along the blocks.
Reinforcement of partitions
To reinforce the internal partitions, one rod is used in the center of the blocks. For corner walls, the grooves are placed at the same angle as for regular walls. The reinforcement rods are placed in the already free grooves. It is important to bend the rods at the ends to form corners to fit into the grooves. In this case, you cannot connect the ends of the rods at corners or joints, only in the middle. The joining of the notches of the rods should occur with a distance of no more than 5 cm. After the grooves and rods are fully prepared, the reinforcement can be removed from the grooves and you can begin to make glue, which then must be poured into the grooves, the reinforcement should be placed there, and the remains removed with a trowel.
Laying window openings
For window openings, reinforcement is also very necessary, even more than in rows of blocks. Steel rods 8 mm wide, about 2-3 pcs., are suitable here. or special galvanized fittings. So, you need to indicate the width of the desired opening, and then cut off the same amount of reinforcement, but a little more by 50 cm.
If you use Murfor fittings, then there is no need to cut grooves - you just need to apply glue to the blocks and lay the rods so that both sides are in one part. After applying the reinforcement to the blocks, you need to apply glue and repeat the steps again.
If this is reinforcement of other brands, it is important not to forget to cut grooves on the blocks; these grooves should be the same in length as the rods. After cutting the grooves, you need to remove the dust with a brush and fill the grooves with cement. Dip the rods themselves in cement, remove excess with a spatula, and clean the blocks with a trowel. Apply an adhesive solution on top of this and lay a row of blocks.
Step 7. Opening lintels
To produce standard lintels, inverted U-shapes are used. The opening must be covered by several joined blocks, since the width of the opening is greater than the length of the opening. A T-shaped partition made of boards is placed under the blocks, which are fastened together and with internal openings for self-tapping screws. This is necessary to support the U-shaped blocks on the walls. In this case, the top of the support should be neatly folded opposite the horizontal seam of the blocks.
A special frame made of steel rods measuring 8 and 10 mm is placed in the blocks. To prepare such a frame, you need to cut the reinforcement into 4 identical pieces the width of the desired opening. From those rods that are 8 mm wide, cut into “jumpers”. The frame itself is square in shape and is made by welding. The rods, which have a diameter of 10 mm, are connected with notches, and then in the center.
Next, the frame is laid in special blocks and filled with cement, which must be pressed to prevent the appearance of air voids. Concrete can be compacted by piercing it with a wooden stick. After all manipulations, the surface must be leveled with a spatula. In this case, the surface should not be higher than the gas blocks themselves. After 24 hours, you can continue laying the blocks after pouring the concrete. This is much faster and better than using steel “lintels”, which were made by pouring concrete into the formwork - here you can build immediately after two or even one week, which is a significant advantage in construction.
Do not hastily remove the lintel supports. It is better to do this when the house is completely completed, so the concrete will harden better and the supports will be stronger. It is important to lay out a couple more rows of gas blocks above the window openings. After this, you need to make a partition between the floors, if the bathhouse is two-story, or an armored belt, and only then can you install the roof.
Typical projects with photos and drawings
In order to choose a suitable project for a bathhouse made of foam blocks, you must first decide on the site that is at your disposal, as well as what you expect from your structure. Meticulous planning is a mandatory item in the “preparatory” program, but if you do not want to deal with the distribution of key zones, then use ready-made projects. They already provide for the separation of a sink and a steam room, and there is also an allocation of space for a relaxation room, a dressing room, and in some cases a veranda . Information on how many foam blocks are needed for a bath is in each size section.
3x3
How many foam blocks are needed: 134 pcs. (4.82 cubic meters)
Project options for those who want to build a compact bathhouse. Both separate washing and steam rooms are allowed, as well as combining two zones into one.
4x4
How many foam blocks are needed: 196 pcs. (7.06 cubic meters)
A selection of bathhouse projects with one of the most common sizes. The square base allows you to make good use of every centimeter of usable space.
3x4
How many foam blocks are needed: 172 pcs. (6.19 cubic meters)
A very viable rectangular and quite compact solution will undoubtedly appeal to those who do not have a reserve of square meters at their disposal.
6x4
How many foam blocks are needed: 245 pcs. (8.82 cubic meters)
An excellent selection of bathhouse projects that provide literally everything: a spacious dressing room, a relaxation room, and a veranda. The layout of bathhouses with an attic allows you to include in some cases a games room with a billiard table.
5x5
How many foam blocks are needed: 267 pcs. (9.61 cubic meters)
A project with the placement of functional areas for a spacious square bath.
6x6
How many foam blocks are needed: 334 pcs. (12.02 cubic meters)
Third stage: erection of walls
Aerated concrete blocks begin to be laid in the corners of the building, and a thread is pulled between them - this is a kind of guideline that will prevent uneven laying of the walls.
Professionals recommend that at the stage of laying the first row of blocks, using a building level, get rid of all the shortcomings that arose during the construction of the foundation itself
The first row is laid on the mortar and manually leveled so that the blocks do not move to the side in the future. Once the cement has completely dried, all dust is blown off, the blocks are cleaned and floated. The second, like all other rows, is laid on a special construction adhesive. The layer thickness should not exceed 7 mm.
Use the solution to secure the first row. For others, an adhesive solution is better
*If the bath area is up to 20 square meters, then the thickness of the walls is half a block; in other cases, the thickness of one block is sufficient.
The blocks are laid edgewise, try to make the joints as small as possible, because the thermal conductivity of the bath directly depends on this. Constantly check the evenness of the walls horizontally and vertically, if necessary, level the blocks using a rubber hammer.
A reinforced belt is laid on every fourth row. Using a hand cutter, a small trench is cut out in the blocks around the perimeter, the depth of which corresponds to the diameter of the metal rods. They must be completely immersed in the recess and filled with solution.
Laying is carried out with bandaging on the floor of the block using a glue carriage or ladle. And the installation itself must be done in such a way that the vertical seams of the previous row do not coincide with the next one. To arrange window and door openings I use a concrete belt made of U-shaped blocks. First, temporary support structures are installed under the openings, and then reinforcement is installed in the product tray and poured with concrete.
A wall chaser will help you easily cut grooves in blocks to create a reinforced belt
The last row of aerated concrete blocks is reinforced with a monolithic stiffening belt, which helps to more reliably fix the Mauerlat and other components of the rafter system.
Thickness and layering of walls
The bathhouse is not a living space and is heated only periodically, so there is no need to build massive walls in it. Excessive thickness only increases warm-up time, forcing you to waste more fuel. It’s not for nothing that standard designs provide for a wall thickness of 300 mm - it is the most optimal.
Taking blocks of greater width (375 mm) or laying a wall one and a half blocks long makes sense only in the northern regions. In a relatively warm climate zone, walls can be made no more than 200 mm, for which the same block with dimensions 60*20*30 cm can simply be laid on its edge.
A lot here also depends on the size of the building - a small bathhouse definitely doesn’t need thick walls. Moreover, the facade is also insulated.
A little about masonry
Work begins with preparing the foundation surface, which is most often uneven. When installing gas blocks, manufacturers recommend using special adhesive mixtures. This is more profitable, since glue, although more expensive, is consumed much more economically.
- However, the first row of blocks is placed on a regular solution of cement and sand, and the foundation is also leveled with it. A screed is made, waterproofing is laid on top of it with mastic (to cut off the possibility of capillary suction of moisture), and then the bed for the first row of masonry is laid out.
Laying the first row of waterproofing
- All other rows are mounted with glue - with it the thickness of the seams is thinner, and accordingly, there are practically no cold bridges. Like any building mixture, dry glue is mixed with water, mixed, and swells for 5-10 minutes. Then it is mixed again and goes to work.
- Laying begins from the highest point of the foundation, determined by the water level. In the corners of the wall, ordering slats are placed, a mooring cord is pulled between them, which will make it possible to control the position of the blocks and the thickness of the seams.
- There should be no differences between the upper planes of neighboring blocks, as this can cause cracks to appear. They are sanded - like the block halves, which need to be sawn to complete the laying of the row. The next row begins to be laid on the side where the extension is installed - this will ensure the necessary displacement of the vertical seams.
About reinforcement
If the length of the bathhouse walls does not exceed 6 meters, there is no need to reinforce them in every 4th row.
It is enough that you provide reinforcement:
- On the sides of the openings on top, where the lintels will rest.
- In the penultimate row of masonry in front of the window opening.
- Make an armored belt in the area of the ceiling or support of the roof rafters.
Reinforcement of a number of gas blocks with rods
The masonry can be reinforced either with rod reinforcement: on walls with a thickness of 250 mm or more - in two rows with a diameter of 8-10 mm (on thinner ones, one rod with a diameter of 12 mm is taken). The reinforcement is placed in pre-cut grooves and embedded in glue. You can also use punched tape, steel or basalt mesh to strengthen the masonry.
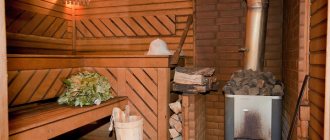
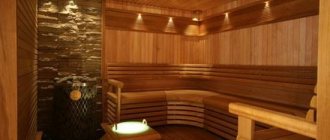
Interior decoration
After laying the walls, they arrange the ceiling and try to quickly install the roof - to protect the construction site from precipitation. Then they begin to form the floor and only then begin to line the walls. First from the inside.
- Traditionally, the walls of the washing compartment of the bathhouse are covered with wooden lining - a profiled board with a tongue and groove on one side and a groove on the other. It is mounted on a wooden sheathing, between the belts of which they lay, for example, foam plastic, covered with sheet foil on top.
Cladding made of clapboard in the steam room
- We have already mentioned the ease of use of materials such as Penofol and Tepofol. They have a great advantage over all known insulation materials, since with the same thermal conductivity they have a vapor permeability coefficient of only 0.001 mg/m*h*Pa. We can say the figure is zero.
- That is, such a material best protects against the penetration of vapors into the wall, while at the same time being a thermal insulator. Thanks to the foil layer, which must face the inside of the room during installation, it perfectly reflects heat.
- A vapor-waterproofing membrane is first installed under the polyethylene foam, making overlaps between the sheets, leading them to the foundation and to the ceiling, and fastening them with double-sided tape. Next, Penofol sheets are mounted end-to-end, gluing the seams with aluminum tape.
- Mechanical fastenings are made with dowels only along the top line, since the sheathing bars installed at the next stage will perfectly fix the rolled insulation. If the lining is mounted vertically, the bars are placed in a horizontal position - and vice versa.
Note: wooden cladding can be provided in other rooms of the bathhouse, but other finishing options are often used in them. For example, they glue moisture-resistant drywall and wallpaper it (in the rest room). In this case, it is advisable to make a choice in favor of a vinyl coating, since it retains steam better. The ideal option for finishing the walls of a bathhouse is ceramic tiles, as well as cement-based plaster, painted with silicone or acrylate paint.