Chimney design
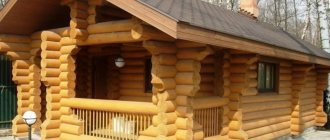
Based on the type of structure location, one can distinguish street (external) and internal chimneys. The street chimney channel goes outside through the wall. Its advantages: simple installation and high degree of fire safety. At the same time, it consumes more fuel and requires insulation.
The channel of the internal structure goes out through the roof and, as a rule, has a strictly vertical configuration without horizontal sections. It has good traction, consumes less fuel and heats up the steam room and sauna as a whole faster. Among the disadvantages, I note more labor-intensive repair and installation, a lower degree of fire safety in contrast to the external channel.
Conditions for normal operation of the chimney
When installing a stove in a bathhouse, the closest attention is paid to the installation of the chimney. Smoke - a product of burning fuel (wood) containing carbon monoxide, which causes human poisoning (to the point of death) must be properly removed outside the premises. To do this, install a chimney for the furnace - a vertical pipe device that discharges combustion products into the atmosphere, the action of which is based on draft due to the pressure difference. The design and installation of chimneys and chimneys is done in accordance with Construction Norms (SNiP 41-01-2003) in force in Russia.
- Air ducts are made from materials that are not subject to corrosion and have a protective coating.
- The smoke duct does not touch communications; in places where it is wired through the walls, the roof is insulated with heat-resistant insulating materials. Heating of building structures next to the pipe does not exceed 50 °C.
- The gaps between the outer walls of the chimney and the sheathing, rafters, wall, and roof should be at least 13 cm.
- It goes strictly vertically. There are no horizontal sections. In ceilings, connections of chimney parts are not allowed.
- The cross-sectional area of the chimney is not less than the size of the boiler pipe. The inlet pressure exceeds 5Pa.
Advantages and disadvantages of a sandwich chimney
The most common type of chimney for a bathhouse is sandwich pipes, which have a number of advantages:
- simple and easy installation, which you can even do yourself;
- high repairability due to standard parts;
- aesthetic appearance;
- high anti-corrosion ability;
- low heat transfer and low condensation due to the insulating layer;
- No soot is deposited on the inner surface of the sandwich pipe because this surface is smooth.
Despite their impressive track record of benefits, sandwiches also have their drawbacks:
- high cost compared to analogues;
- limited service life - up to 15 years;
- When heated, the joints may become depressurized due to metal expansion.
The materials from which it is made are of key importance for a sandwich pipe. The price, service life and safety depend on the filling.
What materials are they made from?
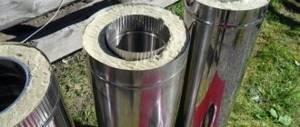
The sandwich pipe has 3 structural elements:
- External pipe. It can be made from various materials: stainless steel, copper, galvanized, steel.
- Inner pipe. It is carried out in a similar way to the outer pipe, but has a smaller diameter.
- The thermal insulation inter-pipe layer is made of cotton wool mineral heat insulator (basalt, stone wool, etc.).
I will dwell in more detail on the materials of the sauna pipe itself: it is this that determines the cost and operational capabilities of the sandwich chimney.
Steel
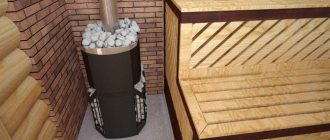
The steel sandwich is made of stainless alloy steel with high anti-corrosion ability. It is very technologically advanced and easily bends in different directions. It is light in weight, unlike, for example, a ceramic pipe. It can be equipped with cleaning hatches and spark-extinguishing grilles, which increase its safe operation. The optimal wall thickness is 1 mm. The pipe itself can be painted in any color, which allows you to decorate it organically.
Which is better: galvanized or stainless chimneys
Galvanization is cheaper than stainless steel, which is due to its lower ability to withstand mechanical damage. Even slight damage to the protective layer can lead to metal corrosion.
Some builders install a combined chimney to reduce costs and at the same time provide the necessary safety and reliability of the bathhouse pipe. Stainless steel is used to make a section in the steam room, where working conditions are more extreme. Galvanized pipe is used in the attic and outdoor areas.
With a combined installation, problems may arise with the joining of elements, so before reducing the budget for building a bathhouse, “measure” the consequences seven times!
Ceramic
Ceramic pipes have a number of advantages:
- High temperature resistance – up to 1200 °C.
- Eco-friendly: they are made from natural clay.
- Light weight in contrast to concrete and brick structures.
- Ease of use due to special ceramic modules, which are manufactured with cleaning doors.
The pipes themselves are compact three-layer modules 30 cm high. The inner layer is smooth, which promotes good traction and prevents combustion products from settling on it. They are easy to assemble into a solid and durable structure.
Glass
The main advantage of a glass pipe for a bath is its attractive and modern appearance. It is made of safety fire-resistant glass: when broken, it shatters into blunt fragments, which eliminates cuts. Glass pipes are durable, easy to clean, and resistant to temperature changes. Not everyone can install such a pipe, because its cost is much higher than chimneys made of sandwiches and other traditional materials.
I think that in the future they will become more affordable, but for now they are a designer luxury that can be abandoned in favor of budget options.
What material is best for a chimney in a bathhouse?
I have listed which pipes can be used to build a bathhouse. I dwelled on each type in detail, highlighting its pros and cons. Now let me clarify that it is not recommended for use in steam rooms.
These include concrete and asbestos-cement pipes: these structures do not comply with fire safety standards for premises with high-temperature operating conditions.
When choosing, take this recommendation into account; otherwise, decide for yourself according to your budget and aesthetic preferences.
Installation and installation
Installing a sandwich chimney in a bathhouse is the simplest type of network installation for removing combustion products. Small and lightweight building elements can be easily assembled using auxiliary elements.
Before erecting such a structure, the following requirements should be taken into account:
Video
The most suitable length from the stove to the fungus on the roof is 5 meters.
The pipe is placed vertically without making ledges. The deviation from the vertical is allowed at thirty degrees, and the maximum deviation to the side is one meter.
Provided that the distance from the roof to the head of the structure exceeds one and a half meters, it is necessary to install a guy wire in order to fix it.
If flammable materials are laid on the roof, then at the end of the smoke exhaust structure you need to install a mesh - a spark arrester; the cells of such a device should be 0.5x0.5 cm. On a flat roof, the chimney is raised above its level above one meter.
The horizontal part of the chimney should not exceed a distance of more than one meter.
Places where elements meet must be left visible. They must not be left inside the roof slab.
Cleanouts and horizontal outlets are not recommended to be placed in the attic; in this room such a structure should run upward.
Such a chimney in a bathhouse is very easy to assemble; it is done according to the principle of a designer. One end of one part is “seated” into the next part:
To do this, the volume of each element on one edge is slightly larger than the corresponding volume on its other side. The reliability of such connections is increased by clamps.
Video
Correct installation of the system in a bathhouse is not possible without proper assembly of the structure. You should start by attaching it to the sandwich pipe of the sauna stove.
This type of work involves the use of a starting cone. One end of it is “seated” on the furnace pipe, and the second is connected to a straight section of the structure.
Often, a chimney in a bathhouse is a simple structure consisting of a pipe leading from the stove to the street. They pass through the roof and ceiling with a small number of turns and accessories.
Buy or make it yourself
Buying a chimney for a bathhouse is easier than making it correctly yourself. But simpler does not mean better, especially if you have the necessary skill, free time and a desire to save money. With the right approach, making a good design will not be difficult. You can use a compromise option: make some elements yourself, and buy some complex components.
approximate price
How much a pipe for a bathhouse costs depends on the number of offers in a particular region of the country, what size the bathhouse itself is, etc.
I collected average market prices so that preliminary calculations could be made.
Basic requirements for a chimney in a bathhouse
The chimney is subject to increased fire safety requirements, because it gets very hot and can cause a fire in the bathhouse. To avoid negative consequences, during assembly and operation you must adhere to simple but important rules:
- 250 mm from the pipe is the permissible distance for placing flammable objects.
- The walls near the stove must be made of fire-resistant materials: fireclay bricks, sheet steel, etc.
- It is not recommended to sprinkle the channel with bulk materials so as not to disturb the air cooling of the structure.
- To prevent fire from sparks, the edge of the pipe must be at the required distance from the roof.
Safety regulations
To ensure that the bathhouse is comfortable and safe, and that the heating device operates without interruption and does not cause a fire or injury, the following safety rules should be followed when installing and operating the chimney:
- Sagging and warping of the elements of the smoke exhaust system are not allowed.
- Turning the pipe is allowed, but not more than three.
- The distance from the chimney to the walls must be at least 50 cm.
- All connections must be made in such a way that none of them end up inside the wall, ceiling or where the roof passes.
- The margin for thermal insulation in the ceiling and roof made of combustible materials is made at least 100 cm when installing a single-wall pipe, at least 20 cm when installing sandwich sections and 6 cm for a smoke shaft or combined chimney. To pass a non-combustible roof, a margin of 13 cm is sufficient.
- If the chimney rises above the roof by more than 1.2 m, it must be additionally secured with braces.
- All connections must be reliable and tight. If a unit is found to be depressurized, it should be repaired immediately. If smoke appears at the junction of pipes or shaft elements, the operation of the heating device is stopped and the joint is repaired.
- During operation, it is necessary to carry out preventive maintenance: cleaning the pipe from soot deposits, discharging condensate from the drip line. This will extend the life of the chimney and heating device.
- When the draft decreases or reverses, as evidenced by smoke in the steam room or boiler room, as well as sparks and hum in the firebox, it is necessary to clean the chimney.
- After a long break in using the sauna, the chimney and heating device may become clogged or airy. In this case, it will not be possible to light the bathhouse. It is better to carry out inspection, repair and cleaning of the chimney before starting up the heat generator.
We recommend that you read: How to make a drainage system on your site with your own hands?
How to make a chimney in a bathhouse with your own hands: step-by-step instructions
The easiest way to assemble a bath channel is from sandwiches. When assembling, there are several nuances that are worth considering so as not to get into trouble:
- Docking of modules must take place in visible areas and is strictly prohibited during ceiling or roof penetrations.
- The optimal size of the horizontal section is up to 100 cm in length, otherwise traction may deteriorate significantly.
Following these two simple rules will help you avoid thousands of negative consequences.
Required tools and materials
To assemble a sandwich structure for a bathhouse, you will need the following materials:
- sandwich modules according to the project (drawing);
- elements for the arrangement of cutting in the interfloor slab and roof passage;
- cotton wool mineral thermal insulation;
- if the sandwich channel for a bath has a complex configuration and horizontal sections, then various adapters will be needed;
- fasteners (screws, ties);
- sealant for sealing joints;
- head.
For high-quality installation you will also need a set of tools. A standard list should include:
- jigsaw;
- drill and screwdriver, or an electric screwdriver;
- skeleton gun for sealant;
- set of chisels;
- level and tape measure at least 5 m, otherwise there will be inconvenience and loss of time during measurements;
- metal scissors.
Design, drawings and diagrams
At the design stage, it is worth considering several common truths:
- The height of the chimney structure to ensure normal operation is at least 450 cm.
- The distance from the edge of the channel to the plane of the roof slope is at least 50 cm.
- The channel must be equipped with a valve (gate, valve) to regulate draft.
- Passage units in the floors and roof of the bathhouse must be thermally insulated.
- The simpler the configuration (the course of the pipe for the bath), the cheaper and more convenient it is!
There are also folk life hacks. For example, paint the outer surface of the pipe with white or light paint to easily detect leaks through which smoke is coming.
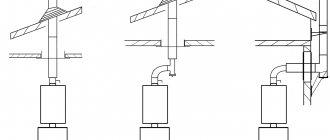
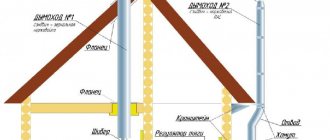
Before assembly, it is important to make a drawing or diagram. Below are two diagrams of a chimney made from sandwiches, which can also be used for a bathhouse.
Diagram of the external (external) channel
Internal channel diagram
Methods for connecting modular elements in a chimney
Sandwich modules can be connected in two ways:
- "By the smoke." This connection prevents smoke and carbon monoxide from entering the room. The lower module is inserted into the upper one so that the edge of the lower one is higher than the edge of the upper one, as shown in the right figure.
- "By condensate." This option prevents condensate from entering the heat insulator of the sandwich pipe. To do this, the upper module is inserted into the lower one so that the edge of the upper one is inserted below the edge of the lower one, as shown in the left figure.
Assembly order
Before installing the sandwich pipe in the bathhouse, passages in the ceiling and roof are prepared. If the cutting of the ceiling-passage assembly (CPU) should be done immediately, then it is better to make a hole in the roof with the sandwich pipe directly approaching it. This way you can prevent the premises from getting wet during rain, as well as unnecessary work on closing the hole itself.
After installing the PPU, you can begin assembling the sandwich line:
- To accelerate heating of the steam room, a steel pipe is immediately installed, and the sandwich is installed closer to the ceiling at a distance of 20–30 cm
- You should not join modules in passage units, otherwise to repair them you will need to disassemble the polyurethane foam or the passage in the roof.
- It is better to install sandwiches for a bathhouse “in the smoke” to protect the health of steamers.
- The joints of the modules are sealed with heat-resistant sealant.
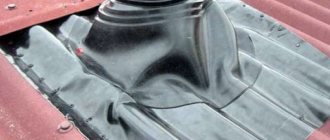
- The roof hole is closed with a flash master with a silicone lining, which seals the roof hole.
Light weight and simple joining of sandwich pipes allow two craftsmen to install them in a short time. You can even assemble a sandwich pipe for a bathhouse yourself, but it is better to call a competent friend or acquaintance to avoid amateurish mistakes.
Chimney passage through a wooden interfloor ceiling
The ceiling-passage assembly (CPU) in wooden floors should be carried out in accordance with SNiP, which sets out the following rules:
- The PPU sleeve is made of non-flammable material, see SNIP for the classification of materials.
- The cutting (the passage of the pipe through the ceiling) is made of fire-resistant materials (basalt wool, etc.).
- The cutting for wooden floors is made with a width of 50 cm.
- The cross-section of the sleeve must be wider than the diameter of the channel to ensure convenient installation.
- You should not use a rigid groove connection with an overlap to prevent channel bending.
- The setback (distance between the pipe and the adjacent wall) for wooden walls is 26–50 cm.
Compliance with these simple rules will ensure the safe operation of the bathhouse chimney and the health of bathhouse attendants and steamers.
Chimney passage through a roof with a roof made of combustible materials
The channel through the roof is carried out as follows:
- Marking and cutting of the roof is done in such a way that there is at least 130 mm from the outer layer of the pipe to the edge of the roof.
- If the roof is insulated, then under-roof and top plates are installed, and the space itself is filled with a heat insulator.
- If the roof is cold, then it is enough to install a flash master.
- The outer cover or flash master at the junction with the roof is coated with bitumen sealant.
Methods for connecting modules
The chimney can be installed in one of the following ways:
- "By the smoke." Such a scheme is designed, first of all, to 100% protect the heated room from the penetration of dangerous carbon monoxide. The internal pipe of the lower module is mounted in the corresponding socket of the upper one, allowing smoke to freely pass through the joint area and be removed from the chimney. On the other hand, with this arrangement, condensation may enter the joint. If the seams are poorly sealed, this will reduce the service life of the structure.
- "By condensate." Here, on the contrary, the inner pipe of the upper element is placed in the socket of the lower one. This prevents moisture from getting inside, while smoke is quite capable of penetrating into the area where people are staying, seeping through any, even the most inconspicuous, cracks.
We recommend that you read: Instructions for creating a porch from a profile pipe
Thus, every owner faces a dilemma - which method to prefer. On one side of the scale is safety, on the other is durability of the structure and savings. What to choose, everyone decides for himself, however, in any case, sealing seams should be treated with maximum responsibility. If you are sure that the joints are absolutely sealed, the “condensate” scheme seems more appropriate .