One of the most important tasks when building a bathhouse is the correct exit and sealing of the chimney pipe. Moreover, two problems need to be solved at the same time: ensuring fire safety and insulating the pipe joint from the flow of precipitation and condensate.
First of all, before solving the problem of water passage, it is necessary to determine where the pipe exits on the roof. The height of the pipe must comply with certain standards. The height depends on where the pipe will exit on the pitched roof.
[toc]
How far should the pipe be raised above the ridge of the bathhouse?
When installing a pipe, the following rule applies: “The closer to the ridge, the higher the pipe should be raised.”
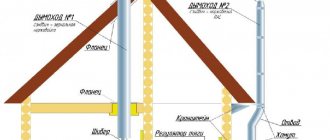
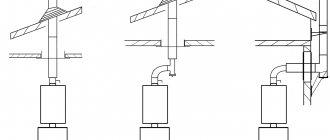
Elevation of the chimney above the roof plane
- If the distance from the center of the chimney to the ridge of the roof does not exceed 1500 mm, the pipe must be raised above the ridge by at least 500 mm ;
- With a distance from the center of the pipe to the ridge from 1500 to 3000 mm, the top of the pipe can be at the same level as the roof ridge;
- At a distance of more than 3 meters, the top of the pipe must be no lower than a line drawn down from the ridge at an angle of 10 degrees to the horizontal.
Where is it better to route the pipe through the roof of the bathhouse?
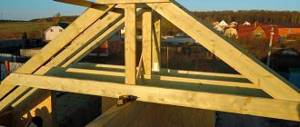
The most convenient option for bringing the pipe through the roof is to pass it through the ridge. In this case, installation is easiest; there are rarely snow pockets on the ridge, and thanks to this arrangement, it is easy to carry out insulation work. But this method has a drawback: the rafter system should not have a ridge beam. An option with two beams that are attached in the area where the chimney passes through the roof is also suitable, but this is quite difficult to implement and is not always possible.
The most unfortunate option for placing a chimney is in a valley (a valley is a roof element made of a kind of tray, forming an internal angle between the joints of the pitched roof elements). Large masses of snow usually accumulate here; during rain, water flows down from two slopes, so even with the most careful insulation, a leak will only appear a matter of time.
The most convenient option for venting the pipe through the roof is near the ridge
Based on this, the most acceptable option for pitched roofs is not far from the ridge, but below it:
- installation is quite simple,
- There is usually little snow accumulation, which means there is no need to install snow retention,
- installation is not the most difficult,
- Due to the not very high height of the pipe, it does not need to be reinforced with braces.
If it turns out that the chimney runs close to the floor beams, or close to them (the minimum distance should be 13-25 cm depending on the type of pipe), exits in the valley or close to the slope, an additional elbow, with which you can lead the pipe to the right place.
If the roof of the bathhouse is pitched, the most reasonable solution would be to organize the pipe outlet through the roof near the top point of the roof.
Ways to increase traction
If the draft force is in the chimney duct of the heating device, eliminating this defect is not always easy. Experienced stove makers use the following methods and methods to increase it:
- The first thing to do if you suspect insufficient draft in the chimney is to clean the pipe. To do this, call a chimney sweep or remove soot deposits from the inner surface of the chimney with your own hands using a metal stove brush.
- A significant increase in the power of the chimney can be achieved by increasing the height of the chimney above the roof surface by adding several additional segments. Using the same method, the chimney is removed from the zone of wind pressure from a ridge or higher building.
If you were unable to find a solution to the problem of lack of draft inside the smoke exhaust duct on your own, seek advice from an experienced stove maker who will tell you what to do and correct the defect in the most rational way.
How to remove a pipe through a roofing pie
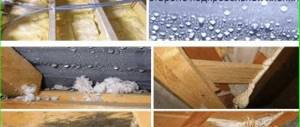
Bathhouse roofs, as a rule, have solid insulation, which solves the problem of heat preservation. To ensure good heat and moisture protection properties of the roofing pie, it is necessary that the membranes and films of heat and moisture protection are continuous.
By bringing the pipe through the roof, we necessarily violate their integrity. Moreover, according to fire safety standards, the distance from the pipe to combustible materials (which are vapor barrier and waterproofing films) must be at least 13-25 cm . How to get out of this situation? The best option is to separate the area where the pipe passes through the roof. To do this, additional rafter legs are fixed at the required distance from the pipe on the right and left, and transverse beams are installed below and above at the same distance between these rafters. In this case, the pipe ends up in a separate box.
Roof passage unit
It often happens that “the pipe hits the rafters.” In this case, the rafter leg is cut, additional rafter legs are installed, as well as cross beams. This creates a box for the safe passage of the chimney through the roof
The space between the pipe and the rafter structure is filled with mineral wool. Not with fiberglass - it does not tolerate high temperatures, but with basalt wool, which tolerates temperatures normally and does not lose its heat-insulating properties when exposed to moisture.
At the same time, to ensure the tightness of the roofing pie within the box in which the pipe will be located, the materials are cut into an “envelope”, the edges are wrapped up to the beams and rafters, secured with staples or nails (counter sheathing strips can be used). To prevent moisture from entering, the areas where materials adhere to the wood must be additionally insulated using adhesive tapes or sealants.
The roofing pie at the passage site is cut into an “envelope” and secured to the sheathing and rafters
But there is another option. If the temperature of the pipe in the area where it passes through the roof does not exceed 50-60°C, you can simply glue the roofing cake films using the same sealants and adhesive tapes. This is possible if, for example, a tank for heating water is installed on the pipe after exiting the firebox or an additional heater is installed, etc., but it is not a sandwich that goes out onto the roof.
In any case, to drain condensate in the waterproofing layer, you will need to attach a drainage groove. You can buy it (usually it is made from stainless steel), or you can make it yourself from a film of sufficient thickness. The groove is secured around the pipe and its end is pulled out to the side. Thus, the condensate flows into this groove and is discharged onto the roof slope.
Sealing rectangular and square pipes
To ensure the reliability of the roof in the areas of valleys and junctions, a tie made of metal parts (junction strips), which are inserted 150-200 mm under the covering, will help.
The junction of the apron with the corrugated sheet around the chimney is sealed with roofing sealant. Eaves outlets are installed at the bottom and sides, directing the flow of precipitation onto the roof slope.
Before applying corrugated sheeting, it is necessary to seal the passage of the riser with a membrane.
1. A cross-shaped cut is made in the material and glued to the walls of the chimney at a height of more than 5 cm.
2.Self-adhesive tape “Vakaflex” is attached under the upper junction bar: from below, from the side, then from above.
Sometimes a chimney is installed in a finished roof, cutting a hole in the corrugated sheeting with a margin of 1.5-2 cm. To do this, the metal sheet at the junction of the rectangular pipe is bent, a waterproofing membrane is glued and a lower and then an upper sheathing is installed, tightly pressed against the roofing pie and the chimney.
Safety precautions when installing a chimney must be strictly observed
Plastering a pipe
To avoid the formation of a thick layer of plaster, you should know how to properly insulate pipes:
1.First, seal all existing irregularities on the pipe with cement mortar;
2.Then cover the walls with reinforcing mesh;
3.The final stage is applying plaster.
Important! Before covering the first layer, bring the solution of lime, cement and slag chips (or sand) to the consistency of sour cream, sprinkle without leveling. The second coating is denser; it is applied with a trowel, rubbing until a smooth surface is obtained.
The reinforcing mesh will allow the plaster to adhere well to the pipe and not crack when drying
Strengthening the pipe with asbestos cement
Lining a chimney with asbestos cement requires the use of a cement-lime mixture applied to the surface of the slabs.
1. The chimney is reinforced with a mesh and the first layer of solution is sprayed.
2.A new layer of the mixture is applied to the insulation sections and attached to the surface of the chimney.
Asbestos contains carcinogens that are dangerous to humans, so experts do not recommend using it in residential areas.
Sheet iron cladding
When insulating a metal pipe, you should maintain a distance of 60 cm from the chimney to flammable materials.
1.The structure is wrapped in mineral wool 5 cm thick, overlapping, and clamped with steel wire. The top is wrapped with a metal sheet.
2. Rivets are inserted into the pre-prepared gaps and the heads of the clamps are closed with a special tool.
WHAT IS THE GOAL?
When preparing drawings, it is important to provide for the direct location of the pipe coming from the furnace.
-The maximum heating temperature of the outer wall of the chimney should not exceed 50 degrees.
-Waterproofing of a brick chimney on the roof allows you to comply with established standards, and metal elements will require additional insulation to prevent the formation of condensation.
After installing the pipe, it is enough to carry out plastering followed by laying millite silica, thermal insulation wool MKRR-130 or rolled felt MKRF-100.
If the outer part of the pipe is 2 meters or more in height, it is strengthened with additional braces
Passage through the roof depending on the roofing material and type of chimney
When passing through the roof, the most important thing is to remove the water flowing down the roof and the pipe itself. To protect against precipitation, protective aprons are used, the upper edge of which is placed either under the sheet of roofing material located above, or under the ridge.
The apron is placed either under the sheet of roofing material located above or under the ridge
When venting the chimney through the roof, it must be fixed, but so that it remains movable relative to the roof. Otherwise, due to thermal expansion/contraction, the integrity will be compromised and leaks will certainly appear. For example, a round pipe can be given direction by metal strips or corners.
When installing, check the verticality using a plumb line - this is important so that soot does not accumulate and there is good traction.
The pipe should not be fixed rigidly when passing through the roof.
Brick pipe passage through the roof
If the chimney is brick, rectangular or square in shape, you can use the materials included with the roofing material.
When passing a brick pipe through the roof, you can use elements offered by roofing material manufacturers
If the roof is made of metal tiles, then the companies that produce it offer special tapes for sealing the joint with the pipe, on one side of which an adhesive layer is applied. These elastic bands are a complex compound containing aluminum and/or lead. One edge of such a tape is glued with the adhesive side to the base of the chimney, the other - to the roof sheathing. The upper edge is additionally fixed with a metal strip, which is attached to the brick with heat-resistant dowels.
To reduce the likelihood of water flowing along the wall, you can make a recess under the bar - a groove. Then the tape and bar will be in the recess. To completely eliminate water seepage, a heat-resistant sealant is applied to the joint.
They practically also seal the passage of a pipe through a roof made of soft tiles or roofing felt. But in this case, instead of an elastic tape, the tiles or roofing felt themselves are placed on the chimney.
When a pipe passes through a roof covered with soft tiles, its edges are placed on the chimney or apron
You can make an apron for a square or rectangular pipe yourself. Roofers usually use sheet metal for this, but sheet aluminum works well. Four separate parts are made of metal - two side, front and back.
An apron for a rectangular or square pipe is easy to make yourself
The metal strips are bent so that one part fits onto the pipe, and the second is attached to the sheathing. In a brick chimney, in the upper part of the apron, an edge is made, which is inserted into a special groove and coated with sealant. To prevent water flowing down the apron from getting onto the sheathing and insulation pie, a sheet of metal of large width is placed under the front part of the apron, with curved sides along the edges. It goes under the roofing material and is called a “tie.”
If metal tiles are used on the roof, then an apron is made from a smooth sheet of the same color, the upper edge of which is tucked under the row of roofing material located above so that water flows onto the apron and does not flow under it. If the pipe comes out close to the ridge, you can either tuck it under the ridge itself, or bend it to the other side.
There is one important nuance: if the width of the brick chimney is more than 80 cm (its size is perpendicular to the rafters), you need to make a slope - a small gable roof located higher. It removes sediment, reducing the likelihood of leakage. But such a width of chimneys in a bathhouse is the exception rather than the rule.
Passage of a round pipe through the roof
Modern round chimneys in bathhouses are usually a sandwich pipe. Occasionally, you can still see asbestos pipes on the roofs of bathhouses, and even more rarely - a single pipe without thermal insulation.
A simple single wall, which is discharged through the roof, carries a very high probability of a fire. Therefore, using this option is extremely undesirable.
Modern round pipes are usually sandwich pipes
The video below shows an option for sealing a pipe when installed on a metal tile roof.
If metal tiles are used as a roofing material, then manufacturers often offer roofing passages. They are made from a sheet of the same color and connected to a special cap through which the pipe passes.
Pipe passage through a metal roof
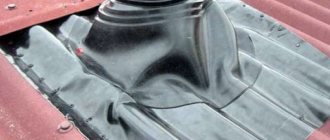
It is easy and simple to seal a round pipe on the roof if you use a factory penetration. It consists of an aluminum flange to which an elastic part made of rubber or silicone is attached.
Factory-made penetrations are the easiest option for sealing the junction of the pipe and the roof
They come in different sizes and have different slope angles. You can choose it for any diameter, roof type and installation location. The penetration flange is coated with a composition similar to the composition of the corrugated part; there are grooves along the edges into which they are filled with sealant. One of the penetrations, “Master Flash,” has 11 sizes that cover diameters from 3 to 660 millimeters.
Walkthrough "Master Flash" MASTER FLASH
When installing such a penetration, part of the corrugation is cut off in accordance with the required diameter. Then it is put on the pipe. The rubber must move with force to ensure a tight fit. Since the hole is about 20% smaller than the diameter of the pipe, you have to pull hard. To make less effort, you can lubricate both with soapy water.
How to install a factory penetration
After the corrugation is pulled to the desired location, the flange is given the required shape - the material is plastic and you can use a hammer, but you need to work carefully.
Using a hammer, give the flange the required shape
Then the grooves located on the inside are filled with sealant, the edges are pressed against the roofing material and secured (self-tapping screws are included in the kit). If the roofing material is not iron, self-tapping screws are not suitable. You need to use either long screws that will reach the sheathing, or dowels for the floor slabs.
Split model of penetration
There are quite a few options for factory-made penetrations, and there are detachable models. They are used when there are thickenings on the pipe or when they have to be mounted on an already assembled chimney of great height. In this version, the kit includes clamps that connect the parts of the passage to each other. The rest of the installation is similar.
The video shows how to seal a penetration through a regular slate roof using a MASTER FLASH corner penetration.
Roof sealants
In order to seal the joints of different parts of the bathhouse pipe passage through the roof, you need to use not just a roofing sealant, but always a heat-resistant sealant. It is advisable to use a neutral silicone heat-resistant sealant.
If Master Flash is installed on a metal roof (metal tiles or metal profiles), then it is necessary to use silicone sealant that does not contain vinegar (non-acetic sealant). This is necessary so that it does not enter into a chemical reaction with the metal and does not destroy it.
Roofing silicone sealant retains its properties in the range from -50°C to +300°C, which is sufficient for all weather conditions and is quite suitable for sealing a chimney.
Roof sealant must be neutral and heat-resistant
But you need to remember that the surface to be treated must be clean and dry. The time for complete hardening is indicated on the packaging, usually 24 hours.
Fire safety precautions when using MASTER FLASH
MASTER FLASH made of silicone can withstand temperatures up to +300 degrees Celsius. This is quite enough to seal a sandwich pipe and, in many cases, a chimney made of asbestos-cement pipe.
The passage through the metal tile is sealed using a Master Flash penetration. Additionally used bitumen tape
As for the metal mono-pipe, in these cases it is possible to use MASTER FLASH in cases where the length of the chimney from the stove to the passage through the roof is at least 3 meters. As a rule, in this situation the temperatures will not be critical, but if not, then thermal insulation of the area that passes through the roofing pie is necessary.
Effective ways to increase chimney draft
Designing a chimney is complex and responsible, on the correct execution of which the efficiency and safety of using the heating device depends. No heat generator is capable of functioning normally without a pipe that removes smoke from the room. Smoke is a mixture of gases containing residual products of fuel combustion. The appearance of smoke inside a heated room is a sure sign of an incorrect design of the chimney system, which entails the risk of fire and carbon monoxide poisoning. This article will tell you what backdraft in a chimney is and how to prevent its occurrence.