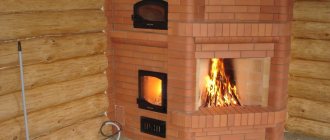
A personal bathhouse on their own site is the dream of many owners, but not everyone decides to start independently building such a desired facility. As a rule, many of them are put off by the completely erroneous opinion that to build a wood-burning sauna with your own hands you need to have a lot of money and extensive experience in performing such work. In practice, building a bathhouse is not so difficult. You just need to follow all the steps in the given guide.
DIY wood-fired sauna
Construction of the foundation
The construction of a bathhouse begins with preparing the foundation. A wooden bathhouse can be built on a strip foundation. Also, columnar bases are perfect for such buildings.
Strip foundation for a bathhouse
First stage. Prepare a trench for the foundation. Determine the trench parameters individually in accordance with the selected type of foundation, dimensions and weight of the future building, soil characteristics at the construction site, etc.
Second phase. Carry out the necessary backfilling. The technology for constructing foundations requires the creation of a cushion of sand and crushed stone. Reinforce the foundation. The order of reinforcement will vary depending on the type of base chosen.
Third stage. Pour the concrete. In the case of a strip base, concrete must be poured in horizontal layers. Treat each layer with a special vibrating tool to remove excess air.
Fourth stage. Waterproof the foundation. Select the type of waterproofing, again, in accordance with the design of the foundation. Most often, special coating waterproofing materials and roofing felt are used.
Bathhouse foundation
At the stage of arranging the foundation, consider creating holes for future utilities. It is most convenient to do this before pouring concrete. It is not recommended to create any holes in an already poured foundation, because... this may lead to reduced structural strength.
Preparing for work
You don’t need to specifically figure out how to weld a stove for a sauna; the drawings can be found here; they will make the task much easier. These options have been tested many times in practice, the calculations are made correctly and accurately. All you have to do is find a suitable option and follow the included instructions exactly.
All tools and building materials must be prepared in advance. You will definitely need:
- welding machine;
- tank for concrete solution;
- measuring container;
- construction mixer;
- tape measure, level, plumb line, ruler;
- Bulgarian;
- grinding and cutting wheels;
- hacksaw for metal;
- saw;
- hammer;
- technical knife;
- set of spatulas;
- rags.
Before welding a sauna stove, you need to prepare the necessary tools and equipment.
Basic consumables for creating a sauna stove:
- sand, cement or ready-mixed concrete;
- sheet steel (thickness 0.8 cm);
- metal pipes with a diameter of 60 cm and a wall thickness of at least 8 mm;
- reinforcing rod with a cross section of at least 1 cm;
- wheel disks;
- brick or stone;
- wooden plank.
Important! It is better to work in special clothes. Be sure to use gloves, a protective mask, etc.
Walling
Approximately 3-5 weeks after pouring the foundation, you can begin building the walls. The construction procedure will vary depending on which material you decide to use as the main one.
Walling
Traditional Russian baths are built from logs. Currently, frame construction is very popular. It’s easiest to build a frame bathhouse - the wall elements are sold ready-made, so all you have to do is secure them to the foundation.
Walling
It is recommended that beginners give preference to frame baths. Firstly, constructing a frame from ready-made blocks does not require much experience or serious skills. Secondly, the result will be a reliable and environmentally friendly wood structure.
Build the walls in accordance with your existing plan and design. At each stage, check the evenness of the installation of structures using appropriate tools. Don't forget to leave openings for doors and windows.
At the beginning of the construction of walls, you can lay floor joists in parallel and think about the installation of utilities.
Stage one. Preparing the container
First, we determine the dimensions of the container that will be used to heat the water. To do this, you need to find out what the maximum number of people will take a steam bath at the same time. And the calculation should be as follows: per person there should be about 8-10 liters of heated water.
Note! It is preferable to use an open type container for this.
This involves slight evaporation of the liquid, but we get several advantages:
- freedom of access;
- the ability to remove residual water in winter and maintain the internal surface;
- In addition, we will be able to clean the inside of the container from scale and dry it.
Such a boiler can be purchased at a specialized store, or you can make it yourself. Well, let's start building!
Roof structure
Roof structure
After removing all the walls and partitions planned for the project, begin building the roof.
First stage. Knock down the base of the roof from reliable and durable wooden blocks - Mauerlat.
Second phase. Place the rafters on the prepared base. It is more convenient to assemble the rafters on the ground and lift them onto the roof in finished form.
Roof of the bathhouse
Third stage. Fix the sheathing to the rafters. Most often, continuous sheathing is made of boards. This is the most convenient, reliable and versatile option.
At the same stage, think about where the chimney will exit. Leave a hole in the sheathing of the appropriate size for the passage of the chimney.
Fourth stage. Secure the necessary insulation materials. On the attic side, a vapor barrier material is attached to the roof frame. Insulation is placed in the sheathing, usually mineral wool. A layer of polyethylene film is fixed on top of the insulation for waterproofing.
Don't forget to nail small wooden blocks to the sheathing elements to create a counter-lattice. Thanks to them, a gap will be created for normal ventilation of the under-roof space.
Bathhouse roof insulation scheme
Fifth stage. Install the selected roofing material. At this point, focus on your preferences and available budget. The main thing is that the finishing coating is fireproof and reliable. After laying the roofing material, proceed to installing the floor.
Roof
Other stove elements
The next stage of work is the construction of the firebox and ash pit. In this case, it is necessary to correctly calculate the dimensions of the firebox, taking into account various factors - fuel for the bath, the presence of a collector for heating water, and so on.
The ash pan, pan and ash pan are needed to collect remaining fuel; they also facilitate the flow of air into the firebox through the grate. To regulate the intensity of firewood combustion, you need a pan or valve. If the bath needs to be heated quickly, then the tray needs to be moved away and then put back in place.
A mandatory element of a heater for a brick bath is a chimney. It first crosses a tank of stones and then goes through a tank of water to be heated. It can be made using ceramic blocks or sandwich pipes and then insulated. The lower part of the structure up to the ceiling is made of steel; when passing through the ceiling pipe, a gate is installed to adjust the draft and improve the degree of combustion.
If the structure is made of a sandwich pipe, then it has two walls, between which there is thermal insulation. Pipes can be installed from the ceiling to the fungus on the roof. To insulate a brick chimney, you need to cover it with basalt mats and secure them with wire. A fungus or umbrella is placed on the structure itself to protect it from precipitation.
Is finishing necessary?
The stove-heater does not require any finishing. But the color of the brick can be further enhanced with a solution of hydrochloric or sulfuric acid, and the stove can also be tiled or plastered.
The layer of plaster is up to 15 mm; for this purpose, compositions based on sand and asbestos with the addition of clay, cement, lime and other elements in different proportions are chosen.
Before finishing, the stove must be heated, then the first layer is wetted and applied to its surface. When it sets, a second one is applied. The wall needs to be rubbed down so that it is perfectly smooth, and when finished it can be painted.
Bath floor
At this stage, no difficulties will arise.
Bath floor
First stage. Insulate the basement of the building. To do this, secure mineral wool and plastic film along the base or above-ground part of the foundation.
Second phase. Pour the concrete floor in the washroom. In the remaining rooms of the bathhouse, make a thermal insulation backfill; expanded clay works well.
Third stage. Lay insulation boards (mineral wool) and vapor barrier material in all rooms.
Wooden floor for a bath
Finally, all you have to do is install the supports for the plank flooring, lay the boards and finish the surfaces. Place the supports in such a way that there is a gap of 10-20 mm between the flooring and the underlying insulating materials.
Construction of a potbelly stove: features, principle of operation, arrangement of heat exchangers
A potbelly stove with a water circuit works as follows:
- Firewood is loaded into the firebox.
- They light a fire, the heat is transferred directly to the water tank or the recuperator coil.
- Hot water enters the heating or water supply system.
- Remaining heat and flammable gases are removed from the room through the chimney.
- The ashes fall through the grate into the ash pan.
The design of the water circuit unit uses two energy harvesting principles:
- Direct thermal energy collection. The heat exchanger circuit is located inside the stove. Heat transfer immediately begins from the contact of the open flame and the boiler tubes. The water in the radiator boils and enters the heating system. From there it is sent to water supply pipes. The heat exchanger experiences large temperature differences (the contrast between the temperature of the water and the heat inside the oven).
- Collection of secondary heater radiation. The boiler circuit is located outside the heater. Being outside, it collects secondary thermal radiation from the heated metal surface. The degree of heating of the heat exchanger is lower than in the previous case, temperature differences are not so significant. The water in the device circuit begins to heat up after the stove warms up.
Photo gallery: common types of heat exchangers
Mineral salts form inside the boiler. Therefore, instead of water, it is more advisable to use antifreeze or antifreeze, which contain additives that prevent the formation of mineral deposits. The most common heat exchanger designs:
- a water tank built into the stove - a capacitive boiler;
- tube boiler - a tank in the form of a water jacket around the stove or chimney - capacitive heat exchanger;
- main boilers - a coil spiral or a water conduit passing through the active heat transfer zone.
Calculation of the main parameters of a potbelly stove with a water circuit
To calculate the dimensions of a stove with a water circuit, you need a drawing, drawing or sketch of the future device. This will help avoid manufacturing errors.
Having chosen a suitable project, we determine the parameters: length, height, width. We calculate the dimensions of the combustion chamber, the length and diameter of the pipe, and the height above the floor. A potbelly stove is characterized by high temperatures inside the boiler, so metal with a thickness of more than 3 mm should be used. Or carry out scheduled repairs every 2-3 years.
Thick-walled alloy metal is used in the manufacture of potbelly stoves
Bath decoration
Bath decoration
Start finishing work with insulation. Polystyrene foam is traditionally used for external thermal insulation. The inside of the bathhouse is usually insulated with mineral wool.
First stage. Cover the walls of the bathhouse with a vapor barrier material. A special membrane film material is suitable.
Second phase. Attach the sheathing to the walls of the steam room in increments of 1-1.5 cm smaller than the width of the insulation.
Third stage. Lay waterproofing material over the insulation. You can use plastic film that you are already familiar with.
Fourth stage. Apply finishing trim to the walls. Usually the cladding is done with wooden clapboard. For the rest, be guided by your own preferences.
Do-it-yourself bathhouse finishing
Move on to finishing the ceilings. The insulation process is carried out in the same way as the thermal insulation of walls. It is recommended to use fiberglass to insulate the attic floor. Mineral wool with a vapor barrier material is laid on top of the fiberglass and a rough finish is performed. You can also make a cement screed.
One, two and done
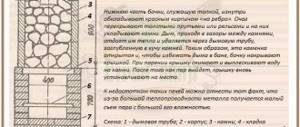
Currently, there are drawings of potbelly stoves with round and rectangular sections. The figure shows a diagram according to which a potbelly stove can be made with your own hands from an ordinary milk can; a similar design can be made from a metal barrel.
Potbelly stove from a can
In order to make a potbelly stove like this for a summer house or garage with your own hands, you will need a minimum of tools and materials:
- An old milk can (if you chose the option of making it from a barrel, then the barrel is made of metal);
- Metal rod with a diameter of 6 mm;
- Retraction. If you have the skill, you can make it yourself;
- Hammer;
- Chisel;
- File.
You can start working with your own hands. We specifically did not indicate the dimensions so that the master would base it on the diameter of the barrel or can used.
First you need to make a blower. To do this, a rectangular hole is cut below the neck of the can (barrel). The edges of the hole are processed with a file.
After this, it is necessary to cut a hole in the bottom of the can (barrel) of such a diameter that you can subsequently insert the outlet tightly (see the article Chimney for a potbelly stove). This is done as follows:
- At the site of the future chimney, markings are made at the bottom of the can or barrel. The diameter should be 2 mm less than the diameter of the outlet
- Using a chisel and hammer, cut a hole according to the markings
- The hole is leveled using a file. A round file is best for this.
- The outlet must be pressed tightly into the hole. If the outlet does not fit, the hole is finished with a file. In any case, the outlet should fit tightly
- A snake is bent from a metal rod; it will act as a grate
- The finished grille is bent so that it can be inserted into the neck
- The inserted grate is aligned inside the can (barrel). The grate is made from reinforcement and welded to the body. As can be seen from the picture, there are two doors installed here for the blower and firebox. Such stoves can not only warm up a room well and quickly, but they can also be used to successfully cook food.
The potbelly stove is ready. If you wish, you can make a stand for it yourself. If you install a damper damper, you will get a stove with adjustable draft. Setting up such a damper is quite simple.
As you can see, a potbelly stove can be made with your own hands without special tools and materials. Simply install a stove made from a barrel or can in the desired location and connect the chimney. Your potbelly stove made from a barrel will regularly warm the room until you install stationary heating.
Installation of doors and windows
Installation of doors and windows
At this stage, no difficulties usually arise. To install the doors, it is enough to install the frame, fasten the hinges, hang the leaf, and then install the decorative elements and fittings
The technology for installing windows will vary slightly depending on the material they are made of.
Installation of doors to the bathhouse
In general, there are no difficulties either. First, the frame is fixed in the prepared opening using anchors or special plates, the position of the window is leveled in all directions, the cracks are filled with polyurethane foam and slopes are constructed.
Options for welded heating devices
When thinking about how to cook a sauna stove yourself, you must first decide what kind of fuel will be used.
In heating metal structures the following is used:
- firewood, pallets, coal and/or briquettes, i.e. solid fuel;
- kerosene and/or diesel fuel, low octane gasoline (the so-called heavy);
- electricity;
- natural gas.
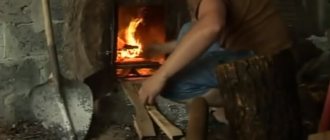
It is believed that it is best to heat a stove using firewood; they convey a specific sauna aroma.
The optimal fuel option for a metal stove in a sauna is, of course, firewood, pallets and/or briquettes. You can use brushwood or wood chips. This is an affordable combustible material. The degree of safety when using it is perhaps the highest.
Nuance! Kerosene, diesel fuel and/or heavy gasoline spoil the interior atmosphere of the room with harmful emissions and unpleasant odors. Fire safety when using them is significantly reduced.
Gasoline and kerosene have a very unpleasant odor, so it is not advisable to use them to fire a stove in a bathhouse.
Before you weld an iron stove into a bathhouse that will operate using electricity, you should think about the high cost of such a device. An electric furnace requires careful handling, high-quality wiring, and careful insulation of all wires and connections. This greatly increases the cost and complexity of installation work. Energy consumption during operation of the furnace is high. Electricity prices are constantly rising.
An electric stove in a bathhouse is considered the most expensive option for heating a steam room
Fuel for a gas furnace is supplied in cylinders or through a special outlet pipe. It is connected to the central highway. The gas poses a high risk of explosion or accidental fire. You should think about this thoroughly when deciding which stove to cook for your sauna.
Gas stoves in the sauna are also an inexpensive option for heating the steam room, but are very explosive
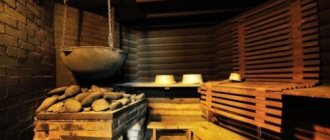
Arrangement of the bathhouse
In matters of internal arrangement, be guided, first of all, by your personal preferences. You will be using the bathhouse, and it is you who should feel comfortable and comfortable in it.
Arrangement of the bathhouse
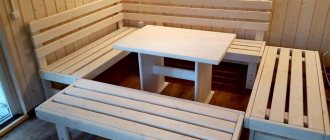
Among the useful and most important items for furnishing a bathhouse are a table with chairs for the rest room, a small refrigerator, an optional billiard table and a TV, hangers, headrests, buckets, lighting fixtures, etc.
When it comes to wiring, it is best to enlist the help of a professional electrician at this stage.
Also, in the process of arranging a bathhouse, you need to connect the main plumbing fixtures and all related activities.
Basic elements of a sauna stove
A metal sauna stove is assembled from the following elements:
- main firebox;
- a reservoir for collecting the resulting ash - an ash pit;
- a pass-through combustion pipe leading into the adjacent room (if necessary);
- afterburning system;
- tank with a capacity of 120 liters or more;
- steam pipe;
- inlet pipe for water supply;
- inlet for installing a shower (optional);
- protective screen (casing);
- tank for emergency water heating;
- tap and valve for water;
- chimney pipe system;
- lockable firebox door;
- grate.
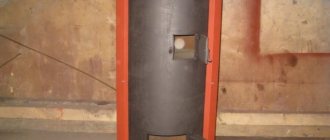
Design of a welded metal stove in a bathhouse
You will definitely need a scoop and a special bucket to remove ash, soot and other combustion products.
Bath stove
Bath stove
The stove is the heart of any sauna. For your steam room, you can choose absolutely any of the many existing variations of sauna stoves. Beginners can be advised to take a closer look at metal wood-burning heating units. A metal stove is much easier to create and install compared to its brick counterpart. The process of arranging a furnace includes several simple steps.
DIY sauna stove
First stage. Prepare a pipe about 150 cm long. The diameter of the pipe should be about 50 cm.
Second phase. Cut the pipe into 2 parts. One part will be 90 cm long and will be used to make a heater with a combustion chamber; from the second part you will make a tank.
Third stage. Cut a hole at the bottom of the long pipe measuring about 200x50 mm. Weld a round steel plate with a thickness of 12 mm over this hole.
Fourth stage. Prepare a sheet of metal for making a grate. Select the dimensions of the grate so that it fits normally in the body. The grate itself is installed in the ash pit. For convenient and reliable fastening of the grate, weld 4 “ears” to it.
Sheet steel stove
Fifth stage. Cut a niche for the combustion chamber. Make a metal firebox door measuring 250x300mm and secure it in place using hooks and loops. A simple latch must be attached to the door.
Sixth stage. Weld the heater blank over the firebox. The functions of the heater will be performed by a piece of pipe about 350 mm long. Weld the back wall of this pipe. Equip the pipe itself with a door up to 300 mm wide.
Seventh stage. Fill the heater about half full with pebbles. Weld a steel circle to the heater to prevent the pebbles from falling out.
Eighth stage. Attach a coupling at the top of the stove with a width of 5 cm and a thickness of about 0.5 cm. To make the coupling, use a steel bar. Weld the coupling to the unit body so that one half of the product protrudes above the stove. You will attach the tank to this part of the coupling.
Metal stove
Ninth stage. Prepare a container for water. Weld a circle of steel about 8-10 mm thick from the bottom to the end of the tank. First, in this circle you need to cut a hole with a diameter of about 15 cm for the chimney. Weld the bottom of the chimney to the bottom of the water container so that liquid cannot drain into the firebox.
Tenth stage. Cover the top of the water container with the steel circle mentioned earlier. Weld the chimney to the hole in the circle. Prepare a hole in the top of the water container for pouring liquid. Equip the hole with a convenient lid with a handle.
Eleventh stage. At a distance of about 350 mm from the water tank, weld a steel platform about 300 mm wide.
Twelfth stage. Weld a faucet with a valve opposite the water supply hole (it is located at the bottom of the tank).
Thirteenth stage. Install the combustion chamber doors.
This completes the assembly of a simple wood-burning stove for a bathhouse. However, you need to know not only how such units are assembled, but also how to install them correctly.
First stage. Prepare the foundation for the stove. You can lay out a brick platform or pour a concrete base 20-30 cm high. You will still have to lay two rows of refractory bricks on the concrete with clay mortar.
For the stove in question, a foundation measuring 700x700 mm is sufficient. Make the foundation at a distance of at least 20-30 cm from the walls.
Installing a stove in a bathhouse
Second phase. In the place where the chimney pipe passes through the wall or ceiling, install high-quality thermal insulation. Asbestos works well for this. Additionally, cover the insulation with clay mortar.
Third stage. Cover the part of the pipe passing in the space between the ceiling of the bathhouse and its roof with a layer of plaster and lime on top. The pipe must rise above the roof ridge by at least 50 cm.
In wooden baths, metal stoves must be lined with brick. A screen with a height of about 120 cm will be sufficient.
Thus, you can handle all the work on building a bathhouse - from laying the foundation to assembling and installing the stove - with your own hands. You just need to follow the instructions you received in everything, and very soon you will be able to enjoy the healing steam of your own bathhouse.
DIY wood-fired sauna
Good luck!
Read an article on our website about how to make a country bathhouse with your own hands.
Materials for making a potbelly stove for a bath
There are several types of potbelly stoves, differing in the material they are made of. The choice of one of them should depend on the size of the bath and its base.
- Metal potbelly stove. Suitable for baths of standard sizes - from 25 square meters. It heats up quickly, but also loses temperature quickly - it will need to be heated from time to time. A properly built metal stove will allow you to enjoy light steam and eliminate the need to heat it regularly.
Important: Metal seems to be one of the most reliable materials for constructing a potbelly stove for a bath. This material will not crack or deform over time.
- Potbelly stove with a brick wall. It will provide the necessary steam for a bathhouse of any size, but will require quite a lot of space. When erecting such a structure, you should be very careful about the selection of materials, as well as the process of creation and use. Thus, during construction, microcracks should never be allowed to form. It is recommended to use only a flow-through heater.
Regular heating will help to avoid the formation of cracks: be sure to carry out this process when the stove has been idle for more than 5 days, and also prepare the bath for 4 hours before each use.
- Cast iron potbelly stove. An excellent option for large baths consisting of several rooms. Cast iron heats up quickly and retains and releases heat well, and also requires accessible and cheap fuel. Among other things, cast iron resists high humidity and temperature changes well.
We also recommend studying this topic:
Cast iron stove: types, advantages and disadvantages, models
Cast iron stoves, despite their long history of existence, are still in demand. They are often used for heating rooms and cooking. Modern models of such stoves are equipped with a hob and even an oven.
12743 2 0
Installation and connection
When installing the stove, you must strictly follow the fire safety rules:
- The distance to walls and surrounding objects must be at least 800 mm. The walls can also be covered with ceramic tiles.
- All parts of the chimney must be tightly connected.
- The room must be equipped with a supply and exhaust ventilation system.
The chimney is installed like this:
- We fix the first piece of pipe above the chimney opening.
- We increase the pipe bends to the ceiling level.
- We make holes in the ceiling with a diameter of 170 mm. We remove a layer of thermal insulation around the hole to prevent fire.
- First, we mount the pass-through glass, then insert the pipe into it.
- Next, we connect the pipes to the external chimney.
- We apply bitumen to the pipe and insulate it.
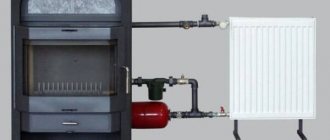
If you need to heat a large area, you can connect the stove to a heating panel. This will increase the heat flow and allow it to be retained longer.
Types of fuel and types of stoves
Bathhouse stoves are divided into 2 main groups: metal (cast iron) and brick options. Brick sauna stoves are heat-intensive; they take longer to heat up, but also take a long time to cool down. An iron stove is an economical heating item due to its multitasking, simplicity and convenience of equipment. When choosing a stove or fireplace, you need to look not only at the design of the heat source, but also at the type of fuel. When burning the same mass, different fuels will release different amounts of heat. There are many variations of the energy carrier.
According to the aggregate content and type of fuel, all fuel groups are divided into solid, liquid and gaseous fuels. Solid is a common class of fuel, it includes: coal, peat, briquettes, firewood, pallets. They are used only in ordinary ovens as they burn quickly. Liquid fuels are kerosene, fuel oil, diesel, boiler, and coke liquid.
They have significant calorific value. The first type of gaseous fuel is natural gas, obtained from gas reservoirs, or associated gas from naphtha production. It has good calorific value.