305
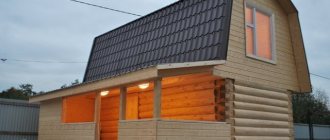
An aesthetic, economical and functional Kuznetsov stove for a bathhouse is the best solution for anyone who decides to do masonry on their own. Special technology developed by I.V. Kuznetsov, will allow you to achieve maximum efficiency - up to 95%. For comparison, a traditional Russian stove provides from 20 to 40% efficiency. Many stylistic and design solutions allow you to install a bell-shaped structure in any residential or non-residential premises.
Igor Kuznetsov’s projects allow you to create a stylish and practical solution for a living space, street or bathhouse
Characteristics
A one- or two-bell model designed for a bathhouse has a number of undeniable advantages, namely:
- thanks to the “free movement of gases” system, the formation of soot is reduced and the most uniform heating of the brick is ensured;
- the compact design is capable of efficiently heating a bathhouse designed for 6-8 people;
- optimized heat supply allows you to save on wood and other types of fuel;
- a minimum number of metal elements extends the life of the furnace;
- the stove heats 140 liters of water without boiling;
- there is the possibility of additionally integrating a circuit to provide hot water supply;
- high efficiency is ensured due to the fact that air that has already cooled and given up its heat to the brickwork enters the chimney.
Important! Another advantage of Kuznetsov’s design solutions is the ability to choose different designs and shapes of the structure. This allows the heating device to fit organically into any interior of the room.
Project selection
This stove project is suitable for many types of baths. The dimensions of the structure will allow you to heat the room (10-15 m2) up to 50 degrees, and when steam is supplied, up to 90 degrees. A tank with a capacity of 180 liters is built into the stove and satisfies all the necessary hot water for a comfortable washing process for all household members. To allow the heater to cool for a longer time after the end of the combustion chamber, iron pipes are provided (6 pieces, next to the water tank).
The pipes also support the stones above the combustion chamber. The pipes heat up quickly, and after the heating process is completed, they gradually release heat. There is a hole above the cobblestones through which water will be supplied to generate steam.
Having formed the project, you need to begin the assembly process itself. Assembling a stove with your own hands is not difficult. Guided by masonry drawings, the process takes little time.
Types of structures
I.V. Kuznetsov was involved in the design of all types of heating structures. Among them the following varieties can be noted:
- cooking structures used for cooking;
- heating models to maintain optimal temperature in residential premises;
- fireplace stoves that allow you to create a unique interior;
- street “blacksmiths” used as barbecue devices:
- stoves for baths or saunas.
Moreover, the structures can be combined. Heating - equipped with a functional hob, a spectacular fireplace heats the house with high quality. Designs with beds add a touch of coziness to the interior, characteristic of houses equipped with a spectacular Russian stove.
Bell-type heating solutions are often equipped with beds
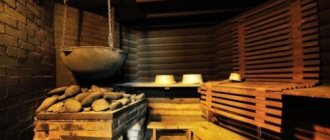
A small stove made of bricks for a bathhouse
This small stove made of brick for a bathhouse is extremely simple and economical. It is suitable for small steam rooms.
A small stove made of bricks for a bathhouse
The procedure for her is extremely simple. It contains a relatively small weight, and, provided the required thickness of the transverse beams is observed and fire safety measures are observed, it can be folded without a foundation.
A small stove made of brick for a bathhouse. Order
In reality, as many baths as there are probably so many stove projects - any owner tries to make the most of the existing space, so changes and adjustments are almost necessary. If you have even a little skill in working with bricks and mortar, you can completely build a brick stove with your own hands. However, if you are not confident in your own abilities, then you need to think about inviting a skilled stove maker, at least as an expert. This can save you a lot of money: rebuilding a stove and removing defects often costs much more than installing a new stove.
In most cases, it is easier to install a metal stove (for example, “Heat”) and line it with brick.
DIY instructions
Having decided to equip a bathhouse with a stove according to Kuznetsov’s design, it is not at all necessary to turn to specialists for help. Using the available instructions, you can make a stove with your own hands. To do this, you need to stock up on the necessary tools and materials, prepare the foundation and act, focusing on the features of the drawing.
What materials are needed?
The following materials are required for construction:
- facing brick (not lower than grade 150);
- fire-resistant brick (ShB-5 or ShB-8);
- clay (fireproof);
- sand sifted through a fine sieve (preferably mountain sand, characterized by the absence of debris);
- metal wire for reinforcement;
- iron parts (metal corners, door, hearth plate, grate, chimney pipe valve);
- pre-ceiling metal sheet, an alternative to which can be ceramic tiles or any other fire-resistant material.
The amount of materials is determined by the dimensions of the structure and the selected drawing. Before choosing the optimal solution, you should evaluate the size of the room and settle on a suitable option from a wide range of I.V. projects. Kuznetsova.
Thanks to the cladding, the structure looks truly impressive
Required Tools
In addition, it is necessary to prepare the tools that will be used during construction. This:
- containers for mixing solutions;
- trowel;
- building level and plumb line;
- spatulas;
- construction corner;
- Bulgarian;
- hammer drill with mixer attachment.
Foundation preparation
A high-quality foundation is the basis for a durable and strong structure, both for a bathhouse and for any other room.
- The dimensions of the base must exceed the dimensions of the future heating device by 15 cm around the perimeter. It should not be connected to existing foundations.
- If the heating device will be placed along the walls, then it is necessary to remove the foundation under construction 6 cm from them, making sure to cover this distance with a layer of sand.
- Waterproofing is an essential part of building a foundation for a stove installed in a bathhouse, a room with high humidity levels and sharp temperature fluctuations. The installation of a sand cushion at the bottom of the trench and roofing material laid on top of the concrete layer will help to avoid damage to the base.
- A reinforcing frame will help strengthen the strength of the base.
Foundation construction
The stages of pouring foundations are as follows:
- A hole is dug, the width and length of which are determined by the dimensions of the future structure. Depth - 1 meter.
- The bottom of the pit is filled with 15-20 cm of sand and a similar layer of crushed stone.
- A few days after the sand cushion shrinks, formwork is made, for the construction of which you can use both boards and any other unnecessary wooden products.
- A reinforcing metal rod is laid.
- At the last stage, concrete is poured. This must be done slowly, constantly removing air bubbles formed on the surface.
- The base should be 2 bricks higher than the level of the main foundation of the room.
Brickwork begins after the foundation has hardened. But before moving on to this stage of work, you should decide on the location of the chimney, both inside and outside the building.
Drawing
To date, the famous stove maker has developed 17 variants of these stoves. For installation in baths, drawings of BIC BK and 14 types of BIC PC are also used. Projects differ from each other in the placement of the firebox, the presence or absence of an oven for stones and a fireplace, as well as a hob. The stove can be equipped with a built-in or remote water tank, and equipped with an open heater. There are solutions for a bathhouse that works “black”.
Heating and cooking structure
Stove in the interior of the bathhouse
Fireplace variety of "blacksmith"
Multifunctional bell furnace
Important! Whatever design of the furnace is chosen, there is a detail that is required for each “blacksmith”. This is a floating firebox, for the installation of which it is necessary to make a special dry seam - a gap to the extreme corner of the stove, almost at the bottom of the firebox. It helps distribute gases into cold and hot ones, and helps raise hot gases into the bell for further cooling.
The process of installing a “dry seam” is presented in the video:
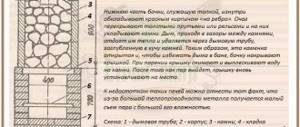
Laying and ordering
- The first rows of the furnace are laid from fire-resistant fireclay bricks. The bricks are connected using masonry mortar. External walls are faced with facing non-hollow bricks.
- After laying the first level, the angles must be checked, each of which must be equal to 90 degrees.
- Cleaning channels are installed - in the back of the furnace, in the blower and on the sides of the structure.
- At the next stage - when laying the 2nd level - smoke exhaust channels are installed, a ash pit is formed, as well as an ash pit.
- The laying is done in a checkerboard pattern, maintaining a joint thickness of 6 mm. The brick is placed on a mortar based on refractory clay.
- At the same time as the walls, internal partitions are formed, a wall separating the working part of the furnace from the blower.
- At the 5th row level, they begin to install a grate, the thickness of which directly depends on the degree of potential fuel loading. There are 7 mm gaps between the grate and the oven wall.
- The grille is mounted at a minimum angle relative to the door. The door itself is installed.
- The combustion chamber should be additionally lined with bricks laid on edge to protect the furnace from overheating of the walls.
- At the level of the 17th row, a cap is placed. After this, they begin to arrange the upper chamber, located strictly above the first.
- The cap is covered and at the level of 21 rows, passages are made along both walls.
- Upon completion of laying the 26th row, the upper cap is covered with brick.
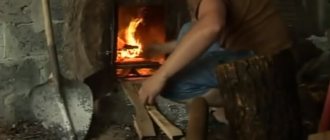
- Starting the furnace is possible only 24 hours after completion of construction work. During the test run, a minimum amount of fuel is used. After checking the structure for leaks, they begin its full operation.
A stove ready for further use.
The sauna design has its own differences. Namely:
- A baking tray with stones is placed on the lower cap.
- Access to water and holes are provided to allow steam to escape.
- The walls of the furnace are thicker than the walls used in the construction of the heating structure.
Kuznetsov's sauna stove - ordering
In the bathhouse at Kolchin in Kuznetsy, the stove is brick
06/27/2012. village Blacksmiths (Pavel Posad).
Evgeny Kolchin, a real and big fan of the bathhouse, is waiting for me on the porch of his own bathhouse.
The weather is fine, sunny. Nearby there is a forest and a lake. In the lake there is a boat, ducks, fish. In short - hunting and fishing, mushrooms and berries - just 2 steps from the bathhouse.
It’s been a while since I picked up checkers in this area.
1. Summer kitchen - barbecue. There is an umbrella with a design on the pipe. British lawn.
2. Key mode in the bath: T=53-60°C, A=50-65%. Evgeniy is a supporter of a moderate, mild healing climate in the sauna. Extreme is no use.
The powerful oven maintained a stable temperature with a smaller gradient in height.
Evgeniy is a fan of dousing the walls to obtain moisture in the sauna (they doused them with cold water). At the same time, the heat of the stones is saved and a mild climate is achieved. I completely agree with him.
While I was hanging and setting up the devices, I was sweating profusely under the influence of the pleasant elastic warmth of the stove..
Rice. 3. Fragment of recording by a new sensor (up to T=125C) of indicators in the sauna.
The change in time step occurs at times when the comp. “fell asleep” (when they went to CO) and the recording stopped.
Raises of the burgundy line occur when steam is supplied (and T rises) or when walls are poured (T decreases). Some small jumps down occurred during calibration (subtracted 2-5 units).
Because the steam room is new, some of the steam went into the gap between the pipe and the ceiling. And part of the steam goes into the pipe through an incompletely closed valve. We saw this at the end when I poured a lot of about 1 liter of water on the stones, but the humidity did not rise, and the temperature dropped a couple of degrees. (:-( Similarly, with the doors not tightly closed (there are only 4 of them one after the other), the steam quickly disappeared, but even with this the steam was wonderful.
Calibration was done using the DVT-03 device (up to T = 120C, manual recording). We were debugging a new meter and measurement channel. Due to this, not everything provided is suitable for work.
4 . The interior of the bathhouse is a relaxation room, a dressing room with a warm stove wall (there will be a bed and the possibility of gentle heating from the stove), a dressing room with a font, a steam room. The floor is a tile with a drain, heated from the stove to 45-55°C. Ceiling - 68°C (difference of about 15° per 2.4 m is good). The top of the stove is about 90°C, the walls are 65-67°C.
5 . The stove is brick. Above the door there is a curtain made of a blanket so that the steam does not escape when the door is opened. Very comfortable look.
6. Temperature distribution on the surface of a brick stove at the beginning of steaming. It remained approximately the same after 3 hours.
7. The shelves at the bottom are not “wired” - easy to clean. We also checked a bunch of household thermometers and hygrometers.
8 . Evgeniy likes to drink delicious (green) tea in the sauna in a light steam. He made extremely tasty steam - three varieties: with garlic; with mint; and, of course, wormwood.
Plus, in one situation, he dropped some anise drops on my hat. Until then, the aroma of anise lingers throughout the apartment, which overpowers the less pleasant aroma of wool.
There were many measuring instruments. Electronic, alcohol thermometer, hygrometers and thermometers with a spring bimorph element and with a thread. They all work differently and show different humidity levels in a wide variety of ranges. Thanks to this, it makes sense to calibrate home hygrometers, for example, at T=60 and A=50%. Then in the range of interest to us (60C x 60%), the difference is minimal
9. A font with fresh water from the lake. Easy to empty and very easy to fill. It's essentially a dip in a lake.
10. And, of course, in addition to temperature and humidity, health was measured - before and after the sauna (cardiogram recording). With this information, you need to go to a cardiologist to understand the effect of the bath on your health. Previous measurements using a cardiovisor and angioscan showed severe stress on the body.
11. The side meter did not want to stay on the body for long and moved away. I had to duplicate measurements.
In general, the atmosphere was calm, peaceful, and relaxing. Because heat affects understanding (demagnetizes), something was forgotten - both distant events and momentary ones (for example, the furnace valve). But there was time and opportunity to appreciate the comfort of the bathhouse and sauna. It’s small, the shelves are wide, the burgundy hot stove is a meter away from me. Comfortable, like being in a walnut shell. Pleasant hot tea, greenery outside the window, clean air. Well, my favorite thing - I understood how hygrometers of different designs behave. Sergei had a similar cozy atmosphere in Priozersk on Ladoga.
And when the test takes place in a crowd of talkative and excited bathhouse fans entering and exiting the steam room, when knowledgeable people are waving brooms and knocking down appliances - this is a completely different song. “I don’t need that kind of hockey!”
Standard set of tools for making furnace linings
- For cutting and fitting – tile cutter or grinder
- For straightening tiles - hammers with a rubber head
- For drilling - drill
- The solutions are mixed with a construction mixer or a drill with a whisk attachment.
- Rubber and notched spatulas for applying adhesives
- To control the verticality and horizontality of the cladding - a plumb line and a building level. More convenient are rack levels with bubble ampoules not only on the long sides, but also on the ends
Consumables - dowels or staples, crosses for tiles (plastic crosses must be removed from the seams), special grouting compounds for stove linings on a mineral or silicone basis, designed for high temperatures.
Only metal meshes are used for furnace lining; fiberglass meshes are unacceptable. The reason is that the mesh distributes not only mechanical impact, but also thermal impact. Therefore, a reinforcing metal wire mesh with a cell of 25 * 25 mm - 50 * 50 mm and a steel cross-section of 1.2-2 mm is used. For a standard layer of glue or primer of 3 mm, this is optimal. But even if the thickness of the glue applied according to the instructions is greater - 4 or 5 mm, it is not recommended to use wire mesh thicker than 2 mm, since the linear expansion of steel is significant, and this creates a danger that when the oven is heated, the tile cladding may begin to peel off.