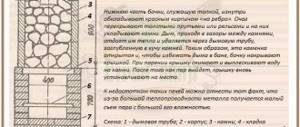
Every bathhouse needs a stove to heat it. And the furnace requires a portal. This is a structure for placing cast iron, a kind of frame.
It must be made of durable and heat-resistant materials that can withstand the temperature of a hot oven for a long time.
Each person who starts building his own bathhouse decides for himself how to approach the arrangement of the frame. It can be made in the form of an ordinary wall, or you can approach its arrangement with a design concept.
Every bathhouse should have such a structure. We'll tell you how to make it yourself.
Types of brick stoves
The general principle of the construction of a brick kiln is the same. The structure consists of the following elements:
- firebox;
- ash chamber;
- heater;
- chimney;
- grate bars.
As for the nuances, chimney channels can be vertical and horizontal. In a “black-style” stove there is no chimney at all. To heat the water, a heat exchanger or tank is provided. For baths, stoves differ in the design of the heater. The stones are separated from the fire only by a grate or a blank slab is installed.
Fold the stove for a Russian bath according to one of 4 options:
- The “black” design does not provide for a chimney. The smoke comes out through the heater into the room, after which it evaporates through the cracks of natural ventilation. The advantage is the simplicity of the design. The sauna warms up faster, fills with aroma, and less wood is needed to heat it up. One of the disadvantages is the grueling waiting process. You can’t steam in a bathhouse until the wood burns out and the fumes disappear. The upper part of the steam room gradually becomes overgrown with soot. Important! Inside the bathhouse with a “black” stove installed, the walls are treated with a special impregnation that repels soot accumulation.
- A sauna stove made of gray brick is equipped with a chimney, but you can steam in the same way after all the wood has burned out. The requirement is related to the design of the heater. The firebox is separated from the stones only by a grate. Most of the smoke escapes through the chimney. However, the smoke still seeps through the stones. “Black-style” stoves can be direct-flow, where the fumes come out through a pipe, and ducted, where the gases are removed through 2 dampers.
- To heat the steam room and dressing room, white stoves are installed. The brick structure is equipped with a chimney. The stones are separated from the firebox by a solid slab, which prevents children from entering the bathhouse. The firebox is located in the dressing room, and the stove itself with the heater is located inside the steam room. The advantage of brick construction is environmental friendliness. The disadvantage is the long process of heating the stones, which can take up to 12 hours.
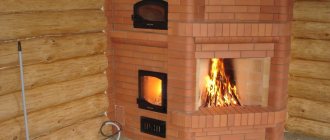
- A stove with a stove is a modern type of brick structure. In addition to stones, there is a tank of water. The heater is heated through cast iron plates placed above the firebox and chimney. The hot water tank is lined with brick on three sides. The reflective screen increases the heating rate.
Conventionally, brick stoves are divided by type of fuel: gas, firewood, coal, electricity, briquettes, diesel fuel. The best fuel for a bathhouse is firewood.
Its power depends on the size of the brick kiln. The recommended minimum dimensions are 89x102 cm. With these dimensions, the length of the structure is 4 and the width is 3.5 bricks. The optimal height is 168 cm, but this parameter also depends on the dimensions of the built-in tank.
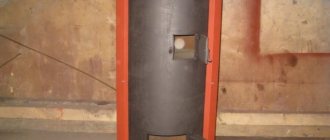
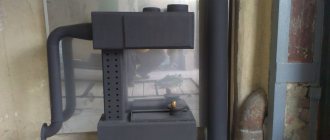
Advice! You can put a metal stove in the bathhouse and line it with bricks on the outside.
Advantages of the stove
Each model of a heating device with a closed type heater is distinguished by the following properties:
- Preventing the penetration of carbon monoxide into the steam room. This is ensured by the fact that the fuel chamber, like its door, is located outside the steam room. Thus, instead of specific smells in this room there is the aroma of herbal infusions and brooms.
- Uniform heating of the entire furnace structure, creating optimal conditions for producing light steam. The steam room creates a pleasant microclimate for a comfortable stay in the room.
- If we compare two types of heaters from the point of view of safe use, then the closed type device has great advantages. In this case, the possibility of burning with steam when pouring water over the stones is eliminated. In addition, the fuel chamber located in the adjacent room ensures safety during bathing procedures.
- Maintaining the temperature at a given level for a long time even after stopping the combustion process. This is achieved by slowly cooling the closed heater.
Brick sauna stoves: projects
Depending on the preferred design, the design of a brick heater stove for a bathhouse differs, but most often the option with a water heating tank is in demand. There are many projects specifically for this design. They are all practically the same. The only difference is the location of the tank: above or below.
Important! The number of rows of bricks forming the oven depends on the size of the tank and its location.
When developing a stove design, it is important to think about the safety of its use in a bathhouse. A heater without a chimney is placed in a steam room. Other stoves with a firebox are brought into the dressing room, and the back part with the heater is immersed inside the steam room. The walls of the bathhouse are lined with flammable material. For safety, it is optimal to maintain a gap from the stove of at least 30 cm. The distance can be reduced to 20 cm if the adjacent sections of the wall are lined with brick or metal with an asbestos lining.
The project provides for safe passage through the roof and ceiling of the bathhouse. A gap is left around the chimney and filled with non-flammable material, such as asbestos. A metal frame is placed on the roof around the chimney to prevent precipitation from penetrating under the roof.
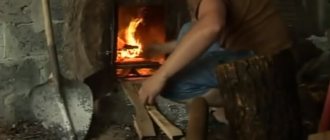
Advice! A metal sheet is nailed onto the wooden floor in front of the firebox, protecting the wood from accidentally falling coals when loading fuel.
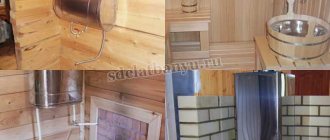
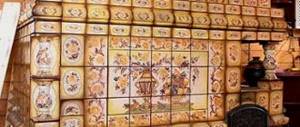
Facing
The brick itself looks aesthetically pleasing if the seams are properly finished with finishing grout, but if desired, additional cladding can be done. For finishing use:
- clinker tiles;
- majolica tiles;
- terracotta tiles.
It is also possible to use natural or artificial stone.
Facing material
Brick stove for a bathhouse: ordering
If you lack the skill to build a brick sauna stove with your own hands, it is not advisable to try to develop the project yourself. It’s easier to find a drawing and put it in order. For an inexperienced builder, the Kuznetsov bell-type model is suitable, it is easy to construct and takes up little space in the bathhouse.
Brick rows start without mortar. Standard designs sometimes do not allow you to fit a stove into a bathhouse. Dry-laid bricks can always be rearranged to determine the optimal dimensions. When the situation clears up, continue bricklaying with mortar.
The zero row of the order is laid out continuous. A small window is left on the side for better traction. The next rows come with dressing. A displacement of 30-50% gives stability to the brick structure.
A blower door is installed on the 3rd row of brickwork. The ash chamber ends on the 6th row with grates. Above the ash pit there is a firebox, where a door is similarly built into the brickwork.
Approximately on the 12th row, a stove slab is laid above the firebox, covering one part of the shaft. The main shaft is approximately driven out to row 26-27, gradually moving on to forming a chimney.
Tools
If you decide to make a stove for a sauna with a tank with your own hands from brick, then you will need several standard stove-maker tools:
- pick hammer,
- special trowel,
- mallet,
- level,
- roulette,
- construction cord,
- plumb line
Innovative technologies are gradually coming to the area of stove laying. Some builders use laser levels and a sander. To make a tank you will need a welding machine, electrodes, and a sheet bender. Making a sealed stainless steel container with your own hands is quite a difficult task for a novice welder. Therefore, it is better to buy the material and turn to professionals for help.
DIY brick sauna stove
It is wise to start building a brick stove for a bathhouse with your own hands after preparing the material. It wouldn’t hurt to think through the design right away.
What kind of stove to build in a bathhouse
When the design of the stove for the bath is precisely determined, you should immediately think about its design. You can simply leave the brickwork in its original condition or approach the design with soul:
- Plaster makes it possible to paint relief patterns on the walls. The surface can be left smooth and painted or applied decorative plaster on top.
- Painting with heat-resistant paint is a simple decoration option. To make the stove in the bathhouse look attractive, they try to perfectly and carefully process the seams of the brickwork.
- The furnace lining hides all the flaws of uneven brickwork. The materials used are decorative or natural stone, tiles, porcelain stoneware .
The stove can be painted any color, but the design must be optimally combined with the interior of the bathhouse. Most often they prefer artificially aged brick. For classics, yellow-brown color with accompanying shades is acceptable.
For a wooden Russian bathhouse made from a log house, white color is acceptable. After applying the plaster, the brick base is painted or decorated with decorative elements.
When all the nuances are determined, we begin to prepare the material.
Choosing bricks for a stove in a bathhouse
Any brick will not work for the stove. We need a material with increased strength and fire-resistant properties. The area around the firebox is laid out with fireclay refractory bricks. The material is suitable for the entire oven, but it is expensive. In order to save money, areas exposed to less heat are laid out with red solid brick.
The quality of the brick is checked by sound by hitting it with a hammer. It should be loud. A hammer will bounce off a good brick. A dull sound indicates poor quality of the material. If the hammer left a dent, such a brick cannot be used even for laying a chimney.
Appearance will tell you a lot. Standard brick dimensions are 25x12x6.5 cm. Deviation from the parameters is allowed up to 2 mm. If the sizes of the bricks are different, they will not make an even laying. Aligning the rows with mortar will weaken the structure. Bricks for the stove are purchased without visible defects. The presence of a mica film indicates a defect. This type of brick has poor adhesion to the mortar.
Advice! To carry out the test, buy 1 brick and split it in half with a hammer and chisel.
If the chip surface is the same color, the material is of high quality. The presence of light and dark areas indicates that the brick was burned during manufacturing.
You can learn more about choosing a brick from the video:
Masonry mortar
Inside the bathhouse, brick ovens are laid on a clay mortar. When extracting clay yourself, it is optimal to reach layers located at a depth of 1.5 m. You will also need river sand for the solution. Materials are sifted from stones. The clay is soaked in advance, at least a day before laying, and combined with sand before starting work.
The proportions depend on the fat content of the clay. If the indicator is high, add 2 parts of sand to 1 part. The viscosity of the solution is checked by dipping a stick. If, after removing it, a 2 mm layer of clay remains on the surface, the solution is suitable for work.
Advice! It is optimal for masonry to use clay similar to that from which the brick is made: brown or fireclay.
The video explains how to prepare the solution:
Arrangement of the base and foundation
A foundation is formed for a heavy brick oven inside the bathhouse. To arrange the foundation, perform the following steps:
- Pegs mark the dimensions of the future oven. A cord is pulled between them and the markings are transferred to the ground.
- Adhering to the markings, remove the soil. You should get a recess of 600 mm. The walls of the pit are made with a bevel so that at the bottom of the pit there is an expansion of about 100 mm in each direction.
- The bottom of the pit is covered with sand 100 mm thick. The pillow is moistened with water and compacted. A 100 mm layer of crushed stone is poured on top.
- A reinforcing mesh is tied from steel rods with a diameter of 10 mm. Lay it raised from the crushed stone to a height of 50 mm, using backings made from pieces of brick.
- The pit is filled with concrete mortar. Leave to harden for at least 7 days.
When the concrete hardens, double waterproofing is laid. The base is covered with hot bitumen, a layer of roofing felt is rolled out on top, then another layer of bitumen and roofing felt.
Sequence of construction of a sauna stove
After preparing the foundation, they begin to lay out the rows. The mixed clay solution is kept at hand. A bucket of water is placed nearby to wet the bricks. The procedure helps reduce the absorption of moisture from the solution. Brick, especially fireclay, is dipped for a couple of seconds.
The first row is laid out solid, and on the next row they begin to form a blower window. The door is installed, secured to the bricks with galvanized wire. To avoid increasing the thickness of the seams, grooves are cut out for fastenings. The step-by-step procedure for laying further rows is shown in the photo. Brown shows red, and yellow shows fireclay bricks.
Installation of a water heating tank and installation of a grate
The grate bars separating the ash pan from the firebox are laid on the 4th row. At the same time, they begin to install a metal hot water tank. The grate should be level with the brick.
After installing the tank on the smoke channel side, a gap appears on the back wall of the stove. Standard sized building material is not able to cover them. You cannot fill the gap with clay. The solution, which has dried out from the fire, will crumble. The gap is created by moving two bricks of the 5th row towards the ash pit. The third brick is not laid whole, but from two large pieces that close the gap as much as possible.
After eliminating the cracks, the installed tank is wrapped with a thick asbestos rope in the area of contact with the inside of the brick wall.
Installation of a cast iron fire door and laying the top rows
The cast iron fire door is installed on the 6th row. The installation principle is similar to the blower. The door is secured to the brick with galvanized wire. Up to the eighth row, the brick near the door is adjusted by cutting out pieces. Next, the masonry will begin with solid elements. A slab is laid on the 9th tier. In the future, a do-it-yourself sauna heater made from cobblestones will be built here.
The upper rows are raised until the entire tank is covered. There are usually 26 or 27, depending on the size of the container. Steel plates are laid over the tank. A damper is provided at the chimney outlet. The upper platform is laid with ordinary red brick. The construction of the stove ends with the chimney exiting through the roof to the street.
Step-by-step instructions for creating a stove
For work you will need the following materials:
- brick (210 pieces);
- clay, sand;
- 2.5 m of reinforcing rod for grates with a thickness of 30 mm;
- door for the combustion chamber, ash door;
- metal pipe with a diameter of 150 mm and a length of 120 cm;
- asbestos-cement pipe with a diameter of 80 to 130 mm, a length of 250 cm;
- water and gas pipe with a diameter of 300 to 400 mm, length 50 cm;
- steel sheets from 5 to 10 mm thick, 100 cm long;
- 1 sq. m of galvanized sheet metal 1 mm thick.