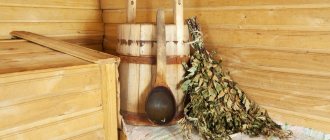
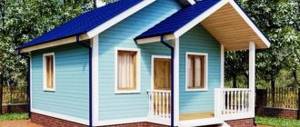
A panel (frame-panel) bathhouse is an environmentally friendly and fireproof design with excellent energy saving and generally high performance indicators. The advantages of a panel bath are obvious: you don’t need to spend a lot of time and money on the construction of such an object.
Do-it-yourself panel bathhouse
We laid out the foundation, erected the frame, covered it with panels, made a roof, completed finishing work, installed a stove - and the bathhouse is ready! At the same time, you can cope with all of the listed tasks yourself. Among other important advantages of panel baths, it should be noted their low weight, which allows construction on weak soils.
Do-it-yourself panel bathhouse can be built in a matter of days
Panel bath project
Draw up a project for the future building. A few simple drawings and sketches indicating the main dimensions, layout features and the order of arrangement of utilities will be enough. If you don’t have the skills and don’t want to learn, entrust the drafting to a specialist, or find drawings that suit your requirements in an open source.
Panel bath project
Determine the optimal bath area. The steam room itself must have such an area that each visitor has access to at least 1-1.5 m2 of free space. Determine the dimensions of the rest room, dressing room and other premises at your discretion.
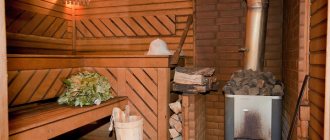
Note in the project the order of supplying electricity, water supply, ventilation and sewerage. Select a suitable stove (heater, metal stove, or more modern electric and other options) and indicate in the project the location of its installation.
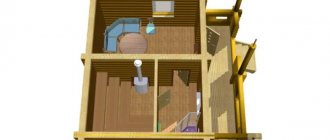
Bathhouse layout
Foundation and finishing
The foundation for a small bathhouse is most often made either tiled, or a screed is poured over the ground and then a floor is laid, either piled or pile-screw. The choice of foundation type depends on the size and total weight of the future structure. Read more about arranging the foundation for a bathhouse in our article.
Finishing the bathhouse with clapboard
Probably the most convenient option is a pile foundation. It has a number of advantages: it is quickly erected, does not depend on weather conditions, and is suitable for any terrain. If there is a natural pond or river near your bathhouse, then other types of foundations may shrink due to increased soil moisture. In this case, a pile foundation is the best option.
Important: The floor in a panel bath has a number of features. Do not forget that it is necessary to drain the water in the shower, and in the bathhouse it is better to make the floor slightly sloping so that the water and leaves flow closer to the exit.
In the recreation room, the floors can be of any kind, but wooden floors can swell due to humid air. The best material for floors and walls is either oak boards or tiles. However, remember that the tiles can get very hot.
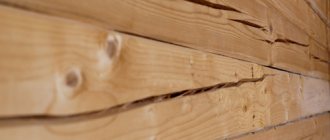
Hardwood lining has proven itself well. The only exception is coniferous trees in places where the air temperature is above average. Exterior finishing can be anything suitable for frame houses. The options are discussed here.
Where to build a bathhouse?
Choose a convenient place to place the bath. If possible, it should be installed at a short distance from the house - it’s simply more convenient.
Where to build a bathhouse
Also, at the stage of choosing a location, it is necessary to take into account such parameters as the level of groundwater, the structure and type of soil, communication routes, etc.
The site for the construction of a panel bath must be level. First get rid of the fertile soil layer and large tree roots.
Choosing a bathhouse project for a summer residence
When choosing a bathhouse project at your dacha, you need to consider the following factors:
- Size of premises
. It depends on the number of visitors or family members coming for the procedures at the same time. - Purpose of premises
. A simple project may include only three rooms in a bathhouse - a steam room, a washing room and a dressing room. If the future building has an expanded purpose, then you can additionally plan to install an attic, a swimming pool, a living room or a relaxation room.
From the many standard designs for country baths that can be found on the Internet, choose the one that is most suitable for your conditions. The finished project will contain working drawings for the assembly of structures, the introduction of utilities and a specification of materials. Based on it, an estimate of construction costs is drawn up.
Devices for work
Before starting any work, pay due attention to preparing the necessary supplies. It is better to spend time collecting them before construction begins than to be distracted later.
You will need the following equipment:
- Circular Saw;
- jigsaw;
- level;
- hammer;
- square;
- electric screwdriver;
- nail puller;
- mites;
- hacksaw;
- yardstick;
- axe;
- all kinds of fasteners;
- insulating materials;
- construction panels;
- timber for arranging the frame.
Frame: ready-made or homemade?
In order to save time and effort, it is recommended to order panel bath frame elements from specialized workshops.
You can also assemble the base yourself by first sawing a durable beam into several pieces of the required size. The frame is assembled from two horizontal bars and the same number of main vertical supports. It is customary to place the outer supports in increments of 62.5 or 81.5 cm. Additionally, it is recommended to install intermediate vertical jumpers. The frame frames will take on vertical loads and the lintels will help to cope with them successfully.
Panel bath frame
To cover the frame, special panels made of chipboard, solid wood or plywood are used. It is important that the lining material is as reliable and high quality as possible - the service life and ease of use of your future bathhouse directly depend on this.
Place openings for doors and windows in any convenient places and in accordance with the plan.
Assemble the required number of frame elements in accordance with your existing project and begin the main construction work. Start with the foundation.
Baths, saunas and swimming pools
57 votes
+
Vote for!
—
Vote against!
The choice of materials for building a bathhouse depends on many factors. If you don’t need a monumental structure that can last for many decades, but just want to be able to steam on your own property in the near future, a panel sauna will be ideal for you - you can build it with your own hands in just a couple of weeks. Due to the relative lightness of the structure, such construction does not require laying a powerful foundation. And the construction process itself does not require special skills. This is not to say that an absolute beginner can handle it, but if you have at least some experience, you can handle this task.
- We weigh the pros and cons
- Choosing a panel bathhouse project
- Foundation structure
- Foundation made of asbestos-cement pipes
- Columnar foundation with removable formwork
- Assembling the frame
- Installing the base trim
- Installing racks
- We mount the top trim and ceiling
- Wall cladding
- Roof
- A good example
We weigh the pros and cons
The main advantages of this type of bathhouse can be safely called the speed of construction and relative cheapness. The disadvantages include a relatively short service life. If a log bathhouse will last you a lifetime, then a panel bathhouse will last for 10-15 years. However, if you further strengthen the frame racks and properly treat the wood, you can extend its service life by a couple of decades.
Choosing a panel bathhouse project
When choosing a bathhouse project for your site, you should take into account the following factors:
- Bath size. It depends on how many people will be steaming here at the same time.
- Number of rooms. If desired, in addition to the steam room and dressing room, you can place a small living room or billiard room here.
- Originality of the project. All enterprises involved in the production of panel buildings offer their clients a catalog of standard projects. Of course, you can always order the design and manufacture of a bathhouse according to your own drawings, but it will cost 30-50% more than a standard one of the same area.
It should be taken into account that the cost of a typical project, as a rule, includes delivery and assembly of the structure on your site. However, if you decide that you are quite capable of assembling such a simple constructor as a panel bathhouse on your own, the price will decrease significantly.
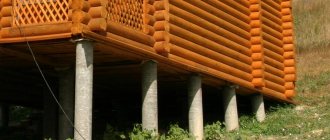
Foundation structure
The light weight of the structure allows it to be installed on a columnar foundation. The number of pillars depends on the size of the bathhouse and its weight. In any case, the posts should be at the corners of the building, under the edges of interior walls and where they intersect.
Foundation made of asbestos-cement pipes
The easiest way to build a panel bathhouse with your own hands on a columnar foundation is asbestos-cement pipes with a diameter of about 20 cm, filled with concrete.
- To fill such a foundation, it is necessary to drill holes in the ground with a depth of 1 to 1.5 meters.
- We pour a reinforced concrete “pillow” onto the bottom. Then we install a pipe in the hole, check its position with a level and backfill it with sand.
- Pour the concrete and wait for it to completely harden.
Important! On heaving soils, we install a pre-connected reinforcement grid inside the pipe.
Columnar foundation with removable formwork
Another fairly simple and economical way to pour a lightweight columnar foundation is removable formwork made from roofing iron:
- We take a sheet of roofing iron and roll it into a pipe of the required diameter. We weld two handles made of thick wire or rod.
- We prepare a hole with a slightly larger diameter than the diameter of the resulting “pipe”.
- We insert the formwork into the hole in the ground and set it level.
- We backfill with fine sand.
- We install a reinforcement grid inside the formwork.
- Pour 2-3 buckets of concrete mixture into the pipe.
- Holding the formwork by the handles, lift it up 30-40cm.
Important! To facilitate the process, you can slightly rock the pipe, but before the next stage of pouring you need to level it again.
- Again, fill several buckets of mortar and raise the formwork.
- And so on until the column rises to the desired level. When pouring above the soil level, it is necessary to allow the solution to “set” and only then remove the formwork.
It is at this stage that fastenings for future strapping can be laid. To do this, threaded rods must be inserted into the fresh solution.
Further work will be carried out only after 2 weeks. During this period, the foundation should be covered with roofing felt or thick burlap, and in very hot weather it should be regularly watered.
Assembling the frame
Its service life largely depends on how strong and durable the bathhouse frame is. How to build a panel bathhouse so that it lasts for several decades? First of all, all prepared wood must be treated with an antiseptic. This will provide additional protection against fungi and rot. Antiseptics often contain substances that repel insects. To reduce the fire hazard of a wooden structure, it is better to treat all supporting structures and finishing materials with fire retardants. The foundation pillars must be covered with a layer of waterproofing (roofing felt), which will not allow the wood to “pull” moisture from the ground.
Installing the base trim
As plinth beams, you need to use softwood timber with a sufficiently large cross-section - at least 20cm. The harness is installed as follows:
- We lay the prepared timber on the foundation posts along the perimeter and connect it in the corners using the “half-log” method. In this case, in one of the beams half the thickness is removed from above, and in the other, half the thickness from below. The grooves are then overlapped and fastened together.
- When all the corner connections are ready, it is necessary to once again check the correct location of the strapping - the construction of a panel bath requires precise adherence to the horizontals and verticals. The height of the column can be adjusted using cement mortar or an additional layer of waterproofing material.
Important! When leveling the plinth beam with cement mortar, always place it under the waterproofing.
- Now we attach the beam to the foundation with anchors. The fastening must extend into the base by at least 10 cm.
Installing supporting racks
When the base frame is ready, we attach the supporting racks to it. They should be located in the corners of the building and in places where internal partitions are attached. For load-bearing posts, timber about 10 cm thick should be used. The easiest way to attach it to the harness is using steel angles or cutting. If you attached the harness with dowels, simply put the posts on the remaining outlets.
Until the installation of the upper frame of the rack is installed, only stay at the bottom. In order not to create additional load on the fastenings and not to provoke possible deflection, it is necessary to install temporary supports that will hold the rack in a vertical position.
Additional racks are installed in the same way as load-bearing ones. The only difference is that for their manufacture you can use timber of a smaller cross-section. The step between additional racks is from 50cm to 1m.
We mount the top trim and ceiling
We connect the elements of the upper trim to each other in the same way as the plinth beams. We install it level and attach it to the racks using metal corners or nails.
We install the ceiling beams and you can begin installing the panels.
Wall cladding
So, how to make a panel bath suitable for use at any time of the year? The main thing is proper thermal insulation.
- We lay thermal insulation material between the racks. This can be polystyrene foam or EPS, but most often mineral wool with a metallized heat-reflecting layer is used. When laying, the foil should be directed towards the room.
- On the inside, the thermal insulation must be protected from moisture. To do this, we stretch a vapor barrier film along the entire surface of the walls. We carefully glue the joints with metallized tape, and place the edges on the floor, ceiling and door and window slopes. We protect the mineral wool from the outside with ordinary dense polyethylene.
Important! It is better to supplement the insulation of a panel bathhouse located in an open area with a “wind barrier” laid under the outer cladding.
- There are a lot of options for covering the outside of a bathhouse. This can be edged boards, plywood or OSB boards. The joints between the sheathing elements need to be caulked or blown out with foam, and only then can the walls be decorated with siding or block house.
- The best option for interior decoration of a bathhouse is wooden lining, especially in the steam room. Hardwood is ideal for these purposes: aspen, linden or alder. Sometimes pine is used, it is much cheaper. The walls in the rest room or in the dressing room can be sheathed with gypsum board or plywood.
Roof
There are no special restrictions in choosing a roof structure for such a structure. As you can see, panel baths, photos of which are presented in the following selection, like fashionistas at a ball, flaunt a variety of “hats.”
The main thing is to correctly calculate the loads. As a rule, in northern regions with snowy winters, a gable roof is made with an angle of at least 30 degrees. This helps prevent snow accumulation and increased load on supporting structures.
Given the rather weak foundation, care must be taken to ensure that the roof of the bathhouse is light. This means you shouldn’t cover it with heavy tiles. It is better to use rolled materials or roofing iron.
The ceiling beams are lined with boards and a vapor barrier and insulation are laid on top.
That's all. All that remains is to install the heater, lay the floor and you can steam to your heart's content.
A good example
And here is another budget bathhouse: a panel bath, do it yourself - a video clip demonstrates the entire construction process.
There are two significant differences between the technology described above and the one you see in the video:
- The base trim is made of two small thickness bars connected to each other. This significantly reduces the load-bearing capacity of the structure, but in order to save money, you can do it this way.
- The insulation is laid after the outer sheathing. Considering the very modest size of the room, this is not entirely convenient.
It is quite problematic to turn around in a small dressing room with a roll of mineral wool or vapor barrier film.
However, whoever likes it more.
Panel bath foundation
The baths in question are relatively light in weight, which makes it possible to avoid the use of heavily buried concrete foundations. An ordinary strip foundation is optimal.
Strip foundation for a bathhouse
First step. Dig a hole about 100 cm deep in accordance with the size of the future bathhouse.
Second step. Level the bottom of the trench and fill it with a layer of crushed stone. The thickness of the crushed stone layer is up to 30-35% of the total depth of the pit, sand is about 15-20 cm. Compact the backfilled material.
Third step. Install board formwork around the perimeter of the pit. The height of the formwork boards should rise above the pit by at least 40 cm.
Fourth step. Collect and lay a reinforcing mesh with cells of 10-15 cm on the backfill.
Fifth step. Prepare the concrete. A more preferable option is to order the production of the mixture from a specialized company. To make concrete, you need to use cement of a grade not lower than M500. Otherwise, the recipe is standard: for one part of cement, about 3 parts of sifted sand, 4-5 parts of crushed stone and water.
Sixth step. Pour the solution into the trench. It is best to complete the filling in 1 day. If you don’t have time, still prepare as much concrete as you will spend in a day, because... the next day it will no longer be possible to fill it. If you cannot fill the hole in one layer, lay the concrete in strictly horizontal layers. Vertical layers will crack almost immediately.
How to make a strip foundation with your own hands
Poke the filler with the reinforcement in several places to release excess air. Leave the fill to dry for 1-1.5 months. Lay roofing material waterproofing on the finished foundation.
Foundation
A do-it-yourself panel bathhouse, the step-by-step instructions of which are quite clear, has a small mass and fairly modest dimensions, which makes it possible to build them on a columnar foundation. One of the simplest technologies that can be used when constructing the base of such a structure is the use of asbestos-cement pipes. Their diameter should be approximately 20 centimeters.
Construction of a columnar foundation for a panel bath
In addition, the pipes must be filled with a concrete-based mixture. Such a foundation makes it possible to construct panel structures in any type of soil. It is also possible to provide the possibility of installing special reinforcing mesh. The process of creating a foundation begins with drilling holes from one to one and a half meters in the ground. After this, a reinforced concrete base is formed at the bottom using the principle of a small screed. After this, pipes are installed and filled with solution.
Construction of walls
Start building walls.
First step. Lay a support beam around the perimeter of the future bathhouse and under the wall locations. Use wooden dowels to connect the support bars. First, holes with a diameter slightly smaller than the diameter of the fasteners are prepared for the dowels so that the dowels fit into the holes with some tension.
Lay out the base from two horizontal rows of timber. In the timber of the top row, prepare cuts for attaching vertical posts. The depth of the cut is half the timber. Select the width in accordance with the width of the vertical posts.
Second step. Insert vertical posts into the prepared holes and secure them with spacers. Install the racks in the corners and along the perimeter of future walls with an average step of 1 m. The specific step usually has to be selected individually in accordance with the parameters of the future bathhouse and the timber itself.
Install all planned racks.
Construction of frame-panel baths
Third step. Tie the upper ends of the racks with a support beam. At the same time, it will serve as a Mauerlat, i.e. foundations for the roof structure. First, prepare holes in the support beam according to the size of the vertical posts, place the Mauerlat on these holes and additionally secure it using fasteners that are convenient for you, for example, jibs.
Fourth step. Attach horizontal jumpers to the vertical posts. Do not forget to leave openings for window systems and doors in the right places.
Columnar base with removable formwork
Another fairly simple and inexpensive method of pouring a light columnar base for a frame bath is iron formwork
- Roll the iron sheet for the roof into a pipe with the required diameter. Next, you need to weld two handles from a rod or thick wire.
- You need to dig a hole slightly larger in diameter than the pipe itself.
- The formwork must be inserted into a hole in the ground and set level.
- Cover with fine sand.
- Install a reinforced lattice inside the formwork.
- Pour several buckets of concrete mixture into the pipe.
- Holding the mold by the handles, lift it up forty centimeters.
- Pour the concrete again and raise the mold.
- Do this until the pole rises to the desired height. When pouring above ground level, you need to let the mixture harden and only then remove the formwork.
It is at this stage that you need to lay the fastenings for the future tying of the bathhouse. To do this, it is necessary to install threaded studs in the fresh solution.
The following work is completed only after 2 weeks. At this time, the foundation must be covered with roofing felt or thick burlap, and during the hot period it must be constantly watered.
Assembling the frame
To begin with, all wood needs to be treated with an antiseptic solution. This will additionally protect against rotting and fungi. Often the treatment composition also contains substances that repel insects.
To increase the fire safety of a wooden structure, it is better to impregnate all building materials with fire retardants. It is necessary to cover the foundation pillars with a layer of waterproofing; it will prevent the tree from absorbing moisture from the soil.
Installing plinth beams
For the basement floor, you need to use a beam made of coniferous wood with a fairly large cross-section - at least twenty centimeters. Install the beams like this:
- The timber is laid on the foundation along the perimeter and connected in the corners using the “half-log” method. In this case, half the thickness is removed from the top on one beam, and half the thickness from the bottom on the other. These grooves are placed on top of each other and fastened together;
- When all the joints in the corners are ready, you need to check the correct placement of the beams - the construction of a panel building requires precise adherence to the verticals and horizontals. You can adjust the height of the column using cement mortar or an additional layer of waterproofing material.
- Now the timber is secured to the foundation with brackets. The anchor must extend into the base by at least ten centimeters.
We make load-bearing racks
When the basement floor is ready, you need to attach the supporting racks to it. They should be located in the corners of the bathhouse and on the fastenings of internal bulkheads. For load-bearing structures, you need to use timber approximately ten centimeters thick. The easiest way to attach it to the harness is with steel corners.
Before installing the upper ceiling, the racks are held only from below. In order not to place excess load on the fastenings and not to provoke tilting, it is necessary to install temporary supports to hold the rack in a standing position.
Additional racks are installed in the same way as load-bearing ones. The difference is that for their manufacture you can use timber of a smaller profile . The distance between the additional racks is from half a meter to one.
Installation of the top trim and ceiling
The parts of the upper floor are connected to each other in the same way as the basement trim. Install it level and attach it to the posts using nails or metal corners. The ceiling beams are installed and the installation of the panels can begin.
External wall cladding
External wall cladding
For the external cladding of the bath in question, special shields are used. Options for materials for manufacturing such shields were given earlier.
All work on sheathing panels comes down to their secure fastening to the elements of the structure frame using dowels or other convenient fasteners. Do this and move on to insulating and finishing decorative work.
External wall cladding
External insulation works
A panel bath needs high-quality heat, hydro and vapor insulation. To accommodate all the insulators you will have to build additional sheathing.
First step. Nail the sheathing bars to the walls at a pitch slightly smaller than the width of the selected insulation.
Second step. Place a waterproofing film on the sheathing and secure it with a construction stapler and staples.
Third step. Fill the sheathing cells with the selected insulation. The best option is mineral wool and materials based on it. For the rest, focus on your preferences and available budget.
Minvata
Fourth step. Cover the insulation with a membrane vapor barrier material. Attach it to the frame using a construction stapler as well.
Installation of the floor of a frame-panel bathhouse in the country
The floor in the bathhouse is double:
- The lower floor consists of two parts with 2% slopes directed towards each other. This design is designed to drain water from the bathhouse. The material used is 20 mm thick boards covered with roofing felt. It is attached to the base using a stapler. The logs are installed on the tires. A gap of 5 cm is left between the parts of the floor. To avoid sticking of the roofing material, 3 metal tubes are placed in the gap. The floor gap serves as a kind of receiving tray for water, which, when it gets from the floor onto a layer of crushed stone, breaks into drops and enters the ground.
- The top floor is the main one. It is made from 50 mm boards treated with an antiseptic. Floor slope - 1%. The logs are installed in 1 m increments, and the boards are attached to them with screws, the heads of which must be recessed.
It is recommended to leave small gaps in the floor. This will facilitate better drying of the boards and provide fresh air for burning wood in the heater. When using a bathhouse, a special grate is placed on its floor.
External decorative finishing
For the exterior decoration of a panel bath, you can use a wide variety of materials. For example, lining and block house are perfect. Siding is also an excellent option. Sheathing with these materials is carried out in the same order: you simply attach the panels to the sheathing with pre-laid insulating layers.
External decorative finishing
Additionally, it is recommended to treat all wood materials with antifungal and fire-retardant impregnations.
When installing external cladding elements, be careful and careful. Start attaching the sheets from the corner of the bathhouse.
Where to build a bathhouse?
Selecting a site is quite a problematic task. You need to plan in advance where to place the panel bathhouse so that it fits comfortably into the site and does not disturb the neighbors. First remove all weeds and level the area. Only after mixing all the pros and cons, start construction. Don't start construction thoughtlessly.
It is also worth initially considering the layout of the room. Remember, if you hurry and start construction, there will be no rollback. Well, or it will, it will just be financially expensive.
Interior work
Inside you will have to sweat a lot more. Start with the flooring.
Floor
First step. Make a concrete screed. This will get rid of any unevenness in the base. You can first pour a layer of expanded clay under the future screed for additional insulation of the floor.
Second step. Lay ceramic floor tiles on top of the screed.
Tile floor
Third step. Grind the seams and perform other activities typical for laying tiles.
It is recommended to use tiles for the simple reason that they withstand contact with moisture much better compared to the same plank flooring.
Walls
First step. Build a sheathing on the wall. Everything is done in the same way as for exterior finishing.
Second step. Cover the sheathing with waterproofing material.
Third step. Place insulation in the cells of the sheathing on top of the waterproofing.
Fourth step. Cover the insulation with a vapor barrier.
Fifth step. Cover the walls with the finishing material of your choice. The best option is high-quality lining.
Wall decoration
Ceiling
First step. Secure the ceiling support beams.
Second step. Assemble a simple sheathing.
Third step. Place layers of hydro-, heat- and vapor barrier on the sheathing.
Fourth step. Cover the ceiling with the finishing material of your choice.
Ceiling
Advantages and disadvantages of frame baths, reviews from owners
Before building a frame bathhouse with your own hands, many people ask themselves: what material to use for its construction? After all, many associate baths with structures made of logs or bricks. But such buildings are quite expensive for their owners, and the time required to warm up, for example, a chopped bathhouse is about 6 hours.
External and internal finishing of a frame bath is most often performed using carriage boards
Advantages of frame technology
The construction of a frame bathhouse solves several problems at once, as these are: a simple construction method, the availability of the materials used and the fast speed of construction. The advantages of frame technology include the following:
- the most affordable construction cost;
- use of lightweight types of foundation;
- low thermal conductivity of the structure contributes to rapid heating;
- the possibility of carrying out communications inside the walls, which has a positive effect on the aesthetic component of the bathhouse structure;
- the absence of shrinkage makes it possible to operate the bathhouse immediately after its construction and finishing;
- use of environmentally friendly materials;
- there is no need to use special construction equipment;
- No special construction skills are required when constructing a frame bathhouse yourself. Videos posted online demonstrate this perfectly;
- the absence of wet construction cycles makes it possible to carry out construction regardless of air temperature and water availability;
- many ways to decorate a building.
When constructing frame baths, environmentally friendly materials are usually used
All these advantages contribute to the increasing popularity of frame baths. Reviews from owners who used this technology during construction indicate that such structures are economical and, if constructed correctly, can create excellent conditions for comfortable use.
Weaknesses of frame baths, reviews from owners
To weigh the pros and cons of the frame bath construction technology, you can ask for reviews from the owners. There is a lot of information on Internet forums from those who already have such a bathhouse and have been using it for some time. Some leave negative reviews: frame baths, in their opinion, tend to quickly lose their appearance due to the formation of fungus on the walls. This occurs due to the rapid cooling of the room, no matter how well it is insulated.
This drawback can be eliminated by using only high-quality insulation materials for thermal insulation. It is necessary to approach the choice of thermal insulation material with all seriousness. After all, cheap polystyrene foam or mineral wool will not adequately perform their functions. The use of economy class foam can cause a structure fire due to the easy flammability of the insulation.
To construct the frame of the bathhouse, timber of various sections is used, as well as boards that have undergone antiseptic treatment
One of the negative aspects described in the reviews is the shrinkage of the bath. Many testify that over time (approximately 1.5-2 years), the frame structure shrinks, the value of which reaches 8-10 cm. This, in turn, can cause deformation of the internal and external finishing of the building.
Helpful advice! To minimize the effects of shrinkage of a frame bath, lumber that has been kiln-dried should be used during construction.
Summarizing the above, we can conclude that the main disadvantages are the significant costs of insulating the walls of a frame bath, the need for thorough antiseptic treatment and low fire resistance. However, given the huge list of advantages, the construction of frame baths is not inferior in popularity to structures made of logs or bricks.
You can get acquainted with some of the assembly nuances and reviews from the owners by watching a video of building a frame bathhouse with your own hands.
Roof arrangement
The roof of the bathhouse will have the simplest design.
Roof arrangement
Roof arrangement
First step. Assemble the elements of the rafter system. It's best to do this at the bottom.
Second step. Install the elements of the rafter system on the Mauerlat, fixed on top of the support bars in the previous stages of work.
Third step. Nail the sheathing to the rafters. It is more convenient if it is continuous.
Fourth step. Cover the sheathing with a vapor barrier.
Fifth step. Place insulation on the vapor barrier.
Roof arrangement
Sixth step. Cover the insulation with waterproofing material.
Seventh step. Place perpendicular counter batten slats onto the sheathing.
Eighth step. Install the selected roofing material. Metal tiles or Euro slate are perfect for arranging the roof of a panel bathhouse. For the rest, focus on your preferences and available budget.
Bitumen corrugated sheet (euro slate)
Finally, you just have to do the following:
- lay water supply and sewerage pipes;
- organize lighting and overall power supply for the bathhouse;
- arrange a washing room, dressing room and rest room to your taste;
- install benches in the steam room;
- install doors and window units;
- install the stove with related accessories.
The procedure for installing the stove will vary depending on what kind of heating unit you decide to equip your panel bathhouse with.
Thus, you can build a panel bathhouse with your own hands without involving third-party specialists. By understanding the basic provisions of the instructions and doing everything in accordance with the instructions, you can significantly save on the services of third-party craftsmen and build a steam room with your own hands that can fully perform all the tasks assigned to it and will last for decades.
Good luck!
Step-by-step instructions for building a panel bathhouse with your own hands with comments
Step 1. Initially, buy all the necessary building materials, namely:
- foundation - piles or cement and crushed stone (claw) with sand;
- for the frame – timber 12*12 cm, board 15*3 cm, bars 7.5*4 cm;
- for interior and exterior finishing - lining, cement particle boards (CPB), OSB or siding;
- for thermal insulation - mineral wool or basalt slab;
- for waterproofing - roofing felt in two layers;
- for securing the material - nails, screws, metal corners, etc.;
- for roofing - metal tiles or roofing felt, gutters and components for draining rainwater from the roof of the panel bathhouse. This is very important, since such a design is very susceptible to increased moisture.
Step 2. Let's start by making the foundation of the future building. As for me, a project for a 3 by 4 panel bath is not needed at all, and the foundation itself should not be very expensive. A pile structure using a strip foundation is ideal. The design is light, which is why you should not make it too heavy.
We pull the first (foundation) beam to the foundation with anchors. We lay roofing felt on top of them and naturally fasten it too.
Step 3. Vertical racks. This is an important point, at this moment we are designing how many rooms there will be in our future panel bathhouse. If you decide to make only one room, then it will be enough for you to place 4 vertical pillars at different corners of the building. In order to make a dressing room for a prefabricated panel structure, you will need to place additional racks. It is recommended to place them no wider than 60 centimeters from each other. This is the key to the strength of the structure, so it is better not to skimp on this matter.
The walls and partitions of this bathhouse must be protected from moisture and insulated. Without this, it will not fully function. It is also worth thinking about fire protection.
Step 4. Most often, gable roofs are installed; they should also be waterproofed.
The attic, as you understand, is best not to do it at all. The structure is not very strong and we absolutely do not need additional loads. A cross-sectional photo of the roof is attached.
Step 5. At this stage, we install a partition in such a bath house and cover the panel floors. It can also be made from OSB or from special boards at an angle so that moisture rolls into the sewer.
Step 6. Install and configure doors and windows.
Step 7. It would be very nice to make the inside out of clapboard, but there are cheaper materials. Our visitors often left feedback that at this point you can seriously cheat. The following building materials can be used externally:
- DSP (1.25 m) - the boards do not burn and are very strong;
- OSB (1.22 m) - Boards of this size fit perfectly and do not even need to be trimmed. Moreover, they are already beautiful; they just need to be opened with paint and that’s it.
There is not really a significant difference here. Choose a material that is easier for you to work with. In order to create a more attractive appearance, you can mount galvanized sheets, well, let’s say this is not an amateur. If desired, you can even make a panel house with an attic.