Before you start arranging a stove or fireplace, you need to take into account all the nuances of the process. The choice of materials becomes a particularly important point.
Since heat production puts quite a lot of stress on the entire structure of the heat source, the structure must be erected using refractory bricks and mortar. This is the only way to completely secure the use of the heating structure.
Preparation of mortar and bricks for the construction of a stove and fireplace
Preparation of materials and tools
By choosing a place away from wooden buildings and trees, protected from gusts of wind, you can roughly imagine the size of the future homemade product. You can make drawings indicating its general contours and height yourself, but for inspiration and to facilitate the construction process, orders of outdoor stoves are proposed. You need to calculate the amount of bricks for building a barbecue in your dacha taking into account 10-15% of waste for processing it (for example, when laying a chimney). To work you need to prepare:
- solid red and fireclay brick;
- cement and sand for the foundation;
- clay mixture for masonry (you can buy ready-made);
- 5x5 corner or steel sheet for jumpers;
- grinder;
- a special pick for chipping bricks;
- trowel or trowel;
- shovel;
- building level, square, tape measure.
If the owner wants to make arched vaults for a barbecue with his own hands, then he will need some plywood to make a circle template on which the brick will be laid. In addition, boards will be needed for formwork of the foundation.
Methods for calculating the amount of bricks
The required amount of brick must be calculated with maximum accuracy and avoid errors in calculations, since if you take too much brick, then the unused material may disappear over time, and if you take too little, then at the end of construction the shortage of brick material will make itself felt and you will not be able to finish the job you started.
There are also universal methods by which you can absolutely accurately calculate how much building material you need. But, before that you will need:
- Tape measure for measurements;
- Plumb lines;
- Trowels;
- Rule.
So let's get started. Counting method number one.
Professional builders put it into a simple and universal formula, thanks to which you can easily find out how much building material is needed.
Well, the formula itself is as follows : you need to take the required number of bricks that will be used when laying the first brick row. The quantity that we received must be multiplied by the number of brick rows (basically, the height of one row is exactly eight centimeters). From the result obtained, you need to subtract one third of the total amount.
For example, the base of a brick stove consists of bricks measuring three by four, then in the bottom row there will be exactly twenty-four bricks.
It is important to know: this formula is conditional and minor errors can be made when calculating.
Next, after we have carried out preliminary calculations, it is necessary to measure the height of the structure. For example, if the height from the floor to the end of the brick structure is exactly two and four millimeters, then from the resulting size you need to subtract thirty centimeters (the height of the cutting itself) and ultimately you get two and nine millimeters. Also, we must not forget about the height of this brick row (seven centimeters) and in this way we get exactly thirty centimeters. Of these thirty centimeters you need to subtract one third (approximately ten pieces of building bricks).
Simple brick grill
A powerful foundation for an outdoor grill is not needed. The depth of the pit should be about 30 cm, and along the perimeter you need to add 10-15 cm to the size of the building itself. Select the soil along the contour marked on the ground and place a cushion of ASG or river sand on the bottom of the pit. The thickness of this layer should be 10-15 cm.
The remaining volume of the pit must be filled with a mixture of cement, sand and crushed stone (1: 3: 4, respectively). Knock down formwork from the boards, which will allow you to slightly raise the base above the ground. Install formwork around the perimeter of the foundation and fill it with the same concrete mixture. To gain strength, the foundation must harden within 7-10 days.
To prevent cracks from appearing, it must be periodically doused with water.
Step-by-step instructions and drawings will help you figure out how to build a brick grill with your own hands:
After the masonry is completed, the stove should dry out for several days, then you can light a small fire in it, warm up the walls of the firebox and cool them completely. The brick barbecue in the gazebo or near it will then be completely ready for use.
Which brick to choose for building a stove?
Despite long traditions and a developed stove industry, there is still an opinion that stove masonry can be made from ordinary bricks and even debris. This is not true. The fact is that ordinary ceramic bricks can withstand temperatures below 800 degrees, while inside the furnace, during fuel combustion, the values reach up to one and a half thousand! Ordinary brick, under conditions of systematic overheating, quickly loses moisture and in a short time is destroyed, crumbles and violates the properties of the furnace. That is why for laying the stove and chimney, a special refractory brick is required, made using a product made from refractory clay - fireclay.
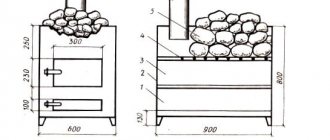
Barbecue with smokehouse and stove
A brick grill-smokehouse with a hob can be built in the form of a compact structure (Fig. 5). In addition to the above materials, to build a simple barbecue you will also need stove casting: grates, doors and a cast iron stove with burners. They are necessary to create a hob with a firebox where the fire is maintained. To hang products intended for smoking above the hearth of the grill, rods are installed. When the stove is fired under the stove, the smoke is discharged into the chamber where the grill is located. When the door is closed, it performs the functions of a smoking chamber.
The foundation for such a furnace can be poured according to the principles outlined in the previous section. The laying of the first 2 rows is carried out according to the scheme (Fig. 6) and forms the basis for the entire structure.
Starting from the 3rd row, you need to raise the walls of the firebox and niches for firewood, as indicated by the row diagram of a brick barbecue. On the 6th row, install grate bars above the firebox and expand the firebox chamber by half a brick on each side. Before laying the 9th row, install a corner to cover the niche.
Figure 6. Diagram of the foundation for a barbecue oven.
Release ¼ of the brick into the firebox on the 11th row, forming a support for the stove. Make it in another compartment for the grill. Further masonry (up to 24 rows) should be carried out according to the order, laying out the chimney in the back of the stove and leading it to the smokehouse-barbecue. On the 17th row you need to cover the opening of this compartment. The vault in the part where the hob is located is made of steel sheet installed on top of the 24th row of brickwork. In the smokehouse, at the same level, you need to smear rods into the masonry for hanging products.
After this, up to the 27th row, we build the vault of the smoking compartment, releasing ¼ bricks into the building. Further levels should be laid without narrowing the internal opening of the chimney, but for an aesthetic appearance, the brickwork of the barbecue continues with a narrowing upward to the 33rd row. After this, the pipe is brought out with vertical walls to the desired height.
How to choose a place?
- Do not forget that this structure is an object of increased fire hazard. It should not be located near the house, wooden or other flammable outbuildings.
- The building should not be too far from the resting place. The ideal option is near the gazebo or near the summer kitchen. You can put up a wide canopy that will not only protect the brick grill from precipitation, but also cover a couple of benches and a table.
- Be sure to arrange the site. There should be no flower beds or beds nearby, as the grass will simply wither due to high temperatures. You should consider a convenient approach, or better yet several. There should be no toilet or trash containers nearby.
- If the wind constantly blows in one direction, make sure that smoke does not enter the windows of residential buildings.
What is needed for construction?
The best material for construction is fireclay brick (kiln). It can withstand large temperature changes and does not collapse. Use clay and sand as a mortar for masonry. But it requires pre-soaking.
For an outdoor brick grill you will need a good foundation, which means you will need building material for the foundation (cement, sand, rubble stone, plywood or formwork boards, reinforcement, stones and crushed stone).
You will also need metal corners, grilles, latches, and a sheet of iron. If you plan to make niches and a work area, you will need a tabletop made of stone; the doors can be made of wood or metal.
Tools needed:
- shovel;
- Master OK;
- level;
- buckets for solutions;
- concrete mixer or trough;
- Circular Saw.
A project must be developed or a ready-made one taken. It is not only convenient to carry out work, but also to calculate the required amount of materials. A small supply never hurts, but there is no need to have large surpluses.
Bottom line
Now you know how many bricks are needed for the stove. It is not difficult to calculate the amount of stone needed to build a stove on your own. Errors can only occur in numbers that need to be double-checked several times. Construction work on the construction of a furnace requires not so much an exact amount of material as its good quality. There are a large number of seemingly similar materials on sale, but they all have different quality.
The described calculation methods are used only in cases where the work is planned to be carried out independently. Hired workers will perform all calculations using their own methods. Don’t be afraid to pick up a calculator and then go to the store and purchase the necessary materials in the required volume.
Pouring the foundation
A stationary brick grill requires a foundation:
- It is necessary to dig a hole according to the size of the project.
- Line the bottom of the pit with rubble stone and crushed stone, and install the formwork (it is better to moisten it).
- Next, the pit is filled with a concrete mixture of cement and sand in a ratio of 1:3, but in layers and laying a reinforcing mesh. Under no circumstances should the reinforcement lie at the bottom of the pit. If the pit is small and the walls are smooth, then formwork is not needed.
- The top of the foundation is covered with roofing felt or ordinary film.
- When the weather is hot, it is recommended to occasionally spray the base with water to ensure uniform drying. It will take 1-2 weeks for the concrete to set and dry. Brick laying is carried out only after the foundation has completely hardened.
- During this time, you can prepare a clay solution. It is necessary to soak the clay in the tub for a week, stirring occasionally and adding water if necessary. Then add sand. A good solution has a consistency similar to thick sour cream; it should be easy to handle and not spread.
- It is easy to check the quality of the solution. To do this, mix a small amount of clay with dry sand. Roll it into a rope with a diameter of 1 cm. It should not lose its shape, crack or spread.
Brickwork of the stove base
At the end of all calculations, exactly twenty rows are obtained and now this figure must be multiplied by twenty-four (the result is four hundred and eighty). Also, we must not forget that an additional fifty bricks will be needed, which will then additionally need to be added to the general cutting.
During laying, we also must not forget that the required number of bricks to build a chimney must be calculated separately. And a novice builder will wonder how many bricks are in a linear meter. In order to build one linear meter of a standard pipe, you will need fourteen rows of bricks (each row has approximately six bricks). It follows from this that there are approximately eighty-four bricks in one linear meter.
Example. If you decide to build a brick pipe four meters long, then you need to multiply these four meters by eighty-four bricks and after all these calculations you will get exactly three hundred and thirty-six bricks to build a four-meter brick pipe.
A similar formula for calculating building material is distinguished by its simplicity and convenience. But, it is important to remember that such a formula is conditional and you can easily make a mistake when making calculations (so double-check the resulting numbers several times).
You can also read about the features of stove construction here.
stroykirpich.com
Bricklaying
The day before laying, it is recommended to water the brick or immerse it in it for 20-30 seconds immediately before laying. This will provide better grip, and the material itself will not take moisture from the clay.
The order of the brick grill is shown in the following figure. If you want to draw the order yourself, then it is most convenient to do this on a piece of paper in a cage.
The easiest way to lay a brick barbecue is to move each row by half a brick in one direction or the other. Laying the plinth should begin from the corners towards the center along pre-marked lines. Every 3 rows, check the level and plumb line, and also lay down the reinforcing mesh.
The first row of masonry, like the second, is made continuous. The base can have different heights, depending on the project, and several compartments in which it is convenient to store firewood, charcoal, some utensils, etc.
Next we move on to laying the firebox (central part).
For the brazier, you can use a pre-cast concrete base with reinforcement or lay it out of brick.
If the firebox is planned to be arched, then a circle is used. A gap of 1 cm is left between the bricks. It is best to use wood chips for this. This way you can distribute the bricks evenly. Only after this the space is sprayed with water and filled with solution. The circle is left for 1-2 days.
The top of the firebox is covered with a reinforced concrete beam or an iron corner. Another row of bricks is laid on top of the lintel.
When laying, it is recommended to leave small gaps, this will allow air to penetrate and combustion will be better.
If you plan to use a brick grill as a barbecue, then you need to think in advance about where to install the grate. For this purpose small protrusions are made. The grill itself is placed on reinforcement bars embedded in the walls of the building. You can make several projections to be able to place the grill at different levels.
Next, wind walls are laid and a smoke collector is made. The pipe is attached to supporting columns and gradually narrows. This is the simplest design. And to protect it from precipitation, a metal canopy is installed above it.
In simple brick barbecue designs, there may be no pipe at all, as well as wind walls.
Quantity calculation
Once you have decided on the required type and brand of product, you need to begin detailed and careful calculations and thereby find out how much brick you need for the fireplace:
- If you already have a pre-prepared project of which you are confident (drawn up by a professional), it must necessarily indicate the amount of bricks used to build such a structure;
- In order to find out how many bricks you need for a fireplace, you can use the following simple and proven diagram. The amount of brick laid in the first row must be multiplied by the number of vertical rows. In order to find out the numerical value and the number of units of material, it is necessary to subtract 1/3 from the resulting numerical value. Of course, this option is far from one hundred percent, but the final numerical value is very close to the truth.
An illustrative example: imagine that the length of the first continuous row of the fireplace is 24 bricks, and the total height of the structure is two meters and forty centimeters.
From this numerical value it is necessary to subtract about thirty centimeters that will be covered with finishing materials, as a result we get a structure height of about two meters and ten centimeters. the height of one row is seven centimeters. At the next stage, it is necessary to divide the total height of the fireplace installation by seven centimeters (one row) and get thirty rows. Next, we need to subtract a third from thirty rows, as a result of which we often get twenty. In order to find out how many bricks are needed for a fireplace , we multiply 24 bricks of one row by the number of rows - 20. The final number is 480 bricks. A certain amount of materials will also be needed for stock and partial finishing - this is about sixty more units, which means the final quantity is 540 bricks.
Important: when using this calculation method, keep in mind that the final quantity is intended exclusively for the construction of the main part of the structure, and the chimney itself is calculated separately.
Calculation of bricks for a chimney
In order to calculate the amount of bricks for chimney assembly, you can use the following example:
- One linear meter of pipe is about 14-15 rows. Consequently, one row has a length of seven bricks, and the total according to this scheme is approximately ninety-eight bricks;
- If the total length of the chimney is about five meters, according to this scheme, the total amount of brick consumed is 490-500 units.
This calculation scheme, of course, is also not 100% accurate, but with its help you can profitably plan and calculate the budget spent on the construction of a heating unit of the required size.
For a more detailed and detailed visual acquaintance, we also recommend viewing the photos in this article.
Interesting to know: today the cost of refractory bricks can vary from 40 to 60 rubles per unit. The cost of stove bricks is somewhat more varied and can range from 20 to 120 rubles.
pech-kamin.ru
Projects, diagrams and drawings
There are many ready-made projects for brick barbecues, varying in level of complexity, costs and decorative options. You can develop your own drawing based on existing diagrams.
We present a barbecue diagram, according to which it is easy to build a barbecue out of brick with your own hands.
Typically, the height from the ground to the roasting pan is defined as the distance from the level of the hand to the floor. If the owner is tall, then the firebox will be located quite high. The width of the frying pan does not exceed 30 cm, otherwise a standard skewer will simply fall into it. Most often it does not exceed 1 m in length, based on 10 skewers.
You can build a brick grill with your own hands according to the following drawing.
Another drawing and a real photo for it, step-by-step instructions for building a brick grill.
The simplest option
The simplest brick grill has only a base and a brazier, and sometimes protrusions for a grate. It is not difficult to lay, it does not require little space and materials. This would be an excellent option for a barbecue for a summer cottage for a small company or a family of 4 people.
If you plan to build a solid structure that could be used all year round, then a stationary brick grill is installed, complemented by wind walls and a chimney.
We recommend watching the following video. It provides step-by-step instructions for building a brick grill yourself.
Almost no vacation at a summer cottage is complete without a grill or barbecue. This structure can be built with your own efforts, if skill and budget allow. How to make a grill out of brick? Today you can find a huge number of detailed instructions, diagrams, and drawings. They make it much easier to create a brick grill yourself.
Of course, you can consider the option of purchasing a ready-made barbecue. But many owners refuse it not only because of savings, but also for personal reasons: they want to build a brick grill with their own hands, of high quality and functionality, with an oven, cauldron and smokehouse. And then family and friendly gatherings will take place near it. Also, an outdoor brick grill is an original component of the design of a summer cottage; it can be installed in a gazebo.
Furnace departments
Any stove, be it Russian, Dutch, Swedish or a sauna structure, consists of several main sections. For each of them, the material should be selected separately, since certain characteristics required specifically for a specific part of the hearth are important.
Foundation
The first step is to build the foundation. Since the structure is usually located on the ground floor, the proximity of the ground must be taken into account. Therefore, a concrete slab is usually laid as the first layer, below the floor level, and a layer of waterproofing is applied to it.
Thus, we get a layer that will withstand the mass of our future structure, and also will not allow moisture and cold that come from the soil to affect it. Solid brick rows are usually laid on top of the waterproofing layer; there can be from two to four.
This is the second part of our foundation. As a rule, clinker material is used for it. This is due to the fact that it has very high strength, it is not afraid of loads, so such a base will easily support the weight of the entire stove.
Firebox
Another section of the design that raises the most questions about the selection of material is the firebox. This is the very place where firewood is laid and where the fire is made. The bricks in the firebox are directly exposed to the flame for a long time, and this happens over many years. Therefore, appropriate requirements are imposed on them.
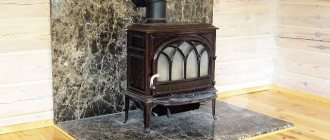
As a rule, fireclay blocks are used to lay out the firebox. They have the highest fire resistance of all possible options, so they quietly perform their functions throughout the entire life of the fireplace.
In principle, the entire structure can be assembled from fireclay. But this is very expensive. In addition, the firebox lined with cream-colored fireclay blocks looks very advantageous when surrounded by red brick blocks, so this solution is optimal from the point of view of not only functionality, but also design.
Chimney and pipe
The chimney does not come into direct contact with the fire and does not carry a particularly high load. However, it also has certain requirements.
Firstly, it is exposed from the inside to aggressive chemicals released during combustion. They have a detrimental effect on the condition of the building material from which the inside of the chimney is lined, so special attention should be paid to the resistance of these bricks to various destructive factors.
Secondly, the part of the chimney that is located above the surface of the roof of the house - that is, the pipe - is also subject to attacks from the external environment. Rain and snow, frost, wind, sudden changes in air temperature - all this significantly undermines brick blocks.
Experienced craftsmen recommend using two different materials for this section of the oven. Clinker, as the most resistant to aggressive chemicals, is used for laying out the inner layer. And on the outside, ordinary ceramic bricks are perfect, as they withstand the effects of the external environment very well. It’s not for nothing that many different structures are erected from it, including residential buildings.
The advantages of such a grill
- Possibility of cooking both meat and other products: seafood, poultry, vegetables, etc.
- The heat can spread evenly over the entire area. This is the merit of the back wall, the round format of the roaster and the more solid parameters of the structure.
- Products can be strung on skewers, but more often they are placed on a wire rack. You can make the height of the grille static or variable.
- Heat can be generated not only from burning wood and coal, but also from other sources.
- You can install a hood for the barbecue.
- You can mount a thermometer to make cooking more convenient.
- Marinating the meat before cooking is not required.
Selection of barbecue area
This is the initial stage of work. If your plot is small, and almost every square meter counts, choosing a plot for a barbecue is difficult. And its drawing is created based on the parameters of the zone where its construction will follow.
The instructions, according to which the factors taken into account are as follows:
- The barbecue should not interfere with ordinary dacha activities.
- It is placed so that the prevailing wind will take the smoke away from the house.
- There should be a main pipe not far from the barbecue area.
- It is not reasonable to connect an entire water supply network to the facility.
- At least a modest canopy over the barbecue is desirable.
- The location of tall bushes and fertile trees near the barbecue is not allowed.
- In the area with the barbecue, it is recommended to arrange a place to store firewood, put chairs, benches, and a table.
- The ground surface for construction must be perfectly flat.
- The barbecue area is placed at a short distance from the kitchen. This makes it easier to equip the place with water and lighting.
- When erecting a barbecue, immediately determine where the meat will be cooked, served and dishes washed.
Required tools for work:
- Bayonet shovel.
- Sledgehammer.
- Shovel type.
- Roulette.
- Rule.
- Level
- Set of pitchforks.
- Hammers: carpenter's and rubber.
- Saw.
- Trowel.
- Chisel.
- Bucket.
- Jigsaw.
- Wheelbarrow.
- Pick.
Brick question
The use of bricks for barbecues is radically different from the use in other buildings. Therefore, it is important to choose it correctly. When laying a barbecue, the following criteria are taken into account:
- Huge temperatures. They can reach more than 1000 C when certain wood species are burned.
- Sudden temperature changes. In a short interval, the brick heats up to powerful temperatures, and then quickly cools down.
Ordinary red and sand-lime bricks are not suitable here. It will not withstand such regimes and will collapse.
Some types of fire bricks can withstand prolonged exposure to intense temperatures, but cannot cope with sudden temperature changes. As a result, they are destroyed.
And the best option for a barbecue brick is red stove brick. It can withstand all these factors perfectly and has a long service life.
Laying process step by step
The masonry scheme is classic. The starting line is laid without composition. This measure will make the walls diligent and even. Marks for the positions of all subsequent masonry lines are indicated on the base.
Before laying, make sure that the base has acquired the required strength. This usually takes at least a week.
Question with masonry composition
For the intended operations, two types of composition can be used.
- Standard. It will not come into direct contact with the flame. Based on the brand of cement, you need to calculate the amount of sand. So, for brand M25 the proportions are as follows: 5:1 (sand-cement). For M50 the ratio is 4:1. For M75 – 3:1.
- Fireclay type clay. It is sent for laying the combustion chamber. It is fire resistant and can withstand high temperatures.
The brick laying method is determined by the order of your preferred drawing. And even the slightest deviation from this order is not acceptable. To comply with the parameters:
- Carefully laying out the first line of bricks.
- Laying out the line starts from the corner. Then the side walls are created.
- The voids between the bricks do not exceed 1 cm.
- The correctness of the angles and the evenness of the masonry are controlled.
- The composition for the initial line must be thick.
- The bricks in the following lines overlap the seams of the previous line.
- When laying out subsequent lines, the verticality of the corners of the masonry is checked.
- Every third seam is reinforced. Steel rods or mesh are used.
In this case, the work follows the following order:
It is very important not to deviate from it. To check the evenness of the masonry, use a level and a vertical plumb line.
Lattice question
A base for the brazier is placed between two walls (opposite). Corners or rods are mounted here. They are metal. The creation of a combustion compartment is already underway on them. For this base, you can use a metal tray. An important condition is that ash must be easily removed from the combustion chamber.
The appropriate height for this department is 10 masonry lines. This is approximately 70 cm. The bottom here is made of sheet metal. The top of the compartment ends with a concrete floor. One brick line is made in it.
Chimney issue
The easiest way here is to install a cone-shaped metal box. It should taper upward.
Creating a chimney from brick is a difficult task in itself. Even the slightest miscalculations in determining its height are not allowed here.
Often the rear wall of the chimney is used to mount the chimney. In this case, three bricks are placed on the back side of this wall, and one brick on the sides. For the required height, 6 masonry lines are created. The front side of the chimney is covered with a concrete slab. One and a half meters of masonry is laid out in a pipe format. A canopy is placed at the top to protect the chimney from precipitation. Galvanized metal is used for its manufacture.
It is important to install valves to be able to further adjust the temperature in the combustion chamber.
Functional surface
To make working with the created barbecue more convenient, it is necessary to build a special working area next to it. This involves creating a table top. As a rule, it is built into the structure. It is made from good durable material that is easy to care for. Often in these cases the following are involved:
- very durable tiles: paving or floor,
- good strong wood,
- decorative stones.
It is important that the countertop fits harmoniously into the overall design of the brick grill, is practical and easy to clean.
Here was an example of creating a fairly simple barbecue for a summer house. This modification is quite popular. It does not require huge costs and, with proper operation, lasts a very long time.
It allows you to prepare various dishes from domestic, eastern and western cuisine. You can also fry, smoke, bake and cook food on this grill.
To construct this building you will need:
- About 1850 bricks (excluding chimney).
- Cubic meter of clay.
- 2 sq.m. sand
- 220 cm of rod, the diameter of which is 1.4 cm.
- Steel strip. Dimensions: 500 x 120 cm.
- Sheet of steel. Its area is 5 mm - 1.5 m²
- A pipe used to carry water or gas. Its parameters: 1/2″ - 0.4 m.
- Steel corner with parameters 10 x 10 - cm. Minimum 4 pieces.
- 7 grates. Parameters of each: 41.5 x 26 cm.
- 3 ash pan doors. Each 27 x 13 cm.
You also need to take into account the cost of the foundation.
How many bricks should I hang in grams?
Let's consider one of the simple and popular calculation methods that allows you to quickly find out how much brick is needed to build a Dutch oven.
Formula
The following formula is used for calculation:
This formula uses the following parameters:
- B – planned furnace height;
- P – height of one row;
- O – the number of bricks in the first row.
Let's look at a clear example.
Let's say it is planned to build a Dutch house 2.4 m high, at the base of which there are 24 bricks. The height of one row is 7 cm (the thickness of one brick).
- Subtract 0.3 m from the planned oven height for cutting. Thus, after subtraction, 2.1 m remains.
- The resulting number should be divided by the height of one row, resulting in 30 rows.
- We multiply the resulting value by 2/3, that is, we subtract 10 rows.
- 20 rows remain.
- We multiply the resulting number of rows by the number of bricks in the base (24 pieces).
- We get 480 bricks.
- Let's add 50 bricks for cutting.
Arithmetically it looks like this:
The result is 530 bricks - the required number to build a thirty-row Dutch oven.
The number of bricks for the construction of the chimney is calculated separately. It is determined by the height and cross-section of the chimney. Therefore, the formula should be used:
The following parameters are used:
- Chd – number of rows in the chimney;
- N – the number of bricks in one row of the chimney.
These simple calculations will allow you to determine how many bricks will be needed to build a Dutch oven.