Unfortunately, the question does not include the region of residence, climatic conditions, or characteristics of the sauna stove, so only general recommendations can be used. In your case, the bathhouse can be located in the garden (or at the dacha), that is, used only in the warm season. Or it is a structure on the site of a private house, intended for all-season use. For each case, there is its own thermal circuit diagram, in addition, there are various operating modes: putting it into warm-up mode, setting a temperature comfortable for washing, taking bath procedures, heating the dressing room for normal changing clothes.
Brick bath
For brick there are fewer restrictions in choosing a place for construction and in implementing the configuration of premises. Fire-resistant material is chosen for the building of the bathhouse.
Brick bathhouse: pros and cons
The advantages of a brick bath include:
- fire safety;
- life time;
- environmental friendliness;
- variety of projects;
- ease of operation.
The clay from which I make bricks is a natural material, so we can talk about its environmental friendliness. At the construction stage of the bathhouse, wood is treated with fire retardants and anti-rot preparations, which carry harmful impurities with them. It is impossible to set the blocks on fire, which is important for the building, since they use solid fuel stoves, in the firebox of which the temperature reaches 600°. A brick bathhouse will last 60 years or more with proper care. A structure made of timber can withstand the same period, but maintenance costs are 2-3 times higher. Rounded or planed timber does not bend, which interferes with the creation of designer buildings. The shape of the block bath wall is made curvilinear if the project requires it.
When choosing a material, consider the disadvantages:
- heat capacity;
- the need for insulation;
- moisture absorption;
- price;
- foundation.
The thermal conductivity of brick is higher than that of wood, so it is necessary to insulate the bathhouse with an insulator. Micropores in the blocks absorb moisture, collapsing from temperature changes and losing strength. A bathhouse project made of brick can be more expensive than one of the same dimensions made of rounded logs. The weight of the structure requires a solid foundation, which also increases costs and creates problems on unstable soils.
Which brick is better to build a bathhouse from?
When constructing the walls of a brick bathhouse, well masonry is used, the peculiarity of which is the presence of an air gap between the planes. This approach allows you to insulate the surface from the inside. The following blocks are used:
- red ceramic brick;
- red porous brick.
Ceramic is suitable for cladding and masonry. Blocks are produced solid or hollow. The former have greater load-bearing capacity, the latter - thermal insulation properties. Solid brick is laid in two rows if bathhouse walls are being built from it. Hollow is not suitable for plinths and chimneys.
Porous blocks are a molded mixture of clay to which sawdust is added. When fired, the latter turn into ash, forming voids, which is important for thermal insulation properties. Thermal conductivity is comparable to that of rounded timber. Advantages: sound insulation, light weight and durability.
Advice! If it is planned to insulate the walls of the bathhouse with mineral wool and install waterproofing, then sand-lime brick is also suitable for construction.
How to build a brick bathhouse
Before building a brick bathhouse, choose a location on the site in accordance with SNiP standards. It is removed 1 m from the neighbor’s fence. In this case, the roof slope must end on the owner’s property. If there is a wooden building on the neighbor’s territory, then the distance from the bathhouse to it should be more than 15 m. The same distance is maintained to open sources of drinking water and forests. A brick bathhouse not adjacent to the house is removed 8 m from the roadway and 5 m from the roadway.
After selecting the territory, a project is determined, which is necessary for calculating the building materials and calculating the supplied communications. The number of blocks for walls is determined by dividing the surface area by the area of the brick. Take into account the thickness of the seam so that there is no excess. Choose the type of pitched or flat roof for a brick bathhouse. The latter is not suitable for areas with heavy snowfall in winter. To reduce the project cost, the roof is covered with a profile sheet. Its quantity is determined by the example with bricks.
Windows and doors for brick baths are made of plastic. They are resistant to moisture and do not deform due to temperature changes. Laminated frames with imitation wood are suitable for red brick. One sash is made openable for ventilation. A small window is placed inside the steam room to reduce heat loss. The entrance door to the bathhouse is made of wood or plastic.
Construction of a building
The process of building a brick bathhouse consists of several stages, which must follow strictly one after another.
Making masonry mortar
Before preparing the mortar for laying bricks, you need to study what the working mass should be. Requirements for the composition for masonry:
- High strength after drying. The masonry should not deform, crumble, or settle.
- High plasticity. Only if this requirement is met, the masonry mixture will be able to fill all the voids between the bricks and securely hold them together.
- There should be enough time before the working composition hardens to lay the bricks on top of each other, align them horizontally and vertically.
The standard mortar for bricklaying is cement-sand. To prepare it, you can use cement m400 or m500. When using the second option, you need to take 1 part cement, 4 parts sand. For the first one - 1 part cement, 3 parts sand. Preparation:
- Pour the ingredients into a bucket.
- Mix them together with a drill and whisk. When stirring, it is necessary to add water.
The result should be a homogeneous thick mass without lumps or large inclusions.
Foundation and floor
Construction of the foundation:
- Prepare the area. To do this, it is necessary to indicate the dimensions of the future building using stakes with a thread stretched between them. Clear the designated area of debris. It is also recommended to cut the soil layer to a depth of 20 cm to get rid of holes and hills.
- Add pegs with string to mark trenches for the strip foundation.
- Dig trenches to a depth of 50 to 80 cm (depending on the freezing point of the soil).
- Make wooden boards from the boards and secure a thick plastic film on them. Install the shields along the edges of the trenches and connect them together with boards. Install spacers for the formwork so that it does not tear due to the pressure of the cement.
- Make a reinforcing frame from reinforcement. It is tied with knitting wire.
- Place a layer of sand 15–20 cm thick at the bottom of the trenches and compact it.
- Install the reinforcement frame inside the formwork. The height of the base above the ground is 50 cm.
Pour cement mortar into the formwork. Cover the base with film to protect it from precipitation. The strip foundation must harden for at least four weeks.
To prevent the cement surface from cracking, it is recommended to periodically water it with a small amount of water.
Walls
Features of building walls in a brick bath:
- Before you start building walls, you need to prepare the foundation. The formwork is dismantled, the voids between the ground and concrete are filled with expanded clay.
- Clean the cement surfaces from uneven surfaces. After this, they need to be covered with a layer of liquid mastic. When the mastic dries, spread 2 layers of roofing felt on top of it.
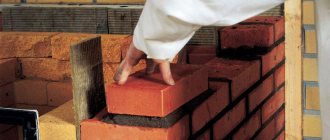
- The first row of walls begins to be laid out from the corners. It is important to check each brick for level so that further rows are level.
- The masonry should not be continuous. Bricks in adjacent rows should be positioned so that the seams do not coincide.
- Every third row you need to make a binding. To do this, you can use a metal mesh or small diameter reinforcement.
If the walls are laid in summer or late spring, it is recommended to wet the bricks before use. This action will help prevent the solution from drying out.
Windows and doors
You need to decide in advance where the windows and doors will be. To limit them from above, metal corners should be used. They must be laid in the top row that ends the window or doorway so that they overlap it. The next row of bricks is laid on top of the corners.
Ceilings and roof
The process of constructing a roof and ceilings:
- The walls must be strengthened with a reinforcing belt. To do this, a recess is made in the brickwork along the perimeter of the wall on the upper side, into which concrete is poured.
- On top of the production of the tightening belt, a mauerlat is fixed - a strapping crown made of timber.
- Ceiling beams are fixed on top of the Mauerlat in increments of 60 cm. The ends of the beams must protrude beyond the walls by at least 50 cm.
- Next, the rafter sections are assembled. It’s easier to collect them on the ground and then put them on the roof.
- All rafter sections are secured to the ceiling beams using rafter feet.
The rafter sections are fastened into a single structure using sheathing. A vapor barrier film is fixed on top. A counter lath is placed on top.
Communications
It is also necessary to pay attention to the laying of communications. These works must be carried out during the first stages of construction.
Electricity
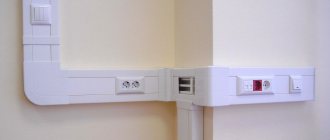
Features of conducting electricity in the bathhouse:
- You need to draw a wiring diagram in advance, on which you should mark switches, sockets, and lamps.
- It is necessary to choose wires with additional protection from strong heat.
- Switches and sockets must be located in the dressing room.
Since most lamps operate on 12 volts, a transformer must be installed in the recreation area. You can hide it behind a metal shield.
Sewerage
Features of the sewer outlet:
- It is better to assemble sewerage from large-diameter plastic pipes.
- The drain should be located at the lowest point of the shower. To do this, during the construction of the floor it is necessary to make a slope in one direction.
- Water drainage points must be protected by gratings.
The sewage system must be discharged into a septic tank or drainage well. There should be at least three meters from it to the bathhouse.
Water supply
Features of water supply connection:
- The best option for running a pipeline for cold water is from a central water supply system. If this is not possible, a borehole or well will do.
- Pipes that run along the street must have additional insulation.
- If the building will not be used in winter, it is necessary to make points for draining water from the system.
Wall treatment
There is no additional need to treat brick walls. They are not destroyed by fungus, mold, insects, or exposure to moisture.
Thermal and waterproofing
To improve the functional qualities of a bathhouse built of brick, it is necessary to perform heat and waterproofing. Waterproofing methods:
- Pasting. It involves gluing brick surfaces with sheet materials.
- Painting. Liquid compounds are used for waterproofing. They cover brick surfaces.
The process of thermal and waterproofing walls:
- Leveling and covering walls with plaster.
- Installation of a frame made of wooden bars or aluminum profiles.
- Laying thermal insulation. Individual slabs are fixed in empty frame cells.
- Packing of moisture-resistant board material.
- Covering the slabs with foil film.
- Stuffing wooden slats to create a ventilated gap.
Roof diagram
For steam rooms and washing rooms, it is better to choose foam glass as insulation. For dressing rooms, vestibules, and recreation areas - mineral wool.
Brick bath projects
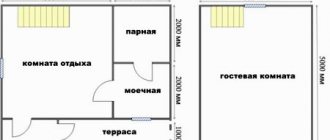
Above is a project for a brick bathhouse measuring 6 by 4. It is being implemented in small areas in country houses or dachas. The building is divided into three parts. Half is occupied by a relaxation room, which is equipped to suit personal preferences. The furnace furnace for the steam room is brought into it. The washing room is transitional; it is combined with a bathroom to save space inside the bathhouse.
This brick bathhouse project has an attic with a billiard room and a gym. The shower and toilet are separated, there is a guest room that will allow you to receive relatives and friends. The steam room area is enough for 3-4 people who can be inside at the same time. A grill or barbecue is installed on the terrace.
The option shown in the drawing is a full-fledged brick country house with a bathhouse inside. It is distinguished from the previous one by its large area and the presence of a font. The latter is filled with cold water for a contrasting effect on the human body. It replaces the pool and is cheaper. There is a separate room for storing firewood, which allows you to avoid cluttering the rest room. The terrace surrounds the brick bathhouse on both sides, expanding the area for outdoor recreation.
Project of a one-story brick bathhouse, in which the bathroom is separated from the shower. To reduce heat loss and store firewood, a vestibule is equipped. The steam room can accommodate 5 people at the same time. In the recreation room there is a corner for the kitchen.
How to do it?
If a brick partition is planned in a wooden bathhouse, then before this the structure must be stable, that is, shrinkage.
To connect the main walls of the bathhouse with the partition, pieces of reinforcement are mounted at one end into the wall and at the other into the masonry joints. The diameter of the rod should be 6 mm. If a brick partition in a bathhouse is placed near the stove, then it would be correct to leave a window for the combustion channel. The progress of masonry work is carried out in the following order:
- The first thick layer of mortar is laid, leveled with a trowel, and creates the base of the wall. We need to give it time to catch on.
- Then another layer - thinner - under the first row of bricks. The mortar is applied to the ends of the outer bricks with a trowel, pressed tightly against the wall and excess mortar is removed. Using a stretched string, the evenness of the rows is controlled. And the level shows horizontal and vertical.
- The laying of the second and each even row begins with halves of material. This - dressing - is done to evenly distribute the load.
- Every 3-5 rows, pieces of reinforcement or steel wire are placed on the cement to provide strength.
- In a similar way, the entire wall is driven completely up to the ceiling. The remaining gap is filled with small pieces and fragments soaked in solution. Small cracks are sealed with tow.
- If the bulkhead is planned with a door, then the frame is set up in advance. It is attached to the brickwork using steel strips. The bricks are laid close to it. Do not forget to control the horizontalness and evenness of the masonry by moving the stretched string higher.
- After the solution has hardened, the seams are sanded.
Between the sink or rest room and the steam room for ventilation during drying, you can place a small hole that can be closed during bath procedures with a shield or plug. After the partition is erected, the wall on the washing side is tiled, and in the steam room it is insulated, thermal insulation foil is laid and covered with clapboard.
Do-it-yourself brick bath: step-by-step instructions
When the building material is delivered to the site where the brick bathhouse will be built, the area is cleaned. Remove debris, branches and grass, remove the turf layer.
Foundation
The cleared area for the bathhouse is marked out for the foundation according to the selected project. Two pegs are driven into the corners, as shown in the photo above. A fishing line or twine is pulled between them. Control the right angle. To do this, measure the diagonals according to plan and compare them with the actual ones. If something doesn’t fit, then one of the corners is shifted to the middle or outward. The posts are secured so as not to damage them during excavation work.
They dig a pit under the strip foundation of a brick bathhouse. Its depth should be below the freezing point. In areas where the air temperature in winter drops to -35°, they decrease by 1.8 or deeper. This is necessary for strength so that the heaving soil does not squeeze out the structure and lead to cracks.
Advice! On unstable soils, a strip foundation is also used for a brick bathhouse, but it is reinforced with screw or bored piles. The latter are lowered below freezing of the soil, and the tape is left on the surface.
The walls of the pit are cleaned and leveled so that they do not crumble. A two-layer cushion is placed at the bottom, which consists of sand and crushed stone. The level of each is 10 cm. The first one is compacted and leveled. So that the surface settles, it is soaked with water. The cake is completed with waterproofing. Use roofing felt or a similar material that will prevent the capillary rise of moisture from the foundation to the brick walls of the bathhouse.
Wooden formwork is installed on top of the trench under the brick bathhouse to a height of 40 cm. The panels are made of moisture-resistant plywood with a laminated coating, which improves the quality of the base, or from boards. The waterproofing material is laid with an overlap so that the solution does not squeeze it out. A metal sheathing made of reinforcement is placed inside the gutters. The boards are reinforced with spacers and jumpers on top.
After pouring the foundation for the brick bathhouse, the concrete is compacted with an internal vibrator, which eliminates cavities and increases the strength of the mixture. The surface is leveled with a trowel to make it easier to maintain it when removing walls. If the tape is poured under a brick bathhouse in the summer, then the structure is wetted once a day and covered with oilcloth so that the surface does not crack due to moisture evaporation.
Walls
Before starting to remove the brick walls of the bathhouse, the surface of the foundation is waterproofed. To do this, it is cleaned and the resulting deposits are knocked down. The top is covered with bitumen mastic, on which roofing felt is laid. An overlap of 15 cm is made between the sheets. Do not use continuous wall masonry, in which the outer and inner planes are located without a gap. This scheme consumes material and requires external insulation.
Metal beacons are placed in the corners of the future bathhouse. They are verified by level in the horizontal and vertical plane. A cord is pulled between the posts to the height of the row, taking into account the thickness of the seam. Laying begins from one of the corners. The string is rearranged as you go. The evenness of the plane is controlled by a plumb line or a line between the beacons. To do this, the latter is moved outside the wall. The base of a brick bath is constructed from blocks without cavities, the walls are erected from hollow ones. If work is carried out in late spring or summer, the bricks are additionally moistened to prevent the mortar from drying out.
Roof and floor
For greater strength, an armored belt is mounted on top, which will prevent the destruction of the brick walls of the bathhouse. Formwork is constructed around the perimeter of the building, metal sheathing is laid and concrete is poured. After 2 days, the shields are removed and the influx is knocked down. After gaining strength, the upper plane is covered with bitumen mastic and roofing felt is laid to protect the roof supports from moisture. A Mauerlat is installed on top of the armored belt. The latter is a wooden beam with a cross-section of 10 by 10 cm. It is attached to the walls of the brick bathhouse with anchor bolts or on studs that were laid during pouring.
Install a rafter system for the roof of a brick bathhouse. It is supported and fixed to the Mauerlat. The lower part of the trusses acts as ceiling beams or they are mounted separately. They fasten the sheathing, waterproofing and roofing. From the bathhouse, the rough ceiling is lined with boards and a foil vapor barrier is laid. From the attic, cover the surface with a membrane vapor barrier and place mineral wool between the joists. Cover the insulation with another layer of vapor barrier.
The space inside the foundation of a brick bathhouse is filled with sand and compacted. At the base level, a wooden beam is laid, which serves as the basis for the floor. Use a log with a section of 25 or 15 by 10. It is fixed with anchor bolts to the foundation or corners to the wall. Boards are placed underneath to hold the insulation. Cover the surface with waterproofing and lay mineral wool. Another layer of waterproofing is placed on top and the subfloor in the bathhouse is laid.
Exterior and interior decoration
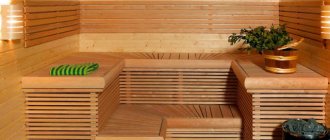
After installing the subfloor and ceiling, they begin the interior and exterior finishing of the brick bathhouse. In the steam room, the walls are covered with aluminum foil, which acts as a vapor barrier. A sheathing of timber with a cross-section of 5 by 5 cm is stuffed on top. An electrical cable is pulled through the corrugation and conclusions are made for the lamps. A lining made of larch or oak is mounted on the frame, and shelves are attached.
Information! A separate brick foundation is built under the stove in the steam room of the bathhouse. The perimeter walls are protected with stainless steel sheets or stripped of insulation and finishing. Pay attention to the node where the chimney passes through the ceiling so that rainwater does not flow down it into the bathhouse.
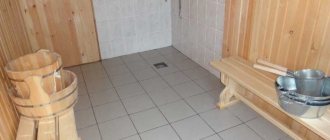
The rest room and dressing room are covered with wooden clapboard or block house, having previously installed the frame. In the washing room of a brick bathhouse, wood is used on the ceiling. The walls and floor are laid with ceramic or porcelain tiles.
If the walls of the bathhouse were laid using the well method with insulation inside, then external finishing is not required, since it is replaced by facing bricks. In other cases, the walls are insulated with mineral wool, secured with glue and plastic dowels. After this, a metal or wood sheathing is installed and the bathhouse is sheathed with a block house, clapboard or siding.
Option “Home bath”
In cold weather, it is very difficult to put the bathhouse into operation (warm it up to working condition). Periodic operation prevents this, since in the cold the structure looks like a block of ice. The above method is also the best for these operating conditions. The load-bearing brick wall in this case serves as a support for the frame structure.
The vertical beam is attached to it using standard ventilated frame technology - on brackets or hangers for the profile of gypsum plasterboard systems. The thickness of the insulation is calculated in a special program; to do this, it is enough to indicate the existing parameters of each layer. You also need to look at the diagram where the dew point falls. Although in this case the occurrence of moisture on the internal walls is unimportant, since in the washing room and steam room moisture is present in any case.
Turnkey brick bathhouse
If the bathhouse is not used seasonally, it will be equipped with heating. This is necessary to maintain the same temperature, so that the wood trim does not suffer from changes and the brickwork does not pick up moisture. Install a solid fuel or gas boiler if the heating is water. Install radiators under the windows or a heated floor circuit. In the latter option, the floor in a brick bathhouse, after compacting the sand, is filled with a concrete screed, waterproofing is laid, insulation is insulated and a pipe is laid. Only after this the finishing is applied.
Advice! As electric heating for a brick bath, infrared film or mats are used, which are mounted under the tiles.
They provide supply and exhaust ventilation, which accelerates the exchange of moisture inside the bath with the environment. At the junction of the channels with the steam room, a valve is installed that blocks the flow of hot air into the relaxation room. The lighting is made from LED chandeliers and strips to reduce consumption and make construction economical.
Installation technology
The walls of a brick bath can be finished by installing lining. It can be installed vertically or horizontally. The first method is most widespread due to its high speed and ease of use. At the first stage, you need to install the sheathing, under which the insulation is laid. Air will circulate between the layers, which will help remove condensation. The sheathing is made of timber, which is coated with a primer. It is recommended to avoid using galvanized profiles.
A 40 cm distance is maintained between the slats. The two outermost elements are nailed at the corners, and a rope is stretched between them. If necessary, shims can be placed under the slats for more precise alignment. Before installing the lining, it is necessary to mark the first row. Fastening is carried out with nails that are nailed to the slats. The last row of trim is cut at an angle. When deviations in height do not exceed 1.5 cm, it is recommended to trim in the bottom row; subsequently, this place is decorated with a plinth.
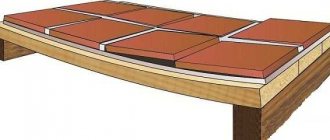
We insulate the floor
At the first stage of thermal insulation of a brick bathhouse, boards need to be nailed to the wooden beams, the distance between which is one board. Next, the surface of the joists and the floor is covered with windproof film. It is fixed on the protruding elements with a stapler. There is a layer of insulation on top. It is better if it has a foil layer, which will speed up the thermal insulation process. Otherwise, you can use a vapor barrier film, which will protect the layer from moisture and will cope better with the task due to its heat-shielding properties. At the next stage, you need to nail a sheathing consisting of 3 cm bars to the logs. They will also provide ventilation. Now you can begin laying the final coating. They can be wooden boards.
We insulate the walls
When thermally insulating the walls of a brick bathhouse, a frame is formed on the load-bearing surface. Next, the insulation is laid, followed by the waterproofing material. This can be a plastic film or a foil layer. The material is covered with an overlap, and its joints are covered with thin slats. The top needs to be covered with clapboard or boards. An alternative option is PU foam boards.
We insulate the ceiling
The first layer will be a vapor barrier, the main role of which is to prevent the penetration of vapors into the thermal insulation. For these purposes, you can use roofing felt or parchment. Modern geosynthetic coatings, thermofol and membranes also performed well. It’s good if you purchased a foil vapor barrier, then it will also shield the heat, effectively returning it inside.
The next layer will be thermal insulation. It is better to choose the lightest possible material so as not to create unnecessary load on the structure. The layer must be non-flammable and resistant to moisture. An additional selection criterion is ease of installation.
Next, waterproofing is installed. It will be located on the roof side and will act as an additional barrier. It can be a membrane or film. One side must be completely waterproof, and the other must be able to allow steam to pass through. If the bathhouse does not have an attic, thermal insulation is carried out only from the inside.
Brick bath: photo
The photo shows an example of a bathhouse with 1.5 bricks. The insulation is done inside the wall, so no external finishing is required. There is a window only in the rest room to reduce heat loss. Metal tiles were chosen for the roof, which are more expensive than corrugated sheets, but are visually superior.
A small brick bathhouse, the walls of which are lined with a well method. There is a dressing room for outerwear and firewood storage.
Brick bathhouse with terrace. In the summer, the latter is used as a place to relax, installing garden furniture and a barbecue.
A completed bathhouse project in which the area of the relaxation room was expanded with a bay window. The advantage is good natural lighting.
A brick bathhouse with a pitched roof is suitable for areas where there are strong winds in winter but little precipitation. The advantage is that the roof is cheaper, the disadvantage is that it is impossible to equip an attic.
In the steam room of a brick bath, a metal stove is installed or it is laid out from fireclay bricks. The space behind it is left open so as not to spoil the finish.
If necessary, install two heaters. One is made of bricks, the second is electric. Power is calculated based on the volume of the steam room in the bathhouse.
If the masonry inside the brick bath was done for jointing, then installation of the lining is not required. At the same time, they think about vapor barrier of surfaces.
When laying a wooden floor in the rest room of a brick bathhouse, make a recess under the firebox window. It is decorated with tiles or metal sheets.
Selecting a location
When choosing a place for a bath, first of all you need to pay attention to ensuring that the place is dry. If there is a river or lake nearby, then the construction site should be at least 30 m away from it. Otherwise, during a spring flood, flooding or simply high humidity cannot be ruled out.
In addition, fire safety requirements must be taken into account. The distance to neighboring buildings must be at least 12 m.
If the bathhouse is heated not with wood, but with a gas or electric boiler, then this distance can be reduced to 5 m. In addition, the bathhouse can be attached to any residential building, this will save building materials and simplify the installation of communications.
Brick bathhouse project