The best situation is when the owner of a country house (for example) starts building a bathhouse, having clarified for himself as many issues related to it as possible. For example, the question of what kind of stove he is going to install will be very important, because it determines whether preparatory work is needed for it during the construction period and to what extent . And if he is going to cover the stove in the bathhouse with bricks, then he needs to make a base of appropriate size and strength.
However, the question of how to line an iron stove with bricks may arise long after the construction of the bathhouse is completed. In this case, the matter may not be limited to simply erecting small walls, but will (possibly) even require dismantling the furnace. In this article we will sequentially analyze each option for the development of events in different scenarios.
Reasons to line the stove in a bathhouse with bricks
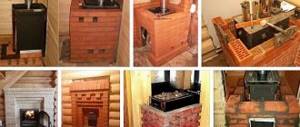
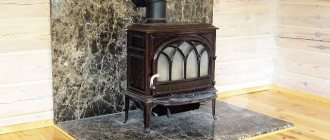
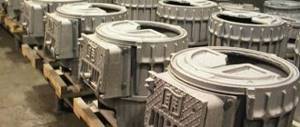
Metal sauna stoves lined with brick
The decision must be made carefully, so we will name the reasons why an iron stove is lined with bricks in a bathhouse.
Unfortunately, the metal stove itself is a source of not only rapid heat, but also hard infrared radiation, which burns the skin from a distance, without contact with the object . In addition, a rapid increase in temperature in the bathhouse leads to dry air , and this is a big obstacle to creating the correct bathhouse microclimate. The third significant reason is that the metal not only heats up quickly, but also cools down quickly, and in a bathhouse this leads to excessive consumption of firewood and unnecessary movements.
Brick is an artificial stone , and therefore it takes longer to heat up than metal and gives off heat much longer. to eliminate the main disadvantages of a metal stove relatively cheaply (compared to natural stone) : make the radiation softer, warm up longer, but without drying out the air, increase the efficiency of the stove by retaining heat from wood burned in the stove longer.
What kind of brick to cover
Choosing the right material for the job is already half the battle. It happens that tight-fisted owners try to save money and cover the stove with what is left from the last construction project. Halves and quarters of bricks are used. The end result is unlikely to please you with its appearance, so it is still better to use a whole new brick, specially purchased for this purpose.
There are several main options:
- Sand-lime brick;
- fireclay or refractory brick;
- hollow red;
- red ceramic solid;
- facing.
Silicate
Chamotte
Hollow
Full-bodied
Facing
sand-lime brick is very good for cladding the outside of buildings, but it is not suitable as cladding for a metal furnace. It is made on the basis of slaked lime, which cannot withstand strong temperature changes. In addition, if the furnace is located in a bathhouse, high humidity and temperature will very quickly destroy the silicate material.
Refractory brick is very good as a heat shield, there are two significant drawbacks - the higher cost of the brick itself and its appearance. Its rough and crumbling surface is unlikely to please anyone. You will have to finish the surface a second time - porcelain stoneware, tiles or other suitable material. As a result, it is not practical to buy fireclay bricks for cladding - ceramic ones will cost less.
As for hollow red brick, it is not the worst material to work with. Of course, a solid one is better, since it retains heat longer, but in the absence of one, a hollow one will do.
Facing brick undoubtedly has enhanced aesthetic properties. But like hollow bricks, it retains heat less well, so it is not recommended to use hollow facing bricks for lining a stove in a house. Solid facing brick is quite acceptable.
Thus, solid ceramic facing bricks can be considered the best option for cladding a metal stove.
Creating a foundation before covering an iron stove in a bathhouse with bricks
The problem is that the story begins long before the stove in the bathhouse is lined. And it begins with a calculation , without which you will not be able to correctly estimate the weight of the stove together with the screen, and therefore, you will either waste your money on the foundation, or, conversely, underestimate the weight and ruin, at a minimum, the floor.
Calculation after which a decision is made on the choice of base
You need to collect the following information:
- dimensions (length, width, height) and weight of the future or existing stove (manufacturers usually post similar information on their websites);
- mass of stones, in ovens with a closed and/or open heater (also indicated by the manufacturer);
- hot water tank (!about stoves with a tank here) - if it is assumed, then its weight and the volume of water it can hold (1 l = 1 kg).
Next, you will have to figure out what kind of brick you will use - red fireproof or fireclay. Since a discussion of the types of bricks awaits you below, here we will indicate the size of only ordinary red refractory brick, which, by the way, is the leader when choosing to cut an iron stove in a bathhouse with facing bricks.
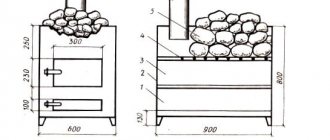
So, the dimensions and weight of one standard brick are 250 mm in length, 120 m in width, 65 mm in height, weight 4 kg.
Now estimate how many bricks will be needed for 1 row if you place them along the walls of the stove with a minimum gap of 5 cm between the stove and the screen?
There are different screens - on four sides, on three, on two - choose your option, focusing on the height of the stove, and count how many rows will fit.
By the way! Do not forget that the brick in the masonry can also be laid in different ways (1/2, quarter and other options), and this will affect the base area.
By multiplying the number of rows by the number of bricks in a row, you will get the total amount of the required material, as well as its mass , multiplying the result by 4.
Add the mass of the screen with the mass of the oven, stones, tank, water in the tank. Add 20% as a safety margin.
If the mass is less than 700 kg , you can safely make the base directly on the floor boards. Otherwise, you will have to build a separate foundation from the sauna stove.
Foundation on foundation
Let's start with the more difficult one. You have calculated everything and it turns out that without a foundation there is no way. The task is easier if you are at the construction stage, otherwise you may have to dismantle the stove, the old base, or part of the floor.
IMPORTANT! You know the dimensions of the foundation by area from the calculations made above. This is a platform formed by bricks on the sides of the stove. Add 10-15 cm to it on all sides.
Start digging a hole. If the soil can withstand it (say, if when calculating the foundation for the bathhouse, it turned out to be shallow, then there is no need to deepen the stove too much), make the depth half a meter and fill it 3/5 with a mixture of sand and gravel, or just crushed stones.
Keep in mind! Not only should the stove and bath foundations not touch each other, it is recommended that the distance between them be at least 5 cm.
On top of the cushion, a screed is usually made from a 1:4 cement-sand solution.
Waterproofing and formwork are placed on top of the screed and a concrete foundation is poured, possibly reinforced, 20 cm high. It will be below floor level.
Note! When drying concrete, it must be frequently sprayed with water to prevent it from cracking.
The concrete is again waterproofed , after which foundation bricks - fireproof red or fireclay, which are placed on a clay mortar . Height – 1-4 rows. Do not forget to check the horizontal level at each stage.
After that, install your device and begin to build a brick screen for a metal stove in the bathhouse.
Floor base
It is easier to cover a metal stove in a bathhouse with bricks if the base is made directly on the floor. However, you need to take into account the structure of the floor and first calculate whether specific lumber will withstand the upcoming load.
ESSENTIAL! In an old bathhouse, a mandatory procedure will be to open the floors and check the beams and joists for rot and other damage. Replacing the damaged one is inevitable due to the increasing load.
Let's start with the fact that the stove does not press on the floor pointwise, but approximately evenly, because it stands on a brick base. This means that we must add the weight of the foundation bricks to the previously calculated total for the stove and screen, and then divide by the area occupied by the latter, measured in square meters. As a result, we get the load per square meter of floor surface under the stove.
In the table below you will find the parameters of the beams (width, height, thickness) that will withstand the specified maximum load - 150, 250, 350, 450 kg per square.
If yours don’t fit, don’t worry - the beams can be reinforced with a channel, steel strip or rods, as well as wood overlays.
If the beams are located at a distance of a meter or more, craftsmen advise placing an additional beam between them. For example, pine with a section of 100x150 mm.
The next thing to worry about is lags . There are also maximum loads for them. Look for the values in the table below.
If there are no color marks, then the values are not close to the tensile strength. Green color is an acceptable, but already limiting value . Red – unacceptable !
Joists are easier to replace than beams.
So, having completed the preparatory work with the floor, you are ready to begin creating the foundation. To do this, markings are made on the floor with an allowance from the screen of 10-15 cm. If any side or sides of the stove are not covered by the screen, then the allowance is made from the stove itself.
Do not forget that fire safety rules require protecting the space in front of the firebox, preventing sparks from touching flammable material. You can either extend the refractory half a meter in front of the firebox, or put a metal pre-furnace sheet there.
After marking, a sheet of refractory material - the material of your choice: asbestos, ceramic fiber or another option. The edges are secured to the floor using self-tapping screws.
asbestos cardboard (asbestos cardboard)
The next layer is the base bricks, the height of which can be, for example, 20 cm. Use only solid refractory bricks - red or fireclay. The solution is clay or with a small addition of cement . Alternatively, you can buy masonry mixture .
Most often they are limited to two rows of masonry . Excess solution is removed without waiting for it to dry. Evenness is also checked immediately using a level - this should not be neglected.
After such lengthy preparations, we are already close to the story of how to line an iron stove in a bathhouse.
Arrangement of the foundation for a metal furnace
Before laying brick over the unit, you need to thoroughly prepare and strengthen the base for it. Since metal structures are light in weight, they do not require a separate foundation for the furnace, but brick cladding will provide an additional load of tens of kilograms.
Not every floor covering can withstand such a mass. For this reason, before covering the boiler with bricks, it is imperative to dismantle the floor and arrange a separate foundation - columnar or monolithic.
Most often, a monolithic base is made. To do this, the floor under the stove is dismantled. The foundation parameters should be such that there is a gap of 10 to 15 centimeters between the future brick cladding and the metal body of the unit.
First, they dig a hole approximately 30 centimeters deep, pour crushed stone and sand onto the bottom, compact it, install reinforcement and fill it with concrete mortar. The foundation will harden in about 2 weeks.
To arrange a columnar foundation, pillars are installed at the corners of the facing box and in places of the highest load. The advantage of this base is that no drainage or waterproofing is required.
The sequence of actions during the construction of a columnar foundation is as follows:
- Markings are made at the corners of the furnace for mounting the pillars.
- Dig holes located strictly vertically, having a depth of about 50 centimeters.
- A 10-centimeter layer of sand is poured into the bottom of all holes and compacted.
- Prepare a solution of cement and sand in a 1:2 ratio; it should have the consistency of thick sour cream.
- The solution is poured over the layer of sand in a 10-centimeter layer. Crushed stone or brick chips are added to it.
- After hardening, brick pillars are laid out so that they rise 7–10 centimeters above the floor.
- Install the lower trim beam. The most reliable way would be to lay the channel around the perimeter and weld the edge.
The use of concrete pillars is allowed. You can make sure that they are vertical using a building level.
Lining an iron stove with bricks in a bathhouse
All the variety of options can be easily demonstrated by breaking them down into points.
Types of linings
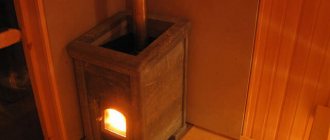
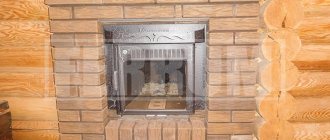
Photo of the finishing of the stove in the bathhouse (at the bottom of the vent for controlling convection)
If you surround the oven with brick walls on four sides, it will be a complete lining . Otherwise - partial . Regardless of how many walls will not be enough to complete, there is a significant difference between one and the other type. It is controlled by convection.
Simply put: this matters only for lovers of the Russian bath, the stoves for which are covered in a separate article. If the convection is controlled, you turn it off at the right moment, the hot air from the heated metal heats not the steam room, but the walls of the brick sarcophagus. They transmit softer heat. Heating slows down. You get the opportunity to maintain the conditions of a Russian bath - 55-60 degrees and about the same humidity.
To control convection, vents with doors or plugs made from pieces of brick are made at the bottom and top of the screen - when open, they do not interfere with air movement.
Even with one open wall near the stove, you can only count on a sauna. And the functions of the screen will be reduced to protection against burns, heat accumulation and fire safety. Which, in general, is also not bad).
Ways to fence off an iron sauna stove with bricks
Bricks for lining a metal stove in a bathhouse can be laid in different ways. Let's list them all.
By the presence or absence of empty space between bricks:
- Solid masonry is rarely used because it creates an obstacle to convection and significantly reduces the efficiency of the furnace.
- Laying in a row - gaps in each row, which is also an infrequent solution, because it also reduces the efficiency, this time of the screen itself. Heat actively escapes through vents, convection is uncontrolled, analogous to the absence of one or more walls.
Ventilations below and above with doors are the most common option. Controlled convection.
According to the position of the bricks in the masonry:
- Brick is a rare type of masonry, which at the same time wastes a lot of material and reduces the efficiency of the furnace, since it takes too much time to heat a steam room with such a screen.
- Half a brick is the best option, which is what most people do. The thickness of the walls and the stability of the structure are not satisfactory. But if desired, you can reinforce it by placing wire or mesh in the seams between the rows.
- A quarter brick is a rare option, because the wall is both thin and unstable. The latter circumstance can be compensated for by reinforcement with wire/mesh, but it is still recommended to install such a screen only if you have the appropriate experience.
What kind of brick to line an iron stove in a bathhouse
Let us say right away that sand-lime brick is not suitable for these purposes at all. But what kind of brick can be used to line a steel stove in a bathhouse: red refractory or fireclay . Both are better full-bodied. However, one must take into account that today you can find bricks on sale not only of different sizes, but also of varying degrees of decorativeness. In particular, there are options specifically for laying stoves and fireplaces.
The type of brick to cover an iron stove in a bathhouse also depends on the distance you leave between the screen and the stove . Let's say, if it is extremely small and amounts to 1 or 2 cm, then the heating of the bricks will be strong, which determines the choice of fireclay. However, no one (or almost no one) does this. The minimum distance is 5 cm. Even in this case, air flows will not allow the brick to overheat regularly. And if it is increased to 7-10 cm, then the inner surface of the bricks will completely stop heating above 200 degrees. The presence of lower vents also reduces this figure.
Advice! Fireclay is more expensive, so it should be used only where its fire-resistant properties are really important - for example, it is used to line the inside of the firebox. Red fire brick is enough to create a screen.
Having figured out what kind of brick to line a metal stove in a bathhouse, let’s move on to the composition of the solution.
What solution is suitable for lining the stove?
There are quite a few options for masonry mortar. The most commonly mentioned components are clay and sand with the addition of cement, but variations are possible.
- You can take clay and cement 50x50, and then add sand in an amount from 1/10 to 1/3 of the total amount.
- Another option: take twice as much sand as clay and add half as much water as clay. As you can see, this is a cementless option.
- Another option without cement involves equal parts of sand and clay and adding 100 grams of ordinary table salt per bucket of solution.
- Mortars with fireclay powder are less durable than those made from ordinary clay; they are best used for grouting joints inside a masonry well. The proportions are different, for example, this: clay 60%, fireclay powder 30%, cement 10%. Or take equal amounts of cement and sand, add 10-30% sand and 20-25% fireclay powder to them.
The clay can be pre-soaked. Either gently crush the dry mixture on a sheet or in a shallow bath with a small amount of water. And only after gaining plasticity is everything else added to it.
We recommend that you simply buy the kiln masonry mixture at a hardware store.
IMPORTANT! Many people advise letting the solution sit for half an hour or a little more before starting to work with it. During this time, the water is distributed, the mixture thickens, and the solution becomes ready for laying.
Technology of cutting an iron stove in a bathhouse with facing bricks
Even before you start preparing the masonry mortar, you need to make sure that the bricks are also ready. Since in a dry form they are able to take moisture from the solution, it is customary to soak them in water in advance.
The process takes quite a long time - at least 12 hours . This is done both if you take a new brick and if it has already been in masonry. In the latter case, by the way, you should not waste time on completely cleaning the old solution.
On the finished brick, you should check the quality of the mortar - if it does not tear or spread, then its consistency is correct, and you can start laying. Usually they are laid in half a brick, the rows are staggered. Each row is carefully checked for horizontal evenness using a level.
Advice! To maintain the correct distance of the seams, you can use special overlays, which are then removed.
Don’t forget that the screen can be reinforced, which we already mentioned above.
The laid out screen must stand for at least a daybefore you start cleaning off excess solution on its surface. A drill with a stiff metal brush can be used as a cleaning tool .
After this procedure, it will be enough to simply run a regular dishwasher brush in a soapy solution, and the masonry will be clean.
Step-by-step cladding technology
- The bricks for laying are soaked in water for about 40 minutes.
- If the walls of the stove will be visible after laying, then before starting work it is advisable to wrap the stove with film so that you do not have to clean it later from any remaining mortar.
- If the stove was sold with a convection casing, it must be dismantled, since its role will now be played by the lining.
- To mark, stretch a fishing line or cord vertically along the corners of the future masonry. If the floor is wooden, you can nail two vertical bars to it on both sides of the stove. They are fixed using wooden spacers.
- Mix the solution. You don’t need to do much – half a bucket is enough.
- Brick laying begins from any convenient angle. For this, only whole material is used, which is carefully, guided by a cord or fishing line, laid flat - “in half a brick.” Each brick is carefully leveled. Excess mortar is removed immediately before it dries; the outside of the masonry is wiped with a rag; burlap is good for this purpose.
- The seams should not contain voids and be of the same thickness (5-7 mm).
- It is advisable to reinforce the second row with mesh. It is cut into strips of the required size and laid on a brick, with mortar on top. The mesh should not stick out from the seams. The corners are reinforced with pieces of wire to tie the entire row into one. The second row needs to start from the same corner, but take not a whole brick, but a half, so that the seams are offset by half a brick - this is necessary for bandaging and strengthening the structure.
- In the third or fourth row, you need to leave several holes for hot air - usually two or three are made on two opposite sides of the masonry, the size of half a brick.
- The next 5–6 rows are made continuous; dressing the seams is mandatory. Do not forget to check each row with a building level for the horizon and vertical, so as not to “fill up” the masonry. Constantly monitor the thickness of the seam.
- In the areas where the firebox and ash pan are located, the brick should not interfere with the doors opening. The bricks must first be laid without mortar, their location must be accurately determined, and, if necessary, cut to the required size with a grinder.
- The row above the door is covered with two pieces of steel strip or corner - on the outside and inside of the masonry. The laying is carried out on it.
- In the penultimate row, two more holes should be made for air circulation - as described above. In this way, it will be possible to achieve proper circulation - cold air below will flow under the heat shield and exit from above already heated.
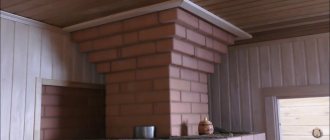
- The work is usually completed when the masonry reaches the upper level of the furnace. Sometimes the brick is laid up to the ceiling, completely covering the chimney.
- Wait at least 48 hours for the solution to dry completely.
- After drying, the brick can be given a more beautiful and rich appearance. To do this, rub it with a stiff brush, which is moistened with a solution of laundry soap. After this, the surface of the masonry is rinsed with clean water.
If the stove is very powerful, it is covered with a special lattice method, leaving gaps between the elements of 10 cm.
For a round stove, the masonry is made round. The technology is not much different from the standard one, although placing the brick in a circle is a little more difficult. Holes for air circulation are made symmetrically on both sides of the masonry. During the work, the main thing is to maintain the same distance between the walls of the stove and the inside of the brick over the entire area.
Additionally: how to line an iron stove in a bathhouse with stone
Here we see two options:
- or you line it with brick, and then put decorative tiles made of natural stone on top - this will simultaneously increase the heat capacity of the casing, increase the heating time, and also change the design of your stove;
- or you should purchase one of the ready-made stone casings for stoves, which are cut in workshops to fit any model, as well as from any available stone. The most popular are casings made of soapstone (soapstone is softer, magnesite is better in this regard) and coils. However, you can find interesting options from other rocks.
For more information on using stones for lining, see this article.
Mini oven
The Hephaestus gas mini-stove is perfect for a summer house, a country house, and also for use on hiking trips. It can cook anything that can be cooked in a full-size oven. Its advantage is its small size. Hephaestus has been producing gas mini-ovens for many years.
They are available in three versions: a hob, a gas oven, as well as a combined version of a gas hob and an electric oven. The gas oven has a usable temperature range of 50-260 degrees. This household appliance has many advantages:
- practicality;
- compactness;
- durability;
- safety;
- easy to wash.
These gas stoves can be suitable for even the smallest kitchen. They are covered with heat-resistant enamel, which can be easily cleaned from grease and various contaminants. They also have a “small flame” function, which allows you to simmer food over low heat. Another convenient addition is the adjustable legs, which allow you to fix the device at the required height.
The gas oven is equipped with a double glass door, due to which the heat remains inside the oven, and the outer surface does not heat up.
Useful video
The first video will be useful for those who have never laid a brick themselves.
A video about how to get a Russian bathhouse by lining a metal stove with brick yourself and cheaply
In the following video, Teklar demonstrates the principle and procedure for lining its own furnace with an external firebox.
*** Well, now you are fully armed with the knowledge of how, why and what you can line an iron stove in a bathhouse with. We can only wish you success and easy steam!
Material and tools
Before starting finishing work, you need to prepare tools and consumables:
- reinforcing mesh;
- roofing felt;
- crushed stone, sand, cement, clay;
- heat-resistant mortar for bricklaying;
- boards, bars, slats for formwork;
- bayonet, shovel;
- trowel, trowel;
- building level, tape measure;
- knitting mesh, fittings.
Many people are interested in what kind of brick to line an iron stove in a bathhouse. You cannot use standard building bricks for this. For this it is better to use:
- refractory brick (fireclay);
- clinker brick.
Silicate blocks are not suitable for lining furnaces, since a large amount of lime is used in their production. Because of it, bricks are destroyed when exposed to high temperatures for a long time.
Bricks can have smooth or patterned surfaces. The latter are more suitable for decorative design of bath rooms.
Clinker brick
When deciding how to properly line an iron stove with bricks, you first need to decide on the materials suitable for this. They must have special characteristics.
Brick
The main material for cladding must be of high quality: without voids, with high heat resistance and fire resistance.
You can choose which brick to line an iron stove in a bathhouse from two options:
Clay brick. It is used for lining the body, masonry of the firebox and chimney of a wood-burning stove. It can be ordinary, front, or with a decorative front surface.
Fireclay brick With this type of masonry, the brick is placed on a spoon - a narrow long part
Solution
The ideal masonry mortar is made from clay and sand in certain proportions, which depend on the quality of the clay. Without experience, it is very difficult to do it. Therefore, it is best to buy a ready-made refractory mixture based on red clay.
Before covering the cast-iron firebox with brick, you just need to dilute it with water, as required by the instructions on the package.
Heat-resistant terracotta mixture
In addition to bricks and masonry mixture, masonry mesh and fire-resistant sheet materials may be needed to create a protective screen for wooden surfaces. And also roofing felt as a waterproofing material.
628998fca4610673d66cabc89e37795b.jpe
Tools
The following tools will be required to complete this job:
- Container for solution;
- Trowel for typing it;
- Hammer for adjusting bricks;
- Pickaxe for dividing them into parts;
- Jointing for seams;
- Ordering is a strip with divisions applied to it, the distance between which is equal to the height of one or several rows, taking into account the thickness of the seam;
- Construction level and plumb line for level control;
- Cord for controlling the evenness of horizontal rows.
Tools required for masonry
A sponge or rag and a bucket of clean water will also help to remove the solution from the front surface of the masonry.
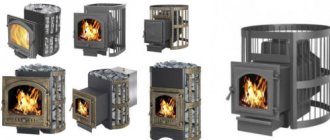
Brick lining of the Hephaestus furnace
— Any Hephaestus stove weighs up to several hundred kilograms, plus the weight of the lining, which means you need to be sure that its weight will not break the floor; in a good way, you need to pour a separate foundation for such a heavy weight.
— For long service life of cast iron, it is necessary to maintain the firebox ventilation built into the stove design. Convection cools the walls of the firebox and the cast iron overheats less and burns out less. This is ensured by the presence of a distance between the brick and the walls and the mandatory presence of special holes in the base of the masonry to supply air to the walls.
Hephaestus stoves lined with brick are cheaper than those with stone cladding and a brick appearance; for greater beauty, you can additionally cover the brick with nice ceramic tiles; there are many options for tiles and it will look very good.