Bath bench: design features
The bench in the bathhouse is somewhat different from the usual one. Firstly, its width and length are determined by the number of bathhouse users, their height and build. Secondly, such products involve the arrangement of several tiers, which is unusual for ordinary benches.
Important! Hot air and steam in the steam room accumulates under the ceiling. On a 3rd tier sun lounger it will be noticeably hotter than on the lowest one. This point should be taken into account when planning the steam room and arranging benches.
There are 2 options for sauna benches - sitting and lying. The dimensions of the sauna bench depend on the purpose and the position that the steamers prefer to use:
- the minimum seat width is 30–40 cm for a sitting bench, for a more comfortable position 60 cm is recommended, and 80–90 cm is required for a lying bench; the value in the latter case may be greater: this is the width that a person occupies while lying down and placing his hands freely;
- the width of the step of the lower bench must be at least 40 cm;
- the distance between tiers is from 40 to 60 cm. As practice shows, the optimal range is 45 cm, the minimum distance from the floor of the bathhouse to the desired tier is 40 cm;
- a bench for a bathhouse is made with your own hands of a certain length, and the size is determined by the preferred position: in a sitting steam room, the length of the bench is equal to the width - at least 40 cm for each user, a 60 cm long option is more convenient; for sitting with bent knees, 90 cm is required, and for lying down, but with bent knees - at least 150 cm; The length of the bench for lying is 180–210 cm and is calculated according to the height of the tallest user of the steam room.
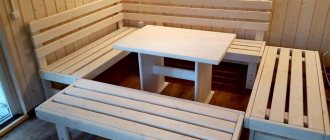
The size of the bathhouse benches depends on the location. If the benches are straight and placed along opposite walls, all of the above factors are relevant when determining the size. But with an L-shaped arrangement of benches, you can save on space.
Bench sizes
Sauna benches can be used for sitting and lying down, and therefore, when creating them, it is necessary to take into account the height of an adult. If the bathhouse will be used by people of average height, it is worth taking the following dimensions as a basis:
- Benches for sitting. Their width should be approximately 40 cm, and their height should be from 50 to 90.
- Benches for saunas, which are used in a semi-sitting position. Their height can also range from 50 to 90 cm. Such benches are created with backs having a height of about 110 cm.
- Benches for lying down. The width of such structures should be about 90 cm. Their height is usually about 50 cm. There is no footrest for such benches.
When creating the described products, you should also follow some recommendations. For example, the length of a bench for one person should be about 90 cm. If the product will be used by several people, about 60 cm should be added for each of them. When creating a bench, the supports should be positioned in such a way that the product does not tip over when the edges are loaded.
Material selection
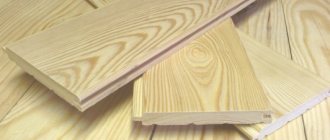
The bench for the bathhouse is made with your own hands only from a certain wood. Pine, for example, is not suitable because it contains a lot of resin, and when heated it releases. Also, for example, an iron hornbeam is not suitable. This wood is very resistant to water and moisture, but unfortunately it gets very hot and literally burns the skin.
The best choice for a bath bench are the following types of wood:
- linden - heats up weakly even in a sauna, tolerates steam well, emits a wonderful aroma, the only drawback is that linden wood darkens over time;
- aspen - superior to linden in resistance to steam and water, but has the most ordinary smell, is also inferior in attractiveness to linden, but is not at all prone to mold if you managed to purchase clean wood;
- larch - under the influence of water and steam it only becomes harder, benches made of larch last for several decades and do not change color or texture, the disadvantage of the material is its high cost;
- cedar is an exception from coniferous species; when heated, the resin is released slightly, but phytoncides evaporate; this material is recommended for use in finishing steam rooms for bronchitis, asthma, and lung diseases;
- oak - more suitable for a do-it-yourself bench in the dressing room, it tolerates the action of water and steam well, is exceptionally beautiful and durable, however, due to its high density, such wood heats up more in the bathhouse, and its cost is very high;
- birch - the material for the Russian bath is traditional and respected in former times, but now it is rarely used; birch is not as resistant to moisture as aspen, for example, it is less resistant to rotting, and when heated it releases tar, the finish and benches in the steam room turn black quite quickly; The release of tar is what makes birch trim so valuable: tar has amazing healing properties and relieves many skin diseases, including contagious ones.
The lining material of the steam room and the bench may not match. This is not a mandatory requirement, but recommended, since the contrast between the bench and the wall, heated to different degrees, is unpleasant.
Bench finishing
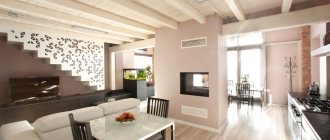
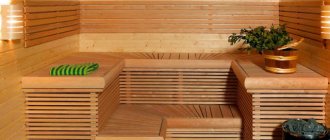
In order for the created benches to be combined with the style of the building, it is necessary to select certain materials and choose the type of construction in advance. For a traditional Russian bath, for example, you can make massive benches from logs. They will be combined with the overall design and will complement the interior. To make them look more harmonious, you can use water containers made of wood.
Sauna benches are distinguished by their strict shapes and polished surface of the boards. They are usually made from light wood. It is worth remembering that for saunas, it is usually not portable benches, but structures that are fixed near the wall. The side surfaces of the sauna product are finished with boards, so they resemble the canopy installed in a Russian bathhouse.
If you want to create a bathhouse in a colonial style, you should make benches from roughly processed boards, on which the structure of the material can be seen. If a bench with a back is created, it is made with massive armrests.
Country-style bathhouse benches are made from boards that are not perfectly level. But you should also choose materials with the expectation that the bench will be comfortable, despite the bends of the material.
Creating a bench for a bath or sauna can be a complex process only if you want to decorate it in an unconventional style, since this requires spending more time on drawing up drawings and finding suitable materials. In other cases, making a bench for a bathhouse is quite simple.
Do-it-yourself bathhouse bench: drawings
The design of bath benches is determined by their purpose and quantity. For a sitting steam room, you can build the most ordinary mobile bench with or without a backrest. But since the product is intended for a bath, several recommendations are followed when making it:
- the seat of the bench is made of linden, aspen, cedar boards, the slats for this are selected both narrow - 5-6 cm, and up to 10 cm wide, fastening to the support beam is transverse, a gap of 1-1.5 cm is left between the fasteners;
- the best support option for a single-tier bench in a bathhouse is a triangular shape, with one block fixed to the wall with self-tapping screws, and the other two making an angle of 45 degrees;
- the support parts are fastened together with dowels, the fasteners are duplicated with heat-resistant glue, the presence of metal elements in the seat is not allowed;
- 2-3 similar boards along the entire seat are fixed to the wall of the steam room as the back of a bench, while the screws go deep into the thickness of the board and are covered with wooden plugs.
The design is very simple to manufacture. It is more difficult to arrange a multi-tiered product. However, using the drawings, you can build such a bench for the bathhouse with your own hands.
The basis of the two- or three-tier option is the frame. It is assembled from rectangles reinforced with corner bars. The dimensions of the rectangle are determined by the height of the seat. The vertical bars of the structure are secured to the wall with self-tapping screws. The rectangles are assembled together on dowels. Both the benches and the space between the seats are covered with boards.
Important! For benches in the bathhouse, only polished wood is used. It is important to prevent minor mechanical injuries to the skin.
Types of wood used for benches
Benches for bathhouses are made only of wood. This is the only material that can withstand high humidity and temperature in the steam room and washing room, does not heat up and does not emit harmful substances into the air. A bench for a bath should be made of hardwood, although the use of high-quality softwood lumber is allowed.
Wood species that are used to make bath furniture can be relatively cheap, or more expensive and exotic. When selecting materials, the main criterion is high quality wood, without knots, cracks and resin chambers in conifers.
Linden
It is considered the best material for making bath furniture and utensils. Linden board has a dense structure, but is easy to process and sand. It is easy to decorate with carved ornaments, it does not split and does not form sharp splinters. Linden products have the only drawback - they quickly darken in damp rooms. To maintain a good appearance, the benches will have to be scraped frequently to return them to a pleasant light shade.
Pine
Pine benches are rarely installed in the steam room and washing room. When heated, wood releases a sticky resin that is difficult to wash off. It is allowed to manufacture structural elements from pine lumber that do not have contact with the skin of people who wash and steam. A positive characteristic of pine and other conifers is their high resistance to moisture. When heated, wood also releases aromatic substances that saturate the air with phytoncides.
In addition to pine boards, larch and cedar are used in the bathhouse - related, but more expensive, coniferous species.
Birch
The aromatic substances of birch have antibacterial activity. Its wood is hard and dense, and differs from linden wood by being more difficult to process and finish. In a humid room it does not darken for a long time and retains an attractive appearance. Unlike pine, it does not emit resinous substances and is suitable for making beds, seats, and backs of bath furniture.
Meranti
Meranti is an exotic tree species native to Indonesia and Malaysia. This wood is valued for its durability and high resistance to moisture. Reddish, yellow, white wood is used for making furniture, flooring, wall cladding, etc. It can be used universally in a bathhouse: resinous substances are not released when heated.
The material is quite expensive and is not suitable for everyone. In elite-level bathhouses, meranti is used to make part of the equipment, which not only serves to perform some functions, but also participates in the decor of the room.
Abash
African oak, or abash, is the same elite material as the previous one. The wood has a light color (yellow, whitish) and is used for decorating any room. In the bathhouse, its resistance to rotting and low thermal conductivity are especially valued. The seats of the benches practically do not heat up and remain comfortably warm even on high tiers of shelves or benches.
Wood does not emit resins. Unlike European varieties of oak, it is light in weight, because it has high porosity. Easy to process, does not split when connecting parts. Practically does not require the use of coatings for moisture protection.
How to make a bench for a bathhouse with your own hands
It is not difficult to build sun loungers for a bath. Even the construction of a multi-tiered structure will not take much time. It is better to mount the latter on a blank wall.
- The 30 cm high slats are fixed to the wall with anchors. The step between the elements is 1 m. The frame is then attached to the slats.
- The bars are cut to length in accordance with the sizes of tiers 1 and 2 in the steam room. Then, supporting U-shaped structures are assembled from them. It is preferable to secure them to dowels. To do this, holes are drilled at the fastening points in the end sides of the bar.
- Racks can be reinforced with inclined slats and metal corners. The supports secure the wall planks of the bench one by one, first the upper tier, then the lower.
- Seat boards are laid on the supports. If the slats are fixed with self-tapping screws, then the fasteners must be recessed and covered with wooden plugs.
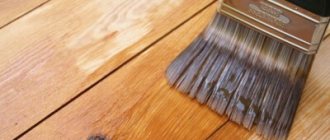
- The finished structure for the bath is treated with impregnation. It is recommended to repeat the procedure.
Benches for the waiting room can be much more intricate in shape. In this case, any kind of metal fastener is allowed.
Required Tools
When making a bench for a bathhouse, you will need the following equipment:
- a miter saw or wort with a reward to cut boards straight or at different angles;
- hammer and construction mallet for assembling parts on dowels;
- a screwdriver or drill with an attachment for drilling slots;
- sandpaper or sanding machine for processing boards;
- measuring tape and square;
- self-tapping screws for fixing the benches to the wall; in the steam room it is better to use stainless steel or at least galvanized fasteners.
Depending on the chosen complexity and qualifications of the master, additional devices may be required.
Material of manufacture
The material for the bench is a suitable tree: linden, aspen, larch, cedar. For benches you will need boards of the following sizes:
- timber 5*6 cm;
- slats 5 cm thick and 10–12 cm long;
- boards or planks for flooring 3–5 cm thick and 7–10 cm wide.
Important! For seated benches and recumbent multi-tiered structures in the bathhouse, bars and boards with the same parameters are used. Only the number of supporting structures varies.
Means of protection
Of the popular wood species, the most resistant to the effects of water and steam are larch and aspen. This wood does not require any protective agents. Other materials should be treated to prevent damage from rot and mold.
Important! Different impregnations are used to protect benches in saunas and Russian baths. In the first case, the air can heat up to 100–110 degrees, but against the background of low humidity. In the second, the heating temperature does not exceed 60 degrees, but the humidity reaches 50% and higher.
For Russian steam rooms, preference is given to waterproof and water-repellent materials. These include:
- oils – for steam rooms, compositions are produced that are absorbed into the wood and do not form a film;
- oil wax - most often it is a mixture of linseed or hemp oil with wax;
- bleaching - such products contain strong oxidizing agents; such treatment not only protects the wood in the bath, but also prevents darkening.
Some allow the use of special varnish that is resistant to high temperatures. But in practice, experts do not recommend using varnish in a steam room, especially for benches.
How to make a bench in a bathhouse: video
Assembling a bench for a bathhouse, although simple, has its own subtleties. You can appreciate the complexity of the work if you once see the whole process.
Materials and tools for assembling a simple sauna bench
There are basic requirements that apply to such products installed in baths and saunas.
- A bench for a bathhouse, assembled with your own hands, should not be covered with varnishes or paints. To protect the product from the negative effects of moisture and temperature, special antiseptics are used.
- Built-in and mobile structures are installed only against blank walls without ventilation and windows, at a safe distance from heating equipment. During installation, a small technological gap is maintained between the wall and the bench.
A bench for a bathhouse is not the same as a garden bench. When assembling, please note that:
- It will constantly be in a humid environment. This means that you must provide it with reliable fastenings.
- You will touch her bare skin. This means that there should not be any metal elements on its surfaces.
That's why:
- Use self-tapping screws to connect the bench parts. Nails soon begin to come out of the holes due to changes in linear dimensions associated with changes in temperature and humidity.
- To assemble the bench, use galvanized screws. Zinc does not corrode, so fasteners protected by it do not rust.
- When fixing the seat and legs, recess the heads of the screws into the body of the wood by 5-7 mm. Cover the holes with a wooden dowel.
- You can use hidden clips to secure the shelf. They are screwed to the base of the bench and hold the slats by the side edges without rising above their front surface.
- The seats must not be coated with varnishes or paints. The painted surface is a guarantee of burns.
Ventilate the room thoroughly so that the wood and fasteners do not get wet in vain.
In spacious rooms, the bath shelf is arranged in steps. In small booths they make one removable bench. As necessary, it is raised to a higher level, and climbed onto it using a small ladder. Another solution is two tiers with a lower pull-out bench.
Any home craftsman can make a simple bench without a back for a steam room.
Any home craftsman can make a simple bench without a back.
For this he will need materials:
- edged board 50x600 mm. or shelf board;
- timber 50x50 mm;
- self-tapping screws 80 mm. and 40 mm.;
- woodworking waterproof glue
and tools:
- saw
- drill
- sander
- screwdriver or screwdriver
Do-it-yourself bathhouse benches: photo
Benches in a bathhouse are utilitarian “furniture” and do not offer much variety in design. However, such products can be given individuality. For example, for a seat you can use a non-standard flooring made of slats, and a cut from the trunk. This is a very effective option for a Russian bath.
It is prohibited to paint bench boards. However, the use of colored impregnations allows you to diversify the design.
In classic benches, the seats are arranged lengthwise. This is a standard do-it-yourself bathhouse bench design, which can be seen in many photos.
It is also possible to arrange the bench slats in the bathhouse across. In this case, the bar for the bench is chosen to be narrow - 5 cm.
If the seat must be level, then this requirement does not apply to the rest of the upholstery of the sunbeds and the backrests. Benches with decorative elements look more interesting.
The most impressive bathhouse benches are those with colored lighting, and they are attractive not only in photos, but also in person.
The choice of design should take into account the overall style of the bathhouse. Lighting, for example, is not the best option for a rustic-style bathhouse.
Benches for washing area
Wooden benches with the simplest design are created for the washing room. They are placed along the walls, next to the shelves intended for bath accessories.
The requirements for such sauna products are quite simple - they must withstand the weight of one or more people and containers of water. Benches must be stable and not tip over when one person sits on the edge of the product. The legs are installed as wide as possible in the transverse direction, which makes the structure more stable. The thickness of the boards for the bench should be more than 40 mm.
Care Tips
To increase the service life of benches in the bathhouse, you should take care of them:
- after each procedure, you need to wipe the seats and backrests with a dry towel;
- also, after using the steam room, it must be well ventilated;
- depending on the type of wood used in the manufacture of benches, it is necessary to periodically treat the products with oil or oil wax;
- if the bench in the bathhouse is dirty, you can wash it with warm water and laundry soap; abrasive or liquid cleaning agents cannot be used: they contain active chemical compounds that evaporate or disintegrate under the influence of temperature, releasing harmful substances;
- If the boards show signs of rot or mold, the affected parts must be immediately removed and replaced with new ones.
Important! Extra oil treatment must be carried out if the bench has been damaged.
Bench made from boards drawing
List of materials
You will need
Materials
Older people find it difficult to cross their legs, and injuries or other limitations can make this completely impossible. It's a good idea to make a bench with semicircular legs for a secure support.
These dimensions work well for most people, but adjustments may be necessary if the bench is used by people of unusual height. The ideal angle varies from person to person, so the rocking bottom of the legs will adjust to you.
Materials:
- pine board 1×6
- saw
- roulette
- milling cutter
- wood glue
- orbital sander
- clamps
- Gloves, impregnation and transparent polyurethane
Make a circular template to mark the curves at the ends of the short shapes. Use wood glue and clamps to assemble the bench.
Cut off the X brackets
The angles for this particular leg are 39 degrees and 51 degrees. If your saw doesn't cut at a 45 degree angle, you'll have to widen the leg.
You will need to adjust the width of the leg frame to adjust the angles. The height of the bench is 16 1/2” (42 cm), so this leg will be as wide as the top.
Once you've sawed off the two X pieces, insert them into the box and mark where they intersect. Mark one side, then turn the entire leg over and mark the other side. Saw where you just marked, but only halfway across both boards - this creates half a joint. The legs should now match each other.
You can then use one of the shapes as a template to mark the remaining 8 boards that needed to be cut at angles.
Attach the leg frames to the top of the bench. To do this, drill holes in the top of the leg that are larger in diameter than the 2 1/2" (7 cm) screws. Use washers to prevent the screw from going any further.
Place the X in the leg frames. Apply glue to all corners of the X that will touch the leg frame, and then insert the X into the frame. You may need to use a rubber mallet.
Sand with a sander to clean up any unevenness. Then go around to round all the edges.
Apply sealer and then paint.
List of materials:
- 4 boards 1 × 3 8” (20 cm) long
- 1 1×2 board 8' (244 cm) long
- 1 x 12 board, at least 54" (137 cm) long, 1/4" screws
- 2 inch (5 cm) screws
- Wood glue, primer, brushes, sandpaper, wood filler.
54" (137 cm) x 18" (46 cm) x 12" (30.5 cm)
A) 4 pcs. 1 × 3 length 17 1/4" (43.82 cm) legs B) 4 pcs. 1 x 3 length 11 1/2" (29.51 cm) end aprons and side braces C) 4 pcs. 1 × 2 length 17 1/4" (43.82 cm) legs D) 3 pcs. 1 × 3 length 45" (114.3 cm) aprons and stretchers E) 2 pcs. 1 × 3 length 25 3/4 “(65.4 cm) F) 1 piece 1 x 12 length 54" (137.16 cm) top
Step 1: Cut out the legs.
We invite you to familiarize yourself with the DIY boiler - the best diagrams, drawings and projects of homemade solid fuel boilers (75 photos)
Step 2: Attach the end aprons, B, to the 1×3 leg pieces, A.
Step 3: Complete the legs. Attach C, the 1×2 leg piece, to the rest of the leg.
Step 4: Cut the supports. Overall length is 25 3/4" (65.4 cm). This is the most difficult step. First mark a 60 degree angle from the top corner. Also mark and cut off the bottom corner. Then place it on the bench. Center the base. Mark where the top of the bench overhangs. This cut doesn't have to be perfect - you just need to make sure it sits firmly below the top of the bench.
Step 5: Secure the aprons and stretchers in place.
Step 6: Secure the cross supports.
Step 7: Attach the top. If you want to hide the holes, you'll need to drill them through the backsplash or screw them into the bottom of the bench. And also buy small L-shaped brackets and secure the upper part.
In the last photos in the gallery, after the drawings, there are samples of benches made according to this project.
Shopping list:
- 4 boards 1×3
- 4 boards 1×4
- Screws, glue, silicone sealant
Cut the boards to the following dimensions:
- 2 pcs. 1 × 3 length 49 1/4 “(125 cm) seat support
- 2 pcs. 1 x 3 length 13″ (33 cm) end aprons
- 2 pcs. 1 × 3 length 50 3/4" (129 cm) side aprons
- 14 pcs. 1 × 4 length 11″ (28 cm) seats
- 2 pcs. 1 x 4 length 52 1/4" (132.7 cm) side seats
- 4 things. 1 × 4 length 17 1/4″ (43.8 cm) legs
Step 1: Make the frame. Step 2: Attach the seat slats to the side aprons and supports, leaving a 1/4" (6mm) gap between the boards. Step 3: Assemble the sides of the bench. Step 4: Use screws and glue to attach the legs to the aprons. Step 5: Sand and paint.
Materials:
- 6 2x4 boards 8' long
- 1 board 2x6x8'
- 1 block 2x2x4'
- screws, glue
Cut the boards to these sizes
For legs
- 2 2x4 boards 12-1/2" (32 cm) long - bottom ends cut at 45 degrees
- 4 2x4 boards 15-1/4" (39cm) long - both ends cut at 10 degrees, ends parallel
- 2 2x4 boards 12-3/4" (32cm) long - both ends cut at 10 degrees, ends NOT parallel
Seat center support
- 1 – 2×4 length 73-1/2 “
- 1 – 2×4 length 15” (center leg)
- 2 – 2×4 length 36 “
- 2 – 2×4 length 13-7/8” - both ends cut at 30 degrees, ends parallel
- 2 – 2×4 length 83-1/2 “
- 1 – 2×6 length 83-1/2 “
- 2 – 2×2 length 12-1/2” (cut to size)
- First make two legs. Mark the centers of the top and bottom subframe.
- Drill pocket holes at both ends of the top board and attach them to the legs with screws.
- Attach the center support.
- Drill holes at both ends of the stretcher boards and attach them to the legs with screws.
- The crosspiece is attached with screws from the outside.
- Make the top part first. Then screw it on the bottom side with screws.
A bench can be made inexpensively from new boards, or for free if you collect used wood. All it takes is a few basic tools and a couple of hours.
- Cut out the pieces using a jigsaw or bandsaw, and the middle piece using a miter saw or jigsaw.
- Attach the subframe through the holes on the bottom side. It's a good idea to have a helper to hold everything in place while you attach the other side.
- Adjust the notches as needed.
- Fill the recesses with glue and press lightly.
One thing: if you made a bench from old wood, you will have new cuts that will require masking. You can use impregnation or other means to hide surface imperfections.
The bench is ready, I’m sure it will look beautiful on any porch.
This project is designed for three purposes - sitting, storing and decorating. This bench with storage is made from cedar planks, which look great and hold up well outdoors. Lifting panels simplify the design; there are no metal parts that will rust. In general, this is a convenient thing in all respects and you will finally be able to solve the problem of storing many things that are needed in the yard, but have to be constantly brought into the house. And if you have children, then such a bench with a storage box is as necessary as air.
Drawing of a bench with storage box
How to assemble the structure is very clearly shown in the diagrams with step-by-step photos; the gallery also has a diagram with cutting the parts. Detailed instructions with a description of each step are on the author's website.
The height of the bench is 74.2 cm, the seat is located at a height of 40 cm, and the armrests are 62.5 cm. You can change these dimensions individually up or down, having previously estimated how it will be more comfortable to sit.
Bench drawing
The bench is only 1 meter long. If you need to make furniture of greater length, then to prevent the boards from sagging you will have to supplement the structure with ties and a pair of legs. Another option is to use 40-50 mm thick boards for the seat, but they cost 2-3 times more than inch boards.
The height of the backrest of the bench is 33 cm. The recommended backrest angle is 18 degrees. You can make a higher back, but to prevent the structure from losing stability, you will have to attach the rear legs at an angle of up to 20 degrees.
Side view
- To make the seat and back of the bench you need to purchase 6 meters of board. Can be in pieces of 2 meters (6 pcs.). These boards need to be cut into 6 meter lengths and immediately chamfered from all corners.
- Legs - 4 parts 60 cm long. Total 240 cm or one three-meter board.
- To tie the legs you will need 4 parts 522 mm long and 50 mm wide (the board will have to be split in two lengthwise).
- The base of the backrest is 2 parts 522 mm long and 50 mm wide (saw the board in half lengthwise).
- For the armrests you will need 2 parts 522 mm long and 75 mm wide (it is convenient to open the board using a circular saw).
In total, approximately 16 meters of lumber, plus a small reserve in case of defects and taking into account scraps, it turns out that 3 six-meter boards are needed.
Assembling the bench is not difficult.
Step 1. First, the legs with ties are assembled. The leg parts are placed parallel to each other at a distance of 32 cm from each other (or 52 cm along the outer edge).
Step 2. The first tie is attached perpendicularly to the legs with self-tapping screws. From the bottom end of the legs to the top edge of the tie 37.5 mm. The second tie is screwed along the edge of the parts. You can immediately attach boards that act as armrests.
Step 3. The assembled legs are placed vertically, and the base for the back is screwed to them from the inside.
We suggest you familiarize yourself with what kind of reinforcement goes on a strip foundation
Step 4. Planks are laid between the two legs and the back support with a gap of 10 mm. Fixation with self-tapping screws or nails.
For comfort, you can lay a mattress or soft pillows on the bench.
What you will need:
- Beam 100x100 mm, can be used;
- Unedged board, first grade, inch;
- Perforated metal corner - 2 pcs.;
- Carpenter's glue;
- Rubber pads for legs.
Tools: screwdriver and drill, jigsaw, hand saw, grinder, chisel and hammer.
Approximate diagram of a bench
Step 1. Cut the timber into pieces.
Timber cutting
The two longest ones are the back legs.
The two middle ones are the front legs.
The two shortest ones are the crossbar between the back and front legs.
Step 2. Bevel 45 degrees from all legs (from surfaces that will be in contact with the floor).
Chamfering
Miter saw
Step 3. On the crossbar we make two “spikes” at both ends. The length of the tenon is 5 cm. To do this, first use a jigsaw to make cuts from two beams to a depth of 3 cm, then select the wood with a chisel and hammer.
Notching and wood removal
Next, we continue to form the tenon, make cuts on the two remaining sides and trim with an ax.
Outdoor bench made of boards
A simple and comfortable outdoor bench for the porch, one might say, a classic option. Agree, it looks very attractive on the porch.
Consumables:
- one pine board measuring 1 x 10 inches (2.54 x 25 cm)
- 2" x 2" block 8′ (245 cm) long (optional)
- wood glue
- 2" (5cm) finishing nails
- column screws
- regular nails 3 cm
- paint color of your choice
To make it clearer, on the right is a photo with details of the bench.
- Cut the boards to the dimensions shown in the photo.
- Attach boards 2 and 3 to seat 1 by first drilling five holes in each apron (slat) and then driving nails into each hole. Glue the aprons and secure with nails.
- Also glue and nail additional boards to each leg.
- Attach the legs using finishing nails.
- To make the bench even more durable, cut and screw additional inserts, as shown in the photo.