Types of bath furniture designs
Depending on the size of the steam room, the location and number of shelves are selected. You can make curtains in the steam room in one or several tiers, install them in a circle or opposite each other.
The following groups of structures are distinguished:
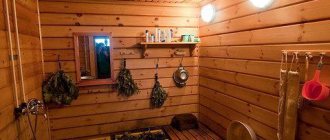
- Stepped . They are the most popular. In this case, the shelves are located near one wall in 2-3 tiers. The heating temperature of the benches decreases from top to bottom. This design involves the location of the top shelf above the stove and heating boiler. You should also provide sufficient height from the shelf to the ceiling to allow you to take a sitting position. This canopy design is best used for large steam rooms. The stepped arrangement of the benches allows you to get a high-quality steaming procedure. They are first placed on the bottom shelf, then moved to the shelf above. On the top row it is very convenient to steam while lying down.
- In the shape of the letter L - 1-2 shelves are placed along the wall opposite the stove, another one is mounted along any of the remaining walls. The height of the shelves in this case is selected individually. This shelf design is best suited for a small room.
- "Coupe" . From the point of view of space saving, the most advantageous design. It resembles sleeping places in a railway carriage compartment, that is, two shelves are installed on two walls located opposite each other. The upper shelves can be equipped with a folding mechanism, which will save space.
What is a tongue and groove board?
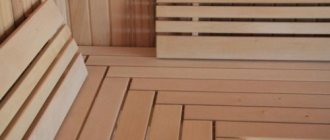
A tongue and groove floorboard is lumber made on a milling machine in a factory. A notch is cut along the edge along one long side, and a protrusion of the appropriate size is made on the other. When joined into a single covering, the tenons are completely buried in the grooves of adjacent floorboards, which makes the resulting joints practically invisible and eliminates the formation of through gaps in the floor.
The tongue and groove board is distinguished by:
- Tenon and groove at the ends.
- Polished front surface.
- One or more longitudinal recesses on the bottom side for ventilation.
- Use in the manufacture of well-dried lumber.
In fact, this is an ordinary floorboard that has been subjected to additional processing. The tongue-and-groove end locks strengthen the overall final covering, and factory sanding of the top face eliminates the most labor-intensive part of the work of laying a plank floor. Plus, the recess at the bottom guarantees continuous air exchange in the space under the wooden finish, thereby reducing the risk of damage to the wood.
Structure of a tongue and groove board
Canopy sizes and shapes
Depending on the area of the steam room, the size of the canopy in the bathhouse is determined. A person should feel comfortable in a steam room, so the canopy should be of such dimensions that it will allow you to sit and lie on it.
The shape of the benches can be a bench, a lounger or a chaise lounge. The choice of shape depends on the size of the steam room and the possibility of installing one or another design in it. The most important thing in placing canopies is their compactness, that is, the benches should heat up well and not take up extra space.
Materials for making canopy
As a rule, curtains are made of the same material as the interior walls. When choosing what to make a canopy from in a bathhouse, they choose deciduous wood, but not coniferous wood, since when they get too hot, they begin to crack and release resin. Also, such wood has low thermal conductivity and significant density.
The following types of wood can be used to make steam room shelves:
- Linden;
- birch;
- poplar;
- aspen;
- cedar;
- oak;
- abash (read: “What is abash for a bath - the advantages of using it in finishing a steam room”).
These types of wood have a fairly strong structure and do not change their shape when exposed to moisture and steam. The best material option is aspen, since its wood has good moisture-resistant qualities. The tree must be treated with special compounds, otherwise it will rot from the inside.
Determining the location and execution of the drawing
The curtains are placed along the longest wall in the steam room, which has no windows, doors, vents or ventilation holes.
It is necessary to take measurements of the steam room and make a drawing on which you need to indicate the stove, heating boiler, location of windows and vents. Following the recommendations of experts, the location of the shelves is indicated. To make a bath canopy with your own hands, the drawings should be made in two projections.
The drawing should also indicate the dimensions and places where the benches are attached to the walls and floor. It is recommended to fasten the upper rows to the walls, and the lower canopy to the floor. The entire structure should be as compact as possible.
Next, based on the drawing, the required amount of wood is calculated with a margin of 5%.
Before you build a canopy in a bathhouse, you need to choose a project, since then nothing can be corrected. You need to figure out how to make a bench for a bathhouse with your own hands right away. It is quite expensive to redo all the work.
When creating bathhouse curtains with your own hands, you should pay attention to the following points:
- The width of the canopy can be 40-60 cm. The benches should not be made too narrow or wide; the size of the canopies in the steam room should be such that it is comfortable for a person to lie stretched out to his full height; the hands should also be placed on the shelf.
- The bottom shelf should be at a distance of 45 cm from the floor. There should be 55-65 cm between shelves.
- The top shelf is located 120-130 cm from the ceiling.
- It is best that the height of the second shelf from the floor is 110 cm.
- Shelves should not be installed close to the stove, even if it has a protective fence. Otherwise, you may accidentally get burned or get heatstroke.
- The location of the bath shelves also depends on the circulation of steam: you should not install benches under it.
Laying for now
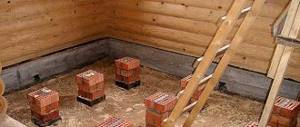
Installation of a wooden floor made of tongue and groove boards is carried out as follows:
- The logs are set and leveled horizontally in increments of 40–50 cm.
- The first board is nailed with a distance of 10–15 mm from the wall and a groove to it to prevent damage to the tenon when tapping (joining) the floorboards.
- The next five to six boards are laid without fixing. They are then held together using a hammer and wedges before being nailed down.
- The procedure is repeated with the next few floorboards.
- The board of the last row is cut so that there is a ventilation gap of 10–15 mm near the wall.
- Finally, the floor is sanded, if necessary, and then the baseboards are nailed.
There is nothing special about the installation of this finish. It’s easier to lay only the varnished coating; step-by-step instructions on how to lay laminate flooring with your own hands consist of three or four points.
When laying boards, you can fix them on the joists using screws and nails. It is permissible to screw (drive) fasteners from above or into the end of the floorboard. The second option is more aesthetically pleasing, but will create repair problems later.
Step-by-step instructions for laying the floor
Preparation of material
Timber and boards used for the construction of bath shelves must meet the following requirements:
- The material must be of high quality.
- No visible defects or defects.
- The wood should be well planed and smooth.
- No knots, cracks or nicks.
One type of wood is used for the entire structure of the benches. In order for bath furniture to dry out faster, thin boards should be used for its manufacture. The width of the board should be 4-5 times its thickness. With this ratio, it will not sag or crack.
It is not recommended to coat the wood for shelves with varnish or any other chemical composition (read: “How and with what to treat shelves in a bathhouse - proven treatment products”).
Assembly and installation of workpieces
Now let's look at how to properly make a canopy in a steam room.
To do this, you must adhere to the following sequence of actions:
- Installation should begin from the top shelves.
- The support beam is located on the canopy base along the entire length of the rectangular shape, the bars are attached 65-85 cm from each other.
- The rack bars are connected to the frame for the canopy in the bathhouse using special self-tapping screws. To ensure greater reliability of the structure, another row of beams can be screwed between the support posts. Self-tapping screws and metal corners are used to firmly connect the frame elements.
- The finished frame is installed in the steam room. Rubber pads are attached to the bars below. They will give the structure greater stability and provide protection from moisture.
- Next is the flooring. The boards should begin to be attached from the bottom.
- The best option is seats with a slight slope, which will allow water to drain better.
- There should be a gap of 1 cm between the seat boards, which is necessary for water to drain and the bench to dry out faster.
- When making canopies, you can use wooden nails or pins, metal nails and self-tapping screws. Metal caps must be buried in the wood. This is done to prevent burns. If it is not possible to drown the caps in the wood, then plastic protective caps should be put on them.
- You can also cover the gap between the rows of canopy with boards. You need to think about this in advance in order to purchase the right amount of material. The space between the floor and the bottom shelf should not be sheathed, otherwise air circulation will be difficult, the steam room will not dry well and cleaning will become more difficult.
- You can also create a collapsible design that allows you to remove the seats and take them out of the steam room to dry.
- For the top row, you can make backrests and headrests (for more details: “How to make a headrest in a bathhouse - proven methods”). You can also make supplies for your feet and small benches. All this makes your stay in the steam room even more comfortable.
- If necessary, you can round off sharp corners.
- When all the work is completed, it is necessary to examine the surface of the seats and sand where it needs to be sanded.
How to choose for the floor?
When selecting a floorboard with tongue and groove, you should carefully inspect each product, or it is better to simply measure everything with a caliper. The thickness and width of the tenons should exactly match or be slightly smaller than the size of the grooves. To avoid mistakes, you can take a couple of offered floorboards directly from the warehouse and join them together - there should be no visible recesses or gaps in the joint.
You also need to compare the edge with a tenon and the edge with a groove in terms of thickness. If one of them turns out to be smaller than the other, then after laying in the joints, adjacent floorboards will be at different levels. Then you will have to scrape them additionally, which will greatly increase the labor intensity of the work.
The lumber should be dry with a moisture content of 8–12%. Such boards are dried in special chambers. Wetter options for natural drying (20–25%) will begin to shrink and deform on the joists after installation, which often leads to the appearance of cracks in the coating.
Preparing a Wooden Floor