Types of boards for finishing a bath
Boards can be edged or unedged:
- Edged board
. This wood is made from logs, the bark is cleared from the sides and carefully sanded. In most cases, its width is twice the thickness. Edged boards are used in almost all types of construction - to create finishing, frames, roofing and other building structures.
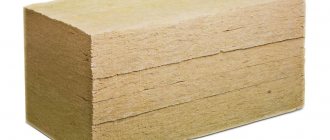
- Unedged board
. It is a sawn tree with bark on the sides. The surface is uneven and has jagged edges. The edges can be partially sawn off or not sawed off at all. Most often, such wood is used for external types of work, where the appearance of the lumber is not important. But it can also be used for the interior lining of a bathhouse - in this case, before installation, you will have to process the wood yourself.
Unedged board for arranging a steam room
On our website, unedged linden boards are presented in a wide range. Here you can order lumber of the required width and height. Their length is 3 m. If necessary, the wood can be easily processed.
Request a free phone call and purchase the required amount of material for your premises. Our builders intelligently combine any materials, for example, with linden lining, constructing high-quality and durable buildings. We not only sell high-quality lumber, but also offer the services of specialists in arranging steam rooms and bath complexes.
You can see examples of our projects and work by following this link{amp}gt;{amp}gt;{amp}gt;Go{amp}gt;{amp}gt;{amp}gt;
Choosing the type of wood for sauna cladding
Each type of wood has its own shade, texture and healing effects. Deciduous and coniferous trees are used to produce boards. It is recommended to decorate the steam room with hardwood, and the recreation rooms with coniferous wood.
Deciduous wood for a bath
The following hardwood species are used to cover the bathhouse:
- Linden
. Finishing the bathhouse with linden boards is the most popular option. This wood is easy to install and retains its beautiful color in high humidity conditions. You can touch linden even at high temperatures without the risk of getting burned. In addition, it smells pleasant and has healing properties.
Alder
. This breed is characterized by the presence of tannins, which provide clean air in the room and protect it from mold and bacteria. At high temperatures, alder releases substances that have a positive effect on the heart and vascular system, and also have an anti-inflammatory effect.
Oak
. Contains tannins, like the previous type of wood. It is very durable and flexible. When heated, it releases beneficial substances that help eliminate fungi and unpleasant odors. But oak has one drawback - its surface is difficult to sand to the required smooth state, since its wood is slightly rough.
Ash
. Ash wood is flexible and not very dense. However, it does not crack and has the best healing properties. In addition, ash is one of the most beautiful wood species. In various photos of finishing a bathhouse with ash boards, you can see that this wood is very light, clean and festive.
. This type of wood has low thermal conductivity, which prevents burns at high temperatures. It does not crack or dry out. Also, aspen has a pleasant color and is easy to process. The only drawback is the rapid loss of natural color.
Coniferous wood for baths
You can sheathe a bathhouse using the following coniferous wood:
Larch
. It is very durable and has low thermal conductivity, which is important for a bath. It releases a subtle and soothing aroma even at low temperatures. Larch has a beautiful color, but, like oak, it is quite difficult to process.
Spruce
. Endowed with a pleasant color and smell. Spruce wood is very soft and easy to work with. Spruce boards are recommended to be installed in rooms not intended for high temperatures. This is due to the release of a large amount of resin.
Cedar
. Perfect for finishing a shower stall or rest room. It has a unique color, specific aroma, and also has antiseptic properties. Cedar releases resins and essential oils that promote calm and relaxation. This type of wood is the most expensive.
. This wood is the most popular material for finishing a rest room. It is highly undesirable to install it in a steam room. It also has a pleasant shade and produces volatile substances that eliminate germs around.
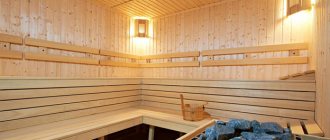
Steam room and sink
Facing
Mostly luxurious wood species are used to decorate the steam room and sink: linden, cedar and abash. They are distinguished by a delightful aroma, enchanting beauty, and incredible benefits for the body and soul. In addition, these wood species have amazing technical characteristics.
Thus, they resist the destructive effects of climatic, biological, thermal, mechanical, and chemical factors. Wood is also easy to process and maintain. It is perfect for finishing floors, walls and ceilings. In addition, the breeds are good for making accessories and furniture for steam rooms and showers.
Decor
Of course, the decor must be selected in accordance with one or another style direction. But since bathhouses are decorated primarily in the Russian style, let’s consider accessories that will perfectly highlight the features of the direction.
The following accessories are appropriate for the “Russian Spirit” style steam room:
- fragrant brooms;
- capacious steamers;
- comfortable footrests;
- original thermometers and hygrometers;
- laconic headrests;
- aromatic herbal infusions.
The following decor is appropriate in the shower:
- exclusive ladles, scoops, buckets, waterfall buckets;
- extravagant slippers and flip-flops;
- fancy hats and towels;
- stock essential oils.
A grain of imagination and a bit of desire will give the bathhouse amazing motives!
Interior decoration of the bathhouse with boards
The cladding process consists of several steps and does not take much time. First, it is necessary to carry out preparatory work, then install a wooden frame, lay insulating materials, and then install finishing boards. Finally, the surface of the boards is coated with a protective varnish.
Preparing to plank a bathhouse
Carefully inspect the surface of the walls. If you find large differences (more than 2 mm per 1 m), you will have to level it with putty or plaster. Then treat the walls and ceiling with a special antibacterial agent.
Next comes the stage of laying communications - electrics, water supply and everything that needs to be hidden behind the board panels. Only after this work has been completed can you begin to purchase boards, fasteners, wooden blocks, metal hangers, as well as steam and heat insulation materials. Take all metal parts from galvanized iron, otherwise rust and stains will appear on the walls over time.
After purchasing the boards, bring them inside the bathhouse and leave them there for two days - they should get used to the climate of the room. If you purchased unedged boards, you will have to work with them a little before covering. Finishing a bathhouse with an unedged board requires preliminary cleaning of the bark, which can be done using an electric planer, and requires high-quality sanding of the material. Use 80 grit sandpaper first, then 120 grit.
Creating a frame for attaching boards in a bathhouse
To construct the sheathing, use wooden blocks. Before installation, treat them with antibacterial agent. Select the section individually, based on the thickness of the insulation. Cut the bars into lengths of 100 cm and 50 cm.
Place metal hangers in rows at intervals of 30-40 cm. Pay attention to the distance between the rows - it should be 40-50 cm. Mark places on the walls for mounting metal hangers. Drill holes, drive in dowels and secure the hangers.
Attach frame bars to the hangers. Start the first row with a long bar, the second with a short one. The sheathing must be level and in the same plane, so check each row with a vertical level. If you find large differences, place a spacer under the bars.
Attach the bars of the same row not too far from each other. This will allow air to circulate between the rows. Around windows and doors, secure the bars vertically along the perimeter of the slopes at a distance of 30 mm from the edge.
Installation of boards inside the bathhouse
Before covering the bathhouse with boards, heat and vapor barriers should be installed. Lay thermal insulation material between the rows of the frame. Mineral wool is often used for these purposes, but it does not tolerate high humidity conditions quite well. Foam glass is ideal - this material is not afraid of moisture, insulates the room well and creates good sound insulation. When using foam glass, a vapor barrier layer is not needed. But if you are used to doing everything according to the rules, you can install a vapor barrier. Let the sheets overlap and glue them together with tape.
If necessary, cut the strips to the required length. The material should be secured to the prepared frame using finishing nails or special clamps. The advantage of the latter is their lack of visibility. The installation of planks for a bath room should be done vertically or diagonally so that the water does not stagnate between the planks, but flows down. In this case, the frame bars must be perpendicular to the boards.
Finishing starts from the corner. Place the first plank with the cut in the corner and secure it. After this, move around the perimeter of the room being finished. Select the finishing board in the joint corner along the width and cut to size. At the end, do not forget to apply a protective layer of a specialized composition (varnish, stain, oil, protective wax) to the boards. In the future, care for the material carefully - do not use solvents or abrasives. Over time, it is necessary to renew the protective coating layer.
In my opinion, the bathhouse, lined with clapboard inside, has already become boring. An alternative way to diversify has been found. Longer, harder, no doubt. But it's more beautiful. » >
The author hangs the carrier on the street, it will give you an electric shock. But to the point, let’s go, you’re doing it for yourself, for my taste, so I wouldn’t plan the edges, but carefully clean off the bark. It’s more natural, or something.. Well, I don’t like it spruce under varnish.. I would like to emphasize the texture with an Iron Brush on a drill.. and tint.
Look for Sahara varnish for baths and saunas - it is not afraid of either heat or water. Easily holds a hot iron without consequences.
ussur wrote: The author hang the carrier on the street, it will give you an electric shock. But to the point, let’s go, you’re doing it for yourself, for my taste, so I wouldn’t plan the edges, but carefully clean them of the bark. It’s more natural, or something.. Well, I don’t like spruce under varnish..I would like to emphasize the texture with an Iron Brush on a drill..and tint it.
When I was sheathing the dressing room, I removed the bark with an ax and polished it. The fact is that fellow bark beetles gnaw passages in some places and sanding the whole thing is very problematic! And so, undoubtedly, it’s not for everyone
BV wrote: Look for Sahara varnish for baths and saunas - it is not afraid of either heat or water. Easily holds a hot iron without consequences.
The temperature in the dressing room and rest room is not high. I think it'll do. The main thing is that less rubbish stands out
How to finish the floors in the bathhouse?
https://www.youtube.com/watch?v=https:accounts.google.comServiceLogin
The floors in the bathhouse can be finished with the following materials:
- ceramic tiles, which have excellent resistance to operating conditions at elevated temperatures and humidity, are not susceptible to pests, mold, and the spread of harmful bacteria, are durable and reliable, do not require special care and are able to maintain decorative and technical properties throughout their entire service life ;
- wood, which has unique properties, natural color shades, a non-slip, pleasant-to-touch surface, high thermal insulation characteristics and simple installation technology, but requires the application of protective agents to ensure a long service life;
- natural or artificial stone, which has unique decorative properties, is durable and unpretentious in use, easily tolerates any temperature and humidity levels indoors, is highly durable and wear-resistant, but its cost is high, and the installation technology is relatively complex.
Installation method
Regardless of which board you chose for wall covering, such products are installed according to a similar algorithm. The main difference between the procedures is the need for insulation or waterproofing of wooden parts, as well as in the method of fastening the parts.
The general scheme of work is as follows:
- First, we prepare the base by cleaning it, and then treat it with moisture-proof and antiseptic components.
- Then we install the sheathing on the base - a frame made of beams or a steel profile, to which the sheathing itself will be attached.
Sheathing made of steel profile
- If necessary, we lay insulation between the cells of the sheathing - polystyrene foam, polystyrene, mineral wool, etc.
Note! Cellulose wool can be blown under the boards after they are installed, but then the thermal insulation process must be planned in advance, specifically leaving holes to fill cavities in the frame.
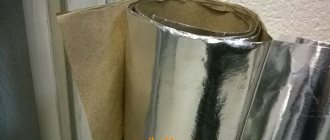
- We lay a membrane material on top of the insulation and sheathing, which will protect the objects under the sheathing from moisture and condensation.
- We install the finishing panels, fixing them to the sheathing using glue, self-tapping screws, nails or special clips.
Installation diagram of parts on clamps
- At the final stage, we install additional elements - skirting boards, fillets, corner trims, flashings, etc.
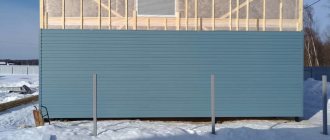
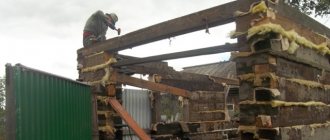
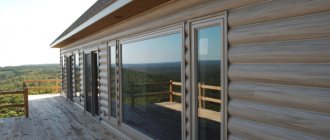
Exterior view of the clad building
Exterior cladding of a house: materials and technologies
In order to make the house attractive from the outside, you will need a beam with a section of 20x20 or 30x30 mm. It will be used for the frame of the building. The average width of an unedged board is 30 cm. The thickness of the elements can be selected depending on preference.
You need to purchase sealant and mineral wool, antiseptic impregnation and protective impregnation in advance. Barriers for the insulation used and finishing products - varnish or paint - are purchased.
- All products must first be coated with a primer or a special substance for protection. This will increase the wear resistance of the elements several times and increase their service life.
- Next, waterproofing is installed on the walls where the boards will be finished. In this case, coating waterproofing would be the ideal option. It is necessary not only to take care of protecting the walls, but also to secure the blind areas of the building. The mastic is applied to the surface of the walls using a small brush. If there are gaps, the mixture is poured into them, and all excess is removed with a spatula.
- You need to wait until the waterproofing layer is completely dry. To prevent mold and mildew from appearing in the building, it is advisable to apply at least three layers of the mixture.
- Then you need to install insulation. Mineral wool would be an ideal option for external insulation. It does not ignite, it is not afraid of frost, high humidity, or precipitation.
Calculation of materials and components
In order to correctly calculate how many elements will be needed to finish the house, you need to determine the installation option. There are several methods for fixing them.
- Butt.
There will be large gaps between the main elements used “butt-butt” In this case, a lot of sealant or special material is additionally used, which is used for caulking. - "Herringbone." The elements are stacked so that the bottom edge of one product is on the top edge of the previous one. The end result can be an effect that resembles siding.
- Overlapping. In this case, the unedged boards will be arranged in a checkerboard pattern.
The last method is considered the most expensive, because you will have to use much more elements for the cladding.
After the most suitable cladding option has been selected, the total area of the building walls that will be treated is calculated. From the resulting amount, you must subtract the area that will fall on the doors and windows.
Option “Herringbone”
If you know at least approximately the size of the board that will be used for the facade, then you can calculate the almost exact number of elements used for the work. The material is purchased with a small reserve so that there will certainly be enough.
What tool will you need?
In order to finish a house with unedged boards, you need to use a minimum set of the simplest tools.
- For marking you will need a pencil and a long tape measure.
- Be sure to use a building level.
- You can't do without nails, a hammer and a square.
- Since the boards will have to be cut, a hacksaw is used.
- To apply the finishing touch, use a small roller or a special brush.
In what cases is a frame needed?
It is unlikely that you can do without a frame if you plan to cover the facade with unedged or some other board.
It plays a very important role and helps to level the base of the building and hide all existing defects that could arise as a result of long-term use of the structure.
The frame allows you to securely hold the insulation used. With its help, it is possible to create a special ventilation gap through which condensate will subsequently be removed.
Frame installation
If you plan to decorate the house with unedged overlapping boards, then you need to pay special attention to the correct construction of the frame.
Wood frame
The work is carried out according to the following principle.
- At a distance of 15-20 cm from the corner of the building, you need to mark the place where the very first element of the future structure will be fixed.
- Similar actions are performed in relation to the second corner.
- The area of the building that remains is divided into as even parts as possible, the width of which will be the same as that of the insulation sheets.
- At the places marked in advance, you need to fix the parts used with dowels.
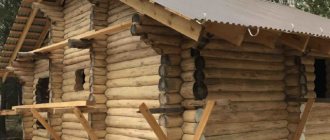
Sheathing a house with overlapping boards
This design for the exterior of a house is quite airtight due to the fact that the upper elements will overlap the edges of the lower boards. Additional work will need to be carried out exclusively at the corners of the structure.
The boards are mounted using ordinary nails on top of a layer of waterproofing and insulation.
The boards are packed vertically, then you can begin to secure the horizontal elements. It's worth moving from bottom to top. Each subsequent layer will be installed on the previous one with an overlap of approximately 2 cm.
Material
When choosing wood, it is important to pay attention to the content of harmful resins. When heated, they will come out, which will negatively affect health.
Benefits of pine:
- low price.
- long-term preservation of properties with proper drying;
- easy processing with different tools.
Flaws:
- after impacts, dents remain, which will be visible in good lighting;
- low resistance to rotting;
- susceptibility to the effects of fungus and mold.
Wood is suitable for making rafters, ceiling beams, joists, but it is better not to use it for arranging flooring.
Benefits of linden:
- presence of medicinal properties;
- easy processing;
- attractive look.
Flaws:
- susceptibility to moisture;
- low heat capacity.
You can use linden to create flooring in a steam room, but it must be properly processed before installation.
Benefits of cedar:
- immunity to mechanical damage;
- attractive appearance;
- resistance to rotting;
- high heat capacity.
Unlike its analogues, cedar is very expensive.
Advantages of aspen:
- low price;
- resistance to rotting;
- attractive appearance;
- simple processing.
When exposed to high temperatures, wood becomes covered with a dark coating.
Advantages of oak:
- high strength, durability;
- attractive appearance;
- resistance to moisture, temperature changes, rotting.
Flaws:
- high price;
- heavy weight;
- tendency to cracking;
- Difficulty in processing - for oak you need to use equipment with increased hardness.
Oak boards are more often used for decorative finishing of premises.
Advantages of larch:
- high density, strength;
- content of essential oils;
- resistance to rotting (wood contains a natural antiseptic).
Resins are released only during the first month. The main disadvantage of larch is its high price.