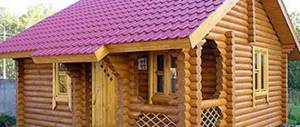
The Homius editors continue the series of publications with the hashtag #betterathome, and today we will talk about what Russian people cannot live without from time immemorial. Yes, you guessed it right - this is a bathhouse. And if these days you find yourself in forced self-isolation at your dacha, and even without a bathhouse, then this is truly a disaster. But the matter can be fixed, of course, if you are willing to put in the effort. And we will not be talking about a major construction project, but about a prefabricated miniature bathhouse, which, however, is in no way inferior in quality to its expensive counterparts. To build it, you can literally use available materials, so the whole process will not require either major investments or a lot of time from you. Andrey Bogdanov, one of the authors of the FORUMHOUSE YouTube channel, explained how to build such a bathhouse. You can easily repeat his version of a mobile budget sauna on your own site.
Design and foundation
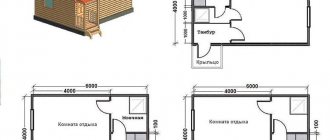
Even a small bathhouse cannot be built without at least the simplest project, so the first stage of work is drawing up a plan diagram.
Here you need to indicate the location of the main objects and their dimensions. As a rule, there are four zones in a bathhouse:
- dressing room - enough space with an area of 1.5 x 2 m;
- rest room - about 2 x 2 m;
- shower room - at least 1 x 1 m;
- steam room - no more than 1.5 x 2 m.
Plan of a small bathhouse for a summer residence
Thus, we obtain the minimum dimensions of the bathhouse: length - 6 m, height - 2 m, width - 2.5 m. This is quite enough for arranging a comfortable and practical steam room.
The second stage of work is pouring the foundation. When deciding on the type of foundation, focus on the type of soil in the area.
If the mini-bath is being built on hard and dry ground, you can limit yourself to a lightweight foundation: lay flat stones over the entire area of the future bath, cover them with clay, compact them, and on top, arrange a dense layer of wooden beams and treat them with waterproofing bitumen.
If your site has soft soil, lay a strip foundation: dig a trench, fill it alternately with layers of sand and crushed stone, compact the base and secure a reinforcing mesh on top, and then fill the pit with cement mortar.
Important! The strip foundation must be covered with a layer of waterproofing. The simplest option is sheets of roofing felt.
On soil with a high sand content, a foundation of concrete blocks can be laid under a miniature bathhouse. For a lightweight design, 10 blocks of standard dimensions 20 x 20 x 40 cm are enough.
Construction of a bath frame
The best method of constructing a mini-bath is frame. It is lightweight, fast and economical. To build the frame you will need:
- bars 5 x 5 cm;
- boards 2.5 cm thick;
- waterproofing film or foil;
- thermal insulation material.
Construction of a bathhouse
First, a frame is assembled from beams, corresponding in its dimensions and configuration to the previously developed project. The inside of the frame is covered with boards. To connect the elements together, use all kinds of anchors and various screws. Insulating materials are mounted on top of the boards: mineral wool, expanded clay or sawdust can be used as thermal insulation, and bitumen or polymer mastics can be used as waterproofing. It is necessary to insulate not only the walls, but also the floor and ceiling.
Advice. It is advisable to additionally cover the thermal and waterproofing of the ceiling with roll-up boards - a row of wooden boards.
After insulation procedures, you need to take care of the roof. You can use corrugated sheeting, slate or metal tiles as a covering: first mount the rafter system on the frame, and then secure the roof to it with self-tapping screws. When constructing the roof, leave an opening for the chimney.
The outside of the mini-bath can be covered with a block house or clapboard - these materials will give the structure an aesthetic appearance.
What is needed for construction
When building a mini-bath, tools are prepared in advance. It is advisable to first make a list of what you will need during the work process. Between manual and electric analogues of the same tool, it is better to choose the latter. You will need:
- concrete mixer;
- level;
- shovel;
- trowel;
- buckets;
- wheelbarrow;
- carpentry tools for formwork.
When constructing walls and roofing systems, the following is required:
- petrol or electric saw;
- drill or hammer drill;
- screwdriver;
- electric jigsaw;
- axe;
- electric plane;
- hammer;
- finisher;
- clamps and clips;
- construction stapler;
- file.
It has long been customary to build baths from wood. But today the basic material may be different. Construction technologies:
- frame-panel;
- frame;
- from rounded logs or timber;
- from profiled timber;
- made of brick;
- barrel bath.
To calculate materials, you can take as an example a 3x2.5 structure with a height of 2.1 meters. The building consists of a dressing room and a steam room. For its construction you will need:
- beams with a section of 10x10 cm, length - 3 m - 25 pcs;
- edged boards 2 cm thick - 1.5 cubic meters. m;
- edged floor boards 4 cm thick - 0.3 cubic meters. m;
- polystyrene foam 10 cm thick - 33 sq. m;
- beams for rafters 10x5 cm, 2 m long - 8 pcs;
- 2 cylinders of polyurethane foam;
- cement for the foundation - 4 bags of 50 kg;
- slate, roofing felt or tiles - 15 sq. m;
- lining for cladding - 0.37 cubic meters. m;
- aluminum foil for vapor barrier - 20 sq. m;
- siding – 23 sq. m;
- bricks for the stove – 250 pcs. or heating element;
- door that will close the oven - 1 pc.
Mini-baths made of boards are built similarly to frame ones, with the exception of one circumstance: boards are used for cladding the outer walls, not OSB.
A mini-barrel is a type of sauna that is easier to purchase than to build. Outwardly simple, but in fact it is a very complex design.
Arrangement of communications
The final stage of work on the mini-bath is the arrangement of the necessary communication systems.
Water supply and drainage. Feeding can be done by gravity:
- Prepare two 50 liter tanks, a hose and a pipe with a mixer.
- Install the hot water tank 0.5 m lower than the cold water tank.
- Connect the tanks together with a hose: fix one end in the lower zone of the “cold” tank, the other in the upper zone of the “hot” tank.
- Additionally, connect the tanks with a pipe with a mixer at the end.
To ensure water drainage you will need a drainage system:
- Dig a drainage well near the steam room.
- Make holes in the floor of the bathhouse for drainage.
- Bring the pipes to the holes, installing them with a slight slope.
- Direct the pipe into the drainage well.
Arrangement of a washing room
Water heating system . To heat water, you can use a mini-stove or heating elements. In the first case, you must first install the device, and then in its hottest place, going around the base of the chimney, install a U-shaped metal pipe: the supply end of the pipe should be placed on the body, and the outlet end 5 cm higher. In the second case, it is necessary to install heating elements under the “cold” tank and connect them to the water supply system with hoses and pipes.
Ventilation system . To ensure ventilation in a small bathhouse, it is enough to make holes with a damper in the wall opposite the entrance.
A mini-sauna is the choice of those who do not want to give up a full-fledged steam room due to the modest dimensions of their summer cottage. As you can see, building it with your own hands is not difficult: foundation, frame, communications - you will successfully cope with these tasks if you follow simple recommendations and rules.
Economy bath project
Having looked at the prices for materials, you will notice that it is more profitable to build a bathhouse from blocks or using Canadian technology. Moreover, the latter will be more profitable if some of the materials are used or low-grade (for example, instead of an edged board, you can use an unedged one, adding color to a country bathhouse). More accurate data on material consumption can be obtained after drawing up a project and estimate.
Before starting construction, it is extremely important to think through the design of the bathhouse, calculate the amount of materials, note all dimensions and at the same time plan not only the location of the premises, but also the furniture in them.
Installation of a shelf in a steam room
Selecting a bath size
The main room in any, even the smallest bathhouse is the steam room. There must be two or three floors of shelves and a heater. Even if the dacha plot is small, and the bathhouse is planned to be very modest, the steam room cannot be made with an area of 3-4 square meters based on the simultaneous stay of two people (visitors should be comfortable steaming with brooms, sitting and lying on the shelves at full height). Such standards are determined by safety considerations (in a very cramped steam room it is easy to get burned on a hot stove or scald your skin with hot steam).
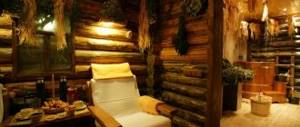
Steam room, interior
Also, if the entire stove is located entirely in the steam room and fuel is loaded from the same room, it is worth increasing the usable area of the room by another 1-2 meters to make it convenient to store and add firewood to the firebox. Directly in front of the stove, a pre-furnace sheet measuring 1x1 m must be laid, which is also noted on the plan diagram of the future bathhouse.
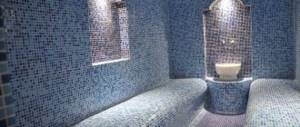
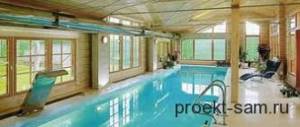
The bathhouse certainly includes water treatments, so you should think about a small shower located in a separate room or adjacent to the steam room. The second option, when the steam room and washing room are combined, allows you to save space and reduce the cost of installing sewer drains and interior partitions.
Bathroom layout
The last important room of the bathhouse is the dressing room or dressing room. There should be benches and hangers for visitors, a cabinet for bath accessories, and possibly a small table. It is also possible and preferable to have the heater located in the steam room, and the loading door opens into the dressing room, which allows you to save on heating.
The photo shows a small dressing room with a slatted wooden floor
In an economy bath you can do without:
- plumbing system. But you will have to equip a stove with a tank and bring water in buckets manually;
- separate bathroom. These amenities can be taken outside or into a country house if the bathhouse in the country house will be used only in the warm season.
But you won’t be able to do without electricity and sewerage, so it is advisable to order or build a septic tank/cesspool/drainage pit, as well as extend a power line to the site where the bathhouse is being built, because steaming by candlelight is very inconvenient.
Bath drain
Be sure to indicate on the plan diagram:
- dimensions of the building and each room separately;
- ceiling height and overall height of the bath;
- furnace location;
- the sides into which the doors will open, including the firebox;
- location of windows (in the steam room the window is located at a height of 185 to 195 cm from the floor and not above the shelf);
- location of the socket and switch, shield and lamps (only products with a moisture protection level higher than IP54 are used).
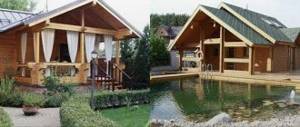
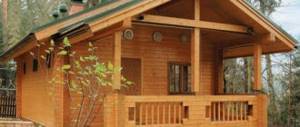
Below are several projects of small one-story country baths.
3x3 m
Bathhouse project 3x4
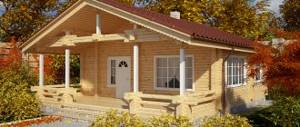
Project of a 6x5 bathhouse with a terrace
Bathhouse 4x4