A bathhouse is an atmospheric place with a special microclimate and functional attributes, providing complete relaxation and comprehensive healing of the body. One of the obligatory elements of the interior is a hanger for the bathhouse.
Modern designs differ in purpose and installation method. The simplest products can be made independently from available materials - wood or metal, taking into account their operating conditions.
Style
Let's start with style. This time we would like to limit theorizing on this topic as much as possible. Therefore, we will limit ourselves to introducing two poles - simplicity and ornateness, and between them let there be many intermediate options, including various attempts to imitate different eras or countries.
So, the more traditional , the wider the possibilities - hangers of any degree of ornateness will suit you, and of the simplest ones, only those that combine exaggerated rigor of geometry with metal or glass elements are not suitable.
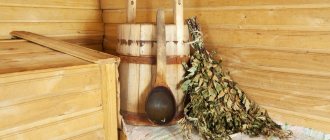
Original homemade hangers in the bathhouse shown in the previous photo
The more modern your bathhouse is, the better it is to opt for relatively simple interior elements. Of course, we are not talking about high-tech now, but simply about a comfortable bathhouse in which modern materials are used, everything is functional and there are not many references to tradition .
What do we mean by comparative simplicity? The presence of some decorative elements , but subordinate to functionality and not very attractive.
Let us explain: the more original your hanger is, the more demanding it will become to its surroundings . You need to understand the principles of stylistic unity - if you put Khokhloma on the table, then several other interior items should play with similar patterns, and the entire interior as a whole should be designed in the Russian ethno-style. A single out-of-the-ordinary object will irritate rather than please the eye.
Dimensions and drawing
The main task when creating a hanger with your own hands is drawing up a drawing. There are no clear requirements here, use your imagination! If you have no ideas, then use ready-made drawings on the Internet.
Step 1. The easiest way, which is quite enough for basic use, is a board with hooks. If desired, it is complemented by a base of large vertically oriented boards, which are held together by less thin ones.
Step 2. Once the drawing has been completed, you need to find the materials listed below. To create the standard option discussed in this article, you need:
- board. Thickness 2.5 cm. Any length. Based on the proportion 50 cm/4 hooks.
- hooks
- tools.
- screws and dowels.
- marker.
Find suitable hooks. The best option for a bathhouse is U-shaped knots. Try to choose dense and strong branches, otherwise they will quickly deteriorate.
Step 3. At this stage, you need to mark on the board or other place the parts on which the hooks will be attached. It is best to mark them with a marker. Make holes all the way through. Secure the hooks using self-tapping screws and dowels, and put on the plugs.
Place
Usually we need a clothes hanger in the bathhouse and a hanger for hats and towels. Where something like a kitchen unit is provided, small hangers can also be useful, but they are no different from what we use in the kitchen.
Hallway: for clothes
the most thorough , because in winter it should hold a decent weight of outerwear for several people.
It is located in the hallway , dressing room or similar area of the rest room , if it is not separated by a partition.
In principle, when choosing, you can focus on the simplest models that we use in the hallway. Since you plan to make a hanger for the bathhouse with your own hands, it is worth deciding how many people it should be designed for, whether it will be enough to make it wall-mounted or whether it is better to make a floor structure.
At the same time, it is worth resolving the issue of a shelf for hats and the like - you don’t have to do it if you don’t want to. On the other hand, they are unlikely to linger on this shelf; after all, a bathhouse is not a home.
Steam room: for hats and towels
But in the steam room you need a very simple and light hanger that does not have to hold a lot of weight. A few felt hats, a few towels - that's all.
It can be quite small in size. You can make it with a shelf or without a shelf.
BY THE WAY !
And nothing prevents you from using one of the corners of the steam room to place such a structure - this is both space saving and convenience.
DIY bathhouse hangers made of wood
The main difference between a bath hanger and a regular one is wood. The design of the products is the same, the manufacturing scheme is also the same. Only the design gives the product individuality.
Drawing
From a photo of a home-made bath hanger, the assembly diagram, much less the dimensions, is not always obvious. When working, you should use the drawing.
You can develop a drawing yourself, or you can download a ready-made one and print it.
Preparation of materials
For a reliable and beautiful hanger-panel with a shelf you will need the following:
- boards - aspen, linden, cedar, depending on the purpose, you need to purchase 3 boards with dimensions of 1120*200*20 mm, 6 pieces with dimensions of 1500*120*20 mm and 1 with dimensions of 1070*200*20 mm. Also, if sidewalls are provided, material is selected for them;
- 35 mm self-tapping screws and 10*30 mm dowels, you will need furniture plugs;
- PVA glue, as well as materials for processing: if a hanger is required for a steam room, then oil or wax, if for a hallway, then varnish;
- sandpaper or grinder;
- jigsaw, screwdriver, drill;
- auxiliary tools: hammer, tape measure, square.
If a hanger of a different size is made, then other boards and fastenings are selected.
Assembling the hanger
Boards, cross slats, and shelves are pre-treated with fine-grained sandpaper.
- The frame is assembled: a tree 1500 mm long is placed vertically, and a tree 1120 mm long is placed horizontally. The pitch between the longitudinal elements is 80 mm.
- The end boards are connected with self-tapping screws from the back side so that the fasteners do not go right through the wood.
- Align the remaining longitudinal elements and screw them to the transverse slats. All corners in the finished sheathing must be straight.
- A horizontal rail 1070 mm long is fixed on the upper section - it serves as the basis for the hooks. The rail is mounted under the frame and screwed with two self-tapping screws.
- Cut out the sides to the desired shape. Mark the places for the connecting dowels and drill holes for them.
- Holes are also marked in the shelf and drilled.
- The holes and dowels are lubricated with glue. First, the dowels are inserted into the shelf, and then the sidewalls are connected. The fasteners are duplicated with 2 self-tapping screws.
- Mount the side panels on the outer vertical boards. The shelf is secured from above with self-tapping screws, screwing the fasteners through the shelf to the board with holders.
Important! Hooks can be installed in any shape and type. The main thing is that they fit on the board.
Attaching the hanger
The hanger in the bathhouse can be secured in two ways.
- Ears are mounted on the outermost and at least one longitudinal board of the grille at the back. Reliable nails or screws are driven into the wall and the product is hung.
- You can turn the structure into a stationary one. Through the horizontal slats of the frame, the hanger is attached to the wall with self-tapping screws. The caps are covered with furniture plugs.
Mount the hanger in a convenient place, taking into account the height of the users.
Material
Since we initially decided that our bath hangers were wooden, the chapter on material will concern exclusively the selection of wood. (Of course, if you have a choice, because often leftovers from other works are used for shelves and hangers, which, of course, limits the possibilities.)
Suitable wood species
Despite the fact that there will be increased humidity , its scale is not so great as to greatly affect the wood in the hallway. But in a steam room, the effect of moisture is much more significant.
The temperature is also distributed unevenly - the highest will be in the steam room, the lowest in the dressing room.
Since we are talking about hangers for the hallway and for the steam room, the advice will be fundamentally different.
ADVICE! When choosing wood for a steam room, avoid conifers if you prefer (even sometimes) sauna mode - conifers emit resin that will stain.
Resin leaks on coniferous wood
In a bathhouse with Russian conditions, this is less significant; you can choose the material at your own discretion - the same deciduous or coniferous.
From deciduous trees , what you have is good. Of course, the same linden or aspen, which are most often used in a bathhouse, do not have high strength characteristics , but in this case this is not significant. Simply coat the hanger with the same oil or wax you used (if used) for the shelves. This way it will last longer.
In the waiting room, the choice is not associated with any restrictions at all. Here, if you really prefer something, it would probably be ease of processing, since you are going to make a hanger for the bathhouse out of wood with your own hands.
Design
Externally, wooden hangers in a bathhouse of this design will resemble an ordinary hallway, often found in residential premises.
But in a bathhouse it can perform similar functions. If you show your imagination and select the appropriate material for it, wooden bath hangers can become an integral part of the interior.
- Prepare 3 boards measuring 20x100x1120 mm and 6 boards measuring 20x120x1500 mm. This will be a load-bearing frame in the form of a sheathing. Mount the first horizontally, the second vertically.
- For fastening, use 35 mm long wood screws, which are screwed from the back through the horizontal boards.
- Prepare material for the hook holder, which will be located in the upper part of the sheathing, with overall dimensions: thickness - 20 mm, width - 200 mm, length - 1070 mm. Secure it on the back as well.
- Place sidewalls along the edges of the shelf, which act as brackets and give it strength. This way she can withstand the weight of objects and things.
- Attach the assembled hanger to the wall through the holes in the horizontal boards. This will ensure reliable installation and prevent it from deforming.
- Close the heads of the screws with furniture wooden plugs, having previously drilled stepped holes. Small diameter for a screw, large for a plug.
Option for a sauna hanger made of linden
- Edged boards 20-25 mm thick (pine or larch);
- Wood screws;
- Furniture dowels measuring 10×30 mm;
- wooden plugs;
- PVA glue for wood;
- Acrylic waterproof varnish for wood, water-based;
- Stain (to change the color) of the structure;
- Abrasive sandpaper;
- Electric drill;
- Wood hacksaw;
- Jigsaw;
- Screwdriver;
- Hammer;
- Square;
- Roulette;
- Ruler.
Assembling the hanger
Before starting assembly, treat all parts with abrasive sandpaper:
- round sharp edges and corners;
- remove chips, burrs and other irregularities.
This wall hanger can be installed in the dressing room, hallway, locker room or other suitable bath room. Or you can, for example, make two hangers. Use one for outerwear, and the other in the dressing room for towels and underwear.
In appearance, it resembles an ordinary hallway, which is often installed in residential premises. And in the bathhouse it can also perform the same useful functions. By choosing the right material for this hanger and finishing it accordingly, it will become an integral part of the bathhouse interior.
The main supporting structure of the wall hanger is a lathing of six vertical and three horizontal boards with dimensions of 20x120x1500 and 20x100x1120 mm, respectively (thickness, width, length). They are fastened to each other from the back with wood screws through horizontal boards. To prevent the screws from coming out of the vertical boards, their length must be less than the total thickness of the parts being fastened, that is, 35 mm.
In the upper part of the lathing there is a 20x200x1070 mm hook holder, on the upper longitudinal edge of which there is a 20x300x1070 mm shelf. The holder itself is attached to the sheathing also from its back side.
Along the edges of the shelf there are sidewalls, which act as brackets to give the shelf sufficient strength so that it can withstand the weight of things and objects placed on it.
The assembled bath hanger is attached to the wall through holes in the horizontal boards. This fastening method will not only ensure reliable installation of the entire hanger, but will also prevent its deformation under the influence of humid bath conditions.
All visible screw heads are covered with wooden furniture plugs. To do this, stepped holes are drilled in the part to be fixed. The small diameter is where the screw is inserted and recessed, and the larger diameter is where the plug is inserted.
Note: As an alternative, furniture screws with an increased hole depth in the head can be used. When using them, it is enough to drill a simple hole in the part to be fixed. Such screws are closed with plastic plugs matching the color of the hanger, giving the entire product a very attractive appearance.
To Contents
Form
By design, all hangers can be divided first into the following categories:
- wall-mounted (have no other support other than walls);
- floor-mounted (may not be attached to walls).
In turn, wall and floor ones can be located along one of the walls, or located in the corner.
Wall mounted
The most minimalistic version of a hanger is a board, on one side of which hooks are attached (these can be wooden sticks, forks of branches, door handles, and knockers, but most likely some kind of purchased type of holders), and on the other side there is a fastening on the wall - ears, hidden loops, other varieties.
A hanger with a shelf is not too different from it in terms of labor intensity . Everything is the same - board, holders, ears, only a shelf is added at an angle of 90 degrees, and a pair of approximately triangular-shaped sidewalls will support it in this position. You can do it without the sidewalls - glue them and place them on the screws.
The structure, which we conventionally call a “ fence ,” is a little more complicated. These are several boards attached to cross slats with gaps between the boards. The upper edge is usually made smooth (because a shelf is most often attached to it), and the lower edge is either smooth, or a triangle, or rounded, or the author came up with something else.
Floor-standing
Floor designs can also be different.
For example, it could be a classic hanger in the form of a pole with a three- or four-legged support and a crown of hooks for circular placement of clothes.
Idea! A variation of such a pillar can be a felled young tree, the branches of which form “hooks”. However, first it will need to be dried thoroughly (at least a year).
In another version, it can be a frame made of round wooden elements, which rests on two “legs”:
an old door leaf into a floor hanger by attaching a shelf and hooks to it.
Corner
Corner can be either a wall or floor design. Roughly speaking, its feasibility depends on whether it is imaginable that you mentally cut the design you like so that it folds at an angle. In some cases this will not be difficult.
However, for a steam room there is no need for a floor structure, and a light wall -mounted one consists of two boards at an angle of 90 degrees and a shelf-lid in the form of a triangle or a sector of a circle. It is quite suitable for hats and towels, and if you wish, you can further decorate it.
Hook options for bath hangers
In a regular hanger, the holders are made of both wood and metal. For a bathhouse, the latter option is absolutely not suitable, since the metal heats up too much.
The simplest version of a wooden bath hook is a peg, fixed at an angle of 45 degrees. But if there is a desire and opportunity to make a more decorative option, they resort to other methods.
Bath hanger made of knots
This is an original and easy-to-make option. It is a regular hanger made of suitable wood, but with hooks made from knots.
To do the latter, you need to follow a few simple recommendations.
- The required number of knots with part of the trunk are sawed off from the cutting. The total length of the fragment should be approximately 50 mm. The back of the block is made flat.
- The bark is removed from the branches and cleaned. The product can be polished.
- The ends of the block, corners and back surface are processed with a grinding machine. The rest of the knot retains its most natural shape.
- Holes for fastening are drilled at the ends of the bars. You cannot fasten it directly to the screws, as the block may crack when screwing in the screws.
- The holders are secured with self-tapping screws and glue.
In order not to spoil the overall impression, it is better to use fasteners with decorative caps of a suitable shade.
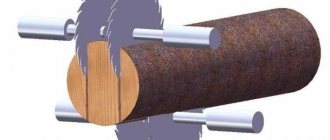
Hanger made of wooden chocks for a bathhouse
You can also make an interesting hanger from maple or oak logs with uncut knots. To do this, all suitable specimens are selected - by size and number of knots, and then production begins.
- The log is cut to a fragment 15 cm long. Then the log is cut in half.
- The back part is processed with a plane, then sanded.
- The finished product is fixed to the wall of the bathhouse using self-tapping screws.
The product can be decorated with carvings.
Wooden hangers: technology (video)
Carpentry products of this kind, such as hangers, are considered one of the simplest (unless, of course, you apply maximum imagination).
Below we invite you to get acquainted with several video instructions, which clearly demonstrate the process of making both simple and quite complex versions of wooden hangers, and it is clear that what is suitable for a hallway in an apartment will look quite normal in a bathhouse.
the fence hanger already mentioned above
And in this video, the master even talks with some awkwardness about how to turn a simple board into a convenient bath hanger:
As a source of inspiration, you can use this instruction from the same master, where he shows the stages of making a piece of furniture in the Japanese style:
It's quite challenging for beginners, but can be enjoyed by professionals.
And here is another fence hanger , but with a triangular bottom:
For the steam room, you can make a hanger from the following roller, just do not use metal hooks - it is better if they are simple wooden pins:
What you need to make a wall hanger
An integral part of any dressing room is a hanger. Made from affordable materials, it can become an excellent accent in the interior. We will tell you further about how to make a hanger for a bathhouse with your own hands and what you will need for this.
When starting finishing work in the dressing room and thinking through the arrangement of the necessary pieces of furniture, it is important to provide for the presence of a hanger in it. After all, this interior detail is simply necessary in a bathhouse. Making it yourself will not be difficult, especially since all the necessary components and fittings can easily be found in any building materials store. The following step-by-step instructions with photographs will clearly demonstrate and greatly simplify the assembly process.
Externally, bath hangers are practically no different from those installed in the hallways of apartments and houses. Therefore, the key emphasis should be on the functionality of the product. And if you take a creative approach to the choice of source materials and the very process of making a bath hanger, you can end up with a completely original piece of work.
So, to make a wooden hanger for a bath you will need:
- boards (pine or larch), of which 3 boards measuring 1120×100×20 mm, 6 boards measuring 1500×120×20 mm, 1 board measuring 1070×200×20 mm, parts for sidewalls and shelves;
- accessories: 35 mm self-tapping screws (for wood), 10×30 mm connecting dowels, wooden furniture plugs;
- PVA glue for wood, water-based acrylic bath varnish, stain;
- sandpaper;
- tools (drill, hacksaw, jigsaw, screwdriver, square, ruler, hammer, tape measure).
If necessary, before starting work, you can make rough sketches or schematic drawings of a bath hanger with your own hands. This will clearly help you determine the desired shape and location of the main elements of the product.
Creating a hanger of this type includes:
- Assembling the sheathing (base).
- Installation of fastenings for hooks.
- Assembly and fastening of the shelf.
- Installation of a finished hanger.
It should be noted that all parts must first be carefully processed with sandpaper, paying special attention to chips, irregularities, as well as working out in detail and rounding sharp edges and corners.
Working with the base is done as follows:
- assemble the frame of the future hanger in the form of a sheathing, installing boards 1120 mm long horizontally, and boards 1500 mm long vertically, so that the step between them is 80 mm;
- Connect the outer vertical (longitudinal) and horizontal (transverse) boards with self-tapping screws on the reverse side, preventing them from coming out through. Then screw the remaining longitudinal boards. It is important to pay attention to the fact that all corners in the resulting sheathing are straight;
- in the upper part of the frame, install a fastening for hooks on the reverse side (a board 1070 mm long). To do this, it should be placed under the sheathing and screwed to each vertical board with two self-tapping screws. This technique will also give the frame additional strength.
Assembling a shelf for a bath hanger is carried out as follows:
- using a jigsaw, cut out blanks for the sidewalls, mark the centers for the dowels, taking into account the following values: on the side edge -200 mm and 50 mm, from the end -130 mm and 25 mm;
- By analogy, do the same with the shelf, marking the centers;
- make holes in all parts for connecting tenons and, after thoroughly lubricating them with PVA glue, insert them into the shelf;
- in the sidewalls, first apply glue to the protruding parts, then connect them to the shelf, after which each sidewall is secured with two self-tapping screws.
Returning to work with the hanger frame, you should:
- attach the sidewalls to the outer boards of the base with self-tapping screws and connecting tenons coated with glue;
- through the holes in the outer vertical boards, connect all the structural elements together so that one side of the shelf rests on the previously installed mount with hooks;
- At the top, screw in the screws and attach the shelf to the hook holder;
- Screw two self-tapping screws onto each side panel from the back side of the vertical boards;
- securely attach the hanger to the wall using self-tapping screws through horizontal boards;
- close the screws with furniture plugs, for which you drill stepped holes of small (for screws) and large (for plugs) diameters.
Instead of plugs, you can also use furniture screws, but it is worth considering that they are somewhat more expensive. Now the DIY wooden bath hanger should be coated with a special water-based compound, or acrylic water-based varnish, and it is completely ready for use.
When creating a bath hanger yourself, it is also important to take into account the recommendations of experienced craftsmen:
- The holes for the dowels should be drilled gradually, in several stages - first take a drill with a diameter of 3 mm, then take a drill of the required diameter (up to 8 mm).
- Initially, connecting tenons should be installed in holes drilled along the fibers, then in holes made in another part.
- If a smaller connecting tenon is required, it is necessary to trim it and fill the free space with PVA glue, which is pre-mixed with sawdust.
- In order to mark the centers as accurately as possible, you need to use small nails.
- Treating all elements of the hanger with acrylic water-based varnish or similar means will significantly extend the life of the product.
- Depending on the necessary requirements, you can make a wooden bath hanger of any size with your own hands. The main thing is to adhere to the assembly algorithm shown above.
- A bench installed under the hanger will perfectly complement the interior, making it harmonious and cozy.
Now, having fully studied this article, you don’t need to use wooden coat hooks in the bathhouse, simply driven into the wall. After all, a skillfully handcrafted bath hanger complete with a shelf will look much more aesthetically pleasing and functional!
It is impossible to imagine a bathhouse without durable benches. Benches are a mandatory attribute of the interior that you can make with your own hands. We invite you to familiarize yourself with the requirements for benches and the features of their installation. A well-made bench helps the visitor to relax and unwind. To achieve the desired effect, many factors must be taken into account when making furniture.
The bench is in direct contact with the body, so choose the material for the product carefully. Bath benches are made only from wood, and the boards must have the following characteristic properties:
- Wood with low thermal conductivity can withstand extreme temperatures and humidity, so strong and hard woods with good resistance to cracking are chosen.
- Choose materials with a minimum amount of damage, without dark knots, blue spots, or wormholes, which reduce the strength of the product.
- A linden bench for a bath is considered the best option. Lumber from bath trees - oak, aspen, maple - is also suitable. Products made from such wood dry quickly and wash well. To save money, you can make the frame of the bench from pine beams.
- The benches in the steam room are made of linden, oak, and larch. These are deciduous trees that do not emit resin and do not burn the skin, and have medicinal properties. Pine furniture is not installed in the steam room due to the appearance of resin on the surface.
- In the washing room you can use lumber from coniferous trees, but after making the benches for the bathhouse, soak them in several layers with antiseptic preparations. The best option for a washing room is furniture made of aspen and linden.
- Furniture for the rest room can be made from any wood; after manufacturing, treat it with antiseptic agents.
- In terms of price category, linden is in first place, followed by aspen.
- The disadvantage of aspen boards is that they rot from the inside, and you may not be able to see the defect visually. High-quality aspen boards are imported and therefore expensive.
Benches in the bathhouse are used for sitting, lying and for a semi-sitting position. They have dimensions that should provide comfort for an adult.
- Benches for sitting: height - 50-90 cm, width - 40 cm, back height - 110 cm, foot rest - 20 cm.
- Benches for semi-sitting use: height - 50-90 cm, width - 60 cm, back height - 110 cm, leg rest - 20 cm.
- Benches for lying down: height - 50 cm, width - 95 cm, no backrest or footrest.
- The length of the bench for 1 person is 90 cm, if the bench is for several people, increase the size by 50-60 cm for each visitor.
- The length of the bench for the steam room and rest room should be at least 180 cm, it should be comfortable to lie on. To increase strength, provide an additional leg or use a board at least 40 mm thick.
- It is not necessary to make benches only according to the specified dimensions; take into account the individual characteristics of the room.
There are various designs of bathhouse benches - movable, stationary, folding. Benches of various shapes and sizes are made for each room.
To properly make a wooden bath hanger with your own hands, you need to follow these steps.
- Prepare boards and all necessary elements for hangers according to your dimensions and drawings.
- To make their surface even and smooth, it is necessary to clean it with sandpaper.
- Place the boards on the table and connect them with self-tapping screws. The angle of intersection of the elements must be strictly 90°.
- Cover the screw caps with furniture plugs to match the wood.
- Connect the remaining elements by analogy, following the individual drawing.
- Attach the hook holder to the vertical boards. You can either buy them ready-made or make them yourself. Hooks made from wood knots or cuttings will look very nice.
- Make holes in the horizontal boards to attach the hanger to the wall.
- Treat the finished hanger with varnish and hang it in the prepared place.
The main difference between a bath hanger and a regular one is wood. The design of the products is the same, the manufacturing scheme is also the same. Only the design gives the product individuality.
Drawing
From a photo of a home-made bath hanger, the assembly diagram, much less the dimensions, is not always obvious. When working, you should use the drawing.
Planed pine boards with a thickness of 20-25 mm are suitable as the main materials, unless, of course, the hanger is intended to be used in a room with elevated air temperatures. But hardwood boards are the best option as they do not release resin.
Ideas for floor hangers
- Regular floor hanger
The design of floor hangers is a small support with hooks at the top. The support is often made to look like a tree trunk, and cut out leaves serve as an excellent addition to it.
Wooden floor hanger. Photo: ae01.alicdn.com
- Hanger-pointer
Lately, lettering on hangers has become popular. Floor ones are no exception. They can serve as a kind of sign for entering the dressing room or bathhouse.
Hanger-pointer. Photo: park-pro.ru
- Claw hanger
A wooden frame resting on “paws” is often used as a floor hanger. Hooks are attached to the top crossbar.
Hanger-frame. Photo: cdn.home24.net