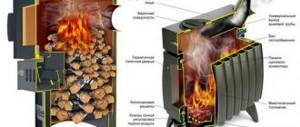
How to make a wooden bucket with your own hands in the form of a small cylinder, we will consider in this article.
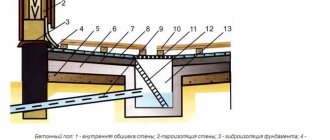
The figure shows a sectional view of the bucket design:
1.
Stacked bottom.
2.
Typesetting board.
3.
Metal hoop.
4.
Eyelet for attaching the handle.
5.
Handle.
It is assembled using glue from boards and slats. Boards measuring 20 x 45 x 225 (mm), in which we mill grooves measuring 5 x 7.5 (mm) in the center of the side surfaces. Planks measuring 5 x 15 x 225 (mm). We compress the assembled shield with clamps and wait until the glue dries completely.
Using a jigsaw, cut a circle from the assembled shield. The end of the bottom is ground around the circumference to size 10 (mm), as shown in the drawing.
Let's make it from a wooden plank with a cross-section size of 20 x 45 (mm), grind the side edges at an angle of 10° with an inclination to the center of the bucket. We end all the planks at the same size 350 (mm) and mill a groove from the bottom 4 (mm) deep and 12 (mm) wide. We will make chamfers on the sharp corners of the end faces.
The number of strips in the example under consideration is 18 pieces. Let's calculate the angle of inclination of the side faces: 360 / 18 / 2 = 10° The angle is an integer; there will be no problems with setting up the processing equipment.
We will make it from hot-rolled tool strip 3 x 30 GOST 4405-75. Drill holes for M5 threads along the edges of the strip. Screw the corners and insert the tightening screw as shown in the figure.
Using a nut, compress the edges of the strip to the required size and weld them. Unscrew the screws and remove the device. Finish the seam and smooth it with an abrasive wheel.
Before welding, we prepare a one-sided joint with beveled edges of the following dimensions:
• joint width 2 (mm) • joint depth 1 (mm) • joint edge angle 60°.
HANDLE EYE
We will make it in the form of a loop from highly alloyed corrosion-resistant wire Ø 5 (mm) GOST 18143-72.
We will make it from the same wire as the ear.
Assembly order
, or how to make a wooden bucket with your own hands:
1.
Let's assemble all the planks around the bottom so that the bottom fits into the grooves of the planks.
2.
Compress the assembled structure with twine.
3.
Squeeze and weld the hoops.
4.
We will weld ears to the upper hoop for attaching the handle.
5.
Insert a pen into the ears.
6.
Let's lower the product into the water.
After some time, the wooden boards will swell and all the cracks will disappear.
Modern materials and technologies have replaced traditional wood from many industries, but in some cases it remains indispensable. If you need antique-style utensils for a bathhouse or a country house, then you can’t do without wood. We will tell you how to make a wooden bucket with your own hands.
You can make a wooden bucket yourself.
Bucket made of wood
Purpose
It is impossible to create a traditional rural setting without wooden utensils.
Read also: Ground cover plants for the garden perennials photo
Many readers will be surprised: who in our time could be interested in the technology of making wooden buckets? In any supermarket you can easily find inexpensive products made of plastic or metal, which are lighter, stronger and more convenient than antediluvian vessels made of boards.
In addition, modern models are much cheaper than their older brothers, which can be easily seen by looking at the prices in the bath accessories department. However, if you are afraid of the price of the finished product, you can easily make it yourself.
Flower pots are often stylized as antique.
However, let's return to the main question. The fact is that everything antique acquires value as a kind of props when it is necessary to create a certain atmosphere and surroundings. This fate also befell wooden utensils.
So, let's list the most typical areas of use of antique-style wooden utensils:
- Restaurants, cafes and clubs, the interior of which is designed in the style of old hunting lodges, taverns or taverns;
- Hotels and holiday homes, the style of which corresponds to family estates, estates or castles of yesteryear;
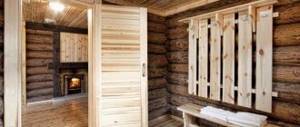
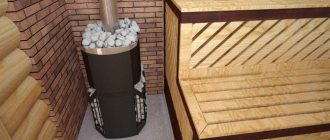
- Baths and saunas, made in traditional interior solutions. This is perhaps the most extensive area, and you can hardly find a Russian bathhouse without a wooden bucket or font;
- Many owners of private log houses like to decorate their premises in the style of ancient Russian chambers;
- Finally, all kinds of thematic events, reconstructions of past events, filming of films, videos, advertising and various programs may also require appropriate props.
Not a single Russian-style bathhouse is complete without antique dishes.
Important! It should be remembered that props can be purely decorative and not fulfill their functional purposes. If you want to use the cookware for its intended purpose, you should do it conscientiously according to all the rules.
Materials and tools
Wooden sauna buckets are made from high-quality lumber.
To make a wooden bucket with your own hands, you can use raw materials of various species. Considering that large volumes are not required, you don’t have to worry too much about the cost of the array, because you don’t need a lot of boards to produce one or two vessels.
In addition, you should buy a strip of hot-rolled steel with a thickness of 2 mm. The length should be enough for two girths with an overlap of 80 - 100 mm. The width of the strip is chosen according to the tastes of the master, but usually it is 30 - 50 mm.
You will also need a pair of bolts with nuts with a diameter of 8 - 12 mm and a length of about 100 mm to tighten the hoops around the board staves.
Clamps can be optimized by welding.
If we talk about breeds, then when choosing, you should be guided by the table:
| Wood species | Properties and Features |
| Oak | The service life in water is over 35 years, at first it can give a bitter taste and color the liquid brown. The most durable and durable raw materials |
| Larch | The service life in water exceeds 25 years; it does not affect the taste and color of water. Larch is the most durable and moisture-resistant coniferous wood from which the support pillars of Venetian houses are built. |
| Elm | Can last in underwater conditions for about 20 years, but is afraid of rotting in air |
| Alder | Durability in contact with water approximately corresponds to that of elm, does not stain water and does not affect the taste, rots in air |
| Birch | Can last in water for 10 – 12 years, does not affect the quality of the liquid, is afraid of rotting |
| Willow | The least durable material, its service life is on average up to 8 years in contact with water. At the same time, it does not affect the characteristics of water and is not afraid of rotting. |
Read also: How common raspberries reproduce
Tools you will need:
- circular saw for slicing;
- jigsaw;
- manual frezer ;
- mallet;
- two clamps;
- vice;
- plane;
- hacksaw;
- file;
- sandpaper and pencil.
Use high-quality lumber without knots or other defects.
Important! For a high-quality result, you should buy a radial cut oak board of the first grade, 10 mm thick and 50 - 60 mm wide.
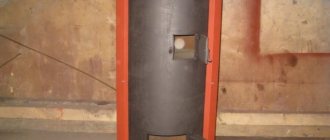
Design of a shower bucket for a bath
Regardless of what material was used to create the pouring mechanism, its design will always be the same. A bucket for pouring into a bath consists of the following components:
- Brackets for securing the vessel to the wall;
- Wooden or other container for water;
- Systems for monitoring the level of water supplied from the water supply;
- Rope, with which the bucket is tipped over if necessary.
In fact, the design is both ingenious and simple.
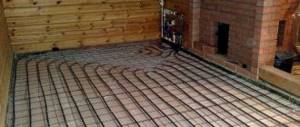
Even a novice master can create one. There are many design options, among which making a bucket from wood is considered the most problematic. The finished product will require special care, but at the same time it will look more aesthetically pleasing than all other options. Some inconveniences of a wooden bucket are associated with the need to fill it with water in advance. The bucket must swell, otherwise cold water will simply seep through the cracks. However, you cannot regularly leave the container filled. Over time, the wood will become covered with mucus, and the water will become cloudy and begin to stink. A solution to the problem can be a plastic insert mounted in a wooden vessel. It will help to avoid unwanted hassle of caring for the system, while leaving the appearance of the structure completely presentable.
Making a bucket
The photo shows the process of making the vessel.
So, if you have not yet changed your mind about working with your hands, then here are a few instructions for you on how to make a wooden bucket:
- From the boards we assemble a square shield, the side of which is equal to the diameter of the bottom. We connect them with glue dowels and compress them with clamps until dry. Then use a jigsaw for wood to cut out a circle;
We cut out a circle from a board panel.
- On both sides along the edge of the bottom we chamfer to a depth of 2.5 - 3 mm;
We remove the chamfer from the edge of the bottom.
- We cut the required number of boards (depending on the size of the vessel), clean and sand the cut area. At a distance of 3 - 4 cm from the edge on one side of each board we make a rectangular groove 4 mm deep and 1 cm wide;
The bottom will be inserted into the groove.
- We profile the ends of the boards for a round groove and a round tenon, as shown in the photograph;
- On the front side of each board we make two grooves into which a strip of steel hoops will fit. We cut the strip so that when it is wrapped around its ends almost touch, and then we bend it 2 cm from each end at 90˚ and make holes in these ears slightly larger than the diameter of the bolts;
We make clamps from steel strip.
- Place the boards on the bottom, gently tapping them with a mallet. We insert the last board from above and hammer it into the general row with a mallet. For convenience, the boards can be tied together with twine;
We assemble the walls from boards.
- We put on the hoops and tighten them first with an adjustable wrench and then with nuts. We make sure that the boards lie level.
We tighten the products with clamps.
Important! After assembly, the bucket must be lowered into water so that the wood swells and all the cracks close.
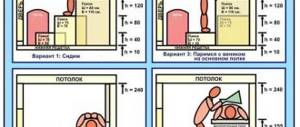
Requirements for installing a dousing bucket in a bathhouse
If the size of the dousing bucket can be chosen personally by the owner of the bathhouse (large and tall or small and wide), then its location must certainly meet special requirements.
In most cases, the upside-down bucket is installed in the washing room: water is supplied there and the drainage system is set up. Although the presence of running water is not at all a prerequisite for the functioning of the “Russian shower”. Water can be brought to the container using a flexible hose or simply poured manually while standing on a bench. Sometimes a dousing bucket is installed directly on the street near the bathhouse. This option allows you to collect and use healthy rainwater for good purposes. But it is worth remembering that drainage on the street is no less necessary than inside.
The most difficult stage of installing a bucket in a bathhouse is correctly determining the required height. For people of average height, the recommended height is 2 or 2.2 m. For tall owners, it is worth setting the mark at 2.6–2.8 m. In any case, a person should be placed under the dousing bucket with their arms extended to the top. Do not forget that the vessel will turn over. Therefore, it is worth adding the height of the bucket itself to the planned mark.
Calculation of the level for a person with average height will look something like this: 170 cm (height) + 40 cm (at arms length) + 40 cm (tank height) = 2.5 m.
Regardless of the choice of location for installing the bucket, the mount must be strong enough and durable. Keep in mind that the fasteners must be able to withstand at least 60 kg! In the traditional version, the container is secured to the wall using metal brackets (even better, stainless steel). To create a movable connection, special ears can be welded to the barrels of the container. And it’s even easier to install a stainless steel rod that passes right through the wooden boat.
Conclusion
If for one reason or another you need a bucket made of wood, you can make it yourself. To do this you will need some quality lumber, a set of tools and a video in this article.
Read also: Simple recipes for winter borscht in jars
Hello DIY lovers, this time we will look at how to make a bucket out of wood with your own hands. This homemade product will be useful for those who have a bathhouse or simply for those who like such things. Of course, in comparison with modern plastic or metal buckets, this wooden bucket is heavy and not durable, but how does it look! You can also ferment cucumbers, tomatoes, apples, and so on in such a bucket. The author used fairly modern tools for manufacturing, so the assembly process turned out to be quite simple. If the homemade product interests you, I suggest you study the project in more detail!
Materials and tools used by the author:
List of materials:
– boards; – iron plates for rims; – screws with nuts; – thick wire (for the handle); – wood glue.
Bucket making process:
Step one. Cutting materials
Let's start looking for the necessary materials, we will need boards of the same thickness, the author used different trims. To get all the boards of the same thickness, the author ran them through a surface planer.
Step three. Bucket assembly
To assemble the bucket, we need to do some calculations, and then cut the boards at the right angle into the desired shape. The point is that after assembling the bucket, all joints have minimal gaps, only this will ensure the seal of the bucket.
We make grooves in the blanks for the bottom, and now the bucket can be assembled. For this we need masking or other adhesive tape. We simply assemble the bucket first flat on the table, gluing the boards together with tape, and then lift it, roll it up and have a finished bucket.
At the end, all that remains is to glue the bottom, here we will need carpenter's or similar glue; to increase the strength and tightness of the connection, we add small sawdust to the glue. We tighten the bucket and let the glue dry.
Step four. Headbands
We make rims for the bucket; they will hold the boards and also compress them, eliminating gaps at the joints. Here we will need iron plates, and we will bend them by cold forging. We take a hammer and hit one edge of the plate; it immediately begins to twist due to uneven internal stresses. Thus, we get the rims of the required sizes, and weld the ends.
We carefully press the made rims onto the bucket, now we have it strong and airtight, and when water gets into it and the wood expands, the structure will become even more airtight and strong.
Features of using a dousing bucket in a bathhouse
The list of bath pleasures is incredibly wide. A place of honor among them is occupied by the process of cooling a hot body in a cold body of water, a snowdrift or under an invigorating dousing bucket. All these procedures not only provide physical pleasure and intense sensations, but also provide invaluable benefits to the body: they accelerate blood circulation, tone the skin, and cleanse it of toxins. In a word, they strengthen and rejuvenate the body.
It’s good if there are objects with cold water for immersion in or near your bathhouse. Otherwise, we recommend that you make a dousing bucket and enjoy all the delights of the original Russian bathhouse.
The shower bucket for a bath is a modernized, improved version of a wooden bucket, movably mounted on the wall of the washing room. This is a kind of container of significant size that instantly throws cold water onto the head of a visitor who pulls a cord or chain. Due to its functional purpose and similarity of shape, such a device has acquired several more popular names. For example, a waterfall bucket for a bath or an upside-down bucket.
On a note! For the first time, the primitive form of such a bucket was invented by ancient Russian bathhouse attendants. At that time, birch bark or a solid log was used for manufacturing, from which the middle was hollowed out. Only over time, coopers began to create them, using smoothly planed dies and metal rims.
Methods and devices for fishing a bucket
In former times, every village house had a special device for extracting a broken bucket from the depths of a well. It is called a “cat” and is a forged product of three or four hooks on a common base.
Metal "cat"
Why in every home:
- Because there were no water pumps and water was obtained exclusively in buckets.
- Because buckets often fell into the well, as they were tied with an ordinary rope, which quickly rotted from contact with water.
- Because the bucket was a valuable household item and there was simply nowhere to go and buy it for nothing.
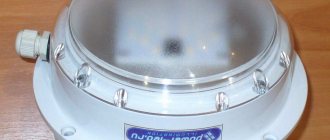
Today such a “cat” is a real rarity, but if necessary, it can be made from thick wire. Or simply drive 3-4 large nails into a wooden stake and bend them with a hook. The instructions for its use are simple: the hooks are tied to a rope or attached to a strong long pole and thrown into the well until they hook the sunken bucket. Sometimes in the process it is possible to fish out a lot more interesting things from the well. There is also a more modern and effective method using a powerful neodymium magnet. A small cylinder like the one in the photo, 2.5 cm thick and 4.5 cm in diameter, is capable of attracting and holding a metal object weighing 80 kg.
Neodymium magnet
Advice. The easiest way to “get” such a magnet is from an old computer hard drive. If you can’t pull out a full bucket with its help, you can at least find it and pull it to the surface of the water, and then hook it with a hook.
You can combine these two devices into one so that you don’t have to worry about searching for a bucket blindly for a long time. To do this, a magnet is tied to a “cat” and this cunning structure is lowered to the bottom of the well. The bucket is attracted to the magnet, after which all that remains is to carefully hook it and pull it out.
Attention! If the well is very deep and there is no magnet, some people risk descending into it using brackets embedded in the walls or on a rope in order to be closer to the surface of the water. This is a very dangerous matter, since gases can accumulate in the mine. Therefore, it is imperative to act with insurance, and there must be at least two assistants at the top who can lift a person to the surface. The price of the issue is his life.
DIY wooden bucket
In the old days, women and children fetched water. The ancient buckets had a weight that did not contradict modern standards permissible when lifting and carrying heavy objects, specified on the protection of women's labor. For children who were taught to work from an early age, small wooden buckets and rockers were made. The two buckets that the woman carried on a yoke weighed no more than 20 kg. Usually, coopers made custom-made buckets so that they could be carried easily without straining themselves.
A wooden bucket was first mentioned in chronicles of the 12th century. In Russia, before the introduction of the metric system, a bucket, which had a capacity of about 12 liters, was a common measure of liquid. The bucket was used to determine the volume of a standard barrel. It included 40 buckets of liquid (490 liters).
The durability of a wooden bucket largely depends on the choice of wood. Oak wood is considered the best. However, buckets are also made from pine, spruce, cedar, linden, alder, and aspen. The wood of these trees is strong, light and easy to process. The bucket should be light, this is its main advantage. Therefore, the rivets are made thinner, but not at the expense of strength.
A wooden bucket is made in the same way as a Badiou. When making and selecting rivets, the distance between the centers of the ears was equal to 1/2 of the perimeter. If these conditions are taken into account in the assembled bucket, then the ears will be exactly opposite each other. The longer the bucket's ears, the less danger of them being split by the pressure of the arms. To prevent the wire bow from cutting your hand, a wooden handle is put on it, which is carved from birch, beech or oak. A through hole with a diameter of 8 mm is drilled in the turned handle. If there is no lathe, the handle is cut from a round trunk of maple, bird cherry, rowan, elderberry or willow. The wood in the elderberry trunk is loose, so it is easy to drill a hole in it with wire with a flattened end.
The bucket handle is made of steel wire 7 mm thick. You can use a handle from an old bucket, remove rust from it with sandpaper, wipe it with drying oil or linseed oil and burn it over a fire until it turns dark brown. A thin film of drying oil will protect the shackle from rust for a long time. The shape and design of the arms depends on how the buckets are intended to be used. If they are hung on the hook of a rocker arm, column or well chain, then in the middle of the bow you need to make a small bend that will prevent the bow from sliding off the hook.
Previously, people used to fetch water with a rocker. In winter, it is difficult to walk along a narrow, deep path without a rocker, as the buckets will touch the snowdrifts. In the summer, dust, plant seeds, midges, etc. get into buckets that are carried in the hands. In addition, carrying buckets on a rocker is much easier and the gait becomes straight and easy.
Rocker arms can be bent, cut-out or stick-shaped. Stick-shaped sticks are a straight round stick with small hooks at the ends. This rocker is not the most comfortable, as the stick puts pressure on your shoulders. If you attach hooks to it, it will become more convenient, since it will be possible to hold the buckets with your hands. Later, instead of a stick, they began to use a rocker cut from a wide and durable board. It tapers towards the edges, and in the middle there is a special cutout for the neck. Wooden or iron hooks were attached to the ends of the beam, from which buckets were hung.
But in houses where people often go to fetch water, they usually use bent rocker arms. The length of such rocker arms is 1100, 1250 and 1350 mm. The rocker is selected taking into account height. The rocker should be light, comfortable and beautiful. The wood for its manufacture is chosen to be durable, flexible, homogeneous, and light. These requirements are met by willow, aspen and linden wood.
There are different ways to make a bent rocker arm. To make a rocker, a tree trunk ridge is first split into two or four parts, from which rectangular blanks are hewn out. Then the workpiece is trimmed in the middle to a certain thickness and soaked and steamed before bending. If it is steamed over a fire, it is heated over the flame; if it is bent, it is buried in the ground at the site of the future fire. After a certain time, when the fire has died down, the coals are raked, the blanks enveloped in steam are taken out of the ground and inserted into the bending device. You can steam the workpiece with a blowtorch.
First, the workpiece is soaked in water, and then in the middle it is heated with a blowtorch until steam appears. To prevent the workpiece from getting burned, the flame must be kept at the optimal distance. The heated workpiece is inserted into the bending device.
The bending device is a massive shield with beams stuffed on it. A beam, one of the edges of which corresponds to the bend of the rocker arm, is called a template, and one with a straight edge is called a stop. The workpiece is inserted into this device and two wide wedges or several narrow ones are driven in between it and the stop on both sides. When wedging, the workpiece is bent and pressed tightly against the template beam. In a bending device, which should be in a warm room, the workpiece is dried.
After a few days, the workpiece dries and the above-furnace part of the rocker takes on an arched shape. The ends of the blanks are cut off on both sides so that the resulting layers go at right angles to the curved shoulder part. Then, at each end of the beam, hooks are cut on top for hanging buckets or they are made into metal strips that are screwed to the wood.
During final processing, the rocker is sanded with sandpaper or scrapers, then impregnated with hot drying oil, painted with oil paints or decorated with carvings.
mirzam.ru
How to make a wooden bucket
You will need
- Planks made of oak, aspen or linden about 10 mm thick, about 40 cm high, a blank for the bottom with a diameter of 25 cm and a thickness of 20 mm, carpentry tools, two metal hoops.
Instructions
Carefully grind the end of the bottom workpiece in a circle to a depth of 10 mm. In the boards on the side where they will be attached to the bottom, make recesses 12 mm wide and 4 mm deep. The bottom of the future bucket will be installed in these recesses.
Process the longitudinal edges of the workpieces with a plane at an angle sufficient to tightly connect the boards to each other in a circle with the diameter of the bottom. Fit the planks tightly together and number them. To fix the boards around the bottom, use a metal hoop strip about 50 mm wide. The second hoop will pull the planks together at a distance of 10 cm from the top edge of the bucket.
Place the prepared planks around the bottom and tie with twine. Make sure that the bottom fits into the grooves. Measure the circumference of the future bucket at the bottom and at the top, cut metal strips a little longer for the rivet. Place the hoop riveted to the required size on the bottom and gradually lower it until it sits, pressing the planks very tightly against each other. Put on the upper hoop of a larger diameter and push it down, squeezing the planks on top of the bucket.
For the handle of the bucket, you can use thick twine or rope, drilling holes sufficient for this in the top of the boards located opposite each other. Thread the rope through these holes and tie. You can use wire for the handle, but since all metal objects get very hot in the bathhouse, drill a hole for the wire in a wooden cylinder and insert the wire into an improvised wooden handle.
Pour water into a wooden bucket - it flows through the cracks! This is natural - the wood needs to absorb moisture in order to swell; when this happens, the cracks will disappear on their own and the bucket will be ready for use in the bathhouse. In the same way, you can make wooden ladles, mugs and troughs. You have made a wooden bucket, now it’s time for the bath itself and light steam!
Sources:
- Wooden bucket - equipment for a bath
www.kakprosto.ru
Bath bucket with plastic liner
You can make a doused bucket in the most primitive way, accessible even to people who have not previously had anything to do with wood.
To do this, it is not necessary to become familiar with the basics of cooperage and learn to use special tools. A couple of simple steps will help you quickly make a wooden container that costs a lot of money on the market:
- To begin, select an ordinary plastic bucket of the most successful color. For example, white or azure blue. Water in such a container will look very advantageous.
- Next, remove the handle and any other parts present from the bucket. You don't need them at all. Don’t rush to throw them away; perhaps they will come in handy in the future.
- Prepare 25–30 not too wide sanded wooden planks. Their exact quantity depends directly on the size of the plastic bucket.
- Using super-resistant glue, attach the strips to the outer walls of the plastic container, imitating a wooden bucket. Coat the joints with transparent silicone.
- Cover the “wooden” container with a suitable varnish and strengthen it even more firmly with metal rings.
The wooden dousing bucket with a plastic liner is ready. Externally it is difficult to distinguish it from natural, but internally it meets all the requirements.
How to make a wooden bucket with your own hands
How to make a wooden bucket with your own hands in the form of a small cylinder, we will consider in this article.
The figure shows a sectional view of the bucket design:
1. Stacked bottom.
2. Typesetting board.3. Metal hoop.4. Eyelet for attaching the handle.5. Pen.
SET BOTTOM
It is assembled using glue from boards and slats. Boards measuring 20 x 45 x 225 (mm), in which we mill grooves measuring 5 x 7.5 (mm) in the center of the side surfaces. Planks measuring 5 x 15 x 225 (mm). Squeeze the assembled shield with clamps and wait until the glue dries completely. Cut a circle from the assembled shield with a jigsaw. The end of the bottom is ground around the circumference to size 10 (mm), as shown in the drawing.
LAYING BOARD
Let's make it from a wooden plank with a cross-section size of 20 x 45 (mm), grind the side edges at an angle of 10° with an inclination to the center of the bucket. We end all the planks at the same size 350 (mm) and mill a groove from the bottom 4 (mm) deep and 12 (mm) wide. We will make chamfers at the sharp corners of the end faces. Reference: The number of planks, in the example under consideration, is 18 pieces. Let us calculate the angle of inclination of the side faces: 360 / 18 / 2 = 10°
The angle is an integer; there will be no problems with setting up the processing equipment.
METAL HOOP
We will make it from hot-rolled tool strip 3 x 30 GOST 4405-75. Drill holes for M5 threads along the edges of the strip. Screw the corners and insert the tightening screw as shown in the figure.
Using a nut, compress the edges of the strip to the required size and weld them. Unscrew the screws and remove the device. Finish the seam and smooth it with an abrasive wheel. Help: Before welding, we prepare a one-sided joint with beveled edges, the following dimensions:• joint width 2 (mm)• joint depth 1 (mm)
• joint edge angle 60°.
HANDLE EYE
We will make it in the form of a loop from highly alloyed corrosion-resistant wire Ø 5 (mm) GOST 18143-72.
PEN
We will make it from the same wire as the ear.
Assembly procedure, or how to make a wooden bucket with your own hands:
1. Gather all the planks around the bottom so that the bottom fits into the grooves of the planks.
2. Compress the assembled structure with twine.3. Let's compress and weld the hoops.4. We will weld ears to the upper hoop for attaching the handle.5. Insert a pen into the ears.
6. Let's lower the product into the water.
After some time, the wooden boards will swell and all the cracks will disappear.
Order a drawing
Share with your friends!
kak-cdelat.ru