In modern interiors, the use of natural materials is actively developing. A ceiling made of boards allows you not only to perfectly stylize the room in a retro style, but also fills the concrete housing with the coziness of a warm wooden house. There are different ways to install such a ceiling, in which both processed lumber and unedged boards can be used. How to hem the ceiling with a board will be discussed below.
How are these boards made?
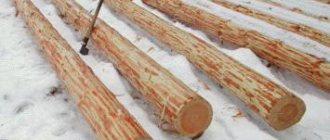
The process of their manufacture is very simple: the log is sawn into blanks about 25 millimeters thick. After this, the edges with bark are either manually processed with a special tool or left in their natural form. To finish the ceiling you need a board with a layer of bark removed. When this operation is completed, the parts are sent to a stack to dry.
After the drying process is completed, the blanks are sent to the woodworking shop, where they are processed on a planer and sanded. Now the material is ready for use and can become part of your interior. The cost of unedged lumber may depend on the type of wood used to make it. Coniferous wood will cost less, and deciduous wood will cost more, but deciduous wood is usually stronger.
Choosing the type of wood for sauna cladding
Each type of wood has its own shade, texture and healing effects. Deciduous and coniferous trees are used to produce boards. It is recommended to decorate the steam room with hardwood, and the recreation rooms with coniferous wood.
Deciduous wood for a bath
The following hardwood species are used to cover the bathhouse:
- Linden
. Finishing the bathhouse with linden boards is the most popular option. This wood is easy to install and retains its beautiful color in high humidity conditions. You can touch linden even at high temperatures without the risk of getting burned. In addition, it smells pleasant and has healing properties.
Alder
. This breed is characterized by the presence of tannins, which provide clean air in the room and protect it from mold and bacteria. At high temperatures, alder releases substances that have a positive effect on the heart and vascular system, and also have an anti-inflammatory effect.
Oak
. Contains tannins, like the previous type of wood. It is very durable and flexible. When heated, it releases beneficial substances that help eliminate fungi and unpleasant odors. But oak has one drawback - its surface is difficult to sand to the required smooth state, since its wood is slightly rough.
Ash
. Ash wood is flexible and not very dense. However, it does not crack and has the best healing properties. In addition, ash is one of the most beautiful wood species. In various photos of finishing a bathhouse with ash boards, you can see that this wood is very light, clean and festive.
. This type of wood has low thermal conductivity, which prevents burns at high temperatures. It does not crack or dry out. Also, aspen has a pleasant color and is easy to process. The only drawback is the rapid loss of natural color.
Coniferous wood for baths
You can sheathe a bathhouse using the following coniferous wood:
Larch
. It is very durable and has low thermal conductivity, which is important for a bath. It releases a subtle and soothing aroma even at low temperatures. Larch has a beautiful color, but, like oak, it is quite difficult to process.
Spruce
. Endowed with a pleasant color and smell. Spruce wood is very soft and easy to work with. Spruce boards are recommended to be installed in rooms not intended for high temperatures. This is due to the release of a large amount of resin.
Cedar
. Perfect for finishing a shower stall or rest room. It has a unique color, specific aroma, and also has antiseptic properties. Cedar releases resins and essential oils that promote calm and relaxation. This type of wood is the most expensive.
. This wood is the most popular material for finishing a rest room. It is highly undesirable to install it in a steam room. It also has a pleasant shade and produces volatile substances that eliminate germs around.
Where to use
Of course, the best place to use such a structure as a ceiling made of unedged boards is in a wooden house. It is these buildings that will best be combined with such an unusual finish. In addition, wooden buildings are environmentally friendly and this type of floor finishing will complement the picture very well.
This material can also be used to decorate buildings made of other materials. At the same time, it is not necessary to cover the entire surface of the ceiling with similar boards - you can highlight part of the surface, giving it a special look. Using stains and varnishes, you can highlight the structure of the wood or simply paint the surface, which provides many opportunities for shaping the overall design of the room.
Don’t forget about those areas that are located outside the residential area of the house - terraces, gazebos and various outbuildings. Such decoration is quite appropriate there, and in some cases, it will give these places a unique flavor.
Features of finishing of bath rooms
A classic Russian bathhouse necessarily contains such rooms as:
- steam room;
- washing;
- vestibule (locker room).
If the area allows, modern buildings will be equipped with a separate recreation room, a billiard room, a swimming pool, a veranda, a barbecue area and even a full kitchen.
https://www.youtube.com/watch?v=ytpress
Despite fashion trends, the basic requirements for a bath remain unchanged:
- the steam room requires persistent hot steam,
- in the washing room there are non-slip floors and the possibility of convenient bathing procedures,
- In general, the premises have a comfortable microclimate and an aesthetically pleasing environment.
The functionality of bath rooms largely depends on the correct finishing. Even if your structure is built from rounded logs, and the walls from the inside look beautiful and aesthetically pleasing, it is recommended to carry out interior finishing of the bathhouse, as this will significantly extend its service life.
Finishing a steam room as a necessity
Each room has a number of features that must be taken into account when choosing materials and cladding methods.
The space provided by the bathhouse, measuring 4x5 m, is enough for a completely comfortable holiday for a family or a small group of 3-4 people.
In accordance with current regulatory requirements, each visitor to the steam room should have at least 1-1.2 m2 of free space if the person steams while in a sitting position. If the bath lover lies down or prefers to take some other possible position, the requirements for the dimensions of the steam room will change accordingly.
Steam room visitors
These points must be taken into account when designing a bathhouse in general and shelves in a steam room in particular. Information regarding possible body positions in the bath and recommendations for shelf sizes for each of them are shown in the following image.
Recommended shelf sizes for different body positions
Arrangement of shelves in the steam room
Regarding the area of the washing room, the recommendations are similar - at least 1-1.2 m2 for each visitor. In order to save space, the sink, as a rule, is made of relatively small sizes so that there is enough space for 1-2 visitors who come here at the same time.
A modern compact shower cabin will allow you to effectively solve the problem of distributing free space in the washroom. In general, the dimensions of the washing room can increase depending on its operating conditions. For example, if the owner decides to install a boiler here to heat water or even a washing machine (relevant when arranging a bath house), the size of the room will have to be increased accordingly.
Shower options
The recommended height of the steam room is about 210 cm, the washing room is 220-230 cm. When designing a steam room, you should adhere to the rule that there should be at least 110 cm of free space between the ceiling and the top shelf
For other types of sauna stoves, the requirements are determined by the individual characteristics of the units used.
Calculation of the minimum required parameters
Recommended steam room dimensions
To prevent water from splashing from one room to another, door thresholds are installed approximately 200-300 mm above the floor. The requirement is also relevant for the main entrance door; if the bathhouse is not equipped with a porch/terrace/veranda, then the high threshold will not allow melt water to penetrate inside the room in the spring, and will make the process of clearing snow more convenient.
For reasons of ease of use, it is better to orient the front door to the south - in winter you will have to remove less snow. Regarding the orientation of windows, everything depends on the characteristics of the individual user. For example, if the owner likes to go to the bathhouse in the morning, it is more advisable to place the windows to the east, if in the afternoon - to the west. If the bathhouse will be used after sunset, the location of the windows is not important.
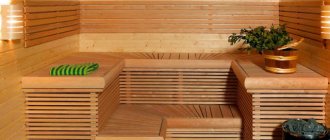
The steam room is the heart of the sauna. It should be light and cozy
A washing room in a bathhouse is a room whose walls are constantly exposed to splashes or even jets of water, which means you need to take care in choosing a material taking this nuance into account. If we are talking about wood, then larch or linden is used - these varieties are best suited for such operating conditions. However, the best option would be to finish the floor and walls with tiles.
Such rooms are designed to allow you to take a break from the hot steam. The temperature in them is maintained cool, which is facilitated by the good thermal insulation of the steam room and the location between it and the dressing room of the washing room.
Decorating a relaxation room involves the use of various materials - strict requirements, as in the decoration of a steam room or washing room, are not imposed on them, but the aesthetic appearance is even more important here. Darker tones are used. The ideal wood for finishing a dressing room would be bog oak.
https://www.youtube.com/watch?v=upload
Looking at these photos of the interior design of bathhouses with rest rooms, it’s hard to believe that the finishing was done by craftsmen without any experience or education as a designer, but this is a fact.
The locker room is the driest room, which means there are no high demands on finishing materials. It is even possible to use pine or spruce - after all, the microclimate here will be similar to a living space.
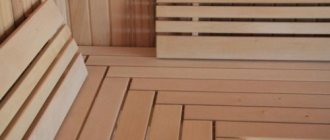
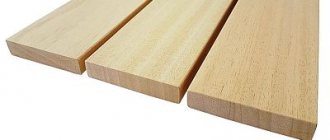
Boards can be edged or unedged:
- Edged board. This wood is made from logs, the bark is cleared from the sides and carefully sanded. In most cases, its width is twice the thickness. Edged boards are used in almost all types of construction - to create finishing, frames, roofing and other building structures.
- Unedged board. It is a sawn tree with bark on the sides. The surface is uneven and has jagged edges. The edges can be partially sawn off or not sawed off at all. Most often, such wood is used for external types of work, where the appearance of the lumber is not important. But it can also be used for the interior lining of a bathhouse - in this case, before installation, you will have to process the wood yourself.
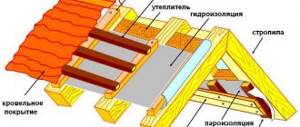
The cladding process consists of several steps and does not take much time. First, it is necessary to carry out preparatory work, then install a wooden frame, lay insulating materials, and then install finishing boards. Finally, the surface of the boards is coated with a protective varnish.
Carefully inspect the surface of the walls. If you find large differences (more than 2 mm per 1 m), you will have to level it with putty or plaster. Then treat the walls and ceiling with a special antibacterial agent.
Next comes the stage of laying communications - electrics, water supply and everything that needs to be hidden behind the board panels. Only after this work has been completed can you begin to purchase boards, fasteners, wooden blocks, metal hangers, as well as steam and heat insulation materials. Take all metal parts from galvanized iron, otherwise rust and stains will appear on the walls over time.
After purchasing the boards, bring them inside the bathhouse and leave them there for two days - they should get used to the climate of the room. If you purchased unedged boards, you will have to work with them a little before covering. Finishing a bathhouse with an unedged board requires preliminary cleaning of the bark, which can be done using an electric planer, and requires high-quality sanding of the material. Use 80 grit sandpaper first, then 120 grit.
To construct the sheathing, use wooden blocks. Before installation, treat them with antibacterial agent. Select the section individually, based on the thickness of the insulation. Cut the bars into lengths of 100 cm and 50 cm.
Place metal hangers in rows at intervals of 30-40 cm. Pay attention to the distance between the rows - it should be 40-50 cm. Mark places on the walls for mounting metal hangers. Drill holes, drive in dowels and secure the hangers.
We invite you to familiarize yourself with the benefits and harms of baths for the health of women and men, how to steam properly
Attach frame bars to the hangers. Start the first row with a long bar, the second with a short one. The sheathing must be level and in the same plane, so check each row with a vertical level. If you find large differences, place a spacer under the bars.
Attach the bars of the same row not too far from each other. This will allow air to circulate between the rows. Around windows and doors, secure the bars vertically along the perimeter of the slopes at a distance of 30 mm from the edge.
Before covering the bathhouse with boards, heat and vapor barriers should be installed. Lay thermal insulation material between the rows of the frame. Mineral wool is often used for these purposes, but it does not tolerate high humidity conditions quite well. Foam glass is ideal - this material is not afraid of moisture, insulates the room well and creates good sound insulation.
How to do
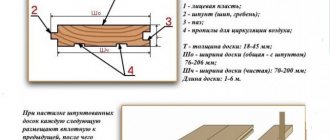
The peculiarity of blanks made from unedged lumber is that their edges have uneven outlines. Therefore, it will not be possible to fit adjacent parts tightly together. There will always be a small gap between them. To prevent all components of the floor or the base plane to which the coating is attached from being visible through it, the parts are attached in two layers. They are laid in a checkerboard pattern and the gaps formed when laying the first layer are closed with parts of the second.
The covering components can be attached directly to the floor beams or to a pre-assembled sheathing. This option is used when the surface to which everything is to be attached is uneven or for other reasons it is impossible to fix the boards directly on it. Fixation is carried out with galvanized nails or self-tapping screws.
Insulation of flat ceilings
Due to the fact that most attic rooms of bathhouses with flat ceilings are not planned to be used, the insulation process is somewhat simplified: the insulation layer is not covered by floor coverings. The following materials can be used for insulation:
- rolled or pressed mineral wool.
Minvata. Rolls and slabs
An excellent insulator, in all respects it fully meets existing requirements. It is sold in thicknesses of 50 mm and 100 mm; for effective thermal protection of bath rooms, it is necessary to insulate with a layer of at least 100 mm. Specific values are selected taking into account the climatic zone of the building’s location;
- polystyrene foam and its “relatives”.
Styrofoam
The price is much cheaper than mineral wool, and its thermal conductivity is almost equal to it. The main disadvantage is the release of harmful chemical compounds into the air. In the case of insulation of exposed ceilings, this drawback does not play a role; harmful compounds rise to the roof with currents of warm air and are discharged outside. But polystyrene foam has another unpleasant problem - it is damaged by rodents, and the likelihood of rodents appearing in the bathhouse is very high;
Rodents love foam
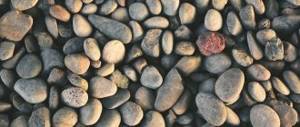
- bulk insulation - expanded clay, foam chips, etc. They have the lowest prices, but also the lowest heat-saving characteristics. They are rarely used in their pure form; construction technologies recommend using them as components of complex insulation pies for various surfaces.
Foam chips
For all insulation, protective vapor barriers must be used; warm steam should not disappear into the insulation. As a vapor barrier, you can use both modern expensive coatings and cheap polyethylene film.
Vapor barrier "Standard"
The insulation on laid ceilings is not closed, which allows it to dry out relatively quickly even in the event of condensation.
Insulation of a floor ceiling with mineral wool
Prices for mineral wool
mineral wool
What to consider
Assembling a ceiling from an unedged board is very simple and this type of finishing does not require a detailed analysis of each of the stages. However, some features of such materials should be taken into account and the most important of them will be the following:
- The boards have a certain percentage of humidity and even after drying they can become slightly deformed. Unlike ordinary boards, unedged boards are laid loosely and this nuance cannot damage the appearance of the structure. However, it is worth taking into account.
- Before use, all wood parts must be treated with impregnations that prevent mold, rot and increase the wood’s resistance to fire.
- When applying stains or tinted varnishes, darker areas may appear on the surface of the material, in which the wood is less dense and the composition is absorbed better. This will allow the wood structure to “reveal” during finishing.
- Before finishing, it is worth assessing the smoothness of the workpiece - if there are splinters or other defects on it, it is better to subject the workpiece to additional grinding. It is especially important to carry out this treatment before applying paint or varnish - the lights will instantly reveal all the imperfections.
Otherwise, this material will not present you with any unpleasant surprises. It is only important to think in advance what the interior will look like with such floor finishing, and if you are satisfied with everything, you can safely begin work.
How to decorate the ceiling in a wooden house - review of materials
1). If the ceiling boards are heavy or very long, you can install one or two more supports.
Remove the rope and press the ceiling board against the wall or previously laid boards. If the board is pressed against the previous ones it is not very raft
Rice. 1. Devices for filing the ceiling:
1 - bracket; 2 - beam; 3 - ceiling board; 4 — block-lining; 5 - wedge; 6 — spacer board; 7 - rope
Fig.2. Modified vayma:
1 - bracket; 2 — fixed stop of the clamp; 3 - board; 4 — block-lining; 5 - wedge
However, in this place you can install additional support and try again to support the board. As a rule, this is enough.
By rearranging the supports, similarly fasten the ceiling board to each beam. If the boards are thick (more than 2.5 cm) and wide, it is better to tighten them using
mounting U-shaped bracket. The internal height H of the bracket is determined by the ratio H - 1.5h + 30 mm (where h is the height of the ceiling beam). Install bracket 1 on beam 2 close to the board being pressed, the sharp edges of the bracket are slightly recessed into the beam with light blows of a hammer, into the gap between the bracket and
Using board 3, insert block 4 and wedge 5. By tamping the wedge, the required degree of pressing of the board is achieved.
Such a bracket can be installed only on one side of the beam, and in order to install the bracket on the other side, the cuts at its ends must be made in a mirror image. By the way, these staples are also convenient to use when laying floors, especially near walls. Finally, the same brackets can be used to replace the movable stop in the vima - a device for assembling wooden panels using glue. In Fig. Figure 2 shows a diagram of joining a shield from boards using such a clamp.
E. KOSMACHEV