Advantages and disadvantages of using penoplex
According to its characteristics, this material belongs to the optimal insulation options:
- low thermal conductivity;
- high moisture resistance;
- strength, flexibility;
- does not rot, is resistant to the spread of mold and mildew;
- can be used at temperatures from -50 to +70Сº;
- does not burn;
- It is lightweight, does not overload the supporting structure, simplifies storage and transportation;
- easy installation, cut with a construction knife;
- service life reaches 50 years;
- low price makes it possible to inexpensively insulate a building.
The disadvantages of penoplex include the following features:
- melts in a fire, releasing toxic smoke;
- insulated surfaces do not breathe due to low vapor permeability;
- the material may be favored by rodents;
- destroyed by exposure to ultraviolet radiation;
- reliable fastening of the penoplex is ensured by dowels.
Polyurethane foam: an exceptional case
The method of attaching penoplex to polyurethane foam also has a right to life. The foam is applied using a spray foam gun around the perimeter and center. To attach the insulation, it is necessary to hold it for a long time until stable adhesion occurs.
Fastening insulation with polyurethane foam is extremely limited due to the expansion of the foam and its destruction over time or under load. It is not recommended to use this installation option for external insulation.
Fastening methods
Surfaces made of different materials can be insulated in different ways. The process of covering a building includes several steps:
- surface preparation;
- insulation fastening;
- finishing.
In order to perform high-quality thermal insulation, penoplex should be installed correctly. First, the starting bar is screwed strictly horizontally. The bottom row of insulation is laid on it.
It is recommended to install a factory additional element (perforated, metal). You need to buy a strip that matches the width of the insulation and the required number of corners.
Before installing penoplex, a horizontal level is drawn along the walls of the building. The starting bar is screwed to the line. It holds the insulation and maintains the “geometry” of the installation.
Features of internal fastening
Experts pay attention to the following factors:
- internal insulation with foam boards is carried out only if there is no opportunity to do work from the inside;
- Insulation can be done in a house only after final shrinkage, as practice shows - after a year.
- the thickness of the penoplex should not exceed 30 mm, and its density should be as low as possible to avoid the formation of condensation on the wall;
- It is necessary to attach a foil film to the insulation to prevent the appearance of dampness and deterioration of the microclimate. The algorithm of actions generally remains the same as for the exterior decoration of a house, taking into account the stated factors.
Take note: interior work on insulating wooden walls can be carried out regardless of the season, but it is recommended to carry out finishing work mainly in spring or summer. It should be noted that the living area of the premises will be reduced by the width of the insulation.
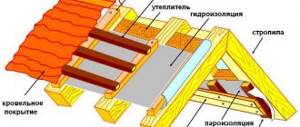
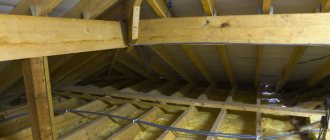
Ceiling insulation with penoplex:
Features of fastening to different types of walls
There are buildings made from various building materials (wood, brick, concrete, gas blocks). For different surfaces, taking into account operating conditions, the methods of attaching thermal insulation differ.
The combined method of attaching the heat insulator is especially common. In this case, bitumen (or adhesive) compounds are used together with umbrella dowels. The result is a sealed layer of heat insulation with an increased insulation coefficient. After installation, the surface is reinforced with mesh and decorative finishing is performed.
Brick
Often rough masonry has strong unevenness on the surface. It is recommended to attach insulation to such a base using combined methods. Before installation, the wall must be primed.
Advice! It is recommended to attach penoplex to a brick base with glue, with additional fixation with umbrella dowels.
Insulation of a brick wall.
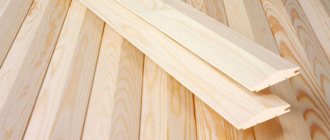
Wooden
Wooden surfaces are treated with anti-rotting impregnations. Next, a frame is constructed from bars, which will ensure ventilation of the facade (the wood will “breathe”). Free air flow will protect the wood from rotting (a ventilation gap is created). Thermal insulation slabs are installed on the sheathing. Penoplex must be secured with special nails or self-tapping screws.
Insulation of wooden walls.
Block
Walls made of aerated blocks must be insulated and decorated with decor (without protection they become damp). Before installing the heat insulator, the walls must be primed. An uneven surface can be leveled with a drill and protruding areas can be trimmed off. If wall panels are chosen as the final finishing, then the penoplex is mounted on the sheathing. The insulation is attached with glue (fixed with dowels) if decoration and painting are planned.
Insulation of block walls.
Features of insulation of wooden surfaces
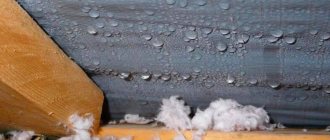
It is known from the school curriculum that wood has the ability to “breathe”, and in conditions of air insulation, after some time the process of rotting will begin. If you provide wood with air flow, the quality characteristics of the wood will remain for decades.
Please note: insulation of wooden walls of a house, including penoplex, requires compliance with the rules of a ventilated facade.
This means that there must be an air space, or ventilation gap, between the wall of the house and the insulation. If you do not follow this rule, then over time, moisture condensation will lead to rotting of the wood and insulation.
How to attach penoplex to the wall
Before you start attaching the penoplex to the wall, you need to draw a diagram with the exact location of the insulation sheets and indicate the dimensions, as well as make markings. This helps to calculate the required number of sheets, fasteners, and glue.
Video:
Inside
Indoor insulation work with penoplex is carried out sequentially:
Insulation inside.
- preparing the wall surface (removing old finishes, priming, sealing cracks);
- fastening of the slabs is carried out in rows (placed with a shift along the perimeter) or in a pyramid (the first row is around the perimeter, then the corners are laid out);
- glue protruding from the seams is removed with a spatula;
- The mounting mesh is laid on the surface of the heat insulator, and finishing work is carried out.
Video:
Methods for fixing penoplex
The choice of a suitable method for installing insulation is determined by the quality and type of surface, as well as the level of load created by the material.
Attaching penoplex to the wall is done:
- With mastics.
- Dry mixtures.
- Glue.
- Dowels.
- Liquid nails.
- Self-tapping screws.
- Polyurethane foam.
Regardless of the chosen method, installation of insulation is carried out from the bottom up.
Polymer and bitumen mastics
Mastics are widely used for thermal insulation of plinths, foundations, external walls and balcony screens. They provide simple and safe installation on walls in the presence of unfavorable external factors.
Mastics are special viscous mixtures in tubes, ready for use. The tubes are installed in a construction gun, after which the mastic is evenly applied to the prepared insulation. Next, the material is mounted and pressed to the surface for a minute.
Modern mastics contain a small amount of petroleum products, so all installation work is carried out in compliance with safety rules and in well-ventilated areas.
Dry mixes
Laying penoplex using dry cement-based mixtures is the most affordable option. Most often it is used to fix insulation to a concrete wall. The dry mixture is diluted according to the instructions to obtain a viscous solution. To simplify mixing, use a special attachment for an electric drill.
The finished solution is applied to the surface of the insulation with a notched trowel to uniformly fill the existing grooves. Next, the insulation is installed in the same way as the previous method.
Adhesive compositions
Penoplex can be glued together using special adhesives presented in the form of foam. Glue is used in the same way as polyurethane foam. The high adhesion of the material allows you to fix penoplex on smooth concrete and stone surfaces.
The composition is applied around the perimeter of the insulation with a construction gun for sealant or polyurethane foam. Next, it is pressed against the surface to be treated for 40 seconds. It will take at least half an hour for the material to fully set.
After two hours, work on finishing the surfaces is carried out.
Disc-shaped dowels
A fastening element with a wide head, which is used for large areas of thermal insulation and for uneven surfaces, such as a brick wall.
For work, plastic or metal fastening mushrooms can be used that can withstand heavy finishing materials and are resistant to damage.
Disc-shaped dowels are attached as follows: using a hammer drill, holes up to 6 cm deep are made, which are filled with foam. Next, the dowel is inserted so that the cap does not rise above the surface of the insulation. Up to 5 dowels are used per sheet of insulation. Adjacent sheets are connected to each other by a single dowel, which is inserted into the connecting seam.
Liquid Nails
You can glue the insulation onto a leveled and primed base using liquid nails. The adhesive composition is applied with a gun in the center and along the perimeter of the foam board. Fixation is carried out by quickly pressing the material to the surface to be treated.
Liquid nails are a universal, expensive composition that is suitable for wooden and metal surfaces. Due to the high cost of the material, such insulation technology is suitable for small areas.
Self-tapping screws
The simplest and cheapest option for thermal insulation of surfaces is using self-tapping screws and a screwdriver. Suitable for fixing penoplex to a wooden wall on a pre-installed sheathing.
Despite its simplicity and accessibility, this method of installing insulation has significant disadvantages. Unlike dowels, self-tapping screws have small heads, so their consumption is greater - up to 8 pieces per slab. Accordingly, this causes the appearance of cold bridges and a decrease in the thermal insulation characteristics of the surface.
Polyurethane foam
The method of fixing the insulation using polyurethane foam is of an auxiliary nature if the main fastening is done with dowels or self-tapping screws. In this case, the surface is glued with foam to increase the adhesion of the material to the surface. This method is used for cladding surfaces made of plastic and gypsum.
The foam is applied with a gun along the center and perimeter of the foam sheet. Next, the insulation is applied to the surface and held for some time to quickly set.