Types of floor repairs
In general, wood floor repairs can be classified into minor, medium and major repairs. Filling cracks in a wooden floor is a minor repair.
There are also the following types:
- Coverage update. Conducted every 2-5 years. It all depends on how worn it is and the condition of the boards underneath it. Renewal is carried out partially - in places of severe abrasion, or during planned procedures.
- Simple repair. It is necessary when the floor creaks or serious gaps form between the boards.
- Major repairs - carried out in cases of rotting of the floor or during the restoration of the entire apartment.
- Complete replacement of outdated flooring. Performed during larger renovations. The finish is being replaced with a new one.
Solid boards that are regularly maintained and made from quality wood (no knots, well-dried) can last more than 150 years. In the case of other topcoats, repairs may be required after several seasons.
Methods for restoring flooring
There are three ways to eliminate gaps and cracks in natural wood floors.
Complete replacement of covering and inspection of floorboards
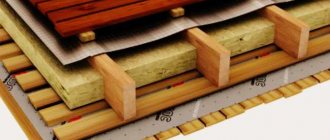
Global restoration work is carried out in case of serious deformations and damage to the sheathing on which the boards are installed.
The procedure is performed using a metal crowbar and a hammer equipped with a nail puller. This method is effective if eliminating cracks in the floor is impossible due to the large area of damage.
The work is carried out in the following order:
- Damaged coating elements are dismantled and new ones are purchased to replace them.
- Floorboards are carefully inspected for defects, and entire elements can be reinstalled. If necessary, their surface is cleaned and leveled.
- After completing the preparatory work, the final laying of the boards is carried out with reliable fixation on the support beams.
Partial coating replacement
Partial repairs are carried out if it is necessary to remove wide and deep defects in small areas of the floor covering, as well as when floorboards creak.
The wooden flooring is carefully dismantled and replaced with new elements.
Often the second method of restoring a wooden floor is carried out together with the third.
Elimination of minor defects in flooring
Sealing cracks in a wooden floor involves redecorating the base using simple and accessible techniques.
The choice of a suitable method for eliminating defects is determined by their size and area of distribution on the wooden surface.
Gaps and other defects in wooden flooring can occur in different areas, which determines the technology for eliminating them and the choice of the most suitable materials.
Methods for sealing cracks
Before sealing cracks, you need to find their source. The main reasons for the formation of gaps between boards:
- Drying of wood. For the floor, it is better to purchase boards processed by vacuum drying. Repair of cracks in this case is carried out by re-laying the coating. In a new house, this should be done every year for 3 years.
- Small rodents. It is useless to eliminate cracks caused by the active activity of mice until the very reason for their formation is eliminated. You can get a cat, set mousetraps, scatter dry peppermint in the underground. Sealing cracks with a solution of cement and broken glass works well.
- Builder mistakes. If the boards “walk” as a result of improper installation, they must be nailed to the joists at an angle. Then you can use putty.
- In case of poor ventilation. The boards rot, turning into dust. Only a complete re-flooring of the flooring will help here.
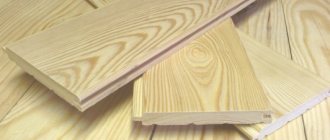
- Incorrect type of wood for floorboards. The most quickly deformed floors are made of ash, maple, beech and cherry. Softwood or oak boards are the best options for creating a beautiful and durable floor.
- High load on the floor during operation.
If floor ventilation is carried out only through cracks, then if they are clogged, the boards will quickly begin to rot. To avoid this, you will need to make special vents or ventilation grilles. In country houses they are usually hidden, they need to be found and opened.
Sealing cracks can be done in many ways. Basic tools and materials that may be needed:
- plane
- saw
- hammer
- putty knife
- sandpaper
- hard brush
- wood glue or PVA
- silicone antibacterial
- epoxy
- nylon cord
- plumbing tow
- wooden slats
- special solutions
- paper, sawdust, paste
It is possible to choose a method that will be optimal for a particular case only after finding out the causes of the problem.
Ways to eliminate cracks
There are many options to help solve the problem. The choice depends on the design features of the floor, available materials and type of floor covering:
Popular floor repair methods
- the use of construction foam with polystyrene foam (suitable for closing gaps between the wall and the flooring);
- the use of sawdust mixed with an adhesive composition;
- wood putty;
- composition consisting of paste and pieces of paper;
- cord sealing;
- driving slats and wedges;
- tow;
- a mixture of epoxy glue and cement;
- thick oil paint with sawdust;
- sheets of plywood (for difficult cases when there are a lot of cracks in the floor);
- sealing with sealant.
Depending on the complexity of the situation, you can use any of these options. Further details about the technology of the most common methods.
Before starting work with your own hands, you need to clean the surface of the boards from dirt, dust and debris.
You can treat the wood with an antiseptic. This will extend the service life and protect against damage by various microorganisms. After this, you can fill or putty the cracks.
Construction foam
Used for the perimeter of the room. The work is carried out in the following order:
- remove the baseboards, clean the surface from dirt and dust;
- if necessary, place pieces of foam plastic into the gap;
- fill the gap space with foam;
- wait for drying time and cut off excess;
- Next you need to putty the surface;
- After the putty has dried, install the baseboards.
A universal solution for repairing wooden floors is construction foam - it does not retract and does not shrink
Sawdust with glue
Suitable for sealing in any place. Performed in the following order:
The mixture of sawdust and glue should have a consistency similar to thick sour cream
- small sawdust in a convenient container is poured with boiling water and mixed until smooth;
- wait time for swelling and cooling, stir;
- add an adhesive composition (PVA or carpentry) to the mixture and mix thoroughly;
- apply the composition to the coating with a spatula and compact it inside without force;
- the composition is leveled and excess is removed;
- drying time – 2-3 days;
- After drying, the coating is sanded or scraped.
There is a second option for preparing the composition - with the addition of cement. It is prepared as follows:
- 2 parts of glue are mixed with 15 parts of warm water;
- 5 parts of cement and 5 parts of sawdust are added to the solution;
- The mass is mixed and infused for 5-7 minutes.
This composition must be used warmed up. The disadvantage is that it takes a long time to completely dry due to the presence of cement (about 2 weeks).
Putty
Suitable for small crevices. Best used as a preparatory step before laying plywood flooring. Disadvantages: fragility, cracking and crumbling. Allows you to easily prepare the mixture without complex operations. The work is carried out in this order:
- prepare the solution and tool - a narrow rubber spatula;
- putty is applied to the surface of the joints, and it must be pressed into the cracks;
- drying of the composition;
- leveling using abrasive processing.
Putty quickly eliminates cracks, but over time it again requires repair of the floor
Do-it-yourself putty allows you to quickly get rid of cracks, but repairs may soon occur again.
Hammering slats and wedges
Stages of work:
- preparing slats that are narrowed at the bottom and match the size of the gap;
- processing the slats and cracks with PVA glue;
- gluing the slats into the gap, hammering them in with a rubber hammer or a regular one, but through a wooden board;
- if necessary, after the glue has dried, remove the protruding part of the wedges and slats with a plane;
- leveling the color of the floor by staining or painting.
Floor repair using slats and wedges
Sealing tow
The material is treated with an adhesive composition. After this, the tow is compacted into the cracks. After the glue has dried, you can paint the floor one color. The material is made from flax, so it has a high degree of environmental friendliness and safety.
Laying plywood
Suitable for wide cracks if the floor is badly damaged and needs reinforcement. In this case, sealing individual cracks is not effective. Plywood allows you to carry out work with minimal labor costs.
Plywood laying process
Execution order:
- If necessary, putty is used as a preparatory step. Only individual flaws can be covered up. Putty will increase the reliability of the repair.
- Lay out sheets of plywood on the floor, adjust the sheets to the required dimensions.
- Fastening is done with self-tapping screws. In this way, you can quickly close all existing floor imperfections at once.
Sealant
For work, choose acrylic or silicone-based compositions intended for working with wood. The advantage is the absence of the need to prepare complex compositions and ease of application. The sealant package usually has a convenient shape and a syringe attachment, which can easily be used to fill all the cracks.
The sealant has a convenient shape and a syringe nozzle, which can easily fill all the cracks
It doesn’t matter what method is used to fix the problem, putty, other compounds or materials, you need to follow the technology and carefully prepare the floor surface. This will allow you to postpone the next major floor renovation.
Gaps at the junction of walls and floors
During the construction of a house, gaps under the baseboards are left specifically for ventilation. However, over time they expand, creating problems in the form of growing colonies of insects or constant drafts.
Advice! In the case of wooden parquet, completely sealing the cracks can lead to its rotting.
Sealing gaps between walls and floors
To find out the scale of the problem if a gap appears between the wall and the floor, you need to dismantle the baseboard.
The easiest way to cover a small gap is with jute.
If it is no more than 2 cm wide, putty should be used.
At the end of the work, a new baseboard is installed.
If the distance from the wall to the floor is more than 5 cm, the entire floor surface or part that is adjacent to the problem area is moved.
To seal cracks without disassembling the floor covering, polyurethane foam or polystyrene foam is used.
Work process:
- careful dismantling of the baseboard
- cleaning the crack from dirt and dust
- sealing the gap with foam with preliminary addition of polystyrene foam
- cutting off excess foam
- treating seams with putty - necessary to avoid dust getting into the formed pores
- after the putty has dried, install the baseboard in place
In addition to polyurethane foam and polystyrene foam, the following materials are also used:
- Colored silicone. The color can be varied, which makes the seam invisible. For large gaps, silicone treatment will become expensive.
- Acrylic sealant. After applying the material, the seam is tinted to match the color of the baseboard. Sealing cracks in wood floors with sealant is one of the most reliable methods.
- A mixture of wood grout and regular PVA.
Sealing cracks in a wooden floor with polyurethane foam requires great care - the floors may lift slightly as it dries.
Advice! The grout mixture is used to seal any hard-to-reach cracks.
Special sealants
There are two types of wood sealants - silicone and acrylic. Both are good for sealing cracks, so choose which one to choose for yourself. To get rid of cracks you need to: dry the area being treated, clean it of dust and dirt, and using a mounting syringe (it is used for convenience and saving material), fill all the voids in the wooden flooring with sealant. Let it dry, sand it, and then varnish it.
Sealing with sawdust and glue
Floor repairs in any area can be carried out using a special composition. It is prepared in two ways.
First option:
- You need to prepare small sawdust. They are placed in a small container and filled with boiling water. The resulting mass must be mixed until smooth.
- Leave the sawdust to swell for 2 hours, then stir again.
- Add glue to the sawdust, mix the resulting composition well until a viscous consistency is formed.
- Then the floor covering is prepared - the cracks should be cleaned with a brush to remove dirt and dust, and if necessary, widen them from above.
- Apply the adhesive mixture with a spatula, compacting it thoroughly.
- Smooth the mixture on top and remove excess.
- After 3 days, the cracks are cycled. Can be used for sanding
Sealing cracks in the floor with sawdust and PVA is a cheap and environmentally friendly way. You can also carry out repair work using a mixture of sawdust and glue, to which cement is added.
Second way:
- Take 2 parts of wood glue, add 15 parts of water (it is important to heat it until warm), mix well. Sprinkle 5 parts of sawdust and the same amount of cement into the resulting solution. Mix the mixture and leave for 10 minutes. If desired, you can give the mixture the selected color - oil paint is added to the solution.
- Clean the gaps between the boards and coat them with the glue used to create the mortar.
- Heat the mixture and apply it to the cracks with a spatula.
- Complete drying will occur after 2 weeks. To give ideal evenness, the cracks are treated with abrasive materials.
This method can be used both for sealing large cracks and for minor leveling of the floor.
How to eliminate gaps between walls and flooring
When installing wooden flooring, small gaps are maintained between the wall and the boards, which ensures natural air circulation, taking into account the expansion of the covering when there is a sharp change in indoor temperatures.
In some cases, this can lead to an increase in the size of the cracks and the formation of other defects. To seal cracks with your own hands, it is recommended to use construction foam with foam balls.
Repair work is carried out as follows:
- First, the baseboards are dismantled.
- Problem areas are thoroughly cleaned of debris and dirt.
- Polystyrene foam is placed into the deep cracks and then filled with foam.
- After the foam has completely dried, the excess is cut off at the level of the floorboards.
- The seams are sealed with a putty mixture to prevent dust from accumulating in the small pores of the foam.
- Finally, the baseboards are installed.
Putty
Putty made from sawdust and glue
You can seal cracks with putty only if the gaps between the boards are small.
If the discrepancy is large, you will have to use strips.
The best way is to seal the cracks in the wooden floor with putty obtained by mixing wallpaper glue and sawdust.
The sawdust is poured with boiling water and swells for an hour.
Wallpaper glue is poured into the cooled solution until a viscous consistency is achieved. The resulting composition is pressed into the crack using a spatula.
The cracks treated with this putty are left to dry for 2-3 days. The finished surface must be sanded.
A special water-based putty is often used. The odorless paste can be easily sealed into any cracks. Along with it, various sealants are used.
Often when repairing cracks with putty, you need to find nails that are under the old layer of repair material. A regular needle will do for this purpose.
First you need to tie it to a thread and magnetize it. To do this, the needle is temporarily brought to a simple magnet.
Then the needle, like a pendulum, sweeps over the areas where the nails should be. Leaning in one direction or another, it will point to the right places.
Wood putty
Using special wood putties is considered the easiest way to eliminate cracks in such floors. Working with putty on wood is quite easy; to do this, you need to slightly widen the existing gaps in the coating with a screwdriver, clean them of dust and fill them with putty using a spatula. After waiting until the composition has completely dried (1-2 days), the area of the former crack is sanded with sandpaper.
Paste and paper
This method does not require large expenses. To implement it you will need paper, a little copper sulfate and paste. Copper sulfate is used against fungus and to repel small insects.
Repair procedure:
- The paper is torn into small pieces and filled with water. You need to wait for it to get wet.
- During the preparation of paper pulp, a paste is made. It is cooked from starch or flour and water. The water must be brought to a boil and the selected ingredient must be gradually poured into the container. Stirring is necessary to prevent the formation of lumps.
- Vitriol is added to the paste that has cooled to a warm state in a ratio of 1:10.
- The paper is wrung out, crushed with fingers, added to the paste and mixed. The result is a thick consistency.
- Then the cracks are prepared for sealing. The main thing is to clean them of excess dirt.
- The prepared mass is placed in the gap and compacted. The top needs to be leveled with a spatula and sanded. You should not put extra effort into the leveling process. With gentle movements, the solution is simply distributed throughout the entire gap.
- The last stage of processing the sealed gap is painting.
So, with the help of old newspapers and starch, you can reliably close all the cracks, without losing the aesthetics and functionality of the floor covering.
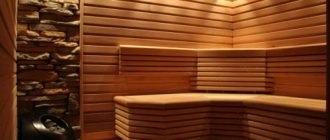
When should a bath be sealed?
Many people try to tightly seal the crown joints immediately after installing the log house. This is a big mistake. During construction, jute insulation is laid between the logs or the cracks are caulked with other material, but after this the bathhouse must be allowed to stand without use for at least six months, and preferably a year and a half.
During this time, the log house will shrink, the logs will dry out, and gaps will appear between them again, and cracks 0.8 mm wide or more will appear in the wood itself. If mistakes were made during installation, they will also appear during this time.
Only after this can sealing be carried out.
Gaps and cracks in the bathhouse after shrinkage of the log house
Cord
Putty is widely used for filling holes in both walls and floors. The product is selected according to the width of the hole.
This technology helps get rid of the annoying squeaking of floorboards. For the procedure you will need a cord of any material or string, as well as wood glue, putty and sawdust.
- The cord should be completely lubricated with glue
- then mix the solution with sawdust, glue and putty
- deepen the cord inside the crack so that 2-4 mm remains to the floor surface (this is important)
- pour the prepared mixture over the cord, leaving a small margin on top
The putty will definitely settle, so there is no need to skimp on the prepared composition.
Modern sealing materials
Modern thermal insulation materials are resilient and elastic, so they are used quite widely when solving the question: how to seal seams in a bathhouse.
Their peculiarity is that it is easy to work with such sealants, they dry quickly, and it is possible to apply several layers if necessary. And this is convenient and profitable.
In addition, modern sealing materials have high adhesiveness, which significantly increases thermal insulation properties, and are not afraid of drops and changes in air temperature and humid environment. But, perhaps, the most important thing is that they do not interfere with the ventilation of the room and are safe for health. Sealants not only seal the seams of the bathhouse, but also any splits and cracks that form in the wood over time.
Among the newest materials for preserving heat in a bathhouse, special sealing tapes should be noted. They need to be distributed in the space between the beams. They hardly caking, which means that there is no need to use other sealing materials, which creates additional savings. In addition, such a sealant can change its shape when the logs begin to move during the natural shrinkage of the bath.
Slats and wedges
A more complex method is to eliminate cracks using slats and wedges. These parts need to be adjusted in advance - they should not push the boards apart.
Floor preparation includes cleaning the cracks and slightly widening them upward. Then a rail is prepared, narrowed downwards. The rail and the gap need to be thickly treated with PVA.
Then it is placed in the gap between the boards and hammered with a rubber (or wooden) hammer. If the rail cannot go in completely, you need to wait until the glue dries and cut off the protruding part with a plane.
You can match the color of the floor and the slats with stain. A hair dryer will help remove a thick layer of paint from cracks. It can also be cleaned using a drill attachment or a grinder.
Repairing cracks with wooden slats
A technically difficult way to repair a plank floor is to use wooden slats. They reliably hide existing defects and prevent floorboards from squeaking.
How to seal cracks in a wooden floor using slats? Repair is carried out as follows:
- Pre-clean and widen the cracks.
- Next, a rail of the required size with a narrowed lower part is made.
- The base of the slot and the rail are lubricated with glue.
- The rail is driven into the prepared groove with a rubber hammer.
- The protruding part of the wedge is cut off and ground.
To cover the cracks, the surface of the boards is covered with stain or painted with a tinted composition for wood.
Other repair methods
There are many other ways to quickly and effectively seal cracks in a wooden floor.
Alternative ways to effectively seal cracks:
- Tow. Today it is more often used in plumbing, but it is also quite effective for filling cracks in wooden floors. You just need to wet it along the entire length with glue and place it in the gap between the boards. After drying, the surface is ready for painting.
- For small gaps - about 1 mm, the floor surface is treated with special solutions. For example, BONA ParketGrunt is suitable for filling small gaps between boards. Varnish or paint is applied on top.
- Epoxy is one of the most reliable methods. Epoxy is mixed with a hardener, and cement is added to the resulting solution in a 1:1 ratio. As soon as the consistency begins to resemble sour cream, the mixture can be poured into the cracks. Large gaps are pre-filled with rope cord.
- The old-fashioned way. One of the oldest methods of dealing with cracks in the floor is to plug them with synthetic rope dipped in glue. PVA is excellent for impregnation. After drying, you can cut it with a knife.
- If the floor is covered with carpet, you can use gray reinforced tape. It is attached to the floor using a stapler and reliably protects the room from unpleasant odors and drafts.
Small cracks can be covered with wax and linseed oil. It must be brought to a hot state - this will make it easier for it to flow into the cracks. The only condition for this method is that the floor is perfectly clean. Otherwise, dirt will get into the cracks along with the mixture.
Plywood will quickly hide all the cracks
Sheets of plywood are often used to cover old floors.
This method is useful in cases where it makes no sense to seal numerous cracks.
Plywood can cover all the defects of the floor covering and provide it with reliable service for many years.
The sheets are attached using self-tapping screws.
The sealant, which has a convenient nozzle, allows you to quickly close cracks and get rid of squeaks.
It is able to close all holes without additional effort. It is one of the most reliable materials. Silicone and acrylic based compounds are most suitable for wooden floors.
Why seal cracks in the floor?
Before you begin to eliminate gaps in the floor, you need to find out why these defects occurred.
- If the floor is covered with new wood, it has most likely dried out. An annual re-coating may be required, which will have to be done for three years.
- If the cause of cracks in a wooden floor is the active activity of rodents, it is necessary to take measures to eliminate their colonies, otherwise the holes will appear again.
- If the boards are installed incorrectly and vibrate relative to each other, only nailing them to the joists will help.
Attention! Oak and coniferous wood are considered good options for flooring.
It is necessary to get rid of cracks in the floor so that the coating continues to perform its important functions:
- provide the necessary thermal insulation, retain heat in the room, and prevent cold air masses from passing through the gaps;
- protect from third-party sounds and noises - wood conducts sound waves well, so holes in the boards can aggravate the problem;
- protect the room from moisture penetration, mold and pests.
After properly sealing the cracks, the boards will not rub against each other and make unpleasant squeaks.
Attention! Wooden floors require ventilation in the form of vents. If the decision is made to eliminate them, it is necessary to draw a ventilation hole through the room itself.
Semi-liquid filling compounds for sealing cracks
Any series of construction chemicals from a Russian or foreign manufacturer includes products for woodworking. They are great for eliminating minor defects. Including:
Pigmented silicone sealants
Used for gaps up to 1 cm wide, they have good adhesion to wood. After application, the composition must be leveled with a plastic or rubber spatula. As a result of polymerization, an elastic, non-shrinking seam is formed that is resistant to water and household chemicals. A particular advantage is the durability of the plastic composition, which does not crumble or fall out due to seasonal expansion and drying of the floorboards.
Silicone sealants for wood.
The color indicated on the label may not match the real one, so ask the store for a display stand of colors. These are samples of finished products made by the manufacturer.
Acrylic sealants, paintable
A good analogue of the previous product, but with a slight difference. After application, the white paste polymerizes for 1 hour, then it can be painted. A very convenient way to repair floors coated with alkyd or oil enamel.
Tinted gypsum putties
Water- or oil-based compositions familiar to customers for gaps up to 1-2 cm wide. Apply with a spatula and compact thoroughly. The material shrinks, so re-application and subsequent leveling may be required. The putty dry surface must be sanded with sandpaper.
After drying, the finished putty becomes lighter by 1-2 tones, so when purchasing you need to choose a darker composition.
The downside of this product is its fragility. After a year, maximum two, the seam begins to crack, crumble, and absorb dirt. The material is in steady demand mainly due to price. The cost of a small package from VGT or Novbytkhim is only 50-60 rubles.
Epoxy putties
Semi-liquid, quick-hardening compositions based on polymer resin. As a rule, these are two-component compounds that, after drying, form a very strong (non-elastic) seam. The adhesion coefficient of this material to wood is unusually high, and, unlike conventional putties, the hardened mass does not crumble. Accordingly, next year you won’t have to look for something to cover up the floor defect again.
Epoxy grouts are used for narrow gaps no more than 3-7 mm wide, applied with a spatula. The shrinkage rate is low, so there is no need for re-processing.
Polyester pastes, colorless or white
Quick-hardening polymer grouts, one- or two-component, for filling gaps between boards no more than 5 mm wide. The mixture is suitable for old floor coverings as it forms a strong, rigid joint. After application, the surface is leveled with a flexible spatula; painting in the same color as the main floor is allowed.
We have listed ready-made compositions. In search of how to fill cracks in a wooden floor, craftsmen often use such means as;
- polyurethane foam (pieces of polystyrene foam, fiberboard scraps, etc. are inserted into the gap as a frame);
- a mixture of fine sawdust and PVA or oil enamel;
- composition of cement and epoxy glue, etc.
There are many options for homemade putties for filling gaps; they are formed according to the “what’s at hand” principle. The most reliable and proven, according to experienced craftsmen, is a mixture of wood flour and PVA. A thick paste is prepared from these components, which is applied with a spatula and carefully leveled. After drying and sanding, the surface can be coated with a protective varnish.