Advantages of metal stoves
Iron stoves have a number of advantages. These include:
- Heat dissipation. Wood-burning stoves made of metal warm up and begin to give off heat much faster than brick products.
- Small dimensions. Installation of metal stoves is possible if there is a minimum
- a lot of free space in the room.
- Mobility. Iron products can be easily moved from one place to another if necessary.
- Simplicity. Anyone can use a metal wood-burning stove.
- Functionality. Many modern models are equipped with a hob and oven. This allows you to cook food on them.
- Saving. An iron stove can be used to heat a house without the cost of additional equipment (radiators, pipes, etc.).
The advantages of these products also include the fact that, in addition to their main functions, they give the room a respectable appearance and comfort.
Do-it-yourself metal stove - manufacturing and installation!
DIY metal stove
A homemade metal stove is perfect for heating a greenhouse, garage, work space, and even a living room. To assemble the unit in question, you can use sheets of metal, barrels, pipes and even fire extinguishers of a suitable size. The procedure for making the stove remains the same. Differences are present only in the initial stages of corps preparation.
DIY metal stove
Advantages of a homemade metal stove
A homemade metal stove has a number of advantages over brick heating units. Among the main advantages of the structures under consideration, it is necessary to highlight the simplicity of their design and the availability of raw materials.
DIY metal stove
Making a simple metal stove will not take much time - there are usually no difficulties in finding (purchasing) metal sheets or iron containers of a suitable size.
DIY metal stove
The installation of a metal furnace will require many times less financial investment compared to the construction of a brick heating unit. At the same time, a metal stove does not take up much space and heats up very quickly during operation.
Homemade metal stove
note
Metal stoves weigh much less than their brick counterparts, which eliminates the need for a strong foundation. To further increase heating efficiency, a screen made of heat-resistant brick can be laid around a metal heating unit.
Extraordinary handmade stove
Main design features
A standard metal furnace consists of the following main elements:
- fireboxes;
- ash pan;
- containers for stones (if the stove is created for use in a bathhouse, under other circumstances such a container can be abandoned);
- hot water tank (if necessary);
- grates;
- smoke exhaust pipes;
- firebox doors;
- doors for the ash pan;
- valves for pipes.
Two options for creating horizontal devices
Installation of grates is carried out in the firebox of the structure above the ash pit. If there is a need to install a tank for hot water, the tank, as a rule, is attached directly to the stove or slightly above it. In this case, a smoke exhaust pipe is usually passed through the container to heat the water.
The mentioned doors will not allow small coals, wood and sparks to fly into the heated room.
Drawing of a metal furnace
To make the body of a metal furnace, you can use sheet iron, barrels, pipes with a diameter of 50 cm and even large fire extinguishers. The use of ready-made containers is more preferable, because in this case, the amount of welding work is significantly reduced.
Before using a pipe to make a stove, carefully examine its condition for rust and other damage. If holes are found, apply patches to them. In areas with the most serious damage, you can make a door for the ash pit or furnace firebox.
Making a furnace from a metal pipe
Making a furnace from a metal pipe
Making your own stove is done in a few simple steps. However, the performer is required to maintain attentiveness and maximum accuracy during each event.
The slightest inaccuracies can lead to serious consequences.
For example, if the chimney is installed incorrectly, the stove may begin to smoke in the room, and poor quality welding work will cause leaks in the water tank.
Prepare a pipe with a diameter of 50 cm. The recommended pipe wall thickness is from 10 mm. In total you will need about one and a half meters of pipe.
Important
The design in question includes a water tank, which makes operating the stove more convenient and efficient. If desired, you can refuse to install a water tank. In this case, it is enough to simply exclude references to the water tank from the assembly manual. Otherwise, the oven will be manufactured using the same technology.
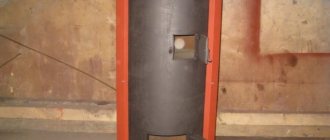
Homemade stove for a bath from a pipe (vertical)
First step
Cut the prepared pipe into 2 parts. The length of one of them (to be used directly for the manufacture of the stove) should be 900 mm, the second part (for the water tank) should be 60 cm.
Second step
Cut holes in a long piece of pipe for arranging the vent and firebox. From cut pieces of metal, make doors for the corresponding holes. To do this, it is enough to weld hinges, handles and latches to the blanks.
Cut out the doors and install the grate
Cut out the doors and install the grate
Third step
Make slots in the walls of the housing for mounting the grate. You can weld the grate yourself from fittings. Select the spacing of the rods so that in the future the loaded fuel does not fall out into the spaces between them.
DIY oven
Weld the ears to the grate. Thanks to them, the product will be fixed in the slots.
Fourth step
In the rear upper part of the stove firebox, make a round hole to connect the smoke exhaust pipe.
Weld a horizontal pipe to the hole. In the future, you will connect the main part of the smoke exhaust structure to it.
As a result, the chimney will be collapsible, which will make its cleaning much simpler and more convenient. The recommended length of the smoke exhaust pipe is from 4-5 m. Determine the final length yourself.
As a result, the outer part of the pipe should rise above the roof of the building by at least 50 cm.
If necessary, install the heater and water tank. These elements are usually included in the design when making a stove for a bath.
Tank on a pipe for a sauna stove
Place the heater on top of the stove firebox. Install the tank at the minimum possible distance from the firebox. Typically, one part of the tank is installed on supports, the other on the furnace firebox. Make racks from materials that are suitable and convenient for you. The main thing is that they are strong and securely fastened as much as possible.
An option is often used in which a smoke exhaust pipe is passed through a water tank, heating the liquid. However, in this case, all welding work must be performed to the highest possible quality. Any gaps will cause the tank to leak. As a result, water will enter the firebox and extinguish the fire.
Advice
If you wish, you can make changes to the design of the stove yourself, placing additional elements at your discretion.
It is recommended to equip the water tank with a tap.
Weld strong metal legs to the bottom of the oven. Installation of such units, as a rule, is carried out on special flood sheets.
Place a fireclay brick screen around the stove. It is also recommended to line the section of the smoke exhaust pipe before exiting the street with bricks.
Where the pipe crosses the materials of the house, lay fire-resistant material, for example, based on asbestos. This will provide adequate protection for materials from fire.
How to bring a pipe through the roof
How to bring a pipe through the roof
How to bring a pipe through the roof
The section of the chimney passing through the attic should not have valves, views or other similar elements.
The length of the horizontal sections of the smoke exhaust pipe should not exceed 100 cm.
Recommendations for installing the stove
Metal stoves are installed in accordance with the provisions and rules of current regulatory documents.
If the walls of the building are made of wood, the distance between them and the stove should be at least 50-100 cm. If you line the wall with refractory bricks, plaster it, or protect it with a thick metal sheet, the specified distance can be reduced to 20 cm. 30 cm.
The firebox and chimney of the stove should be at a minimum distance.
Installed metal stove
Lightweight stoves can be installed without a foundation, on a dense metal sheet. Relatively heavy units require an individual base made of concrete or brick. The recommended foundation height is up to 200 mm.
Installation of a sauna stove
note
Now you have the information necessary to make your own metal stove. Follow the provisions of the presented manual, and the finished heating unit will effectively cope with the tasks assigned to it for many years.
Furnace installation option
https://stroyday.ru
Operating principle
Using a metal stove in a home or non-residential premises requires regular monitoring of the operation of the device. The loaded fuel is enough for a certain period of time. Therefore, it is necessary to constantly reload firewood into the firebox. Home ovens may differ in design, but the principle of operation is the same for all models.
The principle of operation of a metal stove for the home
Firewood is loaded into the combustion chamber. During the combustion process, air enters the combustion chamber through a specialized hatch (blower). The blower is equipped with a door, with the help of which the amount of supplied air is regulated. The more oxygen supplied to the combustion chamber, the faster the fuel burns. Products resulting from combustion are released into the atmosphere through a smoke duct.
Depending on the model, ovens can be additionally equipped with hobs and ovens. The flame in the combustion chamber quickly warms up the cooking surfaces. For aesthetic purposes, many manufacturers make the combustion chamber door from heat-resistant glass. So, you can see the process of burning wood while working.
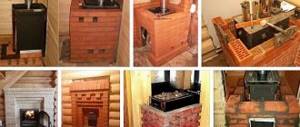
Assembling a homemade heater stove
Assembling a metal stove with your own hands includes the following steps:
- the pipe is divided into two parts of 0.9 and 0.7 m, respectively;
- It’s better to make the ash close to the bottom of the pipe to make it easier to remove the ash. To do this, make a hole in the pipe with a diameter of 20 by 5 cm. Do not throw away the piece of metal obtained as a result of cutting - you can make a door from it. Above the blower you need to cut a hole for immersing fuel. Try not to damage the metal when working;
- From the outside of the pipe, weld the hinges and ears for the latches, and the latches themselves onto the doors. Install doors for the blower and loading area;
- cut a circle from a sheet with a diameter of 0.7 m and a hole for the grate in the middle of it. If you were unable to purchase it ready-made, then make a homemade one from a steel rod. The circle needs to be welded from the inside slightly above the blower. Our firebox is ready;
- make a cutout on the back side of the pipe for watering stones and install a door;
- make a structure for laying stones from metal rods. The sizes should be selected based on the average size of the stones that you plan to put in the oven;
- put stones inside. Then cut out another circle with a diameter of 0.7 mm, drill a chimney hole in it so that it is located near the far wall of the stove. First weld the pipe, then the chimney circle to the bunker;
- weld a small one to a large piece of pipe, make a hole in the tank for the tap and weld it;
- cut out another circle and divide it into two different parts. In the one that is larger in size, we make a chimney hole, and place it on top of the entire structure and weld the hole;
- we secure the smaller section with loops, then water will be drawn into the tank through it.
Application and fire safety measures
A metal stove can be installed in any room. It can be wooden, brick, concrete or a room made of any other material. The main condition for installing the device in a house (or other room) is the presence of a chimney. It must be performed separately from the centralized ventilation system.
Installing a metal stove in the house
If you use a product of large size and weight in your home, you will need to take care of the installation base. A heavy iron stove can damage a wooden or even concrete floor. A foundation must be made. It can be made of various materials. The best option would be to make a concrete foundation. To increase the strength of the base, before pouring concrete, it is necessary to install a frame of metal reinforcement.
Factory stove models meet fire safety requirements. You can easily obtain permission from the fire inspectorate to install such a product. There are models of metal stoves, the installation of which does not require obtaining permits from the fire inspectorate.
Attention: in order to avoid a fire, it is necessary to equip the wall near which the stove is installed with a screen made of heat-resistant material!
Models of metal heaters: photos and drawings
First, let's look at the project of a regular metal heater along with a water tank. To construct it, you will need sheet iron with a thickness of about five millimeters. On the drawings, mark the dimensions of the furnace - 500 by 600 by 800 mm and a height of about 400 mm, respectively.
Such a stove can be loaded with up to 150 kg of fuel , thanks to which a steam room with an area of approximately 12 square meters will be steamed at a temperature of 100 degrees.
Its walls can be single or double, equipped with an air gap. The liquid tank can be placed wherever you deem necessary.
Tip: cover the heater stove with bricks to reduce the heat that is transferred in the form of infrared radiation from the stove to the steam room.
Bath stove combined with kitchen
Another good option for making a homemade metal sauna stove is a combined design with a kitchen stove. It is suitable for those types of premises where there is a relaxation room after the bath , where you can cook and eat something, or for a bath room that is attached to a summer kitchen or to a residential building next to the kitchen.
The firebox of the stove located in the kitchen should be connected to the ash pan on the heater. There should be a door on it, thanks to which it can be heated when the kitchen stove is not used for its intended purpose.
The steam room and the kitchen are separated from each other by a brick partition; also, in order to prevent burns from the side of the bath, it should be covered with a sheet of metal and a wooden partition. A flame tube is then passed through the furnace.
A drawing of such a design should include the following elements:
- stove in the kitchen;
- heater;
- kitchen stove firebox door and backfill pipes;
- firebox door on the stove;
- steam room;
- chimney;
- kitchen area;
- sheet steel and wooden fencing for partitions.
Types of stoves for home
Metal devices, depending on the duration of combustion, the type of fuel loaded and technical characteristics, are divided into several types. These include chamber products, channel products and long-burning devices.
Chamber furnace
This type of construction is made of steel or cast iron. There is a combustion chamber inside. Fuel is loaded into the chamber through a special hatch. The bottom of the firebox is made in the form of grates, through which burnt fuel spills into the ashpit. The ash is removed through a door located in the ash pan. This door also regulates the air supply to the combustion chamber.
Channel product
Channel devices are cast iron or steel stoves. The combustion chamber of such devices is equipped with special partitions. They are located horizontally and prevent the rapid escape of formed gases into the smoke channel. Thus, gases, mixing with oxygen, burn out, and the efficiency of the metal furnace increases.
Long burning stove
This type of device differs from others in that fuel loading must be carried out much less frequently. The air into the combustion chamber of such a stove is supplied not from below, but from above. Thus, gradual combustion of the upper part of the fuel occurs.
How to make a metal stove with your own hands
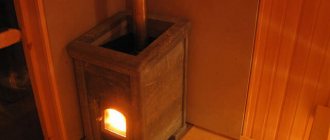
Most often, small metal stoves of the simplest design, called potbelly stoves, are used to heat garages, cottages and outbuildings.
The efficiency of such heating equipment is not very high. But at the same time, the assembly of structures of this type is very inexpensive. This is the type of stove that will be easiest to assemble with your own hands. The baths are equipped with special metal stoves called heaters. Such devices are used not only for heating the washing room, locker room and steam room, but also for generating steam itself.
The main design elements of heating devices of this type are:
- ash pit with grate;
- firebox;
- pipe for the chimney.
Sauna heaters, among other things, are complemented by a compartment for laying stones and a tank for heating water.
To make the body of metal furnaces of any type, both sheet steel and various kinds of available materials can be used - thick-walled large-diameter pipes, empty gas cylinders and even old barrels.
To weld a furnace using this technology, material with a thickness of 3-4 mm is usually used. A potbelly stove made from such sheet steel will be relatively inexpensive and will last quite a long time. In this case, the work on manufacturing the furnace is carried out in several stages:
- a design drawing is drawn up;
- metal cutting is performed;
- the body is welded;
- the doors of the firebox and ash pan are cut through;
- a grate is installed;
- doors are hung on hinges;
- door latches are manufactured;
- the supporting structure is welded.
The drawing is usually developed taking into account the fact that the height of the finished potbelly stove should be slightly greater than its width. In this case, the device will subsequently heat the premises more efficiently and will not start smoking.
Another condition for the correct operation of the potbelly stove during subsequent operation is the correct location of the firebox door. You cannot cut it too close to the lid.
Sheet metal for the stove is cut in most cases with an ordinary grinder. The material is first marked using a ruler, square and marker.
To weld the main part of the furnace:
- the bottom is laid on a flat surface;
- first one and then the other side parts are attached to it in several places;
- grab the ends of the oven.
Next, corners are welded inside the housing to install the grate. Then:
- install the grate itself;
- grab the housing cover in several places.
At the final stage, all stuck seams are finally boiled.
The slots for the doors are usually made after the stove body has been welded. In this case, the cuts in all corners are made a little (about half a centimeter) not completely. The future door must remain in place until the hinges are installed.
After the hinges are welded, the door is cut out or simply knocked out with a hammer to the end. After this, the manufacture of the valve begins. This element is most often secured to the door by welding using a bolt.
The valve itself is usually made from a strip of the same steel that was used to make the body, 2-2.5 cm wide. The free end of the valve is bent to a width of a couple of centimeters before fastening for ease of subsequent operation.
note
You can, of course, use ready-made factory stove doors for a potbelly stove. The frames of such products are mounted in the housing holes, usually on welded corners using bolts. This technology subsequently allows you to change the doors if necessary.
It is possible to cut a hole for this structural element of the potbelly stove both on the housing cover and in the upper part of the rear end. The first option is considered somewhat simpler to implement. Horizontally located pipes usually have to be additionally secured to an angle jumper installed inside the housing.
The easiest way to cut a hole for a pipe is to use a welding machine. But you can do this with the help of an angle grinder.
After the main part of the iron potbelly stove has been welded, you can begin to make a support for it. The frame stand for such a stove can be welded either from a corner or, for example, from pipes of not too large diameter.
A stove welded from metal should be installed on a steel sheet. Cobblestone, panel or log walls next to the potbelly stove must also be covered with a metal screen.
Making a metal stove from sheet steel is thus not too difficult. However, it is even easier to assemble a structure of this type using a thick-walled pipe with a diameter of, for example, 40-50 cm. In this case, making a potbelly stove will look something like this:
- a 60 cm long section under the body is separated from the pipe using a welding machine;
- carry out markings for the doors of the firebox and ash pan;
- cut the doors in the same way as in the first case, not completely at the corners;
- weld the hinges and knock out the doors.
Further work is performed using approximately the same technology as described above. To cut a piece of pipe under the body as evenly as possible, you can use, for example, a strip of linoleum. The pipe is wrapped in one layer and secured with tape. Next, simply cut the pipe along the edge of the linoleum.
The doors of the fireboxes of 60-centimeter stoves are usually made 20 cm high. Their width should be such that it will be convenient to put firewood into the stove in the future. Typically, the opening of the firebox doors of potbelly stoves is made at least 26 cm wide.
To bend the support corner under the grate into a ring, corner slots are made in the shelf along its entire length in increments of several centimeters. Additional rigidity is subsequently given to the ring by welding along the diameter line of the metal bridge.
The pipe stove lid is usually made not round, but square. This allows you to increase the heated surface area and the efficiency of the potbelly stove. The square lid for such a stove can, among other things, be made removable.
Important
In this case, two rings of metal strips, slightly larger and slightly smaller in diameter than the furnace body, are simply welded to the bottom of the square sheet. A non-flammable seal is inserted into the groove between the rings. The grate for a stove with a round body can also be welded yourself, for example, from reinforcing bars.
In this case, to make a metal stove with your own hands, it is also easiest to use a pipe. Iron heaters are assembled using approximately the same method as potbelly stoves. However, the technology for assembling furnaces of this type still has some nuances.
Heaters are most often installed in the middle of the bathhouse - at the jumper between the steam room/washing room and the locker room. At the same time, the firebox of the structure is made remote. In this case, the stove body itself remains in the washing room, and the firebox is removed to the locker room.
The installation technology for such heaters looks something like this:
- a section 100-120 cm long is separated from the pipe;
- at the very bottom of the body, an external firebox made from pieces of metal is welded and a door is cut into it;
- on the side, just above the outer part of the firebox, a hole is cut for the chamber under the stones;
- weld the firebox cover inside the body with a hole made in its center for the chimney;
- install and weld the chimney itself, using a pipe of such length that it rises above the body by about 10 cm;
- insert a piece of another pipe (chamber for stones) of the appropriate diameter into the previously prepared hole;
- weld this pipe to the edges of the hole and to the opposite wall of the firebox;
- install the furnace housing cover.
The section of pipe remaining above the firebox lid in such a heater will subsequently be used as a water tank. Therefore, at the final stage, you need to cut off a small part from the housing cover and fasten it on the hinges. Through the resulting door, water can subsequently be poured into the tank.
The tap in this type of heater is located above the firebox cover itself. The pipe in a sauna stove of this type passes, as you can see, directly through the tank. The water will subsequently be additionally heated from its walls.
It will not be difficult to assemble a heater from a pipe, just like a potbelly stove, with your own hands. But of course, all seams in a furnace of this design should be welded as thoroughly as possible. Otherwise, water will subsequently seep into the firebox from the tank.
- Making a metal stove with your own hands
- Pipe sauna stove: advice from experienced builders
- Instructions for making a potbelly stove with your own hands
The Pompeii furnace is made in several stages, between which there is a technological break. Mandatory elements are: base, tabletop, dome, chimney. Made from materials that can withstand high temperatures.
In recent years, Pompeii ovens have become popular because they are easy to set up yourself.
They are used not only for baking real Italian pizza, but also for homemade bread, pastries and meat dishes.
The design feature is fast heating to the required temperatures and long-term heat retention. Cooking can begin during the heating period with active firewood burning or residual heat.
Pompeii ovens are often located near the house. In combination with a barbecue and a gazebo, it will become a magnificent addition to the landscape. You can organize it at home too. Particular attention is paid to the foundation and proper chimney removal.
The oven consists of:
- stands;
- foundation;
- workspace.
The pipe outlet is always located in front of the stove. This distinguishes it from a tandoor or fireplace. The dome is made multi-layered. The first layer is refractory brick treated with clay. The second layer is a heat insulator.
Usually this is basalt wool, which is covered with perlite insulation. The last level consists of cement.
To enhance its decorative properties, the vault can be finished with mosaics or decorative plaster, suitable for outdoor use.
Advice
During the heating process, the flame rushes to the vault and completely envelops it and the ceiling. Thanks to this, food cooks quickly, heating up from all sides at once.
The entrance is made in the form of an arch. It is necessary for storing firewood and food. The height of the arched entrance is 0.6 radius, and the width is equal to the height of the dome. The internal diameter can be anything, but experts recommend making it no less than 80-90 cm.
If you want to make a stove yourself, first decide on its type. There are Tuscan and Neapolitan. The first variety has a high arch and is considered more versatile because it allows you to cook meat, soups, and crayfish. The Neapolitan variety is suitable for baking pizza. Has a small vault.
To work you will need:
- refractory fireclay brick;
- facing brick;
- cinder blocks;
- thermal insulation;
- waterproofing;
- cement, sand, crushed stone;
- masonry mortar.
At the first stage, design is done. When drawing up a drawing, not only the size and location, but also the proportions of the dome are taken into account. Standard version: height – 80 cm, size – 120*120 cm, arch height – 42 cm, internal diameter – 84 cm.
Foundation
Marking is carried out at the site of the planned placement. It is important to ensure that the area of the foundation is larger than the area of the pedestal. The pit must be at least 350 mm. Wooden formwork is constructed along its inner perimeter. It is covered with a layer of dense polyethylene, crushed stone is poured onto the bottom, then a layer of sand.
The whole thing is covered with a layer of polyethylene on top. The resulting waterproofing pad is filled with cement in three stages. Between them it is necessary to observe a period of at least two days.
Reinforcement is carried out only after the level of the solution has reached the formwork. The foundation will be ready for further work no earlier than three weeks later. If this rule is not followed, there is a high probability of rapid deformation of the furnace.
Base
In the future, it will house a dome and a tabletop. The height of the pedestal is usually 80 cm. Sometimes the foundation is above the ground. In this case, the height may be slightly reduced. The shape of this element resembles the letter “H”, in which the sides are 120 cm. To work, you will need a cinder block with a length of each element of 40 cm.
In some diagrams you can see the base in the shape of the letter “P”. However, experts recommend choosing the first option, since the transverse wall will be able to take on the additional weight of the structure.
Cinder blocks are laid dry. It involves fastening the material with reinforcing wire. After this, all that remains is to pour the cement mortar into the voids of the blocks and wait 2-3 days until it dries completely.
Tabletop
First, the formwork is made. To ensure that the tabletop is the correct size, the formwork is made 20 cm longer at the front. Moisture-resistant plywood serves as the bottom of the formwork. According to the dimensions indicated in your drawing, cut the boards and nail them together. For corners, it is recommended to use metal staples. All that remains is to put the reinforcing mesh with a gap of 5 cm.
Now all that remains is to pour the concrete solution, distribute it evenly, and check it with a building level. In order for the countertop to become hard, it is necessary to take a technological break for a period of one to three weeks.
Bake
A circle with a diameter of 90 to 105 cm is drawn on a dried tabletop. Now you need to lay out refractory bricks in a continuous row, which form the under (base). It is better to use zigzag laying so that there are no transverse seams. Number the elements so as not to make mistakes when laying them out.
One layer of thermal insulation is laid on the countertop. Bricks are placed on top. Do not forget that it is necessary to determine in advance the entrance through which firewood and food will be placed. For the latter, 6 bricks are laid out in one horizontal line to form a side.
To make it easier to lay the dome itself, it is recommended to make a cardboard or plywood template from intersecting semicircular blanks. Further work is being carried out on it. The masonry starts from the entrance and continues to the back of the dome.
All that remains is to make the chimney. Depending on the design, it is made of brick, metal, or ceramics. When this element is installed, all seams must be sealed with mortar. After a few days, the structure will become strong, so it will be possible to dismantle the template structures.
For external cladding, plaster or clay or ceramic mosaic is used. If there is no canopy over the structure, you will need heat-resistant material for the inner layer and moisture-resistant material for the outer layer.
You can use the Pompeii stove no earlier than after two weeks. For the first kindling, it is advisable to use paper or straw, for the second - brushwood, for the third - wood chips; for the fourth - small logs. If all tests are successful, the oven is ready for use.
- DIY Pompeian wood-burning pizza oven
- DIY pizza oven
- Pompeian pizza oven - treat yourself to real Italian pastries!
Famous manufacturers
The Russian market offers a large selection of metal, cast iron and stainless steel stoves. Products from the following foreign manufacturers are in great demand:
- Trend.
- Magnum.
- Thorma.
- Alma Mons.
- Konig Feuer.
- Efel.
- Ferlux.
- Olimp.
The Harmony model from the Belgian manufacturer Efel has proven itself well. It is equipped with a hob and has enough power to heat a large house. The time interval between fuel loadings is about ten hours.
There are many models and domestic manufacturers:
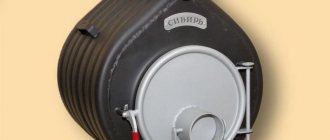
Cinderella stove Termofor
- Termofor;
- Ligov;
- Teplodar;
- Eco fireplace;
- Ermak.
Domestic models come in various types, sizes and shapes. Some can be transported independently and moved from one place to another. Others are permanently installed and have a high mass. Many of the models are equipped with hobs, ovens and transparent doors made of heat-resistant glass.
How to choose a stove for a wooden or country house
The walls of a house made of wood have lower thermal conductivity than those made of stone or concrete. A low-power metal stove is perfect for a wooden house. For a wooden house, you can purchase a steel or cast iron product. Power calculations should be made based on the heated area.
Stove for a wooden or country house
To install on a wooden floor, you must choose a product with special legs. Installation can be carried out either in the middle of the room or against the wall. Before installation, it is necessary to equip the wall with a heat-resistant screen. The stove is connected to the chimney. The best option for a wooden house would be to use a corrugated chimney.
For country houses, you should choose products with enough power to heat the room. A compact metal stove will provide uniform heating of a small house. A good option for a country house would be to purchase a long-burning device. This will eliminate the need for frequent fuel loading. You can purchase a stove with a built-in hob and oven.
Possible options for the location of the tank for the stove in the bathhouse
Wood-burning stoves for baths differ in the type of location of the water tank:
- mounted;
- remote ones, which are placed in a place separate from the oven;
- attached;
- built-in;
- chimneys
Mounted
A stove for a Russian bath with a hanging tank is mounted directly on the body. The container has a lid and a tap for draining water.
A unit with a hanging tank is most often made of stainless steel, since such material can withstand large changes in temperature and is not subject to corrosion.
The water tank can be coated with enamel. This solution is not entirely justified, since over time the coating deteriorates and the container ceases to fully perform its functions.
Thanks to the simple fastening, you can quickly place the water tank on the side surface of the stove; they fit perfectly into the interior of small baths.
The disadvantages are:
- it is impossible to create a shower, since there is no way to isolate the hot surface;
- receiving low-quality steam. This is achieved due to the fact that the water heats up quickly, and the room does not have time to warm up.
To get the right steam, you need to hang the water tank after the steam room has completely warmed up.
You can order a stainless steel tank for a bath in specialized stores or create it yourself.
Remote
This arrangement of the heat exchanger tank is considered one of the best. In this case, the steam room is heated only by the stove; the remote water tank increases the temperature of the room in which it is located by releasing some of the energy. This way moisture does not spread until the room reaches the desired temperature.
These stove tanks are made of stainless steel and are installed in the nearest room. The components are connected using a pipeline.
Pipes must withstand significant temperatures. This is the main parameter by which they are selected. At a distance of 50 cm from the stove, you need to use a metal pipeline; at the remaining distance to a small tank, you can use a metal-plastic one.
According to the rules, a sauna stove with a similar water circuit should not be ignited until water is poured into the system. If this recommendation is not followed, the register may be damaged due to sudden changes in surface temperature.
Correct installation
of a sauna stove with an external heat exchanger implies:
- the connecting pipeline should not be longer than 3 meters;
- the distance between the register and the container must be more than 50 cm;
- only pipes with a diameter exceeding 25 mm are used;
- there should be no sagging;
- the tilt angle is within 2-5 degrees.
The positive aspects are: the heating capabilities of a sauna stove with a water circuit; you can connect a shower or use it for a sauna.
Disadvantages: high cost of components, complex installation and connection.
Attached
The design of tanks for sauna stoves is distinguished by its simplicity. To heat water, the heating unit has a special pipe welded at a certain angle. The upper part is placed in a container of water, which has a large height.
The liquid is heated according to the following principle:
- water enters a small diameter pipe and then boils;
- at a temperature of 100 degrees, bubbles form and move upward. When they reach cold water, they burst;
- In this way, the liquid circulates and heats it quickly.
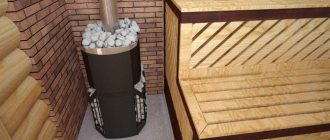
Built-in
As a rule, such sauna stoves are equipped with an iron water tank, which is placed above the firebox or on either side. The shape of the aggregates varies. Rectangular models are very popular. You can make sauna stoves with a closed or open heater with your own hands.
Built-in devices have a big drawback - there must always be water inside. This affects the high concentration of humidity inside the bath. It is inconvenient to control the liquid level. In order for the device to work properly, it is necessary to regularly replace the water.
Chimneys
Typically, the tank on the sauna pipe is made of stainless steel. This configuration of units is popular due to its ease of installation and simple operation. A sauna tank on a pipe is called a samovar type due to its similar operating mode. The water is heated by a tank installed on the chimney. Hot gases pass through the pipe, releasing thermal energy along the way.
They can be oval, rectangular, round or square in shape. Thanks to such a variety of shapes, you can choose the appropriate option.
A chimney
mounted tank for a sauna stove has the following advantages:
- long period of operation of the chimney;
- saving the maximum amount of heat indoors by heating water with gases;
- the small size of the unit allows you to save precious space;
- Cold steam does not form, which occurs with other models.
There are also negative sides:
- difficulty in determining the temperature and liquid level;
- massive structure to hold the water tank;
- filling the container with liquid is inconvenient, since the inlet is located at the top;
- To get fine steam, you need to avoid boiling.
Cons of metal devices
Despite all the advantages, metal stoves for the home also have some disadvantages. These include:
- Frequent loading required. Fuel must be loaded after a certain period of time;
- High heating temperature. The walls, ceiling, and floor at the installation site must be equipped with heat-resistant screens.
One of the disadvantages of metal stoves for the home is that they consume a lot of wood for heating.
From the above it follows that metal stoves for the home are an excellent solution when it is necessary to heat residential or non-residential premises. In addition to their main function, they can be used for cooking.
Material
The sauna stove tank with heat exchanger and water tank are made from several materials. The price of such a device depends on the choice of metal.
Steel
The production of inexpensive steel tanks coated with a layer of protective enamel has been launched. Even with minor impacts, the enamel peels off from the base metal. Such places are quickly corroded by corrosion under the influence of high temperatures, so the service life directly depends on careful handling of such devices, especially during the installation stage.
Cast iron
An excellent option, with high accumulation rates and low heat transfer. The water in such containers does not lose temperature for a long time even when the wood in the stove is not burning. This material is not susceptible to rust, scale, or deformation when overheated. But such tanks are rarely produced, and if they are found, the price for such a container will be very high.
Stainless steel
The most popular material for the manufacture of remote tanks for sauna stoves. The material is not subject to deformation at high temperatures, is not afraid of corrosion and is much cheaper than cast iron. The only disadvantage for home craftsmen is that for welding you will need to have or rent a semi-automatic machine for welding in inert gas (argon). Not every master will be able to perform such a seam with high quality.