Anyone who has started building a bathhouse with their own hands asks the question: how to make a ceiling correctly? After all, the microclimate in the steam room, washing room or rest room will directly depend on its design. The ceiling should retain heat well, dry quickly, not support the spread of fungus and mold, and also have sufficient durability so that it does not have to be redone a couple of years after construction. In this article, let's look at the types of ceilings in log baths, what and how they are made from, consider the main structural elements, and also talk about some features that you should know when starting construction.
Bathroom ceiling height
In order for bath procedures to be enjoyable, you should adhere to certain accepted standards in terms of choosing the height of the interior spaces. In addition, the service life of the bath itself depends on the height of the ceilings.
The determining factor here is the ease of use of the steam room by people of different heights. For example, in order to climb onto the top shelf and not bury your head in the ceiling, you will need a free space of at least 110 cm, and it is better to have a small headroom so as not to get injured when visiting the steam room. In addition, if you like to steam with a broom, you need to take into account the free space that allows you to freely operate this bath accessory. Thus, it turns out that the minimum ceiling height in a Russian log bath should be at least 220-240 cm.
The figure below shows the rationale for choosing this height:
What should the ceiling be like?
Features of the microclimate largely determine the requirements for the ceiling of the bathhouse. The heat generated during bathing procedures, high air humidity, hot steam rising upward - all this should be taken into account during construction. The main requirements for the ceiling are:
- ability to retain heat well;
- resistance to elevated temperature and humidity;
- sufficient strength;
- aesthetic appearance.
If the ceiling does not retain heat well, then most of it will simply go nowhere. In other words, you will heat the air surrounding the bathhouse. To avoid this, the ceiling is made as energy efficient as possible using thermal insulation and waterproofing materials to ensure its normal operation.
The strength of the ceiling is necessary in order to hold the insulation layer, which can have a significant mass, without deformation.
You should also take care of the beautiful appearance of the ceiling. After all, the overall impression of the bath procedures will depend on this. After all, it is much more pleasant to take a steam bath yourself or invite relatives and friends to the bathhouse if the interior looks aesthetically pleasing, which is called “pleasant to the eye.”
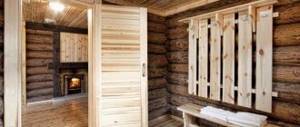
Bathroom trim
What material is suitable for tiling a bathroom or sink - tiles or porcelain stoneware. Unlike wood, ceramics will not require constant treatment with moisture-protective and bactericidal agents.
We invite you to familiarize yourself with: Decorating the inside of a bathhouse with your own hands
Glass-magnesite boards are no less popular. This is a durable, moisture-resistant, non-flammable, non-toxic material that is not susceptible to the development of fungus or mold.
You can also use decorative moisture-resistant plaster, plastic panels, plasterboard and glass magnesite for walls and ceilings, followed by the application of waterproof solutions. PVC, slatted pebbles and fiberboard are also allowed. However, it is necessary to take care of complete thermal insulation of the steam room.
In addition to tiles, you can lay moisture-resistant laminate or panels based on composite plastic on the floor. But tiles will be more practical and durable. Wooden shields are placed on top of it to prevent slipping. What interior to create in the washing room in the photo below.
What material is best to make a ceiling in a log bath?
Another important issue when constructing a ceiling is the choice of material. As mentioned above, the strength, durability and aesthetic appeal of the room will depend on the material. The ceiling material should easily withstand high temperatures and not rot under the influence of humidity. Due to the high temperatures in the steam room, the use of synthetic materials is excluded, since many of them emit toxic polyphenols and other harmful substances when heated. Therefore, you should consider constructing a ceiling only from environmentally friendly natural materials, the best of which is deciduous wood - larch, linden, aspen, alder.
It is not advisable to make a ceiling from coniferous trees because of their high resin content. When heated, the resin becomes liquid and drips downwards, causing serious burns if it comes into contact with the skin.
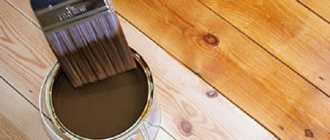
To prevent the wood from rotting, before starting to construct the ceiling, all wooden elements should be thoroughly treated with an antiseptic and fire retardant. The antiseptic will prevent wood borers from eating the wood and protect it from the spread of rot and mold. and a fire retardant will help to significantly reduce the risk of fire in wooden structures.
What materials should not be used
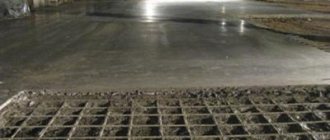
A bathhouse is a building with a specific purpose. The aggressive environment will not allow the use of any material for cladding. Cladding boards and panels made from pressed wood waste are not suitable for every room. The slightest moisture causes them to become deformed. Combustible materials cannot be used as insulation. Polystyrene foam and expanded polystyrene are only suitable for insulating the floor of a dressing room or washing room, but it is advisable to fill it with a concrete screed.
PET film and roofing felt are not used when lining the bathhouse. The material can be laid instead of waterproofing the ceiling on the side of the cold attic. However, it is better to cover the area above the steam room with a heat-resistant membrane.
Wooden lining that shows signs of mold should not be used for cladding. In a humid environment, the fungus will quickly spread throughout all structural elements. An unpleasant smell of rot will appear inside the bathhouse. The ceiling will quickly collapse.
Attention! It is unacceptable to use polyurethane foam inside the steam room to seal joints and seal cracks.
We suggest you read: When to prepare brooms for a bath
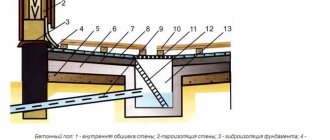
Ceiling design
As a rule, in log baths the ceiling is made of boards, which are hemmed to the beams or laid on them. A board 40 mm thick is sufficient. Its strength is quite sufficient to support its own weight and the weight of the insulation. A layer of insulation is placed on top of the boards, which conserves heat, preventing it from escaping outside. And to prevent the insulation from getting wet, it is protected on both sides with a layer of waterproofing.
In general, a diagram of the installation of a flat ceiling can be seen in the video below:
Types of ceilings
Based on the dimensions of the steam room itself and the area of the remaining rooms of this building, you can use several options for arranging the ceilings. Two of them have become the most popular:
- Hemmed
- Grazing
The difference between the flooring version and the hemming one is the limitation on the length of the span between the walls - up to two and a half meters. In this case, the flux boards are tightly laid directly on the walls of the building. A vapor barrier film is attached over the assembled surface, insulating material is laid on it, and then everything is covered with a layer of waterproofing. The disadvantage of this solution is that it will be impossible to walk in the attic space - the insulation will crumple and lose its properties.
The hemming structure will become more complex. Here, the ceiling is installed to the load-bearing parts of the structure from inside the bathhouse and layers of steam, heat and waterproofing are laid on top of them. After the floor has been properly insulated, the floor of the upper room is laid on top of the insulation and waterproofing film. In this option, the attic can be fully used and you can walk on the flooring without any fear.
How to insulate the ceiling?
Ceiling insulation is one of the most important stages of its construction. It is the quality of the insulation that plays a significant role in creating the necessary microclimate that allows you to enjoy bathing procedures. In order to retain heat in the bathhouse, you can use both traditional folk materials and modern effective types of insulation. If you have access to a sufficient amount of sawdust, then you can cover the ceiling with a layer of sawdust and lay a layer of clay on top, as our distant ancestors did. This method of insulation is quite effective. But its big disadvantage is the flammability of sawdust and high hygroscopicity (the ability to absorb moisture).
If the steam or waterproofing is damaged, the sawdust will absorb wet steam and soon rot may appear in the layer of such insulation, which will be very difficult to get rid of.
Modern mineral materials produced in the form of rolls and slabs are much more reliable. They are non-flammable, made of stone or glass, being a completely harmless environmentally friendly material with a high coefficient of heat transfer resistance, which allows for excellent heat retention in the room. Mineral (basalt) wool has the following advantages:
- Light weight, which reduces the load on building structures.
- Does not support the spread of mold and mildew.
- It is not eaten by wood borers and other harmful insects.
- Does not burn and does not support combustion.
The only disadvantage of mineral wool is its ability to absorb moisture. Therefore, care should be taken to install reliable vapor and waterproofing. Another material quite often used in the construction of ceilings in bathhouses is expanded clay. This is a lightweight porous material obtained by firing clay or slate in special drum kilns. The advantages of expanded clay include:
- high mechanical strength;
- high resistance to heat transfer, providing high thermal insulation properties;
- frost resistance;
- incombustibility and fire resistance;
- chemical inertness, environmental friendliness;
- durability.
You should not make the thermal insulation of a bathhouse from polystyrene foam. Despite its high thermal insulation characteristics, this material cannot be used in a bathhouse due to the release of harmful substances when heated. In addition, polystyrene foam is flammable and can cause a fire.
Preliminary work
Immediately before starting to finish the ceiling in the bathhouse, it is necessary to carefully prepare the project in order to avoid mistakes or undesirable consequences in the future.
The ceiling in the bathhouse must meet several requirements:
- Serve as a heat insulator;
- Look beautiful;
- Do not release fumes that spoil the pleasure of going to the bathhouse;
- Have a long service life;
- Serve as protection against moisture for the thermal insulation layer.
Before arranging the ceiling, you also need to decide on its height. For most modern bath rooms, a height of about 2.5 m is ideal. For bath structures made of wood, a gap is also provided, since the material shrinks.
After this, you need to decide on the materials with which the ceiling will be finished, the necessary lighting and the method of installing the selected finish.
Sheathing the ceiling in a bathhouse should be done only after calculations have been made and the ceilings have been secured. The false ceiling in the bathhouse is the most common. It is a “layer cake” that is mounted on pre-installed joists. The basis is made up of tongue-and-groove boards fixed directly to the ceilings, followed by a heat-insulating layer followed by a vapor barrier. So how to properly hem the ceiling in a bathhouse?
The listed building materials are quite sufficient to ensure that the optimal temperature in the bathhouse is maintained for a long time. An additional room can be created from the attic by simply laying a layer of boards on top of the thermal insulation. They can be fixed to the same beams - the protective layer usually does not exceed them.
Before starting work, it is necessary to measure the room and add 5% to the result obtained. It is worth paying attention to the symmetry of the ceiling. If it is not ideal, you need to decide which wall the sheathing, cut at an angle, will be attached to. Usually this is done near the darkest wall so that it is not too noticeable. The rough ceiling in the bathhouse and the filing must be installed taking into account all the necessary requirements.
Required:
- roulette;
- ruler;
- putty;
- wooden slats and bars;
- building level;
- electric drill;
- screws.
To sheathe a ceiling with plywood, you need to have a fairly flat surface, since all the irregularities will stand out on the already installed material. Therefore, the potholes and cracks present on it must be repaired using putty. When installing, it is better to use sheets that are equal to the length of the room. This will give the future ceiling a more aesthetic and neat look.
Before work, its surface must be prepared. To do this, if necessary, the old coating is removed and cleaned of dust and dirt. Then a diagram is drawn up, on which the location of entire sheets is noted and the sizes of their cut pieces are determined. It is also necessary to calculate the order of installation of the sheathing.
Figure 1. Installation diagram of wooden sheathing.
Since the edges of the plywood must be screwed to the sheathing to avoid sagging, the location where the entire sheets will be located is first calculated. They are usually screwed in the center of the room, and cut-off elements are installed closer to its edges. After this, you need to determine the center of the ceiling using a tape measure.
It is necessary to install a wooden sheathing on the ceiling, onto which the plywood will subsequently be attached. For this, glued laminated timber with a cross section of 20x40 mm is used. First, horizontal slats are fixed to the ceiling surface with screws, then intermediate ones. When installing them, you need to maintain a distance of 40-50 cm between the sheathing elements to avoid sagging (Fig. 1).
What to make a ceiling vapor barrier from?
A vapor barrier is needed to prevent hot, damp steam from the steam room from penetrating into the insulation layer. In the simplest case, ordinary polyethylene film can be used as a vapor barrier, used to cover greenhouses and greenhouses. The only disadvantage of polyethylene is its complete impermeability to moisture. If condensation falls on the inside of the film from the insulation side, and the insulation on top is also covered with an impenetrable polyethylene film, it will have nowhere to go - it will not be able to freely evaporate from the insulation. To avoid this, you can use modern membrane materials that allow the insulation to “breathe”, allowing moisture to pass in one direction (out of the insulation) and not allowing it to pass in the other (inside the insulation).
To understand the difference between vapor barrier and waterproofing, we recommend watching this video:
As you can see, from the room side the insulation is protected by a vapor barrier, which prevents moisture vapor from penetrating into the insulation. And from the attic side, the insulation is covered with waterproofing - a membrane material that does not allow drops of water to pass through, but freely allows wet steam to pass through, allowing the insulation to dry out. Among the modern types of vapor barrier, we can recommend Izospan (membrane), Thermofol (metalized fiberglass), Megaflex (foil on kraft paper), Yutafol.
The joints of the vapor barrier sheets are carefully sealed with special tape, and the vapor barrier itself is stapled to the floor beams.
Step-by-step instructions for installing a false ceiling
Before you start work, you need to decide on the height of the ceiling. It is believed that for comfortable soaring its height in the final finish should be at least 2.2 m.
In this case, the following features must be taken into account:
- In the first two years, a log house can shrink by up to 10-15% of its height;
- the thickness of the rough ceiling is 30-50 mm;
- a ventilation gap of 50 mm is required between the rough ceiling and the finished cladding;
- The thickness of the skin is 10-20 mm.
To ensure the required height of the finished ceiling, the floor beams must be located at a height of at least 2.5 m during the construction of the bathhouse.
Floor arrangement
- Floor beams in classic bathhouse construction are made from the same type of log from which the log house is laid. They are laid along the short side of the log house in increments of 1-1.5 m. The logs are cut off on both sides for the convenience of filing the rough ceiling and attic floor.
- The mats are prepared from the log: they are marked and sawn to size, the upper and lower planes are trimmed to 1/8 of the diameter.
- In the logs of the upper crown - the comb and mats - grooves are selected for connection "in the fat tail". This type of connection is generally similar to the “bowl” connection, but is characterized by increased wind protection and less airflow due to additional spikes.
- After adjustment, the mats are laid in place with caulk, moss, tow or inter-crown insulation. Mauerlats are laid on top of the last crown, on which the rafter system is then mounted.
Floor arrangement
Filing the rough ceiling
- The rough ceiling is made from edged or tongue-and-groove pine boards in such a way as to ensure a minimum of gaps and cracks. When using an edged board, it is recommended to select a quarter in it for better joining. The thickness of the board for the washing compartment is 25-30 mm, for the steam room - 40-50 mm.
- The board is hemmed to the matrices from below. To ensure a tight fit of the boards, logs are cut off to the crowns of the log house.
- The bars are nailed to the resulting plane in such a way as to align them with the top and bottom of the mats. The ends of the subfloor boards are nailed to them, and subsequently the attic floor.
- The rough ceiling is nailed to the mats from below, tightly joining the boards. The first board is laid close to the frame, having previously cut off a tenon or a selected quarter. They fasten the boards with nails to each matrix so that it does not move away or warp; use two galvanized nails for each intersection. You can use galvanized screws by first drilling small-diameter holes in the boards. The length of the nails should be 2-3 times the thickness of the board; usually 80-90 mm long fasteners are used.
- Each subsequent board is inserted with a tenon into the groove of the previous one and knocked with a hammer through the block until the lock is completely connected.
- If a stove is installed in the bathhouse, the chimney of which passes through the ceilings, it is necessary to prepare an opening for the chimney at the stage of laying the subfloor. The mats at the location of the opening are cut off in the same way as the logs of the upper crown, and bars or boards are nailed to them, between which additional floors are mounted according to the size of the pipe penetration box.
Rough ceiling
Vapor barrier
The purpose of the ceiling vapor barrier is to prevent steam from the steam room and washing compartment from entering the insulation layer. Considering the high humidity in these rooms, vapor barrier must be done in compliance with all the rules, without skimping on it.
When heating a bathhouse, the ceiling can heat up to a temperature of 60-100 degrees, so vapor barrier is performed only with heat-resistant materials.
Clay vapor barrier
The traditional method of vapor barrier is coating cracks and joints with a clay-sand mortar, which is also used for laying stoves. Its vapor barrier properties are not inferior to modern materials.
Make a solution like this:
- fine-grained dry quarry sand is sifted through a sieve to remove debris, stones, and organic matter;
- fatty oven clay is soaked in water for three days, after which the resulting solution of semi-liquid consistency is rubbed through a sieve;
- scraps and remnants of basalt or mineral fiber insulation are crushed by hand, it imparts plasticity to the solution;
- mix these components in equal parts to a paste-like mass with a construction mixer, adding water if necessary.
The resulting composition is used to coat the junctions of the subfloor with the log house and pipe penetration.
Clay vapor barrier
They also cover the subfloor from the attic side, the thickness of the vapor barrier layer is at least 5 cm.
Drying such a vapor barrier usually takes at least a week. This method is environmentally friendly and has been tested for years, but is not very convenient, and therefore is not particularly popular with modern developers - they prefer to make vapor barriers with modern materials.
Vapor barrier films
In this case, the adhesion of the subfloor boards to the log house is caulked with tow or inter-crown insulation. For vapor barrier, use any heat-resistant and vapor-proof rolled material, for example, foil or insulating film.
It is laid on top of the subfloor with an overlap of at least 10 cm on the mats, grabbing their edges with a stapler or small nails through thin wooden planks.
Prices for rolled vapor barrier
roll vapor barrier
Vapor barrier film
You can completely cover the matrices from above. In this case, pieces of material are placed with an overlap of at least 10 cm, gluing the joints with metallized or aluminum tape.
Ceiling insulation
An important stage is the thermal insulation of the bath ceiling. It, like vapor barrier, can be done using both natural materials and modern insulation materials. The purpose of thermal insulation is to save firewood and time for lighting the bath, as well as maintaining a high temperature in the steam room for a long time.
To calculate the thickness of thermal insulation, there are many methods that take into account the thermal conductivity of the material, the temperature difference between inside and outside the room and other factors. However, this calculation is complicated, so developers usually use ready-made solutions based on experience in operating baths.
Table. Thermal insulation thickness for the bathhouse ceiling.
| Insulation material | Thickness for an unheated attic | Thickness when installing an attic in the attic |
| Peat, black soil, slag, clay with sawdust | 25-30 cm | 20-25 cm |
| Expanded clay | 20-25 cm | 10-15 cm |
| Mineral and basalt mats in the form of mats and slabs | 10-15 cm | 5-10 cm |
Natural insulation materials
As can be seen from the table, natural insulation materials are effective only if their layer is thick enough. Therefore, when constructing an attic floor above the steam room, it is better to use modern materials.
These include clay mixed with sawdust or straw cuttings, peat or black soil, and expanded clay.
Natural insulation materials
Advantages of using natural materials:
- are not afraid of steam and moisture - they absorb and gradually evaporate it without loss of insulating properties;
- environmentally friendly;
- cheap or even available for free.
Minuses:
- low thermal insulation properties;
- backfilling with a thick layer is required;
- large mass and load on the ceiling.
These materials are usually used in combination with clay vapor barrier. They are poured directly on top of the dried layer of clay putty between the matrices to their top level.
If the attic is used as a technical room, you can not cover the insulation with anything; it is not afraid of getting wet even in the event of roof leaks. When installing an attic floor, a subfloor is laid on top of the insulation and finishing is done.
Modern insulation materials
A more convenient and modern way is to thermally insulate the bathhouse ceiling using mineral and basalt wool. It is available in the form of rolls or mats of different densities and thicknesses. The thermal conductivity of the insulation and its ability to retain its shape depend on the density.
To insulate horizontal surfaces, you can use mats with a density of 30 kg/m³. Special insulation materials are produced for baths, one side of which has a foil surface - they additionally reflect infrared radiation. Such mats or slabs are laid with the shiny side down.
Modern thermal insulation materials
Cut the mats to size using a sharp knife or scissors. You can also use shredded scraps of material. They fill the entire space between the matrices, observing the recommended layer thickness. If slabs are used, they are laid in a checkerboard pattern, overlapping the joints of the previous row.
Mineral and basalt wool must be covered with a layer of vapor-permeable waterproofing. Even when wet once, the fibers stick together, the cotton wool settles and ceases to retain heat.
Video - Choosing insulation for a bath
Waterproofing insulation
It is laid on top of insulation under the subfloor of an attic room or as the top layer of a ceiling pie in a non-residential attic. As waterproofing, it is better to use modern non-woven membranes with one-way vapor permeability - they release moisture vapor from the insulation, but do not allow water to penetrate into the insulation from the outside.
Membranes on the modern market are presented in a huge assortment, their characteristics are similar, so you can choose any one that suits its price and properties. Spread the waterproofing over the insulation and mats with an overlap on the mauerlats and top logs of the log house, placing the film with the pattern facing up.
The strips are joined with an overlap of at least 10 cm. The waterproofing is attached to the mats using a stapler, and strips of construction tape are glued over the attachment point. The joints are also insulated with tape.
Waterproofing scheme
Arranging the attic subfloor
The floor in the attic is made if you plan to use it as a room for drying and storing brooms or as a summer room. For the subfloor, use an edged board with a thickness of 25-40 mm of softwood. It is nailed onto the matrices using nails, 2 nails for each intersection.
A mandatory gap is left along all walls for ventilation of the insulation; its width is 2-2.5 cm. Any finishing coating, for example, laminate, can be laid on top of the subfloor. In this case, the ventilation gap must also be observed. For a technical attic, a subfloor is sufficient.
Rough attic
Which ceiling is better - flat or suspended?
As mentioned above, most often the ceilings are laid or hemmed. The suspended ceiling consists of a lining or edged planed board, which is nailed (hemmed) from below to beams running in increments of 0.5-1 m. A vapor barrier is spread over the boards, insulation is laid, the whole thing is covered with waterproofing on top and can be covered with another clapboard flooring. Also, a false ceiling can be made using the method shown in this video:
Floor ceilings are often made in small baths with a span between walls of no more than 2-2.5 m. It consists of boards laid at their ends on the walls of the log house. There may be no ceiling beams at all. You can watch the construction of a deck ceiling in a log house in this video:
The load-bearing capacity of a deck ceiling is significantly lower. For its construction, it requires fairly thick boards, a small distance between the walls, and is installed less often than hemming. We also recommend reading: How to make a chimney pipe pass through the ceiling to avoid mistakes in cutting. *** As you can see, you can make a ceiling in a log house with your own hands even without prior experience in performing this type of work, if you follow the recommendations given above. As they say, it is not the gods who burn the pots. Good luck with your work and enjoy your steam!
See also:
Ceiling made of eurolining
How to make a pipe pass through the ceiling of a bathhouse?
How to insulate the ceiling of a bathhouse?
How to make a ceiling in a bathhouse?
Ceiling vapor barrier
Preparing for the installation of the ceiling
Immediately before starting to finish the ceiling in the bathhouse, it is necessary to carefully prepare the project in order to avoid mistakes or undesirable consequences in the future.
The ceiling in the bathhouse must meet several requirements:
- Serve as a heat insulator;
- Look beautiful;
- Do not release fumes that spoil the pleasure of going to the bathhouse;
- Have a long service life;
- Serve as protection against moisture for the thermal insulation layer.
Before arranging the ceiling, you also need to decide on its height. For most modern bath rooms, a height of about 2.5 m is ideal. For bath structures made of wood, a gap is also provided, since the material shrinks.
After this, you need to decide on the materials with which the ceiling will be finished, the necessary lighting and the method of installing the selected finish.