Choosing the optimal location for the furnace
The operating principle of the heating device will help with this. The location depends on where the chimney can be erected and removed, and a safe area for operation can be created. If a person wants to build a structure in a specific place, then before starting work it is necessary to take into account fire breaks.
Only after this can you make brick stoves for your home.
The following recommendations will help you determine the exact location:
- air flows must penetrate unhindered in order to create the correct convection system (for example, to warm several rooms);
- when choosing a location for installation, you should take into account the connection of the stove to the smoke exhaust system;
- the presence of free space when opening the doors of the combustion chamber, if there is not enough of it, difficulties will arise in cleaning and kindling;
- any structure must be built taking into account fire breaks, from heating flammable parts (the standards indicate a safe distance).
Simple recommendations will help in performing the work and creating the right device.
Dimensions for firewood
Given the high flame trunk, experts recommend making a firebox for wood with a height of 80 cm to 1 m. If these parameters are not observed, the combustion of volatile substances will not occur, as a result of which these particles will settle in the chimney system.
Over time, a significant layer of soot will accumulate, which will lead to a decrease in the efficiency of the entire furnace. In order for the coals to roll, it is necessary to slightly bevel the corner parts of the firebox, which are in direct contact with the grate.
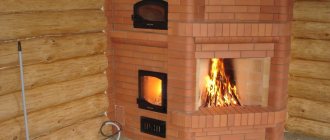
How to make a simple but effective stove
An alternative to metal devices (for example, a potbelly stove). A brick home stove will help heat the room and cook food. The structure is built without a standard base.
The structure will be small, without heavy mass. The frame is made of durable boards. The structure is created in one day. The first kindling can be done on the same day, in the evening. It's easy to build a mini brick oven in your home with your own hands.
Features of self-finishing
It is not difficult to build a stove with your own hands for a beginner, provided that the work algorithm is followed. The main questions arise when finishing. The simplest option is to thoroughly plaster and whitewash the structure. If the brick is good, grouting and jointing is enough.
Sloppy stove walls can be disguised. Before finishing, the surface must be mopped, rubbed with bricks and allowed to dry. After plastering with a clay-sand mixture with asbestos chips, they proceed to finishing. The heating and heating-cooking structure is tiled.
What you need for work
An economical and affordable method of building a heating device. List of materials:
- two types of bricks;
- doors;
- lattice;
- valves;
- metal surface (cast iron is of high quality).
For the binder, a clay mortar is used, which is prepared before laying out the brick oven.
Preparation
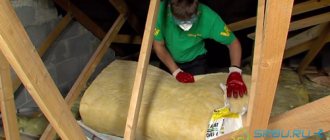
Initially, determine the location of the furnace. Its weight is relatively light. Instead of the usual base, a frame is created from durable boards, with a heat-insulating layer. Use a foil backing.
A material that cannot be heated is used as insulation. For example, basalt wool. A layer of insulation is placed on top. A layer of sand of several cm levels the surface and makes it uniform. This is necessary for convenient subsequent work. Proper preparation will help you make a brick oven with your own hands.
Masonry scheme
Arranging a brick stove for your home with your own hands:
- Initially, it should be placed directly on the sand, without using a solution. The bricks are laid strictly according to level. Thin-layer products are treated with the mixture. The door should first be wrapped with asbestos to compensate for the expansion of the metal due to thermal effects.
- The doors are secured with wire. Then they lay the second row and form a blower.
- Further masonry is carried out with fireclay bricks. Then a grate is installed above the ash pit.
- The next row involves laying bricks on edge. It is necessary to form a channel for removing smoke, and lay the foundation for a partition inside it. Install the firebox door, pre-wrapped with asbestos. At the same time, it should open easily at the top.
- The masonry continues in the primary way.
- In row number 2, at the final stage, the brick is placed on its edge. The walls of the smoke exhaust channel must be wiped with a damp cloth.
- The brick is laid flat.
- At the next stage the firebox closes.
- Before laying, asbestos strips are made, pre-moistened with water. This makes it possible to seal the gaps between the bricks and the cast iron slab. You cannot place a cast iron surface on a clay solution. This will cause cracks to form during operation.
- Formation of a smoke exhaust pipe. There should be a smooth expansion closer to the back. Only needed for the chimney base. The other part is made of metal.
- Installation of an asbestos-wrapped valve. Initially, they are coated with clay mortar. This row is the final one, where the laying of the heating device ends. The correctness of the work performed is checked. Additionally, you can view photos or videos to ensure the correct construction of the structure. A fireplace and a bed are being added, creating comfortable conditions.
Additionally, you can watch photos or videos for proper construction of the structure. A fireplace and a bed are being added, creating comfortable conditions.
Final works
A simple heating system does not require special design. The final stage of decoration is whitewashing. A few drops of blue are added to its composition to prevent the formation of a yellow coating.
There is a joint between the brick and the floor. It prevents sand from getting into the room from under the stove. The joint is covered with a sheet, and the edging is made from plinths. Time to complete the work is one day. In the evening the first kindling takes place. For this you will need wood chips and paper. After heating, add firewood.
Furnace device for hard coal and anthracite.
In order for the combustion process of coal to proceed normally, a significantly larger amount of oxygen is required than when burning wood. Therefore, the area of the grate should be larger than for firewood. Since when burning coal and anthracite, a higher temperature develops than when burning wood, the cross-section of the grate should be larger, which will avoid their deformation when heated. The walls of the firebox are lined with refractory bricks.
Anthracite is characterized by a small amount of volatile substances; in addition, the flame is small, so the volume of the firebox can be 1.5-2 times less than for firewood. The grate is deepened by 30 cm. The firebox for anthracite should be narrowed at the bottom above the grate, which will provide a thick layer of anthracite and increase the efficiency of fuel combustion. Holes are drilled in the valves so that after they are closed, gases can escape into the pipe.
Step-by-step laying of the furnace
Large structures need a strong foundation. If the device is small, then instead of a standard base, a frame is created from durable boards. Installed between the kitchen and living rooms.
In dwellings it is possible to install between the living room or bedroom. Without some knowledge, the process will be difficult, but it can be done.
Step 1. Construction of the foundation
Step-by-step instruction:
- Determination of depth, taking into account the localization of the room. It is important to identify the level of frost resistance.
- The foundation is poured wider than the size of the future structure.
- A sand cushion is created between the ground and concrete. Its purpose is to separate moisture that comes through the soil. Increases in spring and autumn.
- Crushed stone is poured on top of the sand cushion. Natural stone is highly durable and suitable for such purposes.
- The fittings are placed at the bottom. Designed for strengthening. The mesh is installed horizontally.
- The top of the foundation is level.
- After drying, a waterproofing layer is created using roofing felt.
- Holes in the floor are needed for convenient laying.
A correctly poured foundation means successful and reliable operation.
Step 2. Laying the stove
Before laying a brick stove, it is necessary to prepare the order. Each row is built in strict accordance. The dry technique will help the initial masters. This method helps to clearly understand the location of the channels inside, and not make irreparable mistakes.
For dry masonry, wooden slats are used. They determine the thickness of the joints between the bricks. The thickness of the seam must be ideal. The process requires care and patience. The entry and removal of smoke in the chimney depends on its implementation.
After dry laying to the head of the pipe, it is dismantled back. Bricks can be identified by numbers. Then assembly with the solution will happen quickly. After the main masonry, the structure will be completed. Each furnace has a specific order and requires strict adherence to the drawings and diagrams.
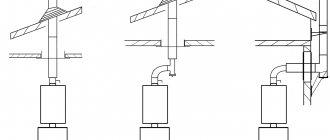
Step 3. Exit the chimney through the roof
At the end of the masonry, a pipe is created. Usually straight, without changing dimensions. A hole is made in the attic in which the brick pipe goes into a metal one. It is important to correctly determine the size calculation.
At the intersection of the chimney and the roof, a fluff is installed. This is a required action. The pipe can be placed at a certain elevation. There are no mistakes to be made in the process. The operation of the furnace depends on this. It is recommended to choose firewood with a low resin content. For example, aspen or acacia. The amount of soot will be negligible.
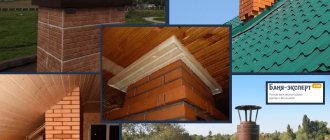
Step 4. Furnace lining
Two cladding methods:
- Standard cladding of vertical surfaces with ceramic tiles. The surface is first covered with mesh and plastered. This is necessary to prevent cracks in the ceramics. The elements are laid on a plastered surface.
- Application of aluminum strips with holes. Attached to vertical seams. Ceramic tiles are placed between the corners. The main thing in this process is maintaining the evenness of the vertical seams. The gaps are filled with solution.
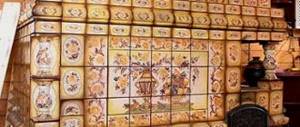
Types of tiles for cladding:
- majolica - a pressed slab with a pattern and a glazed surface;
- terracotta - durable, round in shape, has a highly porous base;
- clinker - made from clay with admixtures of dyes and fireclay.
The main types of slabs are enameled and non-enamelled. The first type is durable and undergoes double firing. The simplest oven is finished using this method. Non-enameled slabs are not resistant to temperature changes and can quickly fail.
The shape of the slab for finishing is rectangular, square. The octagonal look looks nice. Rarely seen. If you lack the skill, it is recommended to choose rectangular products.
Step 5. Lighting the stove
Types of fuel: wood, coal. The principle of kindling is the same. The ash pan and firebox are pre-cleaned. This is done with a poker, broom, dustpan. It is important to remove any remaining ash from the door area. If this is not done, it will not close well during the combustion process.
Instructions for lighting the stove:
- a small amount of crumpled paper and thin wood chips are placed on the grill;
- It is strictly forbidden to use liquid fuel;
- thin logs are laid almost half the volume;
- I arrange the firewood in any order - cross to cross, in a house, the main thing is to leave a gap for air;
- the view opens halfway, the ash door is ajar;
- The paper is set on fire through a hole in the main chamber, then it is closed.
It is convenient if the oven has panoramic glass. This allows you to monitor the combustion process. Soot removal is carried out periodically. After several fireboxes, the ashpit is cleaned for good draft.
Order or diagram of the construction of your stove
In the construction of furnaces, everything is exactly the same as in any other construction work. You need to start by preparing a drawing. In this case, it is called “ordering” and is a schematic representation of each row of brickwork with a top view.
Roughly speaking, if your stove from the base to the end of the chimney consists of 20 rows of bricks, then before installation work you need to make yourself 20 diagrams. Without order, the successful construction of a furnace is almost hopeless.
You can find hundreds of different drawings on the Internet and specialized literature. You can make them yourself - to suit the size of your home and your needs.
To do this, you should know that each oven consists of the following parts:
- The firebox is a furnace chamber into which fuel is placed. The combustion process also takes place in it. It is separated from the ash pit by grates. It has a direct connection to the internal channels of the stove, through which smoke is directed from it to the street.
- The ash chamber is the cavity of the stove through which the oxygen necessary for burning wood is supplied to the firebox. Burnt fuel residues also get into it through the seals.
- Devices for cooking and heating water are built in optionally, depending on the purpose of the stove device.
- Cleaning chambers are cavities necessary for collecting and removing soot.
Repair work
Repair depends on the complexity of the breakdown. A thorough inspection is carried out first. Operational problems are often associated with soot contamination. It is important to check and clean your chimney. If long streaks of smoke appear above the firebox, this is a sign of poor draft. The reason may be improper laying. Part of the structure must be disassembled and reassembled.
If the brick is not destroyed, this is a sign of burning raw wood. Incorrect fuel destroys the chamber and ash pan. Only dry logs are used for kindling. In summer, it is recommended to periodically check the condition of the structure. Inspection is necessary when the structure is not in use for a long time. Metal elements (latches, doors) are periodically checked for strength. If necessary, strengthen with mortar.