Good day, dear reader! In recent years, many types of heating devices have appeared that require a special approach to the design of the chimney system and the use of durable, heat-resistant materials. Installing a sandwich chimney yourself will help ensure good draft and efficient removal of combustion gases: we will discuss how to assemble it correctly in this article.
What is a sandwich, its advantages and disadvantages
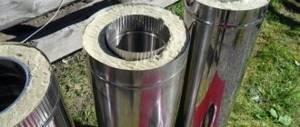
A sandwich chimney is a double-circuit cylindrical structure consisting of several sections of pipes 1 meter long, which are inserted into one another during the installation process. The internal and external contours are made of rolled pipe, between which a thermal insulation material is placed - vermiculite, mineral wool or basalt fiber. It does not allow the chimney to cool quickly and prevents condensation from appearing inside it.
These insulation materials are characterized by a low thermal conductivity coefficient, resistance to chemicals, fire resistance and high moisture resistance. The internal circuit is made mainly of heat-resistant and corrosion-resistant stainless steel; for the external circuit, pipes made of stainless steel, galvanized iron, alloy steel with a decorative enamel coating are used.
Thanks to their design features, sandwich chimneys have the following advantages:
- Simplicity and ease of installation. Thanks to a wide range of connecting parts, you can give the structure a configuration of any complexity.
- Soundproofing properties. Due to the three-layer wall structure, the pipes significantly reduce the hum and noise that occurs during traction.
- Compatible with all types of heating devices, regardless of the fuel used.
- The lightness and versatility of the design means that sandwich chimneys can be installed both indoors and outdoors without the construction of additional support.
- Attractive appearance.
- High heat-shielding properties, thanks to which the structure is reliably protected from the formation of condensation.
- High fire safety. Effective thermal insulation also prevents the outer contour of the smoke exhaust duct from heating to very high temperatures that can ignite flammable materials in contact with the surface of the structural elements of the building.
- Smooth internal surfaces. During operation, they are less susceptible to soot deposits, which makes it possible to clean the chimney duct quite rarely.
- Long service life. The internal contour of the sandwich pipes is made of stainless steel, resistant to thermal and chemical aggression, so they retain their original characteristics for many years.
Despite the large number of advantages, sandwich chimneys also have a number of disadvantages:
- Fairly high cost.
- Loss of tightness resulting from the reaction of the material of the chimney components to temperature changes (narrowing or expansion).
"Pros" of sandwich chimneys
Advantages of sandwich chimneys made of stainless steel pipes:
- Easy on-line installation.
- Relatively small (when compared with stone chimneys).
- Light weight.
An important detail: stainless steel walls provide increased air flow; this material has a minimum roughness coefficient; smooth walls provide high traction. In this case, a minimal amount of soot accumulates. Such structures are easy to clean.
Stainless steel is a metal that is not afraid of corrosion and has a long service life. The temperature of the gases escaping through the pipe is directly related to the type of boiler and fuel. This factor should also be taken into account when designing. The higher the temperature, the greater the heating of the pipe. Here are the basic figures for heating pipes from different heat sources:
- Stove, fireplace 340 - 660 degrees.
- Sauna stove 420 - 720 degrees.
- Gas boiler 125 - 210 degrees.
- Boiler operating on coal 520 - 730 degrees.
It is recommended to remember that wood may have an increased fire hazard. If wooden elements are located near a heating device, they can char and flare up at two hundred degrees Celsius. If wood is regularly exposed to high heat for a long time, it can ignite at 175 degrees. Such information should be taken into account during project development and calculation of sandwich chimney pipes; it is recommended to completely eliminate the possibility of ignition. There are no trifles in the installation of such elements; according to statistics, up to eighty percent of all fires in private households occur in incorrectly designed chimneys.
Types of chimneys
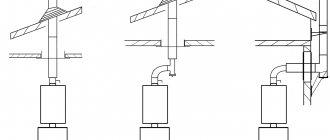
Depending on the location of the stove or boiler, the availability of free space and the design features of the chimney, organizing the removal of smoke outside the building can be done in two ways - external or internal installation of the chimney.
Outer
An external chimney is a flue that connects the outlet pipe of the heating device to a pipe that goes outside through the wall. To ensure good draft, the height of the chimney pipe must be no lower than the level of the ridge or rise above it. The length of the horizontal section of such a structure should not exceed 1 m, the distance from the edge of the roof should be at least 0.5 m. A prerequisite for the normal functioning of the external chimney can also include the installation of external insulation.
The advantages of this option for placing a chimney are saving usable space in the house, reducing fire hazards, maintaining the integrity of the roofing, and independence from interior design decisions.
Interior
The internal smoke exhaust system consists of a vertical part located inside the house and led outside through the roof. The modules must be joined outside the attic and between floors so that there are no obstacles to checking their tightness. The chimney passages are protected from high temperatures using passage pipes and a roof penetration. Sealing of the joint with the roofing is ensured by the roof groove.
The internal arrangement of the chimney pipe with a 100% vertical position provides more stable draft, is easier and more convenient to maintain, does not require insulation, and does not spoil the architectural appearance of the building facade. However, this type of chimney will take up part of the usable space in the room; during its construction, the costs of arranging passages through the ceilings, ceiling and roof will increase, and the tightness of the roof covering will be compromised.
Advantages of external installation of chimneys ↑
The external method of wiring the outlet pipe has the following obvious advantages:
- Removing the main part of the drainage channel from the house allows you to increase the usable living space of the room.
- The installation of a combustion product exhaust system can be carried out upon completion of the main construction activities.
- External installation of a chimney will not require you to spend a lot of time and effort.
Easily removable disadvantages of this approach include:
- The need for mandatory insulation of chimney pipes.
- Possibility of significant heat loss with low quality thermal insulation.
- The difficulty of combining the design of the chimney with the architectural style of the building.
Despite all these difficulties, when deciding how to make a chimney through a wall, preference is usually given to its external placement (full or partial).
How to choose the right sandwich chimney installation kit
When purchasing such a kit, first of all you need to correctly calculate its geometric parameters - the diameter and height of the future structure. It is also necessary to take into account what material the component elements are made of, the thickness of each layer of products, so that during operation the sandwich chimney can withstand the temperature of exhaust gases, for example, from powerful solid fuel boilers.
Material of manufacture + GOST table for stainless steel
The pipes of both circuits of sandwich chimneys are mainly made of high-alloy and heat-resistant steel with a thickness of 0.5 - 0.7 mm. This material is resistant to chemical aggression and condensation. Stainless steel pipes can be combined with any type of heating device. The main requirement is the precise selection of steel grade depending on the maximum possible temperature of the exhaust gases.
| Steel grade, according to American AISI standard | GOST Russia | Characteristic | Heating device type | Maximum permissible exhaust gas temperature |
| AISI 304 | 08×18Н10 | Chrome-nickel steel | Gas and liquid fuel boilers | 450ºС |
| AISI 316 | 03×17N13M2 | Austenitic chromium-nickel-molybdenum steel | Gas and solid fuel appliances | 800ºС |
| AISI 321 | 08×18N10T | Non-magnetic austenitic chromium-nickel steel with titanium addition | Powerful gas and solid fuel appliances | 850ºС |
| AISI 310S | 10×23Н18 | Austenitic steel with increased nickel content (17 - 20%) and chromium (up to 25%) | Solid fuel pyrolysis boilers | 1000ºС |
In addition to double-circuit stainless steel structures, sandwich pipes for chimneys are produced, in which the outer and inner contours are made of galvanized steel. The cost of such products is much lower, but they are subject to deformation at temperatures above 450ºС. A more durable option is when stainless steel is used to make the internal circuit, and galvanization is used for the external circuit. In this case, the outer pipe is made of metal with a thickness of 1 mm; for the internal contour, stainless steel products with a wall thickness of 0.5 mm are used.
Wall thickness (for solid fuel, gas)
The wall thickness of the internal contour of sandwich pipes for gas units should be selected depending on their diameter:
- From 130 to 450 mm - 0.5 mm.
- 500 mm - 0.6 mm.
- Over 500 mm - 0.8 mm.
For solid fuel appliances, the determining factor in choosing the wall thickness of the inner pipe is the temperature of the combustion products:
- Up to 450ºС - 0.6 mm.
- Over 450ºС - 0.8 mm.
The design of the chimney of a solid fuel boiler must include a non-insulated section connected directly to the outlet pipe of this device. For these purposes, a monopipe made of heat-resistant stainless steel with a wall thickness of 0.8 mm to 1.0 mm is usually used.
The casing on the outside of the products, depending on its diameter, must have the following wall thickness:
- Up to 450 mm - 0.5 mm.
- Over 500 mm - 0.6 mm.
Selection of diameter + table of dimensions of minimum sections
The internal diameter of the sandwich pipe should be selected depending on the parameters of the heating unit. The cross-sectional area of the chimney is calculated based on the thermal power of the boiler, but its size over the entire height of the structure cannot be less than the cross-section of the outlet pipe of the device.
Table 2 presents options for the sizes of the minimum sections of the smoke exhaust duct depending on the power of the heating device.
table 2
| Heat generator power parameters, kW | Dimensions of the diameter of the internal and external sections of the pipe, mm |
| less than 3.5 | 120/180 |
| 3,5 — 5,2 | 140/200 |
| 5,2 — 7,0 | 150/220 |
| Over 7.0 | 200/260 |
Insulating layer thickness
The choice of heat insulator thickness also depends on the temperature of the exhaust gases. For gas boilers of low and medium power with a temperature of exhaust gases of 250ºС, an insulating layer 30 mm thick is sufficient, for more powerful gas and liquid fuel appliances with a temperature not higher than 450ºС - 50 mm. Gas ducts of solid fuel units, especially coal units, in which the smoke can heat up to 1000ºC, require a heat insulator 100 mm thick.
Connection types
You can connect chimney modules with your own hands in the following ways:
- Bells. This type of connection is used for modules that have a slightly wider chamfer on one side. It provides a high degree of channel tightness.
- Corrugated edges. Assembling a chimney from modules with corrugated edges does not require high precision installation; the tightness of the joints here is ensured by a large amount of expensive high-temperature sealant.
- Flange. This method allows you to assemble a structure that has no obstacles to the escape of smoke, but with poorly closed joints where moisture can seep in and damage the thermal insulation layer.
- Bayonet. The parts are connected to each other by moving along the axis and rotating, and sometimes lateral displacement, one element relative to another.
What is a sandwich pipe
Sandwich - this type of pipe received this name for its layering by analogy with the named product. The inner and outer layers of such pipes are represented by metal cylinders, and the middle one is a layer of thermal insulation.
Metal for chimneys began to be used quite a long time ago. A simple example is the pipe of an ordinary potbelly stove. However, soon after commissioning it became clear that metal pipes have a number of disadvantages. The problem was that metals, having good thermal conductivity, quickly heat up and give off heat to the environment, and there is always a danger of ignition.
The solution turned out to be simple - the metal pipe was wrapped in a layer of thermal protective material. However, such material does not tolerate environmental conditions well and is not very attractive from an aesthetic point of view.
Sandwich pipes are the next solution in the evolution of metal chimneys. Another metal pipe is placed on top of the thermal insulation layer, which protects the inner two layers from external influences and does not spoil the appearance of the building.
It is important! Sandwich pipes can be purchased ready-made, but you can make them yourself by selecting the materials with the required parameters. It is worth remembering that the inner pipe should be more expensive and better quality than the outer one, but smaller in diameter, and the thicker the thermal insulation layer is, the higher the combustion temperature of the fuel in the heating device.
The inner cylinder is made of stainless steel. This material is less susceptible to corrosion by combustion products. The steel must be high quality and high-tech. Preference is given to those options whose seams are welded using the TIG method - the most reliable and wear-resistant, but also the most expensive.
We recommend that you familiarize yourself with: Metal hose in a sheath with PVC insulation to protect the cable
The middle layer provides thermal insulation and protection of surrounding surfaces from heat. For these purposes, mineral wool is used, the density of which is at least 120 kg/m3. The thickness of this layer depends on the temperature inside the chimney. This parameter should be selected individually.
The outer cylinder is also made of steel. It is worth giving preference to stainless material, but to save money you can choose galvanized steel. The durability of the chimney will depend on its quality to a lesser extent than on the quality of the internal cylinder. In addition, sandwich pipes with decorative outer cylinders are available.
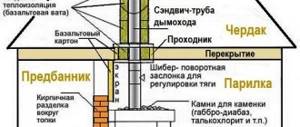
Diagram with internal structure
Elements of the chimney system in the diagram:
- A heating device with a vertical pipe for connecting a chimney in the upper part of the firebox.
- Connection unit for the chimney from the boiler, which includes a 90º inspection tee, a plug - an inspection hatch, a plug with a condensate drain and a 90º connection tee.
- Mono-pipe is a section of a smoke exhaust duct without thermal insulation. It is located in close proximity to the boiler. The need for such a section is explained by the maximum temperature effect on this zone of the structure, so there is a need for effective heat removal. In turn, the hot initial section of the chimney will become an additional source of thermal energy in the room. With a different approach to assembling the structure, high temperatures can lead to sintering of the insulation in the sandwich, which will increase the fire hazard in the house.
- Additional equipment: tank, mesh heater or convector. The thermal energy of the initial area without thermal insulation can be used to install a hot water tank or a heater grid on it. You can also make good use of the high temperature of combustion gases if you replace the monopipe with a convector equipped with channels and additional heat exchange fins. Using a convector will provide faster heating of the room.
- A damper (gate) is a rotary or translationally moving device designed to regulate draft. This happens by changing the cross-sectional area of the channel for removing flue gases.
- Adapter from mono to sandwich - a special design with a round cross-section, used for connecting an uninsulated area with a sandwich-type pipe;
- Sealing all connections with clamps. Clamps are placed and tightened on each connecting node of the smoke duct.
- Ceiling-passage unit is an element of the system that ensures fire safety in places of passage through the ceilings.
- A sealed passage through the roof. A ready-made pass-through node is used - a master flush. It is installed at the junction of the pipe and the roofing to protect against leaks.
- The cap is the final element of the smoke channel. Protects the system from precipitation and decorates the structure.
What happens if done poorly?
Poor assembly and installation of a sandwich chimney can lead to poor or reverse draft, when gaseous combustion products do not evaporate into the atmosphere, but are concentrated in the room. The most common reasons for changes in thrust direction are:
- Incorrect calculation of pipe parameters depending on the boiler power.
- The configuration of the smoke exhaust duct is too complex with a large number of narrow sections and turns.
- Low position of the head in relation to the ridge or nearby tall buildings.
Options
Sandwich chimneys are good because they have a modular structure, which allows you to assemble any configuration, with any parameters. Before you go to the store, you need to know the required diameter of the chimney, the height of the pipe and those additional elements that will be needed.
Chimney diameter
When choosing the diameter of a sandwich pipe, a simple rule applies: it cannot be less than the diameter of the boiler outlet pipe. If your outlet pipe is 120 mm, then the internal diameter of the sandwich should be the same or larger. It may be wider, but definitely not smaller, and the narrowing cannot be done along the entire length of the chimney. If the chimney is slightly wider than the pipe, an adapter is purchased, which is placed directly at the boiler outlet, and then the working size comes next.
If you don’t have a boiler yet, but you know its power, you can choose a chimney based on these data:
- boiler power up to 3.5 kW - internal diameter of the sandwich - 80 mm;
- from 3.5 kW to 5.2 kW - at least 95 mm;
- more than 5.2 kW - 110 mm and more.
But it’s better to buy (or at least choose) a boiler, and then decide on the chimney, because many manufacturers insure themselves by making the outlet pipes wider to improve draft.
Installation of a sandwich chimney begins with determining the diameter
Pipe height
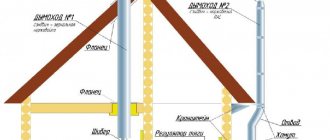
The height of the chimney above the roof surface depends on the location of its outlet, but its minimum height should be 5 m. That is, if the height of the house is small, in any case, install the pipe to a height of 5 meters. If the height of the house is above 5 m, then the pipe should rise above the roofing material to the following height:
- Should rise 50 cm above the ridge if it comes out at a distance of less than 150 cm from it.
- If the distance from the ridge to the pipe is more than 300 cm, then the pipe may be lower than the ridge level, but the angle should be no more than 10° (see figure).
- If the chimney exits at a distance of 150 to 300 cm from the ridge, its height can be at the same level as the ridge element or higher.
Under such conditions, normal traction is ensured. The smoke will go away normally regardless of weather conditions. To prevent leaves from getting into the chimney, they install special umbrellas, weather vanes, and in windy places - deflectors, which further improve draft.
Sandwich chimney pipe height
If it is not possible to bring the pipe to such a height, they install a smoke exhauster - a forced draft is obtained. A fan will not be needed all the time, but in some conditions, when natural draft is not enough, forced exhaust saves the situation.
The principle of correct installation of sandwich pipes (for smoke, for condensate)
Assembling a chimney from sandwich pipes can be done in two ways:
- Connection “through smoke”. The end of the lower module fits completely into the pipe of the upper module, which ensures unhindered passage of combustion gases.
- “Condensate” connection. This is a more complex assembly scheme. In this case, part of the inner pipe of the upper section is inserted into the lower composite segment, and the outer part - the end of the lower one is inserted into the upper module. This method of installing a gas duct ensures unhindered drainage of condensate and natural precipitation down its surfaces. With this connection option, moisture will not penetrate into the insulation and the pipe will not corrode, however, if the joints are loose, smoke may enter the room.
It would be more correct to combine both assembly schemes so that the inner contour of the pipe is mounted along the condensate, and the outer contour is mounted along the smoke.
Sandwich pipe for chimney. Why she?
Recently, multilayer sandwich chimneys have become widespread. Their design is extremely simple. A heat-insulating material is applied to a pipe made of stainless steel, usually mineral wool made of basalt. This, in turn, is covered with another pipe, which can be made of corrosion-resistant steel or galvanized sheet. There are locks at the end of the pipes, which allow the installation of a chimney from sandwich pipes through walls or roofs without any particular difficulties.
Thus, the homeowner, how to install a chimney, can easily assemble a gas exhaust system on his own, without resorting to the expensive services of third-party specialists. But, at the same time, he must know how to properly install a chimney and some other rules that will protect his home from fire in the future due to improper assembly or operation of this structure.
Features of the use of steel
Fuel combustion products are highly saturated with chemically aggressive substances. Temperature differences and the presence of moisture inside the sandwich pipe create the prerequisites for the activation of corrosion processes. Corrosion processes are minimized by using stainless steel. But, in fairness, it should be noted that the use of this rather expensive material does not eliminate all the problems associated with the use of metal in chimney structures.
The stainless steel sandwich guarantees rapid cooling of combustion waste, especially for those sections of the chimney located in open areas. A drop in temperature leads to a decrease in thrust. In addition, temperature changes lead to the formation of condensation. Its presence on the pipe surface creates conditions for the formation of soot layers and the growth of corrosion.
The use of metal in the initial sections of the outlet sandwich pipe, especially close to the boiler or furnace, results in the pipe heating up to dangerous ambient temperatures. Touching such a pipe can result in burns, and building structures are under constant threat of fire. That is, when installing sandwich pipes in a bathhouse, it is necessary to take measures to eliminate this threat.
The use of such pipes to create systems for removing combustion products has solved most of the problems identified above and allows you to install a sandwich chimney yourself.
Preparation
The preparatory stage includes carrying out calculations on the proposed configuration of the chimney, developing a diagram - drawing, marking the mounting points. This will allow you to calculate the required number of modules, connecting parts, and develop a plan for further work.
Consumables and tools
In addition to the standard elements included in the sandwich chimney kit, for independent installation you will need the following consumables and tools:
- Clamps.
- Wall brackets.
- Fasteners.
- Fireproof sealant.
- Scissors and jigsaw for metal.
- Hammer.
- Side cutters.
- Construction hairdryer.
- Putty knife.
- Master OK.
- Measuring tools: tape measure, square.
- Construction level and plumb line.
- Marker.
What to fasten with?
The structural parts must be secured with special clamps, which are tightened with nuts. The finished chimney, if it is located along the wall, must be secured to it with brackets in increments of 1.5 - 2.0 meters. A stretcher should be installed on the upper element.
Chimney height (total + on the roof)
When calculating the height of the structure, the following rules should be observed:
- The height of the channel from the nozzle of the heating unit to the final element - the head - must be at least 5 m.
- The part of the pipe located on the roof must rise above the ridge by no less than 0.5 m and the roof of neighboring buildings by no more than 1.5 m. If there is a need to lengthen this section of the smoke exhaust duct, then a guy should be installed for additional fixation .
Connecting the tee to the heating device + sealing + mounting to the wall
A heating device with a horizontal outlet pipe on the rear side is connected to a monopipe using a tee (mono), equipped with a plug at the bottom with a condensate collector. Before installing it, the inner surface of the central outlet should be covered with a layer of heat-resistant sealant.
Next, the tee should be tightly placed on the stove pipe, pushed in all the way and secured in the area of connection with the pipe with a clamp and bracket. In this case, it is important to check the verticality of the tee axis using a building level; only after this procedure can it be secured to the wall with a bracket using anchors or dowel plugs.
Installation of a monopipe
To install a straight section of a monopipe, you must first mark on the wall the place where the bracket is attached, so that the markings coincide with the junction of the module and the tee, and drill holes for the fasteners. Then you need to put a clamp on the upper branch of the tee, but do not tighten it completely, but fix it with a bracket to the wall.
Further installation work will be carried out using the “condensate” method - inserting the lower end of the monopipe into the tee. A heat-resistant sealant is used to seal the joint. It is applied with a narrow spatula and distributed in an even layer in the joint zone.
Then the pipe moves in the tee pipe until it stops. The installation of this section of the monopipe ends with tightening the clamp. The next block with a damper is installed according to the same scheme: a clamp is put on the already installed pipe, its free end is coated with sealant, where the upper part is inserted, and the clamp is tightened. It is advisable to mount another section of monopipe, 50 cm long, behind the damper to ensure maximum heat transfer from the flue.
Sandwich + polyurethane foam installation
Sandwich modules are installed in the same order: applying sealant, joining parts and tightening with a clamp. In the ceiling, in the place where the channel will cross it, you need to drill an opening and continue assembling the structure, checking the verticality using a plumb line. The factory-made ceiling pass-through assembly consists of a box-shaped body made of galvanized steel, covered at the bottom with a stainless steel plate.
In the middle of the body there is a through hole corresponding to the outer diameter of the sandwich pipe. The PPU is placed on top of the already installed module and lowered into the ceiling opening. The bottom of the polyurethane foam should be flush with the surface of the ceiling, the top of the box should be filled with fire-resistant insulation - basalt wool, expanded clay or vermiculite and immediately closed with a lid.
Mono-pipe again (if the room is 2nd floor residential)
If the building is two-story and the rooms on the second level are residential, then in order not to lose useful thermal energy, the part of the structure passing through them should be assembled from monopipe sections. To do this, first install an adapter from a sandwich module to a single-circuit pipe. Then, in the usual manner, the chimney is assembled from monopipe sections up to the attic floor, fastened with clamps to each other and brackets to the wall.
Again sandwich + polyurethane foam
An adapter is installed in front of the attic floor, now from a mono section to a sandwich pipe, and then the assembly of the channel to the head will be carried out from sandwich products in the order already discussed. At the point of passage through the attic floor, an opening is also cut out and polyurethane foam is installed and filled with heat-insulating material.
Making a hole in the roof
The hole in the roof must be calculated so that it does not affect the elements of the wooden rafter structure and is located at a distance of at least 13 cm from them. The shape of the hole can be rectangular - for a roof covering laid on a continuous or frequently spaced sheathing, or oval - on a pitched roof. You can make an opening using an electric jigsaw, having first marked its boundaries.
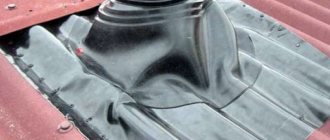
Installing master flash
After the chimney is brought out through the roofing, the passage must be sealed by installing a special master flush passage unit. It consists of an elastic base (flange) with flexible aluminum strips around the perimeter, ensuring the best possible fit to the roofing material. Connected to it is the upper part - a corrugated cuff in the shape of a truncated cone, made of silicone or EPDM rubber. In the working position, the cuff fits tightly to the pipe, preventing the penetration of atmospheric moisture and dust.
Before installation, the top of the cone-shaped cuff must be cut so that the cross-section of the resulting hole is approximately 20% smaller than the outer diameter of the sandwich section. Next, the seal is put on the pipe and moves down to the roofing, to which it is fixed with silicone glue.
On pitched roofs, additional fastening with self-tapping screws and fixation with rivets is required. The installation of the masterflash is completed by treating the upper cut of the cone and the lower edge of the base with sealant, and fixing the upper edge with a metal clamp.
Installation of the head
The cap is the final element of the structure; it fits tightly onto a pipe brought to the required level and is attached to it with three or four metal screws.
Video:
1. Passage through a soft tile roof
2. Installation through ordinary tiles
How to install a chimney through a roof
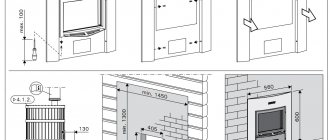
Before the pipe goes through the roof, it must be routed through the ceiling of the room. To do this, create a hole in the ceiling. The minimum distance from the wall to the chimney is 25 cm.
We recommend that you familiarize yourself with: Insulation for protecting pipes, made of foamed polyethylene (thermal insulation)
There are two options for installing a chimney through a hole in the ceiling:
- In the first case, thermal protection is made independently. To do this, the edge of the hole in the ceiling must be lined with a fire-resistant coating. The space between the coating and the pipe is filled with mineral or basalt wool. The entire structure from the side of the room is covered with a stainless steel sheet. Between the steel and the ceiling there must be a layer of thermal protection, for example, mineral wool.
- The second option is simpler. It is enough to purchase a ready-made ceiling-passage block. In this case, the edges of the hole in the ceiling are covered with mineral wool, and then a block that already has a thermal insulation box and a stainless steel coating is inserted into it. The pipe does not have to be tightly attached to the ceiling; it is enough to simply set it in a vertical position.
Exiting the chimney through the roof is the most difficult part of the installation. It is important to know the location of the roof beams and slabs in order to position the pipes correctly. The chimney must pass between the beams without touching them. The distance between the chimney and flammable building materials must be at least 13 cm. All combustible materials must be additionally insulated with a thermal protective layer, for example, using mineral wool. This will prevent a fire if the pipe starts to heat up.
It is important! To ensure optimal draft and save building materials, it is recommended to create a vertical chimney. Sometimes this is not possible, since the heating device is located in the middle of the wall, and the chimney must be located as close as possible to its outer part between the beams. In this case, a rotation angle of 45° should be created, and the pipe in this place should be additionally secured to the wall with brackets.
From the outside, the pipe is separated from the roofing by at least 13 cm. There is a layer of thermal protection along the edges of the roof, the space between the chimney and thermal insulation is free. To isolate it, you need to purchase a master flash. This part is called a rubber “skirt” or “cuff”.
In addition to rubber, there are more reliable silicone options. The master flash must be selected according to the pipe diameter and roof configuration. It is put on the pipe, pressing it tightly to the roof.
We recommend that you read: Do-it-yourself chimney for solid fuel boilers
A layer of sealant is applied between the cuff and the roof, as well as the cuff and the pipe.
After this, the master flash is attached to the roof with roofing screws. The process of installing the chimney and fastening the head is completed.
Installation according to external circuit
In the case when a sandwich chimney is installed outside a building, it has one horizontal section of a single pipe, the length of which should be no more than 1 m. It is connected to the stove with a slope towards the vertical channel and is connected to the sandwich, which passes through the wall.
If the wall is built from non-combustible building material, then a metal or asbestos sleeve is installed at the passage point. The gap between it and the surface of the smoke channel is filled with basalt wool or asbestos cord. The tee for connecting the vertical part of the structure should be placed outside the house and a condensate drain should be connected to its lower branch pipe.
The vertical channel is assembled from the bottom up and attached to the wall with brackets every 1.8 - 2 m, each part is fixed with a clamp, and the joint is filled with sealant. A deflector or umbrella must be mounted at the top of the flue.
Common mistakes
Errors in choosing the material and assembling the chimney can lead to a number of problems during its operation.
Traction problems
Traction problems can occur due to:
- Insufficient height of the canal or its incorrect location.
- The passage is too narrow or wide for gas outlet.
- Pipe deviations from the vertical.
- The location of the head is below the outlet section of the ventilation hood.
Building fire
A fire can occur if there is insufficient thermal insulation where the flue pipe passes through the structural elements of the house.
Roofing leaks
Insufficient sealing of the joints between the surfaces of the smoke exhaust duct and the roofing will inevitably lead to the entry of atmospheric moisture into the attic and the wetting of the ceiling.
Expert advice
The construction of a proper chimney system is the basis for the efficient and safe operation of heating equipment. If you plan to assemble it yourself, then advice from masters - professionals in this field - will not be superfluous.
Subtleties of switching from a brick pipe to a sandwich
At the point of transition from a brick pipe to a sandwich, it is better to install not a homemade, but a ready-made metal adapter. Its lower part corresponds in size to a brick channel, and the upper part has a round shape with a diameter equal to the diameter of the sandwich. A reliable heat insulator is already installed inside. The use of this device ensures the necessary tightness and fire safety of the connection.
Subtleties of passing through a wooden roof
When using ready-made polyurethane foam, it is necessary to take into account that wood can expand at high humidity, so there should be a small gap between the walls of this device and the opening, approximately 3 - 5 mm. In addition, it is important to impregnate the wood in the joint area with anti-friction agents, which increase its fire resistance.
Where is the best place on the roof to install the pipe?
It is better to move the place where the pipe exits through the roof slightly from the ridge to one side. If it passes through the ridge, then when installing the passage unit, it will be necessary to violate the integrity of the rafters and the ridge beam.
Where is the best place on the wall to make a conclusion?
It is advisable to cut a hole in the wall at the level of the boiler connecting pipe, the main thing is that there are no communications in this place. If you choose a higher place for the outlet of the gas duct, then additional transition elements and installation of horizontal sections will be required, which will negatively affect the draft.
Protecting wood from hot pipes
In the place where the gas duct passes through a wooden wall, a rectangular opening should be cut and a special unit, PPU, should be installed. This is a universal design and is used not only for fire protection of floors, but also walls. The pipe will pass through it, and the free space in the housing can be filled with basalt wool.
How much could such work cost?
Of course, the cheapest option is for the homeowner to assemble the chimney himself. But nevertheless, it is better to invite professionals to perform this work. It is only at first glance that the installation of the structure does not seem at all difficult, but during the process various problems may arise that only experienced specialists can solve. The cost of assembly and installation work depends on the total length of the channel, the method of its placement, the number of overlaps and varies among different craftsmen from 1,700 to 2,000 rubles per meter.
Installation and installation of a chimney pipe: for a home or boiler room (diagrams, drawings)
When installing a standard furnace or boiler room and a boiler operating on solid, liquid or gas fuel, a chimney installation is required. The smoke removal system serves to remove flue gases into the atmosphere and requires general rules for its installation as for a boiler, stove or fireplace.
Therefore, all issues related to installation work must be resolved at the design stage. Having decided to carry out the installation yourself, it is important for the owner of a country house to additionally familiarize himself with the main rules and useful tips regarding the performance of such work.
Before you properly make a chimney for a gas boiler, you must first pay attention to the following factors:
- correct calculation of all parameters, including the size of installed pipes;
- determining the correct pipe length; determining the location of the chimney;
- familiarization with the basic rules for assembling a structure;
- features of the passage of floors, the creation of insulation for the pipe and the exit of the chimney pipe to the roof.
Basic parameters
Before installing a chimney, it is necessary to correctly determine the dimensions of the structure. This includes not only the length of the chimney, but also the cross-sectional diameter of the chimney pipe. To make the most correct choice, it is enough to familiarize yourself with the regulatory requirements of SNiP. It is recommended to select the diameter according to the thermal power of the furnace or boiler.
Here rely on these recommendations:
- the diameter of the pipe should not be less than the diameter of the boiler outlet;
- if the thermal power indicator is less than three and a half kilowatts, the optimal pipe cross-section should be 14 centimeters;
- if the thermal power indicator varies between 3.5-5.5 kilowatts, the diameter must be increased to twenty centimeters;
- if the thermal power indicator is 5.5-7.5 kilowatts, it is necessary to install a chimney with a diameter of 27 centimeters.
In this case, the length of the chimney must be determined according to the following rules:
- the minimum height that will make it possible to create the required thrust is 5 meters from the combustion chamber to the top;
- if the roof is flat, then the chimney must rise above the roof by at least 0.5 meters;
- do not forget to pay attention to the roofing material used during construction work. If the roof is made of flammable roofing material, the height of the pipe above the ridge should be one meter. The best option is one and a half meters.
1-1
Installation diagrams for chimney sections
If you prefer to install the structure externally, you need to attach a pipe to the wall every meter. This is possible thanks to special brackets that prevent collapse under strong wind influence. It is also important to pay attention to the distance from the wall at which the brackets are mounted on the chimney of the boiler room.
1, 4.Brackets 2.Tee 3.Plug 5.Insulator 6.Pipe
- Triplets item 2 should be selected locally in accordance with the area of the pipe of the device connected to the chimney.
Bracket for attaching pipes to the wall of a building
1. Console 2. Angle 3. Half-clamp 4,5,6 Bolt, Nut, Washer
- It is also important to pay attention to the distance from the wall at which the brackets are mounted on the chimney.
Bracket for fastening the base of the chimney pipe
1. Console 2. Strut 3. Angle 4. Hairpin 5. Pipe 6. Bottom
Chimney passage through the wall of a building
- The gaps between the bracket pipe and the tee are sealed with 30 mm asbestos cord.
Chimney insulator for penetration through the wall of a building
1. Body 2. Bottom 3. Pipe 4. Filler
Example of a sleeve (piece of pipe) when passing through a wall made of non-combustible materials.
The next option is installation inside the building. As a rule, the chimney is located on the outside of the building, but it can be installed right at home, although for this you will have to create passage units through the ceiling and roof. Here you will need to pay special attention to the places where the pipe passes through the ceiling and what your ceilings (floor, ceiling) are made of, whether they are flammable or non-combustible materials.
1. Sandbox 2. Tee 3. Plug 4. Support structure 5. Apron 6. Pipe
Chimney insulator when passing through ceilings
1. Body 2. Bottom 3. Pipe 4. Support structure
- After installation, the insulator must be filled with non-flammable filler, for example sand.
Attaching the insulator to the ceiling
- The orientation of the supporting structure is taken depending on the supporting beams.
The assembly of the chimney through the combustible ceiling
The assembly of the chimney through the fireproof ceiling
The passage of the chimney through the roof (roof)
Support structure for roof penetration
1. Channel (corner) 2. Corner 3. Half-hole 4,5,6,7. Bolt, nut, washer
- The size of the supporting structure is taken depending on the melting between the rafters.
The final chimney installation scheme is determined by the owner of the house at his own discretion.
Features of determining the height of the pipe based on its location
To determine this parameter, it is necessary to take into account the location of the chimney in relation to the ridge structure; a diagram of the wind support zone will help with this.
In this case, the building owner should also not have difficulties:
- if the distance between the pipe and the ridge is up to one and a half meters, the upper part of the pipe must be raised above the ridge by 50 centimeters;
- if the chimney is located from one and a half meters to three meters from the ridge, its height can be at the same level as the ridge;
- if the distance between the chimney and the ridge is more than three meters, the height can be fixed at the level of the contour located at an angle of ten degrees from the horizon of the roof ridge.
Note. Before making a chimney, you must also pay attention to the presence of buildings nearby. If their height is greater than that of a residential building, the top point of the chimney must exceed the top point of the extension roof by one meter. Thus, the constructed chimney will always be operated with maximum safety.
Assembling the pipe structure
One sandwich segment is one meter high. During the installation process, one pipe is installed into another (into a socket). When installing a sandwich chimney with your own hands, you must adhere to a strict sequence of work. So, for example, installation begins from below the stove, and then smoothly goes up. During installation, joints are always formed on the outside of the pipes. They must be covered with a special plug that covers the insulation. We install individual segments one meter high one inside the other.
Note! Before installing the chimney correctly, you must remember that the pipe always has one narrowed end. It must be installed in the next pipe. Each link is assembled in such a way that the condensate released during operation cannot be retained. It should flow down.
The joining must be done so that the inner pipe and the outer casing have a tight connection with each other. Without possessing specialized skills, it may initially seem that this work is problematic. You can simplify the task with one simple trick. Before installing the inner pipe, you need to extend it 15 centimeters, and then insert one pipe into the other. Only after this can you begin to connect the outer casings.
Note. Sometimes manufacturers pack their own products in special plastic film. Before you start installing chimneys for gas boilers, you must get rid of it.
When assembling the structure, it is important to strengthen all joints with special clamps. Usually they are included in the basic kit, but if you notice that they are not there, you will have to purchase additionally. Place clamps and tighten them around the joint; it is important to pre-treat the joints themselves with a special sealant so that the structural layer of the chimney is not damaged by heating. On sale you can always find special compounds that are used for furnace equipment.
Chimney pipe design
Before assembling the chimney, do not panic about possible difficulties. To correctly assemble the structure, you must remember that this is just a product, the assembly of which is made of individual segments. Each of them contains a pipe, inside of which there is another one, but with a smaller diameter.
Between each pipe there is a special thermal insulation layer. Its type is selected depending on the scope of application and technical features of the furnace and boiler.
The outer layer is a casing made of stainless steel. The inner layer is also made of stainless steel, but inside it is coated with a special anti-corrosion coating.
There are other varieties. For example, you can not only assemble a chimney from stainless steel, but also purchase products made from copper, brass or ceramics. In this case, stainless steel is the highest priority option, since all other varieties are characterized by high cost.
For example, if you assemble a chimney from simple ordinary steel, its service life will be limited by its wall thickness, since soot from flue gases contains sulfur, which upon contact with moisture turns into acid; it will gradually turn such a chimney into a sieve.
On the good side, we can also note asbestos-cement pipes; they are connected into a socket and are durable, but they are relatively heavy, fragile and, in my opinion, they have a temperature limit.
Thus, experts recommend installing a chimney made of sandwich pipes, where each part is made of steel. Manufacturers prefer to install insulation (mainly basalt) between the pipes, which will have a positive effect on the operation of the pipe.
The use of this design allows you to take advantage of a number of advantages. Firstly, basalt insulation does not collapse under the influence of temperature changes. Secondly, the product is characterized by increased resistance to chemical and physical stress. In terms of thermal insulation benefits, this material is one of the most effective. Different manufacturers prefer to install insulation with different thicknesses.
The minimum indicator is 26 millimeters, the maximum is 60. Such chimney pipes help prevent the penetration of cold into the premises when the stove is not in use.
Conclusion
In itself, installing a chimney from sandwich pipes is not a difficult job. It is quite possible to build such a structure yourself. The main advantage of using a stainless steel chimney is that there is no need to use bulky equipment to carry out the work. During the installation process, it is necessary to correctly select the height of the structure as a whole and the height from the roof of the building.
A correctly assembled chimney will always delight you with trouble-free and high-quality work over a long period of time. But if you do not understand all the intricacies of chimney installation, it is best to seek help from specialized specialists.
Maintenance of the assembled system
During operation, soot growths may appear on the walls of the sandwich chimney, reducing its cross-sectional area, which can lead to smoke in the room and a fire. Therefore, it is necessary to clean the duct at least twice during the heating season. It is convenient to carry out cleaning through the inspection hatch in the plug; if there is none, you can open the plug completely for these purposes by unfastening the clamp.
The condensate collector also requires regular inspection to ensure timely discharge of accumulated liquid. If the condensate drain is connected to the sewer system, then the condition of the connecting tube must also be examined: clean it if it is clogged and replace it if it fails. To clear a clogged drip line, you can use a thin, strong wire.