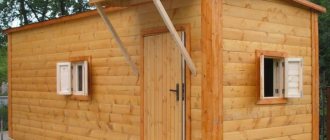
Overall plan
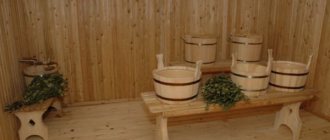
I allocated most of the barn for the sauna - about 6 square meters. m. There should be at least 2 “squares” per person in the steam room. My family is small, so this area is quite suitable for us. I planned the location of the stove and shelves in advance.
The concrete floor of the barn in the area reserved for the sauna was covered with pimply tiles, on which it is impossible to slip. Now, when we go to the sauna, we also put wooden grates on top of the tiles.
I didn’t make a hole in the floor to drain the water - we usually don’t use water in the sauna. Of course, sometimes you want to give in to the park. But if you took a steam bath, then ventilate the sauna and wipe the floor with a dry cloth.
TOOLS FOR HOME AND GARDEN, HANDCRAFTS, ETC. PRICES VERY LOW
Remodeling a room for a sauna or bathhouse
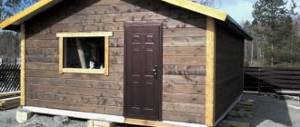
A dacha is a place where you can enjoy nature and take a break from the city. But a hot sauna gives me complete relaxation. I decided to convert an unused wooden barn with a concrete floor into it.
Overall plan
The concrete floor of the barn in the area reserved for the sauna was covered with pimply tiles, on which it is impossible to slip. Now, when we go to the sauna, we also put wooden grates on top of the tiles.
I didn’t make a hole in the floor to drain the water - we usually don’t use water in the sauna. Of course, sometimes you want to give in to the park. But if you took a steam bath, then ventilate the sauna and wipe the floor with a dry cloth.
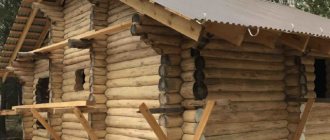
Frame plus walls
The steam room was made from spruce beams and aspen boards 6 cm thick. I chose well-dried wood, it will last longer.
I built the frame of the walls and ceiling from the beams. The hardest part was attaching them to the floor. To do this, I drilled matching holes in the beams and floor, into which I then inserted large screws. A layer of waterproofing was placed between the beams and the floor.
The frame of the walls was first equipped with vapor-insulating boards, then covered with aspen boards. I made longitudinal grooves on the boards. They made it possible to firmly “grip” the structure. The bottom layer was also used here for waterproofing. I drove the nails with which I nailed the boards deeper into the wood so as not to get hurt or burned, because the temperature in the sauna reaches 100°.
Bathhouse renovation inside
The interior of the bathhouse is no less subject to wear and tear than the façade. The first thing to disappear is the wall and ceiling cladding and flooring. If restoration is not done in time, moisture will penetrate to the thermal insulation and structural elements of the building will begin to disappear under it.
Repair of bath walls
The reconstruction of the bathhouse begins with the removal of all furnishings. The walls are examined to determine the degree of damage. They are revealed not only by visible defects. If there is an unpleasant smell of rot or dampness in the steam room of a bathhouse, most likely the lining is being eaten by a fungus. The lining is carefully dismantled, taking care not to damage the foil vapor barrier.
After dismantling the cladding, the frame is examined. If moisture gets under the lining, the timber will also be rotten. The sheathing is replaced with a new design along with thermal insulation and foil vapor barrier. The use of old insulation for restoration is excluded. When dismantling the sheathing, the mats are severely damaged. The new frame is covered with clapboard. Other rooms in the bathhouse are undergoing partial renovations. Due to the lower moisture concentration, the cladding lasts longer. Restoration is aimed at partial replacement of individual damaged planks.
If during the inspection before repair no damage to the cladding was detected, but a large loss of heat was observed, the thermal insulation of the walls must be restored. To get to the insulation, you need to dismantle the lining.
Important! It is necessary to remove the lining as carefully as possible. After the restoration of the thermal insulation layer, it will have to be put back in place.
Old thermal insulation and vapor barrier are removed. The walls of the bathhouse are examined for the presence of cracks. Identified defects are puttied or caulked. New thermal insulation is placed in the cells of the sheathing, covered with foil material, and the lining is secured.
During repairs, it is important not to forget to leave a ventilated gap under the cladding. This is provided by a counter-lattice attached to the sheathing on top of the vapor barrier. The exterior restoration of the bathhouse is carried out in a similar manner, only non-foil material is used for vapor barrier.
During wall repairs, the windows and doors of the bathhouse are carefully inspected. They may be intact, but the frames become deformed due to exposure to moisture and temperature changes. Cold air enters the bathhouse through the cracks. Bent frames are replaced; they cannot be restored; the gaps are caulked with tow.
Bathroom ceiling repair
A major overhaul involves the restoration of all elements. The ceiling wears out faster than the walls, as steam constantly accumulates at the top. The area near the pipe is exposed to elevated temperatures. The facing material is deformed and cracks appear.
Repairs begin with the passage of the pipe. At the same time, the condition of the roofing is assessed. Do not throw away old insulation from the ceiling. An additional layer of insulation is laid between the sheathing, covered with foil insulation, the counter-lattice is returned to its place and the sheathing is secured.
Bathroom floor repair
The flooring comes into most contact with water. In theory, the flooring should rot before the wall cladding. However, there are many positive factors. The floor is laid in a bathhouse from boards 50 mm thick. Hardwoods are most often used. The boards are well impregnated with antiseptic. All factors help the flooring last longer. A big plus is good ventilation of the underground space.
Restoring the floor involves dismantling all the boards. The underground space of the bathhouse is cleaned of dirt, and the functionality of the sewage system is checked. The boards are inspected. Undamaged flooring elements are dried, cleaned, and treated with an antiseptic.
Advice! If the boards are badly rotted and there is no replacement, the flood floor is replaced during repairs with another type of wastewater drainage.
Solving the problem of lack of space on the site
The plan of such a one-story “bathhouse-barn” structure is quite simple, which allows for some deviations in size and even the organization of a porch at the entrance (see description in the text)
The main, as it is fashionable to say today, pilot option for combining a bathhouse and a utility room could be the following, tested in more than a dozen implementations:
- A – hallway – dressing room, note that the stove is controlled from the steam room, but the wall of the stove opens into the hallway, which ensures its reliable heating;
- B – washing room, there is a small window - windows in the working rooms of the baths are either absent or small in size (in the proposed version 50 by 40 cm), which allows for better control of heat transfer;
- C – steam room – traditional floor and stove, there is everything for a true connoisseur of relaxation “with a park”, please note that in the proposed implementation there is no window in the steam room, this is the unspoken rule of all steam rooms for all designers;
- D – a barn, or, well, a utility room with an area of 4 sq.m., in such an area you can place a small machine; appreciate the thoughtful and forward-thinking approach of the proposed solution - the barn with its pile of metal has no contact with moisture-rich rooms; of course, thermal insulation and vapor permeability must be ensured at the highest level, however, such a division indicates a subtle understanding of the situation by the developers;
Perhaps the heroes of “Kalina Krasnaya” steamed in such a bathhouse, simply attached to a barn, but those days of 40 years ago are still gone and today you most likely won’t have to agonize over the question of how to attach a barn to a bathhouse
- E – porch, and this is another plus of the proposed project.
Helpful advice! But the main positive feature of the proposal is the installation of the entire structure on piles. Here, a more expensive and reliable option was chosen - square-section concrete piles. Although for such a structure as a one-story bathhouse, it is quite possible to use metal pipes, they are more convenient to install, and the load capacity will fully meet the objectives of the structure. The main thing is that piles are an ideal way to deal with unreliable, heaving soils and the main way to reliably ventilate a structure, which is very important for bathhouses.
Design Features
The technology for constructing the proposed bathhouse with a barn is so well developed that usually a team of 2-3 people undertakes to build it in no more than a working week. And the price for all this pleasure will disappear after putting the barn in order - no more than 300 thousand rubles.
Here are some more useful technical characteristics of this combination of a bathhouse and a barn:
- for external walls, planed timber measuring (mm) 95 by 145 is used;
- for the steam room - aspen lining;
- size of concrete piles – 200 x 200 x 400 mm;
- distance between pedestals – 200 mm;
- number of pedestals – 9 (8 around the perimeter and one in the middle of the building);
- roofing material must be used on top of the piles as waterproofing;
- means of insulation between the beams - jute;
- vapor barrier in the steam room is provided by special bath foil;
- 50 mm insulation is used both on the floor and on the ceiling of the bathhouse;
- all joints, bottom and top, are covered with skirting boards;
- on the outside the roof is sheathed with pine clapboard;
- ceiling height inside – 225 cm;
How to build a bathhouse from a barn with your own hands
This is not to say that you will definitely strive for this - to combine two premises such as a bathhouse and a barn under one roof.
Even if you convince yourself that from Persian “barn” is nothing more than a “palace”. We use this as a place to store odds and ends, more tools and “just in case” junk. But situations can be different - the barn is already standing, but there is not enough space anyway, or a successful bathhouse design with a “utility room” already appeals to you. One way or another, such a combination is possible, it all depends on how the “palace” for hoes and shovels will be maintained in the future.
A better solution to the question of how to make a bathhouse out of a barn is to do it radically - build a bathhouse with a utility room anew
The plan of such a one-story “bathhouse-barn” structure is quite simple, which allows for some deviations in size and even the organization of a porch at the entrance (see description in the text)
The main, as it is fashionable to say today, pilot option for combining a bathhouse and a utility room could be the following, tested in more than a dozen implementations:
- A – hallway – dressing room, note that the stove is controlled from the steam room, but the wall of the stove opens into the hallway, which ensures its reliable heating;
- B – washing room, there is a small window - windows in the working rooms of the baths are either absent or small in size (in the proposed version 50 by 40 cm), which allows for better control of heat transfer;
- C – steam room – traditional floor and stove, there is everything for a true connoisseur of relaxation “with a park”, please note that in the proposed implementation there is no window in the steam room, this is the unspoken rule of all steam rooms for all designers;
- D – a barn, or, well, a utility room with an area of 4 sq.m., in such an area you can place a small machine; appreciate the thoughtful and forward-thinking approach of the proposed solution - the barn with its pile of metal has no contact with moisture-rich rooms; of course, thermal insulation and vapor permeability must be ensured at the highest level, however, such a division indicates a subtle understanding of the situation by the developers;
Perhaps the heroes of “Kalina Krasnaya” steamed in such a bathhouse, simply attached to a barn, but those days of 40 years ago are still gone and today you most likely won’t have to agonize over the question of how to attach a barn to a bathhouse
- E – porch, and this is another plus of the proposed project.
Useful advice! But the main positive feature of the proposal is the installation of the entire structure on piles. Here, a more expensive and reliable option was chosen - square-section concrete piles. Although for such a structure as a one-story bathhouse, it is quite possible to use metal pipe ones, they are more convenient to install, and the load capacity will fully meet the objectives of the structure.
The main thing is that piles are an ideal way to deal with unreliable, heaving soils and the main way to reliably ventilate a structure, which is very important for bathhouses.
The technology for constructing the proposed bathhouse with a barn is so well developed that usually a team of 2-3 people undertakes to build it in no more than a working week. And the price for all this pleasure will disappear after putting the barn in order - no more than 300 thousand rubles.
Here are some more useful technical characteristics of this combination of a bathhouse and a barn:
- for external walls, planed timber measuring (mm) 95 by 145 is used;
- for the steam room - aspen lining;
- size of concrete piles – 200 x 200 x 400 mm;
- distance between pedestals – 200 mm;
- number of pedestals – 9 (8 around the perimeter and one in the middle of the building);
- roofing material must be used on top of the piles as waterproofing;
- means of insulation between the beams - jute;
- vapor barrier in the steam room is provided by special bath foil;
- 50 mm insulation is used both on the floor and on the ceiling of the bathhouse;
- all joints, bottom and top, are covered with skirting boards;
- on the outside the roof is sheathed with pine clapboard;
- ceiling height inside – 225 cm;
As in the “shortest joke” from Yuri Nikulin: “Bathhouse, locker room across the road.” Outside the city, this is no longer a joke, especially if you made a bathhouse from a barn with your own hands
- wall thickness – 95 mm;
- height of the ridge of the bathhouse – 150 cm;
- for the roof, ondulin is used in three colors - green, red or brown;
- floor characteristics: rough thickness - 20 mm;
- steam and waterproofing material – glassine;
- insulation material - URSA 50 mm;
- floorboard - 27 mm tongue and groove;
600 x 600 mm – one.
Useful advice! Please note. The proposed bathhouse option does not include a stove in the standard mandatory delivery. Its selection and installation is made on a separate order. We advise you not to forget about this condition and be sure to inquire about how to install the stove in the bathhouse when searching for a contractor. The decision on installation must be made in advance.
Some contractors are ready to install any stove proposed by the customer, but this usually requires approval.
Any project of a bathhouse with a barn requires a particularly careful attitude to the foundation - creating a parameter around the perimeter is a very good option
conclusions
The proposed option of combining a bathhouse and a utility room is far from the only one. Therefore, the instructions for action here will be traditional for the construction market - first, be sure to conduct research and choose the most suitable option that satisfies all your wishes and placement conditions.
If it were not for the increased demands, not even on the strength, but on the quality of the bathhouse foundation, perhaps it would be recommended to try to do everything yourself. But since the specifics of building baths require experience and qualifications, we advise you to contact professionals who work with already proven project samples.
We invite you to familiarize yourself with the optimal size of a bathhouse for 3 people
In the photo, everything was placed on a tubular pile foundation - for a bathhouse this is the best option in terms of preserving the structure for many years
in this article, perhaps, he can still convince you, for the sake of saving space, to combine a bathhouse with a utility room, if you were unable to solve the placement problem in another way.
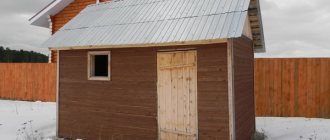
If you are the happy owner of a summer house or a private house with a small plot, then you can set up a bathhouse in an old barn. It will give the whole family good health and wonderful relaxation after a hard day at work. Also, if the need and desire arise, you can make good money by setting an hourly wage and letting your neighbors, acquaintances and other people steam there.
We will equip an old barn, which we do not use, with a concrete floor as a steam room. The barn can be built from wood, brick, foam block or shell.
Are planning
We will allocate a considerable area of the barn for the steam room, approximately 6 square meters. m, this will be a small steam room; when calculating, take into account that there should be at least 2 sq. m per visitor. m. If you have a small family, then 6 sq. m will be enough for you, but if you plan to make money in the future using a steam room, then the area will accordingly be needed more.
Don’t forget to plan in advance the location and number of shelves, and determine the most advantageous place for the stove; the convenience of staying in your bathhouse from an old barn, which you will make with your own hands, depends on the layout.
Bath floor
It is worth laying structural tiles on a concrete floor in a barn; the surface of such tiles is a little rough, as if a little abrasive. And it is almost impossible to slip on such tiles. It is also worth making grates from boards, which we will lay on top of the tiles for comfortable movement around the bathhouse, because wood does not heat up as much as tiles and will not burn your feet when walking.
Be sure to weigh the pros and cons and decide whether to install a water drain in the floor. If you want to take a steam bath with a park, then your DIY barn sauna will need to be thoroughly wiped with a dry cloth and ventilated.
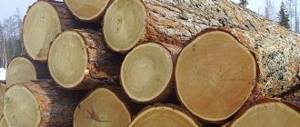
We recommend making a bathhouse from aspen boards, the thickness of which is at least 6 cm, and spruce beams. You should choose a dry tree, because dry wood retains its shape better and is much more durable than raw wood.
We construct the frame of our bathhouse from beams, it is not a complicated work at all, and then it is difficult to attach the frame to the floor. But this can be done with a little effort. We will carry out fastening by drilling aligned holes in the floor and beams, into which we will insert long screws, and do not forget to lay waterproofing between the floor and beams.
It is very important to install steam and waterproofing boards on the walls, which should be sheathed with boards. For these works, it is better to use aspen boards, having previously made grooves along the boards, which will serve for better adhesion of the boards to each other.
When driving nails, you should drive them as deep as possible into the wood, because the temperature in the steam room is high, and you can get burned by touching the hot head of an iron nail.
We install the ceiling in the bathhouse from the barn with our own hands from the boards with which the walls are covered. But to do this, we saw them in half, and we get 2, 3 cm each. We attach them directly to the frame of the bathhouse.
Shelves for lying
Shelf-beds should be made wide, their width should be approximately 70 cm. It is worth treating the surface of each bed very well so as not to get injured and not to drive splinters into the skin.
The stove should be placed near the door, on refractory bricks. We also lay the brick in the space between the stove and the wall, and take the pipe outside. Take care to enclose the stove with wooden structures and avoid getting burned.
Minimizing heat loss through doors
In order for as little heat as possible to be lost through the doors, we make it narrow, 50-60 cm, and attach a rubber seal to it. Door handles should be made of wood.
To illuminate your bath, you will need a special double-insulated cable and a lamp that is resistant to high temperatures. The switch should not be ordinary, but moisture-resistant, it should be located at the entrance to the steam room, as required by fire safety rules.
The wiring should be deepened into the walls so that the cable does not interfere, and then the bathhouse will look better and neater.
Additions:
- all boards used for lining the bathhouse must be made from deciduous trees;
- do not skimp on wiring materials, cables, lamps, switches and sockets. Buy high-quality and moisture-resistant ones, because the life and health of your family and guests who will visit your steam room depend on it;
- lamps must be made of heat-resistant glass, since the temperature in the bathhouse sometimes rises above 100 °C;
- Many people like to plunge into a cool pool after a hot bathhouse. But if you can’t afford such luxury, build a small pond in the yard, or place containers with cool water, for example, barrels, into which you can happily plunge after warm and pleasant bath procedures.
conclusions
The proposed option of combining a bathhouse and a utility room is far from the only one. Therefore, the instructions for action here will be traditional for the construction market - first, be sure to conduct research and choose the most suitable option that satisfies all your wishes and placement conditions.
If it were not for the increased demands, not even on the strength, but on the quality of the bathhouse foundation, perhaps it would be recommended to try to do everything yourself. But since the specifics of building baths require experience and qualifications, we advise you to contact professionals who work with already proven project samples.
In the photo, everything was placed on a tubular pile foundation - for a bathhouse this is the best option in terms of preserving the structure for many years
The video in this article may still be able to convince you, in order to save space, to combine a bathhouse with a utility room, if you were unable to solve the placement problem in another way.
If you are the happy owner of a summer house or a private house with a small plot, then you can set up a bathhouse in an old barn. It will give the whole family good health and wonderful relaxation after a hard day at work. Also, if the need and desire arise, you can make good money by setting an hourly wage and letting your neighbors, acquaintances and other people steam there.
We will equip an old barn, which we do not use, with a concrete floor as a steam room. The barn can be built from wood, brick, foam block or shell.
Are planning
We will allocate a considerable area of the barn for the steam room, approximately 6 square meters. m, this will be a small steam room; when calculating, take into account that there should be at least 2 sq. m per visitor. m. If you have a small family, then 6 sq. m will be enough for you, but if you plan to make money in the future using a steam room, then the area will accordingly be needed more.
Don’t forget to plan in advance the location and number of shelves, and determine the most advantageous place for the stove; the convenience of staying in your bathhouse from an old barn, which you will make with your own hands, depends on the layout.
How to make a new one from an old bathhouse
If there is an old bathhouse in the yard, restoration is easier than building a new building. A major overhaul involves replacing all damaged elements.
Reconstruction of an old bathhouse
They begin repairing an old bathhouse with their own hands by conducting a thorough inspection. The following building elements are inspected:
- On the walls, check the condition of the cladding, vapor barrier, and insulation. In some places, areas will have to be opened to get to the crowns and assess their condition. Carefully check the bottom and corner joints.
- The rotted lower crown of the bathhouse indicates problems with the foundation. The base is inspected for the presence of waterproofing. If during the inspection large cracks, subsidence or destruction of the foundation are revealed, the old bathhouse will have to be dismantled and rebuilt.
- The condition of the bathhouse ceiling is assessed by cladding, vapor and thermal insulation. At the same time, the roof, roofing covering, and the condition of the chimney duct are inspected.
- Doors and windows are checked for cracks. Wooden frames are deformed by changes in temperature and humidity.
- The floor is subjected to a final inspection. They are trying to get to the drain, checking the functionality of the sewer system.
Based on the results of the audit, a repair plan is drawn up for a bathhouse that has not been used for its intended purpose for a long time.
Bathhouse repairs begin if the building itself is in satisfactory condition. The following elements are subject to restoration:
- Walls. First, get rid of the cracks. With old insulation there will be large heat losses. After restoration, the wall is covered with new thermal insulation.
- Windows and doors. In the bathhouse, frames suffer from steam and temperature changes. Restoration of a deformed structure is impossible. It is wiser to install plastic windows and doors in all rooms of the bathhouse. This option is not suitable only for a steam room. Due to the high temperature, a new wooden window and door are being installed here.
- Interior decoration. This repair item includes cladding, steam and thermal insulation of walls and ceilings. In the aggressive environment of a steam room, materials disappear over time and must be completely replaced. Inside other rooms, the finish lasts longer. A repair option is possible here. Replace damaged cladding elements, add insulation, and attach a new vapor barrier.
- Floor. In the dressing room and washing room, the floors are often tiled. The coating is not damaged by moisture. The tile may burst if struck by a heavy object. A damaged coating element must be replaced. The wooden flooring of the steam room can be repaired. Rotten boards are thrown away, but good ones are cleaned, dried, treated with an antiseptic and reused.
- Sewerage. During floor repairs, the drain is cleared of accumulated dirt.
The final restoration of an old bathhouse is the treatment of all wooden elements with protective impregnations.
The video shows the details of the restoration of the interior decoration of the bathhouse:
Bathhouse from an old house
Owners of private courtyards are interested in the project of converting a hut, a house that has served its intended purpose, into a bathhouse. Restoration of an old building begins with the installation of communications. To organize the drainage, the old floor is torn off. A trench is dug from the side of the building and the street, and a sewer pipe is installed under the foundation. The underground space is filled with concrete screed.
Simultaneously with the sewerage system, a water supply system is laid inside the bathhouse. If the walls of the old house are not wooden, you can install hidden wiring. The cable is hidden in grooves. If the durable wall material does not lend itself well to cutting grooves, the wire is laid on top in a metal corrugated sleeve.
Ventilation holes are cut out on the walls below the ceiling and above 30 cm from the future finished floor. You must immediately decide on the location of the stove. While there is no lining in the bathhouse, a hole for the chimney is cut in the ceiling and roof. You can immediately put the pipe outside. The passage in the ceiling and roof is framed with non-combustible material.
After laying communications, restoration continues with cladding of walls and ceilings. The process involves attaching the sheathing. Basalt wool slabs are placed between the frame elements. The insulation is covered with foil waterproofing on top, and a counter-lattice is nailed onto which the cladding is attached.
Advice! If external cladding and wall insulation are required, a ventilated facade is made on the old house.
The floor in almost all rooms of the bathhouse is easier to fill with concrete screed and lay tiles. For heating, electric mats are embedded under the floor covering. Inside the steam room there is only a wooden floor.
Simultaneously with the arrangement of the floor, a foundation is erected under the stove. A concrete slab or brick-lined area will do. The walls around the stove are covered with sheet asbestos and metal on top. A similar reflector is mounted on the ceiling around the chimney.
The final part of the restoration of an old house for a bathhouse is the manufacture of sunbeds, benches, and a font. Furniture is installed in the rest room, decorative elements are hung on the walls.
The lower rims of the bathhouse have rotted, what can be done?
The first and second crowns from the foundation of the bathhouse quickly rot. If the wood has completely deteriorated, it cannot be restored. The crowns can only be replaced. It is very difficult to lift with jacks or disassemble the frame. It’s easier to initially take measures to prolong the life of the lower crowns:
- The wooden frame of a bathhouse is often placed on a strip foundation, on top of which a plinth is laid out of brick. To prevent the brickwork from drawing moisture from the concrete strip in contact with the ground, the surface of the foundation is lubricated with hot bitumen and a strip of roofing material is glued on.
- A similar layer of waterproofing is installed on the surface of the brick plinth. Wooden crowns will not come into contact with the brick and draw moisture from it.
- Rainwater can stagnate on the roofing material under the lower crowns. Low tides help prevent puddles from accumulating. Wooden or metal strips are attached around the perimeter of the log house to the lower crown. Water at low tides will flow to the ground without harming the crowns.
- Ventilation ensures accelerated drying of the lower rims of the bath. The basement is equipped with air vents. Small windows in the foundation bring fresh air into the underground space, and steam escapes through them.
To ensure that the lower crowns last a long time, they are made from hard wood. Larch is considered the best option. If such crowns could not be obtained, boards are placed under the frame of the bathhouse. They will be the first to come into contact with water. The boards are then easier to replace than the entire crown. For the lining, hard types of wood are also used: larch or oak. Protective impregnation extends the service life of the crowns. Sometimes owners use used motor oil. This option is not very good, since it is only suitable for crowns located below the bathhouse floor level. If oil gets into the steam room, chemical fumes with an unpleasant odor will appear. In addition, machine oil does not saturate wood well and does not provide reliable protection for the crowns.
The best impregnation is considered to be the drug “Senezh”. The composition is applied to the crowns in two layers. After drying, apply three more layers of hot drying oil. The crown must be covered without leaving any missing areas, otherwise there will be no sense in the treatment.
Steam room materials
We recommend making a bathhouse from aspen boards, the thickness of which is at least 6 cm, and spruce beams. You should choose a dry tree, because dry wood retains its shape better and is much more durable than raw wood.
We construct the frame of our bathhouse from beams, it is not a complicated work at all, and then it is difficult to attach the frame to the floor. But this can be done with a little effort. We will carry out fastening by drilling aligned holes in the floor and beams, into which we will insert long screws, and do not forget to lay waterproofing between the floor and beams.
It is very important to install steam and waterproofing boards on the walls, which should be sheathed with boards. For these works, it is better to use aspen boards, having previously made grooves along the boards, which will serve for better adhesion of the boards to each other.
When driving nails, you should drive them as deep as possible into the wood, because the temperature in the steam room is high, and you can get burned by touching the hot head of an iron nail.
We provide electricity to the bathhouse
To illuminate your bath, you will need a special double-insulated cable and a lamp that is resistant to high temperatures. The switch should not be ordinary, but moisture-resistant, it should be located at the entrance to the steam room, as required by fire safety rules.
The wiring should be deepened into the walls so that the cable does not interfere, and then the bathhouse will look better and neater.
And in winter, water procedures can be replaced with snow rubdown:
- Be sure to ensure that the water in the barrels, pool or pond does not stagnate. Disinfect containers with water. Especially if other people are bothering you;
- Over time, you will be able to expand the bathhouse, add a relaxation room, and use it to earn money. After all, this is a good idea for business.
Converting a turnkey bathhouse into a sauna according to your mind
Page 1 of 4
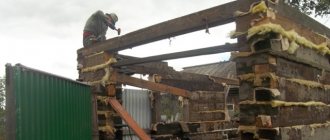
Preface Dear friends! I begin to tell here my story of the construction, or rather, the conversion of a standard dry-air bathhouse, built on a turn-key basis by crooked “specialists,” into a Russian bathhouse. The article is great. I tried to describe everything in detail. Lots of photos. I hope that this article will be useful to many. Both those who are planning to build a bathhouse, and those who, perhaps, after reading my article, will think about the modes of their bathhouse. The article describes frequent “shoals” during the construction of a bathhouse. I stepped on some rake well. And the article talks about this. What a Russian bathhouse is and how it differs from the dry-air bathhouses that are ubiquitous in our country, you can read in my article about the Russian bathhouse. I have been going to public baths since I was a child. I have wanted my own bathhouse for a long time. I kept thinking, I’ll save some money and build a good two-story log house. I am an experienced steamer. I steamed regularly in public baths for more than 30 years. I thought that the +110g mode was just for me and there was nothing better in the world. And I considered everyone who steamed at lower temperatures to be weaklings, and I did not consider temperatures up to +90 degrees a bath at all. Now I understand how much I was wrong. After reading the forum on Russian baths, I decided to try the regime of that same Russian bath and fell in love with it irrevocably! As a result, I personally converted a disgustingly made bathhouse by craftsmen “on a turnkey basis” into a Russian bathhouse “according to the mind.” I took almost all the ideas from the forum about Russian baths. I studied it every day for over a year. I finalized most of the ideas and put them into practice. The bathhouse has been operating for 4 years, both summer and winter seasons (in frosts down to -32C). Almost all of my engineering and technological solutions worked perfectly. The bathhouse was tested by eminent gurus of the bathhouse world and its conditions were highly appreciated. This allows me to recommend my bathhouse design for copying by other bathhouse enthusiasts. If you don’t have the time or opportunity to study forums for a long time and thoughtfully, to search for and compare information, then you can safely implement all my engineering solutions and get a good, well-thought-out bathhouse. Below I present my construction diary with detailed photographs, test results and my conclusions.
How it all began Fate prompted me to build my own bathhouse last year. It was necessary to dismantle the old, chopped up shed on the site. And the already fairly rotten logs of its walls had to be put somewhere. So the decision was born to urgently build a bathhouse and cut the logs for firewood. There was little money and we were looking for a cheap option. The thought of buying a ready-made bathhouse was immediately dismissed. A friend of mine has one like this. Used only in summer. They gather, drown, make their first pass, then fanatically drink beer or something stronger. If they don’t forget, they make a second pass. That's all. They are 100% satisfied with it and it’s clear why. I saw this bathhouse. There are cracks the size of a finger, there is a smell of rot, since it is lined with clapboards, obviously on the wet base of the walls. In winter you can’t heat it or dry it out. Total trash. Therefore, I looked on the Internet for someone who offers more serious turnkey bathhouses. They bring the material and assemble it on site. I even traveled to Moscow and looked at exhibition samples. In appearance, everything is beautiful and wonderful. Upon closer inspection, it was clear that again it was hack work. The timber is not dried and does not stand properly, but is immediately covered with clapboard - rotting is guaranteed, as are various distortions and cracks. They insulate carelessly, little and not wisely. There are many other shortcomings that are visible to the eye, but so many are hidden! That is, again the bathhouse is only for summer drinking. Like, “I was in the bathhouse.” It didn't suit me. Here I met an acquaintance who said that he had a team of “professional bathhouse attendants” in mind. Many have already been built - everyone is as happy as elephants. I met with their foreman-technologist. He painted everything for me. He assured that he himself was a good construction technologist and there would be a super bathhouse, built according to the classic bathhouse design and taking into account all the technologies. To be honest, I fell for this scam by the “technologist” and the recommendations of my friends. After long negotiations, we agreed on a figure that was a little more expensive than a ready-made prefabricated bathhouse, but acceptable for me. The work had to be done on a turnkey basis. Looking ahead, I will say that when the bathhouse was already built, the “technologist” let it slip that he had no construction education and had only been involved in construction for less than a year. Before that, I sold wholesale vodka. I had some kind of premonition that you could only do everything properly yourself and that after these “professionals” a lot of things would need to be redone. Therefore, including to save money, I asked that the entire interior be made from the cheapest material without any frills. Now at least this makes me happy. The brigade itself is from Tataria. They work quickly, don’t drink or smoke, and don’t swear. Everything is clean and tidy. It was a pleasure to watch how they work. This is where I completely lost my vigilance. Although the foundation, walls and roof were done well. True, the floors and insulation were done terribly poorly, the bathhouse almost rotted because of them. Another year and the log house would have completely rotted away. In terms of bath subtleties, ventilation and other things, they turned out to be complete ignoramuses. But more on that below.
The diary started in 2009. Initial data. Bathhouse 4x6 on a shallow (40 cm) strip foundation (plays a little in winter). The soil is clay, the groundwater level is high. The 150x150 timber is not planed in any way. Steam room 2.4x2.5x2.15. Stove "Vesuvius 22VK", the brick screen does not cover the entire height of the stove. Tank-"samovar" on a pipe.
I started using the bathhouse. The first schools appeared immediately with the arrival of cold weather. The most important of them does not fit in my head at all. The door from the steam room was made directly into the relaxation room. Passing the vestibule and washing room. Okay, I was far from the technology of building baths, but they built more than one bath... All the steam and water from the steam room instantly went into the relaxation room. In the rest room, a strong water mist immediately formed, drops on the ceiling and dampness, which did not dry out completely in winter. Horror!
The second jamb is the complete absence of any ventilation or exhaust. Only windows in the recreation room and vents in the foundation. The lack of ventilation also had a detrimental effect on the atmosphere in the steam room and relaxation room and made it impossible to properly dry the bathhouse. The third jamb was like this. They covered the whole guy with foil foam. Since it only holds +70, I had concerns about its use. But the “technologist” said that everything was fine, and they do all the baths this way. A subsequent autopsy showed that the penofol had completely shriveled from the temperature and, accordingly, released a lot of byaka. Moreover, they did not glue the foam foam joints. As a result, the joints diverged by almost 10mm. And one last thing. They made the wall between the steam room and the relaxation room like this: lining, 5mm foil foam, 50mm non-grooved board, 3mm non-foil foam, lining. The board immediately dried out and gave quite serious cracks. As a result, at the junction between the ceiling and this wall, steam and heat came out with terrible force. It was noticeable even to the naked eye.
Also, they dirtied the floor so much that if I decided to treat it, I would have to sand it. It’s good that the immediately identified problems helped me make the decision to completely remodel the interior of the bathhouse. Even before remodeling the bathhouse, I started reading the bathhouse forum and tried to bring my poor stove closer to a normal stove for a Russian bathhouse. I lined the stove dry with bricks. Initial option
Changes dry
Then I made a stainless steel lid to cover the heater. Reduced the temperature to 60-70. I liked it. Improved dry brick screen. So I steamed until spring with thoughts of remodeling the interior. The thoughts in my head from complete chaos and horror that everything was wrong with me, closer to spring, began to form a logical chain of how and what needed to be changed. In May there was the last bathhouse (in total the bathhouse was used for 8 months weekly) and dismantling of the entire interior began. It's boring and unpleasant. He dismantled everything in splendid isolation, took out all the nails, and stacked the boards in bundles in the attic for later use on the farm.
The dismantling of the furnace went off without a hitch. There was very little soot in the chimney, although I used both pine and damp wood to burn it. In the area of the “samovar” tank in the chimney there was no more soot than in other sections of the pipes. Practice has dispelled the myth that much more soot is formed in the pipe in the area where the “samovar” is installed. The black screws rotted into dust, the golden ones were like new. When I started opening up the walls and floor, I was simply horrified. Firstly, the floors were made flush against the wall without a ventilation gap, which is necessary for any technology. To cover the lower crown, a strip of roofing felt was put in, which was absolutely unnecessary there. As a result, 2-3 lower crowns began to rot and white mold appeared on the walls and joists. Between the strip of roofing material and the crown, water simply flowed in streams when I tore off this strip.
For some reason the vents only worked in one part of the bathhouse; the subfloor was dry. In another part of the bathhouse it was completely damp, although the number of vents and their size were similar. The floor pie was like this: subfloor, glassine, 50 mm insulation, glassine, finished floor. The dismantling of the wall decoration in the steam room and relaxation room also did not add optimism. Everything was done by “specialists” without any ventilation gaps or lathing. Pie: timber 150 (not caulked and not covered with anything from the outside), glassine, non-foil 3 mm penofol, lining. The joints of penofol and glassine were not taped. As a result, condensation formed or moisture entered between the glassine and the wall beam. The walls began to rot and become covered with white mold. There were 6 such fireplaces, approximately 300x500 mm, on the walls throughout the bathhouse.
It’s quite enough to rot a log house in a very short time. Moreover, the lower crowns rotted just as merrily due to improper construction of the floor. But everything was saved. The rot affected only 1-3 mm of timber in depth. Now everything is open and drying. I dismantled everything except the ceiling above the rest room. There was a cake: lining, foil penofol 5 mm, glassine, Ursa 10 mm. It seemed to me that the insulation was not enough, and I changed the cake to: clapboard, foil penofol 5 mm, glassine, ecowool 150 mm, ventilation gap, wind protection - vapor-permeable membrane "Izospan A", lathing - ventilation gap, rough attic ceiling - 8 mm plywood. The attic is cold. This is what happened after dismantling (all that remained was to remove the beams).
Start of new construction I'm starting to make a foundation for the stove and a screed on the ground. I will do screeding throughout the entire bathhouse. I'm already afraid to deal with a completely wooden insulated floor. I’ll just put a wooden floor on the screed in the rest room. Of course, I would like it to be heated, but I have problems with the electrical power. It’s barely enough to buy a house, and there’s practically nothing left for a bathhouse. Water was supplied to the bathhouse. The HDPE pipe is buried 1.3 meters. A 2 m self-regulating heating cable will be installed at the outlet of the pipe in the bathhouse. I found this in only one place in two construction markets. Most “specialist” traders do not even know about its existence; the rest sell it without a coupling, assuring that it is not needed. Only one merchant in the farthest corner of the market knew about its existence. And he gladly sold it to me at an insane price. All persuasion to lower the price to the real one was unsuccessful. He knew very well that this turned out to be a shortage.
He installed a sewer system into the bathhouse and dug a sealed barrel into which the water would flow, and from there it would be pumped out by a drainage pump into the city sewer system. We had to be tricky with the pump, since the bathhouse is located below the level of the city sewerage system, and the water does not flow in the opposite direction by gravity. The sewer system had to be redone because the Tajiks did not make a good slope and did not add a cushion the first time. But after arguing, they realized their mistake and redid everything. We purchased ladders with a dry shutter and height adjustment. I must say that the item turned out to be very rare and not so easy to buy.
I took two ladders to the steam room and washing room. It turned out that, structurally, about 3-5 mm of water still remains in the drain. This, of course, slightly disappointed me. The foundation for the furnace was dug. I made reinforcement from Ø10 mm reinforcement. I filled everything with concrete. On top I put waterproofing - roofing felt in several layers and 3 rows of bricks. Made concrete floors. I thought about the cake for a long time and decided to do everything using technology. TechnoNIKOL 30 mm EPPS was chosen as insulation for insulating the base and at the same time arranging the expansion joint and 100 mm for the floor. I got carried away, I think 60 mm would be enough for the floor. There are good reviews about this company's EPS on the Internet and, most importantly, their warehouse with reasonable prices is nearby. Since I decided to make the pie according to technology, I was guided by the pie diagram from the TechnoNIKOL website.
But they didn’t have any film or tape for the seams. Ambush. The nice girl manager kindly gave me the phone number of the team leader certified by them, who makes screeds on the ground on their behalf. He explained to me in true Russian language that the membrane on... is not needed, their cunning film is also expensive, and the technologist went to.... I thought... The girl manager got me their colorful prospectus, which they show to all customers and are guided by it. The picture of the pie was completely different from the one on their website. In particular, there was no waterproofing as such on top and bottom of the insulation. This put the girl into a kind of stupor and misunderstanding of how they consulted customers for so long. She made a phone call to their super chief technologist. He, in almost the same terms as the foreman, sent this drawing in their booklet and stated that it was fundamentally wrong and should not be done this way. The girl manager froze... I took the initiative into my own hands. And as a result of tripartite negotiations, the following pie was developed: sand-crushed stone cushion, unreinforced screed 2-3 cm, Izospan D film, EPPS, Izospan D, reinforced screed 8-10 cm. This pie was approved by both the foreman and technologist. The technologist still timidly insisted on a lower plastic pimply membrane as in the diagram on the website, but was sent by the foreman to... Here are the steps for pouring the floor. The soil was removed, a sewerage system was laid, 30 mm EPPS was installed - an expansion joint
Pillow
Preparatory screed 2-3 cm
Izospan D
EPPS
Again Izospan D
Reinforced screed 8-10 cm
Installation and lining of the stove The screed had dried, and I began installing and lining the Svarozhich Lux stove. Nowadays this oven is called “Totem-Lux”. The choice fell on this stove, because it is intended specifically for the Russian bath. You can read about stoves for the Russian bath in my article about stoves for the Russian bath. I must say that I had a very great desire to line the stove myself, but a complete lack of bricklaying skills and a catastrophic lack of time pushed me to hire a bricklayer. Moreover, the stove and the pipe with the register must be covered before frost. So I was very hesitant to do it all myself. I will note that in kindergarten and early school age I really loved watching how masons laid bricks at construction sites. When they asked me what I wanted to become, I did not hesitate to answer - a bricklayer. Other normal children usually said astronaut, policeman or military man. My parents were sometimes ashamed of me; my sister openly teased me about it. Since then, throughout my life I have never been able to tinker with bricks enough, although the desire from childhood remains. It overpowered me, and I decided to cover the stove myself. To make it before the frost, you have to work every day after work from 6 to 11 pm. It doesn’t turn out smooth everywhere, the pattern of the seams also somehow doesn’t work out very well, but I’m doing it myself... for the first time and I’m trying really hard. Vitebsk red solid brick was chosen for the lining. The quality is not great, but quite acceptable. An electric tile cutter made in Voronezh was purchased.
But by all indications, China. I cut bricks on it. Very satisfied. The price is cheaper than grinders with a diamond blade, but in terms of safety and convenience it is much better. As a masonry mortar I use fireclay clay with the addition of cement. Looking ahead, I will say that fireclay clay is far from the best choice. Do not use ready-made solutions based on fireclay clay! Now I would do it with a regular clay-sand mortar. It is sold ready-made or you can mix it yourself.
A pedestal for the stove was made in two rows of bricks
A “tunnel” was laid to insert a 200x60mm plastic box with street air under the stove. Why did you use fireclay bricks for the top of the stove pedestal? I just had it in stock in large quantities and…. Well, there must be fireclay bricks in the oven
The furnace was installed and its lining began. There are two small doors at the bottom on the face and one larger door on all sides of the stove - inflow. It will be possible to use the doors to switch the inflow under the stove in the “air from the street”, “from the rest room” and “from the washing room” modes. According to desire and feelings.
- Back
- Forward >>
conclusions
Now you know how to make a bathhouse from a barn with your own hands, it is not such a difficult task. By taking a steam bath, you get a lot of positive emotions, while seriously improving your health.
Yes, building a bathhouse is quite a labor-intensive process, and if you complete the job you started, you and your family will be happy, and if you approach this business with creativity, use your ingenuity and imagination, you can make good money.
>