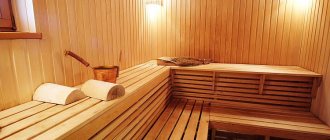
From time immemorial, the bathhouse has been revered in Rus'. Bath day was looked forward to as a holiday. She relieved any ailment, cleansed and gave strength. Today, the steam room is not so popular, but even now in Russia most residents are not averse to soaking up on the shelves or steaming with a fragrant oak or birch broom. The only problem is that if you hire craftsmen to install the shelves, the cost of their services can be significant. Today we’ll look at how you can save money by arranging shelves and shelving in your bathhouse with your own hands.
Types of shelves for a bathhouse with your own hands: photos of various options
Shelves can differ according to four criteria - type of fastening, design, material of manufacture and number of tiers. Let's try to figure out what exactly the differences are and what the shelves look like in different variations.
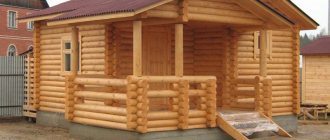
Almost no private sector farmstead is complete without a bathhouse.
Differences between regiments by material of manufacture
Even at the stage of planning the shelves, you should decide on the material for their manufacture. Any synthetic raw materials are immediately excluded - only natural wood is suitable for a real steam room. At the same time, not every tree can be used in a bathhouse. The main criterion should be the absence of resin, which under the influence of temperature will melt and stick to the body. It is also worth paying attention to the density - the wood should not absorb moisture like a sponge.
This is what African abashi wood boards look like
You can make your own shelves in the steam room from linden, aspen or birch. Recently, making shelves from African abashi wood has become quite popular. However, true steam room connoisseurs do not approve of such delights.
Types of shelf fastening, how they differ
Depending on the type of fastening of the shelves, it can be stationary or removable. In the first case, the boards are fixed to the frame with screws or nails. But the second option is more suitable for less dense wood species. It is simply boards laid on a frame, which after washing can be easily removed and taken outside so that they can dry.
The shelves are removed for drying, making cleaning easier
Shelf sizes and number of tiers
The number of tiers directly depends on the size of the steam room. However, it should be understood that if we are talking about a Finnish sauna, then here the shelves are made narrower, only for sitting, and in a Russian steam room the dimensions of the shelves in the bath are larger. This mainly concerns the width, which should allow a person to lie down so that he can get enough steam.
It turns out that in a regular steam room the shelves can be located in a maximum of two tiers, while in a Finnish sauna there may well be three.
Everyone chooses the number of tiers independently, depending on who is more comfortable
Photo of shelves on the wall in a bathhouse with your own hands
Wall shelves for washcloths and soap can be made from any material, but products made from the same material as the shelves will look more practical and aesthetically pleasing. Many people buy metal shelves, but this material is not very safe. In high temperature conditions it may become too hot. As a result, you can easily get burned when touching it. Below you can see several examples of shelves for a bath.
Quite an interesting do-it-yourself corner shelf
Another homemade shelf option
But you shouldn’t use such metal shelves in a bathhouse.
Today we won’t consider how to make shelves on the wall with your own hands; it shouldn’t be difficult.
Construction device
The shelves in the bathhouse are often called a bench in the common people. They are called that for a reason, since the entire structure is a flooring of benches that differ in level. Any shelf design for a bathhouse consists of two fundamental parts :
- The frame is necessary for the correct fastening of boards for permanent decking; it is also used to support a collapsible decking system. To build it, support posts are required; they can be compared to the legs of a bench.
- The flooring is constructed from thin planks, which are first made absolutely smooth by sanding. Their thickness is about 2 cm. It is recommended to choose linden or aspen as the material for production. The boards are stuffed with a small gap. The flooring is attached to the frame or to the ladders, which must be separately knocked together and installed on the floor.
The racks are connected by large boards that serve as jumpers necessary for the correct, level position of the shelf. Very rarely they are built according to the stringer principle, which serves as the basis for installing a flight of stairs. If Finnish technology is used, then when creating the frame there is no need to install supports, since the entire structure can be attached to the walls of the steam room.
If the flooring is not secured, it can be taken out into the fresh air for ventilation in the summer. Together with the flooring, you can build backrests for seats, devices for raising legs to a certain height, and sides of shelves.
The steam room is usually built in small sizes , since the smaller the room, the lower the heating costs and the faster it warms up to the required temperature for steaming. To set up a steam room well, you need simple, even furniture. Ladders for climbing shelves are often large and have 2-3 steps.
If possible, you can allocate the necessary area for the construction of a chaise lounge or sofa, often rounded in shape.
If the bath area is too small, it may not be possible to create a bottom shelf of a standard shape and size. In this case, you can build a triangular shelf. You should get an isosceles triangle, one of the legs of which needs to be attached to the wall, and the second is adjacent to the adjacent shelf.
Bath shelves are always multi-stage . This is due to the simplest laws of physics. The hot air gradually rises upward, part of it goes outside through the ventilation, and the rest is reflected from the pre-installed overhead system, so it returns and remains at the top of the building. Gradually, the upper part of the room becomes much warmer than the lower part, so everyone has the opportunity to choose the optimal temperature for themselves by sitting on a specific shelf.
When constructing shelves, you should adhere to the traditional configuration, designed according to the principle of a ladder. With each vape, a person will be able to independently choose a strong steam or a fairly moderate atmosphere. In addition to this aspect, the bottom shelf is of particular importance. With its help, the bath attendant can easily climb to higher tiers or use it as a podium for a convenient approach to the person receiving the procedure.
If the bottom shelf is not intended to be used as a supporting element, then the distance from the floor to it must be at least 30 cm.
In the steam room you can install shelves on both two and three sides . A large number of them will allow you to invite more guests to the bathhouse. When planning the structure, it is necessary to take into account the possibility of free movement. Staying in the steam room should not cause traumatic consequences.
Another video about how to make shelves for a bathhouse.
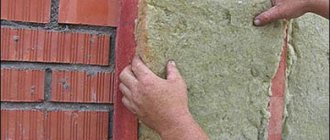
How to properly insulate a bathhouse? You will find out the answer to this question by reading this article. And here is an article about insulating a frame bath.
Corner shelves
Shelves in a bathhouse can be not only horizontal, but also made with two perpendicular sides. Corner shelves are often constructed by stitching together several blocks of boards. Steam rooms look elegant where the shelves are lined up in tiers on one side, and the corner shelf is located only in the bottom row, smoothly framing the nearby wall, smoothing out the corners.
For a large steam room, you can provide for the arrangement of tiers of shelves parallel to each other, and between them place one lower shelf, which will be fastened to the adjacent ones, serving as a corner shelf for each. You can use it as a bench, stand, or put various objects on it. It will be located opposite the entrance.
How to make shelves in a bathhouse with your own hands: step-by-step instructions with photo examples
Arranging wooden shelves with your own hands is not a very difficult task, but it requires a careful and rational approach. You should initially think through every little detail and, if possible, draw up a drawing of the future design. The material must be prepared in advance by cutting the boards to size so that you are not distracted during the assembly process. Let's try to consider step by step the entire algorithm for arranging regiments.
Shelves for a sauna or bath: a step-by-step guide
The shelf shown in the photo examples can be used both in a sauna and in a steam room. To make it easier for the reader to perceive information, all actions performed and described will be supported by photographic examples.
| Illustration | Description of action |
| First of all, you need to make a drawing. If the home master is familiar with modeling programs, then this work is greatly simplified. On a computer you can create a three-dimensional model with all the necessary dimensions | |
| Next, you need to cut the timber for the frame to size. When you have a drawing at hand, this will be quite easy to do. | |
| After all the necessary parts of the frame have been cut, you can begin assembling it. Fixation is best done with self-tapping screws | |
| Having completed the assembly of the frame, you can proceed to processing the boards for the shelf. They need to be carefully sanded on top and sides, chamfering. This will save people from splinters. The more thoroughly the boards are polished, the more pleasant it will be to sit or lie on them. | |
| It is best to attach boards from below. For this purpose, self-tapping screws are selected, the length of which is sufficient for fixation. At the same time, the screw should not go through, coming out from above | |
| Having assembled the main shelves, you can proceed to making the steps. They are needed to make it convenient for people to go upstairs. Steps should be located so that they do not interfere with washing. In this case, it was decided to place them only on the short side of the shelf | |
| This is what the finished shelf looks like. In the photo it is the short side with steps, intended for sitting | |
| Here's the long side. It will be very comfortable to lie on it. After the shelf is ready, it must be impregnated with a special composition. Typically, this is linseed oil or wax-based impregnation, which, when melted, is absorbed into the wood and protects it. |
You can learn more about the master class on making shelves in a steam room in this video.
Step-by-step instructions and manufacturing stages
It is quite possible to make sauna shelves with your own hands if you follow a simple sequence of actions.
The most important thing is to pay due attention to the quality of materials, the reliability of fastenings, as well as the surface treatment of the benches.
Frame
The first stage involves installing the racks.
They ensure the reliability of the finished structure of the sun lounger.
For the top row, they usually use from four to six racks with a length of one meter and a cross-section of 1 cm (more precisely, you need to calculate based on the length of the beds).
You can fasten the racks to each other using wooden blocks, which are located along the entire perimeter of the bed. In order to securely fasten the racks to the wall, you should use the longest dowel screws.
Important! To arrange the racks of the upper shelf, you can use unpolished timber, the main thing is to make sure that there are no chips or cracks on it.
Bearing beam
After the racks are securely fastened, you can focus on arranging the directly supporting structure of the shelves in the bathhouse.
This is a very important step, since this design supports not only the weight of the people who will be on top, but also the weight of the shelf itself.
That is why the cross-section of the supporting beam must be at least 5x10 cm.
The top row of this design is installed across the length of the upper plane of the bed. The width of the step depends on the thickness of the boards used to arrange the shelf.
Attention! The thinner the top boards of the bath seat, the smaller the step between the supporting beams.
In order to ensure that all visitors to the bathhouse are comfortable enough, the width of the top shelf should be made at least 60 cm, optimally 90 cm.
Front surface
After the load-bearing structural elements are completely ready, you need to take care of the upper bed. The boards for it must be prepared in advance, that is, carefully sanded and processed.
The optimal thickness of boards for arranging the surface of a shelf is from three to six centimeters. They should be attached at a distance of 1-2 cm from each other. This is done to ensure unhindered circulation of steam and moisture.
Next, we’ll find out how to attach the shelves in the bathhouse to the frame. To ensure your own safety, it is recommended to use wooden wedges. They need to be inserted into holes previously prepared for them.
You can fasten the boards both along and across the sunbed. The second option is more economical, since in this case the installation of additional support bars is not required.
Important! Under no circumstances should you leave the caps of metal fasteners on the surface of the shelf, as this can cause burns.
In order to avoid danger, metal elements are driven 5-10 mm deep into the board.
Lower tier
The shelf located on the lower level must be installed at least 30 cm from the floor level.
This rule applies to those cases when the lower seat plays not only the role of a step for the bath attendant, but also the role of a sun lounger.
In order to install the lower shelf, you need to attach four wooden blocks to the posts of the upper deck. This quadrangle acts as a frame for a shelf in a bathhouse.
Next, the boards for the surface of the bench are attached using the technology described in the third stage.
Processing, impregnation
It's no secret that under constant exposure to high temperature and humidity, wooden elements in a bathhouse deteriorate very quickly. It is for this purpose that the final stage in finishing the shelves in the steam room is the treatment of all structural elements made of wood with special substances.
Information. To treat the shelves in a bathhouse with your own hands, you should use only environmentally friendly substances so as not to risk your life and health.
Regular flaxseed oil is considered an excellent protective agent against fungi and mold, which is why it has been used for many years to treat sauna shelves.
To treat the shelves in a Russian bathhouse with your own hands, use a solution of turpentine and beeswax.
Protective substances should be applied in at least two layers, but it is worth remembering that it takes about eight hours to dry one layer.
After complete drying, the bath shelves acquire a matte shine and a water-repellent surface.
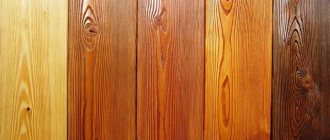
To see this, look at the photo below. The wooden element on the left was treated with special protective substances, but not on the right. Therefore, it is always better to take care of protecting the shelf in the bathhouse with your own wooden hands.
Drawings of regiments for a bathhouse with your own hands: photos of interesting solutions
As an example, you can consider several examples of ready-made drawings of shelves for a bathhouse with your own hands, as well as ready-made designs. Perhaps the reader will find something suitable for himself. If not, then based on the presented examples of drawings of shelves for a bathhouse with dimensions, you can always create something of your own.
Next you will see photos of wooden shelves made by yourself.
How to properly make shelves in a bathhouse: a few tips
The first thing to consider is the type of wood, this has already been mentioned. Also, do not place shelves in close proximity to the stove. If the flooring boards are fixed from above, be sure to recess the heads of the nails or screws. Otherwise, they will burn when the steam room warms up.
It is important to leave small gaps between the deck boards. This will help the wood dry faster, which means it will extend its service life. As for the width of the shelf, it all depends on the preferences of the owner. After all, some people like to lie in the steam room, while others, after sitting for a while, run away to the cool dressing room.
The height of the shelf in the bathhouse from the floor may also differ, depending on the thermal insulation and the design of the water drain. The higher the height of the shelves in the steam room, the more steam will fall on the steamer.
Gaps between shelf flooring boards are required
Determination of optimal parameters
When designing vaping devices, it is necessary to find a consensus between standardized requirements and the presence of individual characteristics of family members or regular visitors.
Options for a bath or sauna
The comfort of staying in the bathhouse depends on pre-calibrated meters and centimeters. This data is also important when purchasing building materials.
Therefore, it is necessary to decide what the distance of the shelves in the bathhouse should be at the design stage.
To do this, it is recommended to first measure the expected space, and then choose the configuration and depth of the shelves that you like or that is optimal for the room. The parameters should be correlated with the requirements of convenience and comfort of those who will be here for the purpose of washing or healing.
European standards for baths
When taking measurements, take into account the following:
- the length of the shelf can vary from 1.8 to 2 m - the latter parameter will allow you to receive guests of almost any height, and saving on length will make the lying position uncomfortable for a tall person;
- you can limit yourself to 1.5 m, but on such a step you can only lie with half-bent legs or in a fetal position, which makes it doubtful to get real pleasure from the steam room;
- the minimum for the bottom shelf is 40 cm, usually it is used as a footrest, but this width allows a beginner or someone who does not perceive heat well to sit with sufficient comfort;
- the middle and top ones are usually made at least 60 cm, in such a space you can sit in different positions for quite a long time.
In the country
It is also worth noting:
- if the shelves are 90 cm wide, it is convenient to take a lying position on them both on your back and on your stomach;
- the height calculation begins not from the bottom, but from the top shelf, while the main reference point in a Russian bath is the steam door of the stove, but the bottom bench should not be lower than 30 cm from the floor;
- the fastening of vertical supports should be at least 60 cm so that the structure does not sag even with significant weight of the person lying or sitting, although it may vary slightly depending on the thickness of the wood used;
- the height of the top shelf should be measured from the ceiling above - at least a meter is left from the head of the person sitting on the top bench to the ceiling, so it is important how much the height of the bathhouse is.
Dimensions of shelves in the steam room
Nuances of height
The dimensions of the shelves in the sauna may differ from the parameters recommended for the Russian steam room. It is enough to compare the method of heating air and the conventional vaping method to be convinced of this.
Prices of shelves for a bath: what amounts should you expect when purchasing
Let's try to figure out what the cost of ready-made shelves for a bathhouse or planed boards for them might be.
| Name | Material | Size, mm | Average cost for December 2020, rub. |
| Board | Linden | 90×27×2000 | 220 |
| Board | Linden | 26×90×1900 | 200 |
| shelves | Aspen | 600×1500 | 2 300 |
| shelves | Poplar | 600×1200 | 1 600 |
| shelves | Linden | 400×1200 | 1 200 |
It turns out that prices for linden shelves are lower, which, frankly, is strange.
How to do it right: layout and location
It is necessary to install shelves in the bath along those walls on which there are no windows, in two or three tiers.
Information. It is best to arrange ready-made shelves for a bathhouse in the form of steps, since the air temperature rises closer to the ceiling, and with this arrangement, each visitor to the bathhouse will be able to choose the optimal temperature regime for themselves.
As mentioned earlier, there are several ways to arrange bath shelves, let’s summarize:
- You can place them along one of the walls in several tiers;
- You can arrange two structures along two supporting walls, creating the appearance of a railway compartment;
- You can even design the shelves in the letter “G” in several tiers, combining two design methods;
- There is also an option for this arrangement: place the upper and lower shelves along one wall, and the middle one along the other, parallel to it. Looks great in medium-sized baths.
One of the main rules is to install shelves in a bathhouse on walls without windows. The fact is that the constant movement of steam can simply crack the glass.
That is why owners of a steam room with windows have little choice in layout.
How to make shelves in a sauna steam room durable: tips for caring for wood
The dampness that is constantly present in the bathhouse, plus the high temperature, creates favorable conditions for the proliferation of various bacteria and microorganisms. As a result, mold and mildew may appear quite soon, and the boards may begin to rot. To avoid such problems, it is necessary to periodically treat the wood with various compounds.
You can install ultraviolet lamps that will turn on after washing
The first is treating shelves and walls with antiseptics. They remove all unwanted flora and also prevent insects from breeding. Today, there is a huge range of similar products on the shelves of Russian stores. However, it should be remembered that processing must begin immediately after arranging the shelves. If the boards are already affected by rot, no antiseptics will help.
According to numerous surveys, Russian consumers trust Finnish and Danish-made impregnations more. These compositions are more effective and require application much less frequently than domestic ones.
It is also necessary to clean the bathhouse after each wash. Particular attention should be paid to foam residues on the shelves. After complete cleaning, the steam room doors should be left open so that the room is ventilated and excess moisture evaporates. The shelves should be periodically cleaned with a wire brush or iron scraper, trying to remove all dirt from them without any residue. It is worth looking through all the cracks between the boards. Leaves left there from a broom can cause wood to rot.
Thorough cleaning of the bathhouse will help extend the life of the shelves
How to treat shelves in a steam room
Final processing of the shelves is necessary to create a clean appearance of the structure and extend its service life. In steam rooms, it is better not to treat the wood with anything, but just sand it thoroughly. But this is good in cases where there is good ventilation in the steam room. If in doubt, it is better to play it safe and cover the shelves in the bathhouse with special compounds. In addition, impregnations will additionally strengthen the wood.
Floorings are coated with strong antiseptics. It is best to do this before assembly by treating the boards. Such compositions will prevent wood from rotting, mold, fungi, and small insects. Natural-based impregnations, such as linseed oil, are suitable.
You can treat the boards in a bath with chlorine bleach. The substances included in its composition will protect the wood from rotting and make it lighter.
Use special bath compositions: colorless and with tinting additives. Varnishes and impregnations based on alkyd or polyurethane are not suitable for steam rooms. When heated, such coatings release toxic substances, cause an unpleasant odor, and can cause poisoning.
How to make a simple bench without a back
Simple bench without back
To make a bench with your own hands you will need:
- hammer,
- plane,
- Grinder,
- hacksaw,
- roulette,
- screwdriver
The materials used are: wooden beams measuring 50x50 cm, wooden panels 20 mm thick and 100 mm wide, wood fasteners. The frame of the product is made from timber, and the slats will become the flooring.
Drawing of a bench for a bath
Operating procedure:
In order not to make mistakes when making and installing a bench, a drawing is first made that determines all the dimensions and location in the room. It will be easier to start working with a clear diagram at hand. Benches designed for one person are made 90 cm long; if there are more people, 50 cm is added for each person.
Saw the existing timber into four equal parts of 40 cm each - these are blanks for the bench legs. Measure two 60 cm sections from the other beam for the cross posts and saw them off with a hacksaw. Sand all parts to perfect smoothness. Nail two legs to each crossbar. To create a frame, attach two 1 meter long beams to the crossbars.
Sanding the board
Sand the prepared slats with a special machine or sandpaper so that you don’t feel any discomfort when touched. Stuff the finished planks onto the prepared frame. Leave 1 cm between adjacent crossbars; this gap will allow the wood to expand as it swells and water to drain from the bench. For fastening with dowels, holes are drilled with a slightly smaller diameter than wooden nails. If you can’t hammer in the dowels, you can use self-tapping screws. Their caps must be recessed into the wood by 5 mm, and the holes are sealed with wood putty. This will protect people from being burned by hot metal, and the screw from corrosion.
Note! To saturate the bench you need a special antiseptic, which can be purchased in the store. This is usually a composition based on vegetable oils.
Multi-tiered structures are made using a similar scheme.
Canopy sizes and shapes
Depending on the area of the steam room, the size of the canopy in the bathhouse is determined. A person should feel comfortable in a steam room, so the canopy should be of such dimensions that it will allow you to sit and lie on it.
The shape of the benches can be a bench, a lounger or a chaise lounge. The choice of shape depends on the size of the steam room and the possibility of installing one or another design in it. The most important thing in placing canopies is their compactness, that is, the benches should heat up well and not take up extra space.