Traditionally, baths are built from wood. This is a natural material with good thermal insulation properties. Therefore, the walls of a wooden bathhouse made of rounded logs or timber do not need insulation. Only the ceiling and floor are insulated there, and only because they are made of thin boards.
It's a completely different matter in a brick bathhouse. The thermal conductivity of brick is much higher than that of wood, so everything in a brick bath needs to be insulated: walls, ceiling and floor. Here we will look at how to insulate a brick bathhouse from the inside with your own hands.
In every region where there is a brick factory, brick is a very affordable building material. In such regions, the share of brick buildings in the private low-rise sector is especially high. There it is used for everything: for houses, bathhouses, garages, outbuildings.
Information. By choosing brick, you can save on exterior finishing. It may not be carried out at all. It is enough to decoratively embroider the seams. This does not happen with any other building material for walls.
Outside, brick, regardless of the type (red or silicate of any color), looks good. Therefore, the brick bath is insulated from the inside. Also, all brick buildings are insulated only from the inside.
The exception is large buildings, where in addition to internal insulation, facade insulation is also carried out. In private low-rise construction, this practice is rarely used, mainly when it is necessary to update the facade.
There are no significant differences in the insulation of the floor and ceiling in a wooden and brick bathhouse.
Moreover, in both cases, the floors and ceilings are made of the same material - wooden boards, so this article focuses specifically on insulating the walls of a brick bathhouse.
Various sauna rooms
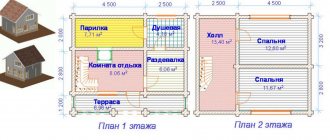
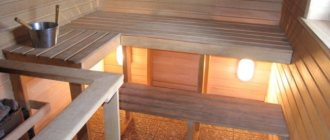
A classic bathhouse has three rooms: a steam room, a washing room and a relaxation room (often indicated as a dressing room). The insulation of a brick bath in all these three rooms differs. The most powerful thermal insulation should be in the steam room.
The average option is installed in the washing room, and in the rest room you don’t have to use special “bath” insulation schemes at all. Everything is done as in a regular living room, because the microclimate in the dressing room is the same.
Information. Not only the insulation layer differs, but also the vapor barrier. She should be especially careful in the steam room. Keep in mind that how long ecowool and other non-moisture resistant insulation will last depends on how well you did the waterproofing.
Steam room
Leaving just brick walls in the steam room is unacceptable. The wall structure will always be composite. A good option has the following layers in section:
- load-bearing brickwork walls;
- waterproofing layer;
- insulation layer;
- vapor barrier layer;
- external cladding of the steam compartment (lining, imitation timber, block house).
From these layers, the waterproofing layers between the brick wall and the insulation layer are sometimes excluded. Brick walls themselves, if they are built correctly and well waterproofed from the foundation, do not become damp. If you are not sure about the walls of your brick bathhouse, then be sure to install this additional insulation.
Steam room cladding
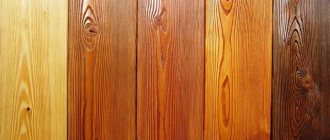
- To decorate a steam room, in the vast majority of cases, deciduous wood species are used: alder, linden, aspen, maple. Linden is the most common, because under extreme operating conditions it is the one that performs best.
Note! When answering the question of which wood is best for a steam room, you should remember that in this case the most important parameter is the minimum density of the material, and therefore its heat capacity. Thanks to this, the wood heats up more slowly and does not burn the skin.
- Of the coniferous species, cedar or pine is used for cladding the steam room. “Pockets” are preliminarily cut out of them and resinous substances are neutralized.
Abashi wood is also excellent for cladding a steam room.
- If you have the means, you can advise (especially for lining shelves, benches and benches) to use abashi wood. The unique wood of this native of Africa does not burn when touched even at very high temperatures.
- Such beautiful and noble species as elm, oak and beech are absolutely not suitable for lining a steam room. They have dense wood and you will inevitably get burned.
- When thinking about what kind of wood is best to cover a steam room, you should take into account that with temperature changes in conditions of high humidity, deciduous lumber darkens quite quickly.
Material
Building materials can be divided into structural (steel, concrete, brick, stone) and thermal insulation, which have low strength and specific gravity, but they retain heat well.
Thermal conductivity and specific gravity indicators are interrelated.
That is why almost all heat insulators have a porous structure, float in water and are often combustible.
The walls of a brick bathhouse can be insulated from the inside using any heat insulators that are approved for use in interior work.
The choice of material must be made before insulating a brick bathhouse. The required material is indicated in the project.
Here is an approximate list of them:
- Polystyrene foam (foamed polystyrene). It is moisture resistant, which makes it well suited for a bath; the thermal conductivity is very low. The specific gravity is about 25 kg per cubic meter. The main disadvantage is that the material is fire hazardous and not environmentally friendly;
- Mineral wool. It is rarely used in baths, since even after a single wetness it irreversibly “shrinks” in volume. If the thermal insulation is good, it can be used in baths. The advantage in combination with brick walls is absolute fire resistance;
- Basalt slabs. In many properties they are close to mineral wool. Safer for humans;
- Organic insulation: moss, straw, sawdust. Nowadays they are almost never used, but they are often used as a backup option;
- Factory-made organic insulation materials, for example, porous cellulose boards. Their main advantage is environmental friendliness. A good option for a bath;
- PPU foam rubber. It is mainly used for pipe insulation. In rare cases, they are used to insulate houses and bathhouses. It is possible to use both ready-made elements and foam spraying from a foam generator;
- Other polymer insulation materials, of which there are many brands: Pepoplex, foamed polyethylene, magnesium oxide on acrylic resin;
The insulation can be fireproof, like the rest of the brick bathhouse. How to insulate the walls and ceiling is determined by the budget and the overall project. Of all the options for a bath, foam plastic (only it has excellent moisture resistance) and basalt slabs are most often used.
Both materials are available in the form of flat slabs.
To install them on walls, floors and ceilings, a lattice frame is always required.
The insulation itself is fragile, does not hold its shape clearly, and on top of its layer there must be a durable outer surface (for example, bath lining).
The combination of these two layers is ensured by the frame. Insulation with any slab materials is similar in technology.
This is the installation of slabs cut to the size of the frame cell, as well as their adhesive fastening.
Almost any slabs are attached with glue: foam plastic, basalt, ecowool. The choice of glue is carried out according to the recommendations of the insulation manufacturer.
Important! Working with mineral wool and insulation containing fiberglass requires special care. Work in protective equipment, a respirator, and goggles.
Working with foam plastic and cellulose porous insulation requires compliance with fire safety rules. Minor dust formation may occur during cutting. Such intensive protection as when working with glass wool is not required.
Making partitions from foam blocks
Making partitions from foam blocks
Foam blocks (made from aerated or foam concrete) are distinguished by the fact that, despite their low weight (compared to bricks), they are large in size, which means that masonry will be carried out much faster.
Partition foam blocks
Standard blocks have a height of 300 mm and a length of 600 mm. The thickness depends on the type of room where the partition is planned to be installed, but in most cases, products of 75 mm, 100 mm and 150 mm are used. The cost of foam blocks ranges from 21.5-49.5 rubles, depending on the thickness.
Interior partitions made of foam blocks
The masonry procedure is not much different from the previous version, but there are still some differences. Below is the sequence of actions.
Masonry procedure
Prices for foam blocks
foam blocks
Stage one. Marking
First, the floor and walls are prepared in the same way as in the case of brickwork. Then the cord is pulled and the doorway is marked. In accordance with the markings, the first row of blocks is laid out “dry”, and if necessary, trimming is done. A grinder is suitable for this, although it is better to use a stone saw. In the absence of these tools, a simple hacksaw is used.
Block cutting
In place of the future structure, waterproofing (roofing felt is suitable) is placed in two layers.
Stage two. Installation
For laying foam blocks, a special glue is used, which must be diluted in accordance with the manufacturer’s instructions. The glue must be mixed with an electric drill with a special mixer attachment. The adhesive composition is applied to the foam block with a layer of 3 mm, then the block is put in place and tapped, verticality/horizontalness is checked. Each new row of foam blocks must be shifted by about ½ the width of the product to make the partition more durable.
Block laying
Where the partition meets the main walls, it is tied with pieces of reinforcement or large nails. To do this, holes are made in the walls, and reinforcement with glue is inserted there to a depth of at least 50 mm. You can make recesses in the blocks themselves, although it is preferable to place the products directly on the rods that stick out from the walls.
On a note! When the height of the partition reaches the top of the doorway, two reinforcement rods with a diameter of 1.6 cm are laid in this place. The length of the rods must exceed the width of the opening by at least 10 cm. Blocks are laid on top of the reinforcement up to the ceiling.
Partition made of blocks
Partition installation
Partitions made of foam blocks
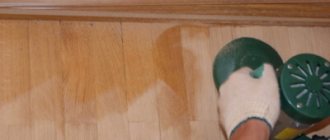
Stage three. Plaster
For plastering, you can use the same adhesive solution that was used for laying. If necessary, channels are created for laying communications. After plastering is completed, the surface is dried, puttied, painted or tiled.
Plastering blocks
Plaster prices
plaster
Good advice
In some cases (if the weight of the structure is insignificant), a partition made of foam blocks can be built directly on a wooden floor. Although there are some nuances here.
- When purchasing blocks, you need to pay attention to the quality of their surfaces. The smoother the surfaces are, the better the finishing will be.
- The dimensions of the blocks depend on the installation location, while the density does not play any role.
- It is advisable to purchase blocks produced using cutting technology.
- If the foam blocks are moistened with water before work, this will increase the density of the masonry.
- The blocks of each new row must be shifted to avoid the appearance of vertical seams.
- It is advisable to leave a small gap (about 100 mm) between the partition and the ceiling, which must be filled with polyurethane foam.
Frame (beacons)
Proper manufacturing of the frame is the most difficult stage of insulation. A high-quality and durable frame provides a smooth front surface made of lining.
Insulation of a brick bathhouse inside is carried out by filling the cells of a wooden or metal frame.
Other options do not apply.
The wooden frame is assembled from bars, the metal frame is assembled from a specialized galvanized profile.
A wooden frame is simple and cheap, but its strength is less than that of a metal one.
For a heavy block house, a wooden frame made of bars may not be enough. Then the cross-section of the elements must be increased or a structure combined with metal must be used.
A powerful wooden frame is only possible with a large gap for placing insulation. The choice of this gap must correspond to the thickness of the insulating board. Typical options provide a layer of 20 – 90 mm.
The quality of insulation directly depends on the thickness of the slabs. The choice of how to insulate a brick bathhouse from the inside is based on typical data for your climatic region. Recommended projects can be used. Types of connections in a wooden frame:
- Tenon and groove;
- With metal corners;
- Butt joint on nails and dowels.
The most durable and practical connection is on metal corners. Instead of nails, it is convenient to use self-tapping screws, which are purchased with metal corners.
Each T-shaped connection requires two angles and about 10 screws.
Vertical posts (beacons) and horizontal bulkheads are made from bars of the same cross-section.
The most advantageous aspect ratio is 7:5.
Such timber is produced in large quantities and can be purchased at any lumber store.
Flooring repair
The floors in the bathhouse are made of boards 35–50 millimeters thick. Moreover, before installation, they are treated with special substances that increase resistance to moisture. The constant presence of water and temperature changes lead to the boards becoming unusable and requiring replacement. Bathroom floor repair is a top priority.
Repairing the floor in a bathhouse with your own hands must begin with assessing its condition. In most cases, restoration does not involve a complete replacement of the coating. All that is needed is to remove the boards that have begun to rot and replace them with new ones. The baseboard also needs to be replaced.
A complete replacement of the floor is carried out only if there is a need to redo the sewer system. For example, replace the pouring floor with another type of drainage. At the same time, boards that have not yet exhausted their resource can be reused. They, like new lumber, must be dried and treated with an antiseptic.
Metal frames (metal profiles)
The entire metal frame is quickly assembled from ready-made profiles, which are produced by industry specifically for this purpose. In addition to profiles, shaped elements are purchased to make connections.
If in a wooden frame you can make connections with ordinary nails, screws and glue, then in a metal frame you cannot do without specialized fittings. On a metal frame, only the insulation of a brick bathhouse is created from the inside; the scheme is not used for external insulation.
Advantages of a metal frame:
- Quick and easy assembly;
- Fireproof design;
- Suitable for insulation systems with minimal slab thickness.
Information. To insulate the bathhouse, a frame of a standard design is assembled. Without significant changes, frames for plasterboard, suspended slab ceilings and external ventilated facades are made using the same technology.
Installation of beacons
The main element of the metal and wooden frame is the lighthouses. These are vertical bars or steel profiles that are installed strictly plumb. If the brickwork has defects and zonal deviations from the vertical surface, then the correct installation of beacons will eliminate them.
Installing beacons is the first thing you need to start with insulating a brick bathhouse from the inside; all operations are done here with your own hands. Insulation work is quite simple. They are often seen not only in bathhouses and private houses, but also in apartments.
The accuracy (deviation from the vertical surface) of a well-placed beacon is 1-3 mm. The outer lining of the bathhouse will be attached to its front surface.
Attention! For defective areas of brickwork, it is convenient to mount beacons with specialized brackets with variable length due to threads.
The lighthouse is secured to the wall with anchors. It is better to drill holes for anchors in the centers of the bricks. If the wall is plastered from the inside, then you can drill arbitrarily. Anchors are used here.
Making a brick partition
The partition in the bathhouse between the steam room and the sink can also be made of brick. Here it is better to use ½-brick spoon masonry (or, alternatively, a whole brick). Such a structure will weigh quite a lot, so to lighten it, you can use hollow bricks.
Making a brick partition
Stage one. Preparation
Before starting work, it is necessary to prepare all working surfaces. The plank covering is removed from the floor all the way to the foundation, then everything is cleaned with a wet broom. Next, the workplace is equipped with good lighting, all items that are not needed for work are removed from the room. The contours of the structure are outlined.
Stage two. Solution
To work you will need the following equipment:
- sieve;
- Sander;
- shovel;
- mixing tank.
Tools for work
Step 1. First you need to sift the sand to clean it from foreign objects. A sieve is constructed from a fine mesh chain-link mesh and 4 beams. The sand is carefully sifted.
Sifting sand
Step 2. Next you need to take care of the mixing container. It can serve, for example, as an old iron barrel, cut lengthwise into two parts. The barrel is firmly installed for ease of operation.
Step 3. Mixing proportions – 3:1. First, you should fill in six buckets of sand and two of cement. Water is added and the solution is mixed with a shovel. This volume of solution is enough for about an hour of work.
Step 4 . The solution is mixed to the consistency of thick sour cream. At the end of kneading, it will begin to harden and shrink, but there is no need to add water - just stir it once every 15 minutes.
Stage three. Construction
For this stage you need the following tools:
- level;
- pick;
- trowel;
- plumb line;
- rule.
| Step, No. | Description | Illustration |
| Step 1. | The string is stretched - it will serve as a guide. The solution is laid and leveled with a trowel, and the horizontalness is checked. Then you need to wait a little for the solution to set. | First row - diagram |
| Step 2. | Another layer is applied on top of it and the laying of row No. 1 begins. | Second row |
| Step 3. | The first brick with mortar applied to the end is laid on the surface and pressed against the wall. Next, the brick is tapped and leveled with twine, and excess mortar is immediately removed. | Bricklaying |
| Step 4. | If a doorway is planned (and most partitions have one), then it needs to be set in advance. Using spacers, you should install the door frame. It is checked for horizontal/verticality and, if necessary, its position is adjusted. | Laying a brick partition |
| Step 5. | The brick is laid close to the box. To tie the partition to it or to wooden walls, metal strips are used: they should be bent and screwed to the side surfaces so that they (the strips) are between the bricks; You can also use reinforcing bars. | Door frame |
| Step 6. | At the end of laying row No. 1, the brick is broken into two parts using a pick. The second row begins with one of these halves. The string stretched horizontally is carried higher to make it easier to navigate. The third row begins in the same way as the first. | Laying brick partitions |
On a note! Bandaging the masonry is a prerequisite. Thanks to this, the load on the structure will be evenly distributed, and the partition itself will be more durable.
- Every five rows, steel strips or pieces of reinforcement are placed in the seams - this will strengthen the structure.
- The structure is tied to the walls with steel strips, and auxiliary reinforcement can be used for the door frame (ideally, this should be a channel of the appropriate size).
- The gap formed between the ceiling and the wall is filled with small pieces of bricks previously soaked in concrete. The pieces need to be pressed as tightly as possible to each other. All cracks are sealed with tow, also treated with cement mortar.
Video - Laying a partition of ½ brick
Good advice
- If you plan to plaster the partition, then when laying it you don’t have to put too much effort into the quality of the seams. If a brick structure serves as a design element, then the seams must be neat, so excess mortar must be removed in a timely manner.
Plastering a brick partition
- If the partition is to be plastered, then it is quite acceptable to use even used bricks - this will significantly reduce costs.
- If any communications must pass through the partition, it is recommended to use a piece of pipe of the appropriate diameter for this purpose. The pipe is lined with brick, but is not attached to the structure with mortar - this way, in the event of any changes, the masonry will not be disturbed. The voids formed between the trim and the masonry are blown in with polyurethane foam.
Steam room in a brick bath: how to do it right
In the steam room, the air temperature is the highest during the operation of the bath, and this imposes certain requirements for thermal insulation. It should be better than in all other rooms of the bathhouse. In addition, high humidity requires the construction of hydro- and vapor barriers.
All hydro- and vapor barrier materials can be divided into film (roll, membrane) and liquid (mastics, impregnations). Insulating a steam room in a brick bath requires only rolled steam and waterproofing materials. Mastics are used only as auxiliary.
The best vapor barrier option is the use of a specialized vapor barrier membrane. They are composite polymer films. Modern manufacturers offer a huge number of ready-made membrane options in rolls.
Important! Foil membranes have especially good performance characteristics. A separate article on our website talks in detail about foil bath materials.
Steam, unlike moisture, does not spread through structures, but through the air. Insulation from it should be more airtight than waterproofing. Rolled foil material is rolled out over the surface of the insulation and frame bars and glued with construction tape.
A protected, homogeneous surface without cracks is created. Subsequently, it will only be damaged by the fastening of the casing. To provide for this point, you can use several vapor barrier layers, and not all of them should be laid on top of the bars.
Vapor barrier is necessary in the steam room. It is desirable in the washing room, since the materials for it are inexpensive. You don’t have to do it in the rest room, but brick walls have good thermal conductivity, so condensation is likely to form.
Ceiling and roof repair
If the time has come to repair the bathhouse, then you need to pay attention not only to the logs, floor and stove, but also to the ceiling and roof. Over time, they could begin to leak, including where the chimney pipe passes. The pipe penetration must be checked first. For the rest, you should rely on the current condition of the roof.
The ceiling should be additionally insulated, for example, with mineral wool. Near the chimney, the ceiling is insulated with non-flammable materials that can withstand high temperatures.