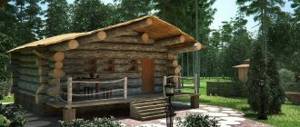
The design of a bathhouse inside and outside determines its functionality, aesthetics and quality. Many elements can be implemented in different ways.
This makes it possible to save budget or, on the contrary, to build an entire complex with the entire range of possible services. In this article we will look at the main methods of maneuvering when building a bathhouse.
>
Photo of the interior view of the steam room
Important Rules
It is useful for novice builders to learn a number of rules, thanks to which the bathhouse will last for many years:
- do not build a steam room too close to a pond to eliminate the risk of flooding, or near a road;
- decide on the location - a separate building or an extension to the house;
- ventilation and wastewater disposal are important tasks that should be solved at the design stage;
- the building must be located taking into account the cardinal directions and wind direction, preferably in the southern part of the site, protected from the wind, with access to the west;
- a very careful attitude should be taken to fire safety, especially if the bathhouse is adjacent to the house;
- To maintain normal relations with neighbors, consider the size and location of the bathhouse so that the owners of the neighboring property do not experience discomfort and do not make complaints.
Requirements for basic parameters
A Russian bath, like a Finnish sauna, requires maintaining perfect order in the steam room. This rule primarily applies to torn leaves from birch and oak brooms. In order for the room to be fresh and have a pleasant aroma, and not the smell of musty leaves, cleaning should be carried out especially carefully, including behind the benches. Therefore, when calculating floor parameters, the gap between the boards and the floor must be taken into account. It would seem like such a trifle, but it must be taken into account in construction.
In fact, the requirements for the main parameters of shops are:
- Compliance with rational dimensions for the height of steps;
- Compliance with the dimensions of the width of the benches;
- Taking into account the requirements for the length of sunbeds;
- Ensuring the structural strength of the floors, their functionality and rationality of location in the steam room.
The benches in the bathhouse must comply with the width dimensions. But before moving on to revealing each of the parameters, it is worth briefly considering what the design of the benches in the steam room consists of.
The simplest and most functional is the frame structure of the floors. The basis is a slatted frame, one side of which is built from bars, the second side is made in the form of planks, tightly attached to the load-bearing walls. The boards of the benches are attached at one end to the frame, and at the other, they lie on a block against the wall. The lower steps have two support points - one on the post of the upper tier step, the second support point is a smaller post.
This scheme allows you to build a durable structure that will provide not only strength, but also functionality. Everything else is just subtleties that will be considered during the work process.
Floor height
Correct selection of floor height parameters is very important for a steam room. Typically, the ceiling height of a steam room is usually taken at the level of 2.1-2.25 m. A high ceiling creates an additional volume that needs to be heated, and the temperature there will be higher, while at the level of 1.2-1.6 meters the temperature for comfortable steam will not be enough. That's why 2.10-2.45 are the most optimal parameters for ceiling height. And if so, then the parameters for the height of the floors will be:
- The lower tier of the beds is 40-45 cm.
- Middle tier 80 cm;
- The upper tier is 120 cm from the floor level.
Thus, from the top point of the floor to the ceiling there remains 1.2 meters (with a ceiling height of 2.45), which is quite enough for normal steam and working with a broom.
The height of the lower tier of 40-45 cm is determined by two parameters - the first, practical, this height is enough to remove debris after procedures using cleaning equipment. The second indicator is related to the height of the rise - it is equal to the height of three steps of a regular staircase.
The height of the second and third tiers is associated with the possibility of the most effective bathing procedures. On the top shelf, the temperature promotes the maximum beneficial effect, and it is more convenient for the bathhouse attendant to work with brooms from the first step; there is no need to reach out to whip the steamer.
Width
The standard width of the shelves is determined depending on the purpose of the tier. The lower tier is usually not used in the steam room for procedures, or is used by those who do not like to steam with a broom, but at the same time do not deny themselves the pleasure of receiving a portion of warm water steam. Oh, yes, this place is to the liking of children, here they are comfortable both in terms of the height of the shelf and the temperature in the steam room. Therefore, despite the small height of the step, its width should ensure that both an adult and a child can sit down. The width of such a bench should be from 30 to 45 cm.
The second tier is usually used by adults to warm up. But it is not recommended to make it too wide. 40-45 cm is enough.
The upper tier is the most popular, so its width should be larger; there should be enough space to lie down and sit down normally. The optimal width of such a tier is 1.2-1.4 meters.
For those who build a bathhouse themselves, the width of the widest flooring may be different; in this case, experts recommend using a simple method for calculation - measure your height, divide the result by half and add 20 cm. The result obtained will be optimal for determining the width of the top shelf.
Cavity length
This parameter is usually overlooked, especially if the steam room is made “for yourself”, that is, it is enough to be content with the fact that you can just sit and warm yourself and whip yourself with a broom. Alas, you won’t really get pleasure from such a bathhouse. Therefore, when determining sizes you need to take into account:
- The minimum length should provide the ability to lie down and bend your legs;
- The average length of a bed is equal to the average height of a person plus 15 cm;
- The optimal length is 220 cm.
Recommendations for planning a bath
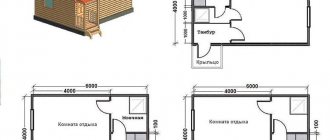
First of all, consider the optimal building area . For one person, 5 m2 is provisionally provided. That is, if you want to accommodate four visitors in a steam room, start from a total area of 20 m2 (at least). Below we offer a list of which rooms should be included in the bath complex:
- steam room;
- shower and font;
- restroom;
- dressing room;
- toilet.
Sketch out a few diagrams and drawings for yourself:
- general plan of the building;
- separate drawing for each room;
- schematic structure of the foundation;
- plan for fastening and laying out timber;
- floor and ceiling arrangement plan;
- installation diagram of a sauna stove with the removal of its design features.
Tank influence
It is also important to decide how you will use the steam room of your building. More precisely, which steam do you prefer: dry or wet?
If it is wet, then you should equip a Russian bathhouse. To do this, you should install a water tank in the steam room, which significantly increases the humidity in the room.
Tank inside the steam room
If dry procedures are closer to your soul, then the tank must be taken into the next room and connected to the stove with a heat exchanger.
Firebox door and water tank in a separate room
Frame-based bathhouse: pros and cons
A traditional DIY frame bathhouse is an excellent choice for those who do not have a huge budget and want to save time. The advantages of frame technology in the construction of baths are very significant:
- lightness of structure provided that modern insulation is used;
- the speed of construction of a frame bathhouse is superior to analogues made of brick or logs;
- walls are not subject to shrinkage;
- the technology allows you to simultaneously finish a bathhouse on a frame basis both inside and outside;
- it takes only a few days to assemble the frame, and several weeks to install heating and finishing;
- you can come up with a lot of options for interior and exterior finishing - from plaster, boards and siding to tile covering;
- all pipes, automation elements and other equipment are conveniently and aesthetically hidden in the wall of the structure;
- the total cost of a frame bathhouse project is lower than in the case of log and brick structures.
From the owner reviews, one significant drawback . This is a high susceptibility to moisture, which accumulates inside the frame during frequent rains and snowfalls. And yet the professionals found a way out. We offer several secrets on how the happy owner of a frame bathhouse can ignore weather conditions and excessive humidity.
Useful: Terrace near the house: planning, progress of work
Add-ons
The bathhouse can be supplemented with the following designs that increase its functionality:
Polati
A place to sleep or sleep during the day
You can abandon the ceiling design and do the following:
- Lay tongue-and-groove boards thirty millimeters thick over the steam room and sink.
- Install a ladder leading to them.
- Place comfortable mattresses on top.
This creates the most convenient place where you can:
- Stay overnight in the absence of a residential building.
- Place part of a large company. At the same time, it will be possible to continue communicating with those who remain in the rest room, since nothing will separate them.
- Arrange guests for the night.
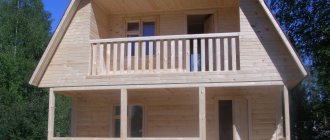
Attic
Second floor in the bathhouse
On a suburban area that does not have any buildings, it is very convenient to build a bathhouse with an attic. On the attic floor there is a perfect place for a full bedroom, a guest room and even a balcony.
This will provide the following options:
- Possibility of living until the house is built.
- Privacy in the presence of a large group of vacationers.
- Options for installing a billiard table or a massage trestle bed on the second floor.
Advice: be sure to take care of high-quality ventilation, including installing an air conditioner on the attic floor. Because on summer days, when the stove is fired, it will be very hot there.
Hozblok
Sauna project with utility block
A small extension with all necessary communications, including water supply and sewerage, can:
- Place a bathroom. Which will be very useful when children visit the steam room in winter.
- Equip the kitchen. This will make it possible to significantly relieve the load on the residential building.
Vapor barrier and thermal insulation of frame baths
Proper vapor barrier will prevent condensation from forming and will provide the opportunity to steam in a frame sauna in winter. For this purpose, specialists use glassine and vapor barrier films between the insulation and the internal lining of the building. Ruberoid is not a suitable material because it smells unpleasant when heated.
The goal of high-quality thermal insulation in a frame bath is low thermal conductivity and tightness to reduce heat loss (but without disrupting air exchange). Fiberglass and mineral wool in this sense will be the best option for insulation.
Comfortable lighting
Most steam room projects do not provide for natural lighting, so you simply cannot do without additional light sources. Properly selected lighting will create a favorable atmosphere and ensure comfortable bathing procedures.
A classic DIY steam room provides for a sufficient number of light sources to create twilight, conducive to relaxation.
The location of bath lamps should not interfere with the procedures, and the light should not tire the eyes. The best option is to place one large surface-mounted lamp above the door, and small built-in lamps above the shelves.
Today you can purchase lamps and lamps for the steam room, made with decorative lampshades made of wood or glass. They can be overhead or built-in.
The main thing is to adhere to fire safety rules when installing lamps - insulate conductive wires and light bulbs. To do this, the light bulbs are placed in special metal housings of a hermetically sealed design, and the wires are placed in plastic boxes that are resistant to overheating. The switch is mounted outside the steam room.
That’s all the subtleties of how to make a steam room in a modern bathhouse with your own hands - to do this, it’s enough to purchase a heater, insulate and decorate the room, install bath furniture and the steam room is ready for use.
And if during its arrangement all the rules and recommendations were followed, then the heat and steam produced will have a powerful beneficial effect on the human body.
How to choose wood for a frame steam room
Only dried wood is suitable for building a frame bath. Wood material from linden, larch and aspen has low thermal conductivity and firmly retains the original shape of the frame. Therefore, we recommend that you consider these breeds first.
Please note that for the construction of walls you will need boards 2-3 cm thick . Pine or larch is suitable for external cladding. The internal lining is made of boards with a vertical arrangement.
Optimal sizes
As mentioned above, the optimum depends on what type of bathhouse its owner prefers - Russian or Finnish.
The average data for each type of bath are as follows:
- in the sauna, the width and height should be comfortable for sitting - this is from 40 to 60 cm in seat width and 45-50 cm in height;
- In a Russian bathhouse, shelves are needed for lying and sitting . The minimum width is 60 cm, and the height is somewhere around 70-75 cm, but it is better to determine it anatomically, as recommended above.
The length of the shelf is usually equal to the distance between the parallel walls, since it is usually made along one of the walls
On our website there is a more detailed analysis of the nuances associated with the size of bath shelves.
How to build a bathhouse on a frame basis
Pre-design the location of the stove, chimney, ventilation, veranda and select the type of roof.
Foundation and bottom trim
Now about the foundation, lower trim and construction of walls :
- A budget columnar foundation made of asbestos-cement pipes with concrete filling is suitable for a lightweight frame structure. You will need 4-meter asbestos-cement pipes with a diameter of 100 mm and a filling solution made of cement, small crushed stone, sifted sand and water. First, the pipes are cut into equal halves, then inserted into wells drilled with a gas drill (depth 1.5 m; diameter 200 mm). Next, sand is poured and compacted, and at the final stage it is filled with concrete mixture.
- The bottom trim is made from several edged boards with a cross-section of 150x50 mm, nailed together. The logs for laying the floor from the boards are cut into the frame afterwards. Pieces of roofing felt are suitable for waterproofing. For additional strength, the logs and piping are attached to the foundation pipes with metal plates, pre-walled. Finally, the structure is treated with a solution to protect it from rot and insects.
Construction of walls and roofs in a frame structure
When the wood has rested and dried well, the preparation of frame racks and parts of the rafter system for the roof begins. The installation sites for frame racks are marked. The final assembly is done like this:
- Two corner posts and several intermediate ones are mounted.
- Strictly leveled with screws, sheathing is done with oriented strand boards from one selected corner.
- The remaining racks are exposed and sheathed according to the same principle.
A solid structure is obtained by sequentially adding racks and attaching OSB boards . Door and window openings are taken into account immediately.
Construction of the roof
The roof is done as follows:
- All rafter structures are assembled on the ground according to a single template.
- After assembly, they are lifted to the roof one by one, each having its own stand, above which the installation is carried out.
- Before installing the last truss, mark out the shape of the pox sheets for future cladding of the pediment.
- For ease of assembly work, temporary floors made of ordinary boards are laid on the beams.
- A ventilated roof is considered to be the best in terms of functionality, so a special film is laid between the rafters and the counterbeam, and the sheathing is placed directly on the beam.
- One of the most desirable roofing materials is ondulin.
Useful: How to cheaply build a house with your own hands
Finishing a frame bath
External cladding with spruce or pine boards is the best and visually attractive option. The horizontal position of the elements ensures stability and additional rigidity of the frame bath. Sometimes the boards are placed end-to-end with the installation of hydro- and thermal insulation under the sheathing.
The internal lining is made to protect against environmental influences. For the rough ceiling, OSB sheets that were used previously are also suitable. Three layers of insulation will be needed to reduce heat transfer. The walls of the steam room are covered with screen foil, and the remaining walls are covered with glassine.
Next, the boards are nailed face down to the joists; at this stage, you can save money and reuse the scaffolding. The stove-heater is placed in the steam room, and the boiler-heater is placed on the side of the dressing room. For the sake of fire safety, we recommend laying a brick wall between the steam room and the relaxation area.
Great Bath Wall
If the Great Wall of China performed purely defensive functions, then the tasks of the bathhouse wall were broader and more complex. It must ensure the following conditions are met:
- Be strong enough to guarantee the overall integrity of the structure, being a key element in connecting the foundation and roof, evenly distributing the load, both from the roof and its own, onto the base of the structure;
- Have good thermal insulation functions and ensure maximum heat retention, with minimal costs for generating thermal energy;
- Have an attractive appearance and give aesthetic pleasure to lovers of a wide variety of trends and design trends;
- Be a structure with a long service life and can be easily subjected to cosmetic, routine and major repairs;
- Be opaque, so that visitors to the steam room are not happily recognized on public transport. Although, given the latest global trends in the popularization of the ideas of nudism, as well as in the presence of a high fence and blind neighbors, the last point can be neglected.
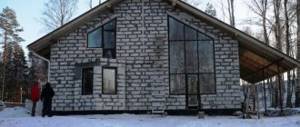
Frame-panel structure for a bathhouse: project features
A simple frame made of wooden beams, covered with insulated panels, is a frame-panel bathhouse.
Advantages and Weaknesses
The undoubted advantages of the design are the low cost of materials, speed of construction, ease of construction work, minimal shrinkage, low thermal conductivity and very rapid heating of the material. Of the minuses, it is worth noting the joints between the shields . However, with adequate organization of vapor barrier and mineral insulation, they will not interfere, since the structure will become airtight.
Who is a panel bath suitable for? If you do not have a large budget and are looking for quick construction, this option is for you. The disadvantage is the fragility of the project, only 10 - 15 years, while an expensive log bathhouse will last a lifetime. The structure itself weighs little, so it is placed on a columnar foundation; the pillars are placed at the corners of the building, at the intersections of internal walls and under their edges.
How to assemble a frame-panel bathhouse
Assembling the frame of a panel bath begins with treating the wood with an antiseptic to protect it from rot, insects and fungus. Treating all load-bearing structures and finishing with fire retardants is highly desirable to ensure fire safety. The pillars are covered with roofing felt to avoid excessive moisture.
Next, the frame of the panel bath is assembled in the following sequence:
- base piping;
- load-bearing racks;
- installation of the top trim and ceiling;
- wall cladding (in layers - internal cladding, wooden frame, vapor barrier, insulation, water and wind insulation and external cladding);
- roof.
If you study the reviews of owners about frame-panel baths, you will find a lot of positive impressions. Just a few days for assembly, the efficiency of the stove with sufficient power, the possibility of purchasing a ready-made frame-panel structure - these are the main positive aspects that the owners of such baths talk about.
Choice of insulation
Experts by a majority of votes recommend the use of slab-type mineral wool “Ecobasalt” as the most convenient, economical and proven material. However, other materials can also be used as insulation, for example:
- Ecowool . Despite a lot of positive qualities, insulation has significant drawbacks, the main of which is the loss of its qualities over time, a high risk of shrinkage with the formation of cavities, and the possibility of prolonged smoldering when exposed to high temperatures.
- Glass wool . Recently, its use has dropped sharply due to the dangers during operation. However, with proper protection of the respiratory organs and eyes, this is quite a decent insulation. absolutely non-flammable and durable.
- Expanded polystyrene, or polystyrene foam . It is light in weight and rigid, convenient for use, and easy to cut and process. Disadvantages - inaccurate fit causes the need for additional use of polyurethane foam, which, in combination with the higher price of polystyrene foam than, for example. for mineral wool, increases the cost of insulation.
- Expanded clay . Relatively cheap, fire-safe material, not afraid of dampness, lightweight, effective. The disadvantage is its flowability, which makes its use on vertical surfaces difficult. Nevertheless, expanded clay is quite suitable and even recommended for insulating the ceiling and floor of a bathhouse.
- Sawdust . Traditional insulation that has been used for centuries. They are used in the form of mixtures with clay, cement, pressed blocks (arbolite), but are not used in their pure form due to flammability and the danger of insects and rodents.
- Clay . Clay does not work as an insulator in its pure form, but it can be used in a mixture with sawdust or shavings, which is why it acquires good properties and can be used. Disadvantage: it tolerates moisture extremely poorly and does not dry out for a long time.
- Liquid insulation . This name may refer to several types of material with different qualities. For baths, polyurethane foam is most often used, produced in liquid form and applied by spraying or pouring into prepared cavities through a technological hole. It has a number of very useful properties: it is light, non-flammable, has antiseptic properties, when applied, it tightly seals the entire space and leaves no gaps. Economical, does not require waterproofing from the outside.
- Foil insulation . One of the methods of insulation is the use of ordinary foil as a heat reflector, mounted on a film base or on a layer of mineral wool. It is used as additional insulation on the outside, or as a cutting layer on the main insulation.
It should be taken into account: the thickness of the walls of a frame bath, despite what was said above in the relevant section, may be less than 10-15 centimeters or more, this depends on the thermal conductivity of the insulation. Some will consider 50 millimeter polystyrene foam sufficient, while others use expanded clay and will need 20 centimeters.
How to install insulation?
Installation of insulation is carried out by placing pieces of material cut to size into the space between the wooden frame elements. The main condition for proper installation is a tight fit of the insulation and the use of additional sealing agents, for example, polyurethane foam.
Note: If this condition is neglected, cold bridges will be formed in the walls, leading to the formation of condensation, which is detrimental to wooden structures.
When using film or foil materials, they should be secured to the surface with a stapler, and the joints should be carefully taped with metal tape. Polyurethane or ecowool is sprayed more often from the outside, and the vapor barrier layer must first be strengthened. Working with expanded clay is simple - pour it into prepared cavities and level it, after which a number of boards are laid on top to protect it from moisture, debris, etc.
Useful videos
Watch the videos where the builder shares many details on insulating a frame bath:
External insulation
Additional insulation is installed on the outside, enhancing the effect of the main layer. In the conditions of the Russian winter, the measure is not at all superfluous, and sometimes it is simply necessary. It is often recommended to use polystyrene foam as an additional layer, as it is a lightweight material with good hydro-repellent properties. You can attach foam sheets with glue or nails to the frame elements. A reinforcing mesh is attached to the polystyrene layer and a layer of screed is applied, after which the finishing coating is applied after drying.
Internal insulation
Insulation of the walls from the inside, in addition to the existing pie, is not required. Above the layer of vapor barrier installed with foil inside the room, lathing and cladding are installed. The cladding material is traditionally pine or aspen lining.
A few words about the design of the drainage system
The design option for the system depends on the type of soil on which the bathhouse is being built. For example, sandy soil absorbs water easily, so a hole size of 0.6x0.6 m (depth - 0.5 m) will be sufficient. Crushed stone, gravel, broken brick are poured into it. The ground near the foundation is usually covered with clay, and then compacted strongly.
Clay soil absorbs water poorly, in this case, when arranging drainage, they do not make a hole for water; the system here is different: from the pit inside the bathhouse, washing water is diverted through a drain pipe to a drain outside the building.
https://www.pogreemsya.ru/youtu.be/ddOAIPQLuP8