Application of the Kuznetsov furnace
Over many years of inventive activity, I.V. Kuznetsov has developed about 150 models of furnaces, designed for use in all areas of human activity without exception where heat generation is required. According to the type of specialization, “blacksmithing” is:
- heating;
- cooking;
- heating and cooking;
- baths
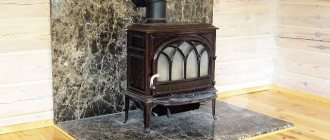
- outdoor, intended for smoking food, barbecuing and grilling;
- fireplaces with an open firebox, allowing you to admire the flames.
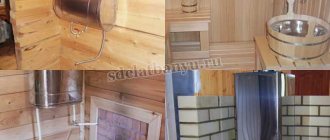
Examples of the Kuznetsov furnace
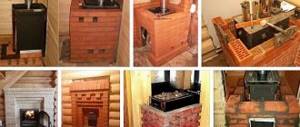
Furnace designs for private low-rise construction
About 150 bell furnace designs have already been created and brought to life. All of them have stood the test of time and are working successfully. Kuznetsov’s team of like-minded people continues to develop new options, improving existing ones. His website contains complete information with detailed descriptions and recommendations for making stoves.
Models are indexed and written with abbreviations. For example, OVIK stands for “heating and cooking stove by Igor Kuznetsov.” OIK is simply “heating”, etc. Each project is accompanied by step-by-step instructions and visual ordering, made in the AutoCAD program.
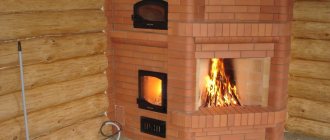
Combined model of a stove with a fireplace: the location of the fireplace on the stove is selected based on the layout of the room - a side fireplace, a back fireplace and a side fireplace with a stove bench
There is no need to do calculations and calculations: the site provides accurate measurements and descriptions of finished projects. If necessary, you can contact Kuznetsov and discuss the design conditions with the formulation of a specific task.
Vertically located hoods allow you to build a narrow stove if the room is very small.
The stove can be installed in any home: a new building or an already built one. But construction in a finished house will cost more, since the roof will have to be partially dismantled to remove the chimney. It is better to schedule work for warm weather. To choose the right place to install the stove, you should remember that the closer it is located to the center of the room, the more uniform the heating will be. At the same time, the stove is located closer to the front door - it is more convenient to bring in fuel.
Video: construction of a Kuznetsov furnace with a water boiler
A round-shaped dome stove operates with the greatest heat output. But if we are talking about a small room and the radius of the furnace circumference is less than 2 m, complications arise with the installation of furnace castings - firebox doors, cleaning pockets, etc. Metal parts designed for flat surfaces are not placed in semicircular shapes: gaps and cracks will appear, which is unacceptable.
A schematic representation of the functioning of the furnace with horizontal cuts and orders helps to better understand the specifics of laying bricks
An experienced craftsman with an assistant lays out a bell-type stove in 2–3 weeks (depending on the complexity of the model). The process is unhurried and requires great care; the fitting of all parts must be careful, with measurements. A beginner will need more time, and you need to be prepared for this before starting work.
Advantages and disadvantages
The wide popularity of Kuznetsov stoves and the deep respect that people knowledgeable in the stove business have for them are due to a number of advantages:
- The efficiency of “blacksmiths” exceeds 80%, and for some models it can reach 95%.
- Furnaces operate at high temperatures, but at the same time they do without materials and technologies available only in factory conditions.
- The high-temperature mode allows you to heat the stove even with the most waste and low-quality fuel.
- Again, due to the high combustion temperature, the fuel is oxidized almost completely, so soot is formed in minimal quantities. The oven may not require cleaning for several years.
- The design of the furnace ensures very uniform heat transfer between the fireboxes, while less material is used than in construction using traditional technology.
- In furnaces equipped with a heat exchanger, heat for heating water is taken from the flue gases, and not from the firebox, so the “blacksmith” can easily perform the function of a boiler without deteriorating performance.
- The operating principle of the stove provides good draft, so there is no need to build a high chimney.
- “Kuznetsovka” is very plastic both in terms of design and design. That is, it can easily be adjusted to any room without compromising performance and efficiency.
- The stove is designed in such a way that after firing, its chimney does not need to be blocked with a view. Carbon monoxide poisoning is completely excluded.
- The design assumes uniform heat distribution in the furnace body, so cracks do not develop in the masonry due to local deformations.
What can you say about the disadvantages? Technically there are none, but there are still some things to consider. The Kuznetsov furnace cannot have massive walls - this would negate many of its advantages. But at the same time it is subject to fairly high thermal loads. Therefore, this unit must be carefully calculated and verified at the development stage and built just as carefully, with scrupulous compliance with all technology requirements. At the slightest deviation from the technical regulations, the “blacksmithing” will turn out to be very short-lived.
You can even build a Russian stove with your own hands if you follow the detailed instructions. You will find them in our next article: .
Is it worth building it yourself?
The amount of methodological material on the inventor’s website and serial drawings allow you to build a bell-type stove for a bathhouse or home yourself. In this case, be sure to follow the sequence of work. Property owners who are not confident in their construction skills turn to specialized companies.
It is better to entrust the construction of powerful dome structures to professionals. This will ultimately save time and money.
In any case, it’s worth practicing by building a small-sized Kuznetsov heating stove, for example, in a utility room or barn for pets. Only after this can you begin to build a stove in a residential building. A correctly selected and manufactured design will last for many years without breakdowns.
Design and principle of operation
The inventor I.V. Kuznetsov used a bell-type furnace, known for its efficiency, as a basis.
This is what a bell furnace looks like - a prototype of Kuznetsov’s model
The high efficiency of such furnaces is due to the nature of the movement of flue gases. If in channel stoves they are drawn into the chimney, often without having time to give off heat to the brick mass, then in bell-type stoves they swirl under the roof of the bell for a long time until they cool down. Only then do they fall down to the outlet, from where they then enter the chimney. The bell filled with gases simultaneously plays the role of a view: cold air from the chimney cannot penetrate into it, just as water cannot fill an inverted diving bell. This effect is called gas view.
The inventor worked with a complicated version of such a furnace, which had two hoods.
Diagram of a two-bell model
Scheme of a two-bell furnace
As you can see, the hoods are connected in series, that is, heat from the flue gases is removed in a two-stage manner. Previously, the construction of stoves with such a design was not very willingly undertaken - not only because of the complexity, but also some undesirable features. So, for example, the draft in the second bell can easily break the gas plug in the first, negating the effect of the “gas view”.
The master dealt with this drawback in the following way. The furnace was equipped with so-called downstream channels, laid to bypass the heat-accumulating parts of the array. While the flame is burning in the firebox, the convective flow it creates ensures that the draft operates as usual. When the fuel is consumed and convection stops, the draft will redistribute itself in such a way that the cold air flow will follow through the downstream channels, and not through the heated body of the furnace.
This solution not only compensated for the instability of the gas coil, but also turned out to be more reliable: a plug formed by gases can be pulled out by a strong gust of wind, while in the Kuznetsov furnace, the draft is redirected away from the hot mass under any conditions. In addition, thanks to the presence of downstream channels, there is no need to arrange room ventilation.
Design Features
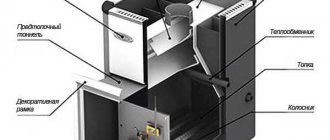
The furnace structure is based on two hoods. This element means a chamber with inlet and outlet openings for gases formed in its lower part. One of the design characteristics is the ability of the equipment to retain heat for a long period, and also not to cool down, even if the valve was not closed in time. In addition, combustion products in the form of gases are freely removed from the device. A two-bell stove will be an excellent option when it is not possible to install a chimney of the required height, which reduces the draft force.
Calculation of the Kuznetsov furnace
“Kuznetsovka” is a very complex heating device and attempts to calculate and design it yourself will not lead to anything good. You just need to choose from all the available options the most suitable one for yourself - the author does not make a secret of his developments. If the characteristics of the model you like do not indicate the heat transfer power, it can be calculated approximately: a stove that is heated twice a day, every sq. m of its surface gives off approximately 500 W of heat.
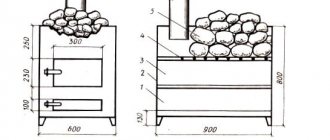
The OVIK-9 furnace, the manufacturing procedure of which we will consider, with dimensions of 1015x630x2100 mm, has a heat transfer power of 3.6 kW.
Model OVIK-9: general view
Preparatory work
First of all, you need to choose a place to build a furnace. The easiest way to do this is before building a house - then both the stove and the building are designed together so that three or at least two rooms are heated. With a ready-made house, the situation is more complicated. In this case, they tend to build the stove into an interior partition, since installing it into a load-bearing wall requires complex calculations and dangerous, time-consuming work (part of the wall will have to be dismantled, keeping the load from being blocked by a system of lintels and columns).
You can, of course, limit yourself to a simple wall-mounted arrangement, but then only one room will be heated.
A reinforced concrete foundation must be built at the selected location. Its dimensions must exceed the dimensions of the oven by at least 100 mm on each side. It is not allowed to combine the foundation of the furnace with the foundation of the building - both structures give different settlements and one of the foundations will pull the other along with it, causing it to skew.
A reinforced concrete foundation must be installed under the furnace.
The depth of the foundation depends on the bearing capacity of the soil, the depth of its freezing, and the method of operation of the building (periodically/continuously). Typically, in buildings with year-round habitation of people located on stable ground, the foundation is deepened by 400–600 mm. Crushed stone should be poured onto the bottom of the excavation as a reinforcing layer, and a sand cushion should be placed on top of it.
Then everything is done using traditional technology - they install the formwork, fix the reinforcement frame and fill it with concrete. You should proceed to the construction of the furnace only after the concrete has fully matured and gained sufficient strength - this usually takes about a month.
Before laying the 1st row, waterproofing of two layers of roofing felt or roofing felt must be laid on top of the foundation. The contours of the future furnace are drawn on it with chalk - this will make it easier to navigate.
Techniques for safe operation of a water boiler
The proper operation of the heating installation and long service life directly depend on the handling of the stove from the first days after its creation.
Do not attempt to heat the house if the water has been drained from the heat exchanger. The resulting damage cannot be repaired.
Also, you cannot pour liquid into the pipes if the furnace is already heating up, and the owner later remembered this, since the circuit will begin to crack from the temperature difference.
It is possible to pump moisture without using a circulation pump, but then the speed of water movement will be significantly reduced. This will result in reduced heat transfer from the heating system.
If a break in heating work is planned during cold times, it is possible to prevent freezing of pipes by pouring specialized antifreeze inside the pipes.
It is not allowed to cut off the water flow while the stove is burning, since without complete cooling there is a risk of rupture of the overheated heat exchanger.
The heating stove designed by Kuznetsov has great potential benefits for everyday life, especially in cold climates. But the complexity of execution, the presence of multiple nuances of masonry, will require mandatory consultation with an experienced stove master.
The step-by-step process of assembling the Kuznetsov stove is shown in the following video:
VKontakteFacebookTwitterGoogle+Average rating of ratings more than 0 Share link Comments There are no comments yet, but you could be the first... Similar articles Creating a brick stove with a water circuit for heating a house with your own hands 168 0 Laying a Kuznetsov stove for a bathhouse with your own hands, subtleties of masonry and ordering 289 0 V the convenience of a garage stove with a water circuit, how to make a potbelly stove with your own hands, the advantages of using 382 0 How to build a rough stove with your own hands: 12 photos with examples and stages of work 579 1
Materials and tools
To work you will need:
- trowel;
- level;
- mallet and other construction tools.
To divide bricks you will need a pick hammer and a grinder with a diamond wheel.
This set of tools will be needed for work
The furnace will be built from two types of bricks: conventional solid ceramic with a grade of M150 (250x120x65 mm) and fireclay grade ShB-8 (250x123x65 mm) or Sh-5 (230x114x40 mm). The firebox walls will be lined with fireclay bricks.
When purchasing fireclay bricks, you should be very careful. Unscrupulous sellers may pass it off as acid-resistant brick, which is similar in appearance but cannot withstand high temperatures. So it won’t hurt to ask to see a certificate.
Brick for laying the furnace
It is often recommended to choose fireclay bricks by color - the darker the better. But this rule does not always apply. If clay taken from different deposits was used, then the characteristics of light brick may well be higher than that of dark brick. It is more correct to evaluate the quality of fireclay bricks according to the following criteria:
- the structure must be uniform and fine-grained - without pores and inclusions visible to the naked eye;
- when tapped with a metal object (light hammer or wrench), the brick should produce a clear, abrupt and ringing sound;
- when dropped, it should break into large pieces (low-quality ones crumble into small fragments down to sand).
For a structure with dimensions of 1015x630x2100 mm, you will need 430 ceramic bricks (excluding the chimney) and 22 fireclay bricks.
How to prepare the solution
The solution used is clay. The clay and sand used for its preparation should not contain organic impurities that can lead to cracking of the seams. In clay, the presence of these impurities can be recognized by a clearly audible smell (it can even be pleasant) - normally clay has almost no smell.
Sand should be used either from mountain sand or made by grinding broken bricks - in these varieties the content of organic impurities is minimal, or they are completely absent. Brick sand usually costs less than mountain sand, but is not inferior in quality. Just pay attention to the following circumstance: for ceramic masonry mortar you need sand from ceramic bricks, and for fireclay - accordingly, from fireclay.
Pay attention to the grade of clay. The mortar for fireclay masonry should be prepared on the basis of white kaolin or fireclay marl. Any clay with fire-resistant properties is suitable for ceramic masonry, for example, gray or blue Cambrian, gray kaolin.
Clay of the same grade, but from different deposits, can differ greatly in viscosity, fat content and adhesive properties. Therefore, the solution recipe, namely the optimal ratio of sand and clay in it, should be selected experimentally. In the case of using brick sand, this is done as follows:
- A 1 kg portion of clay should be filled to the top with water and left for a day.
- After this, the soggy clay is kneaded with the addition of water until it looks like plasticine or thick dough and stops sticking to your hands.
Next, the clay is divided into 5 equal portions, to each of which a certain amount of sand is added:
- first - 10% of the volume of clay;
- in the 2nd - 25%;
- in the 3rd - 50%;
- in the 4th - 75%;
- in the 5th - 100%.
Each portion must be thoroughly stirred until smooth and dried for 4 hours. Don't forget to mark how much sand is contained where.
After this, each portion of the solution must be rolled out into the shape of a cylinder 30 cm long and 1–1.5 cm in diameter. All of them are wrapped around a round blank with a diameter of about 5 cm. Now the test samples must be dried for two weeks at room temperature and without drafts .
After this, it remains to evaluate each of the options:
- If there are no cracks on the cylinder at all or they are present in the form of a very fine mesh, such a solution can be used for any part of the furnace.
- If the depth of the cracks reaches 1–2 mm, the solution can withstand temperatures up to 300 degrees. This mixture can be used for laying a country fireplace or barbecue.
- If there are deep cracks or breaks, the solution is considered unsuitable for use - the proportion of sand in it is excessive.
Typically, about 0.2 cubic meters are consumed for a laying of 500 bricks. m mixture of clay and sand.
Note! If you don’t mind the additional costs, you can purchase a ready-made mixture for preparing a stove solution at a specialized store.
Having thus determined the optimal combination of clay and sand, we begin to prepare the solution:
- the required amount of clay (approximately 40 kg per 100 bricks) is again soaked for 24 hours, kneaded until the consistency of dough, but then rubbed through a sieve with a mesh size of 3x3 mm;
- then sand is added according to the experimentally selected recipe;
- gradually adding water, stir the solution until creamy;
- evaluate how the solution wets the trowel and, if necessary, adjust its composition by adding a small amount of clay or sand.
What else do you need?
- A fire door, for example, brand DT-3, with opening dimensions of 250x210 mm.
- Blower door, for example, DPK brand, with an opening of 250x140 mm.
- Grate size 250x252 mm.
- Cast iron hob with two burners, size 586x336 mm.
- Doors measuring 510x340 mm, 2 pcs. – for the cooking chamber.
- Gate valves with a flow area of 130x130 mm, 2 pcs. – for the cooking chamber and for switching between summer and winter operating modes.
- A valve with a clearance of 250x130 mm - for a chimney.
- Equal angle pieces 36x4, 600 mm long (4 pcs.).
- A piece of steel strip 40x4 mm, 600 mm long.
- Steel sheet 3 mm thick, size 600x550 mm.
- 3 mm thick steel sheet measuring 500x700 mm to protect the floor in front of the firebox.
Replace steel with any other fireproof flooring, for example, ceramic tiles.
Have you always dreamed of having a magical fireplace in your home? You can fold it yourself. And the following guide will help with this: .
Features of bell furnaces
- A distinctive feature of Kuznetsov stoves is the firebox (combustion chamber) isolated from the main masonry, which is made of fireclay bricks. This is due to the high temperature inside the chamber, which can reach 1200°C. Uneven expansion of fireclay bricks and ordinary ceramic bricks without a gap between the combustion chamber and the wall would inevitably lead to cracking of the stove. The space between the firebox and the wall is usually 5 mm. In order to increase heat transfer, it is filled with a mineral sealant: asbestos or mineral cardboard.
- The second feature of a Coppak stove is the presence of a “dry seam” - a narrow (20-30 mm) gap in the wall of the combustion chamber, which is filled with breathable mineral material (mineral or asbestos wool). The dry seam is designed for additional air flow into the combustion chamber from the internal volume of the furnace. The influx of heated air increases the combustion temperature of the fuel and contributes to more economical consumption of firewood.
- Another feature of a bell-type furnace is the location of heaters, water-heating tanks and ovens in the volume of the second bell. This arrangement prevents direct contact of pipes or the metal casing of additional equipment directly with an open flame or hot gases. The temperature in the second cap usually does not exceed 400°C, which is quite safe for metal.
- A bell-type stove has a relatively short chimney. Its task is to remove combustion products, and only secondarily to create draft in the furnace.
- The efficiency of bell-type furnaces of some models reaches 80% compared to max. 60% for stoves of other designs. Thanks to the small size of the combustion chamber, fuel consumption is very economical. It is 20-50% lower than in furnaces with direct-flow exhaust of furnace gases.
Masonry: ordering and step-by-step instructions
The sequence of work looks like this:
Lay out the 1st row of 20 bricks, which should be an ideal rectangle with a strictly horizontal surface.
First row diagram
“Rectangularity” is checked by measuring the diagonals - they must be equal. In the absence of experience, the row must first be laid out without mortar and only then, when everything has been adjusted and checked, the mortar must be applied. The thickness of the seams should be 5 mm.
Advice. To make the stove look more attractive, install rounded bricks in the corners. You don’t have to cut them yourself—such blocks are sold ready-made.
In the 2nd row, the first (lower) hood and the blower chamber originate. The two halves of the brick are laid without mortar and slightly pushed out. When the masonry is completed, these bricks will need to be removed, which will make it possible to clean the base of the cap from splashes of mortar and brick fragments. After cleaning, the halves are finally placed on the solution.
Second row diagram
When the 2nd row is laid out (14 bricks are required), install the blower door on it, supporting it with several bricks. The door frame must be wrapped with asbestos cord, which will act simultaneously as a seal and expansion joint. It is fixed in the brickwork by means of wire, which is placed in the seams.
It is recommended to use wire to reinforce the walls of the furnace, placing it in the seams of every second row.
Having laid out the 3rd row according to the diagram (the bricks included in it should tightly fix the blower door), proceed to laying the 4th. Here, in addition to ceramic bricks, fireclay bricks are used - we begin to lay out the side and rear walls of the firebox.
Third row diagram
The blower door is covered with hewn ceramic bricks looking outwards, and hewn fireclay bricks looking inwards. They must be separated by a thermal gap of 5 mm. It can be arranged in the following way: a spacer of corrugated cardboard is placed between the bricks - it has just the required thickness; When kindled, the cardboard will burn out and a gap will form on its own. Temperature gaps must be provided wherever fireclay bricks are adjacent to ceramic bricks.
Fourth row diagram
In row No. 5, the fireclay bricks forming the side walls of the firebox are slightly shifted so that the bricks of the 4th row located underneath them form a shelf 10–15 mm wide for the grate. The bricks should be moved apart so that there is a gap of 5 mm between them and the grating, which is necessary for the free expansion of the heated metal.
Fifth row diagram
The brick forming the front wall should be cut at an angle.
In the same row, the formation of a vertical channel connecting both caps begins.
When the row is laid out, you should install the grate in its place, filling the gap between it and the bricks with sand.
Installation of grate bars
In parallel with laying the 6th row, you need to install and fix the fire door. Direct contact of its frame with the brick is not allowed - it is necessary to lay an asbestos cord as a gasket. The door frame can be fixed with wire from below, but a more reliable element is required from above - the wire will quickly burn out. Instead, a steel strip is used.
Sixth row: installation of the combustion door
When laying row No. 7 on the side of the brick that forms the back wall of the firebox, a gap of 20–30 mm wide is left. This is the beginning of a dry weld.
Seventh row diagram
Having laid out row No. 8 according to the diagram, proceed to laying the 9th row. At this stage, a channel is formed connecting the firebox with the lower hood. Lilac color indicates bricks in the side walls of the firebox, the upper edges of which should be 10 mm below the plane of the row. An asbestos strip 10 mm thick will need to be laid on the left wall so that it is flush with the plane of the row.
Eighth row diagram
Pay attention to how the fire door is blocked: the bricks are cut at an angle to create a “lock-on” masonry.
Ninth row diagram
When laying out the 10th row, you should remember that ceramic bricks must be laid without mortar on the asbestos lining (it covers the fireclay bricks in the firebox wall).
Tenth row of order
It is necessary to make a cutout for the hob in the ceramic bricks surrounding the firebox. Its dimensions should be such that there is a temperature gap of 5 mm around the slab, that is, the bricks will need to be trimmed by about 10 mm. And in the contact area of the hob with fireclay bricks, it is necessary to leave a gap of 10 mm. These bricks, cut at an angle, are located in the front and to the right (indicated in orange).
If the slab is equipped with stiffening ribs at the bottom, it is necessary to additionally cut grooves in the brick so that the slab is supported on the brick along the entire edge. It is installed immediately after laying the row - on an asbestos cord soaked in clay solution. The gaps between the slab and bricks are filled with sand.
Near No. 11 the walls of the cooking chamber begin. A door for it is also installed here, the frame of which must be wrapped with asbestos cord. For fixation, you can again use wire.
Eleventh row diagram
Rows 12, 13 and 14 do not need comments - we simply lay them out in order.
After laying the bricks of the 15th row, the cooking chamber is covered with a steel sheet 3 mm thick and 600x550 mm in size with a cutout for the exhaust duct. The top of the sheet is reinforced with 4 pieces of angle and a steel strip. The steel ceiling prevents various small debris from getting into the food, which could fall into it from the brickwork.
Installing the hob
In the bricks of the 16th row, framing the exhaust and front vertical ducts, cutouts are made for valves, taking into account a 5 mm temperature gap.
Scheme of the 16th row
When the row is laid out, the valves are installed in place.
Installation of valves
After the 17th row, the formation of the upper cap begins (18th row). Here, too, it is necessary to leave the slightly extended halves without mortar; by removing them, it will be possible to clean the base of the cap from the mortar and various debris that fell during the laying process. After cleaning, the removed bricks are coated with mortar and finally installed in their place.
The eighteenth row of the order is the beginning of the formation of the cap
Rows 19 to 27 are laid out in order.
In the 28th row the main chimney damper is installed. Under it, cutouts should be made in the bricks with a depth of 10 mm (indicated in lilac) and such a width that a temperature gap of 5 mm remains around the valve body.
Scheme of the 28th row
The valve must be installed immediately after laying out the row, and it is laid on the solution.
Installation of a chimney damper
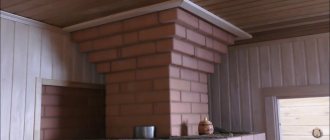
In rows No. 29 and 30 the furnace is closed, and in row No. 31 a mounted pipe begins with a smoke exhaust channel into the brick (270x140 mm).
Formation of the casing pipe
The finished oven must be thoroughly dried. To do this, it is kept for some time with the doors and valves fully open. Things will go faster if you hang a light bulb with a power of 200–400 W in the firebox. It will provide not only heat, but also a stable convective flow, which will remove all moisture in a short time.
The first fire should be done with a small portion of fuel - the fire must first harden the walls of the firebox.
You should not start finishing the stove before it has fully worked for the first season - the decorative coating may be damaged during shrinkage processes.
Tools and materials necessary for the construction of a sauna stove
The peculiarity of the construction of the Kuznetsov brick kiln is that not only standard solid ceramic bricks are used for masonry, but also special fire-resistant fireclay bricks.
The fact is that fireclay refractory allows you to maximize the combustion temperature, because the operating temperature for this material is 1500-1900 degrees. But here another problem arises - if fireclay bricks can be easily found in a hardware store, then special fireclay refractory clay must be ordered in advance. The laying of the firebox and the main furnace bell is done precisely on such refractory clay, and in no case on cement mortar.
The external masonry of the stove is usually made of red solid brick. Its quantity can be calculated by a simple calculation, where the number of bricks of the 1st row of the project order is multiplied by a factor of 0.8 and then multiplied by the number of rows in the project. The first, lowest row of the structure is filled completely, but other rows, for example, 7 or 10, have less filling due to the arrangement of internal channels; compared to the first row, the average filling of the remaining rows is usually 0.8. So calculating the number of bricks this way is quite simple.
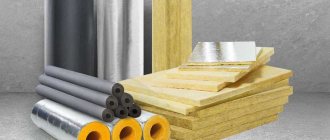
During work, it will be necessary to maintain certain proportions and dimensions, so it is necessary to provide a certain amount of basalt wool or basalt cardboard. It is this material that fills the voids between red and fireclay bricks.
Metal fittings are selected in accordance with the taste and wishes of the owners, but even here it is worth listening to the recommendations of specialists. Cast iron doors and valves are considered optimal. Steel, of course, looks more impressive and beautiful, but cast iron can withstand higher temperatures and not experience the same deformation as steel.
But as for the heat exchanger and tank for heating water, here, on the contrary, it is recommended to use special refractory steel. It is also recommended to weld a container for the heater stones from steel. You can, in principle, use a cast iron stove, but then the volume of stones must be increased by 1.3-1.7 times.
The work of creating brickwork requires precision and accuracy, so you must have in your arsenal:
- Mason's trowel;
- Building level;
- Marker thread;
- Plumb;
- Bushhammer;
- Brick cutting machine.
Experienced stove-makers advise having, in addition, a brush with stiff bristles and several containers - for the solution and for water. The purpose of the brush is to clean the surface of the bricks before applying mortar to them; simply soaking the bricks in water wastefully adds water to the already substantial weight of the oven. In addition, the clay mortar already takes a long time to dry and excess water in the mass of bricks will not contribute to the rapid drying of the masonry.
Well, of course, the main thing you need to have is a serial plan for laying the stove. The order of Kuznetsov’s brick sauna stoves is made publicly available, so you can download and print it without any problems.
Operation in various modes
In summer mode, Kuznetsov’s stove turns from a heating and cooking stove into a cooking stove. To do this, it is enough to open a special valve (it is called the summer valve), after which the flue gases will enter the chimney directly, bypassing the caps. Accordingly, only the hob will be subject to heating.
The temperature inside the cooking chamber can be regulated by a valve installed on the exhaust duct extending from it. By closing the valve and the chamber door, it can easily be turned into an oven. For ease of use, shelves for baking sheets can be fixed in the walls.
If you need to quickly warm up the room or dry out, open the door of the cooking chamber. At the same time, the temperature on the burners remains high enough for cooking.
Kinds
According to their purpose and design features, blacksmiths can be divided into several types:
- Heating. The devices are designed for efficient and safe heating of premises.
- Cooking. Used for cooking. This includes ovens for baking bread and bakery products.
- Bathhouses. The Kuznetsov bathhouse stove is designed for simultaneous heating of the main bathhouse premises. Such devices have high heat transfer with minimal fuel consumption.
- Street. A stove complex consisting of a grill or barbecue for outdoor cooking.
- Fireplace. The equipment is used as a decorative element of the interior or as an additional heating option. Some fireplace stoves are equipped with special loungers for a pleasant leisure time.
The most popular are complex devices that are distinguished by their multitasking. A striking example is the Kuznetsov heating and cooking stove, which is intended both for heating residential premises and for preparing food.
Despite their functional features, all stoves operate on the same principle - effective distribution of heated gases in the bell into separate streams.
It is noteworthy that stove hoods can be equipped with additional equipment - electric heaters, hot water tanks, steam generators, oven and stove.
A competently designed and constructed Kuznetsov sauna stove will provide reliable heating in all functional rooms: steam room, washing room, dressing room, rest room. In addition, it will allow you to quickly heat water, accumulate hot steam and purify the air.