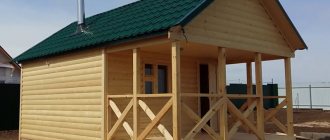
The floor in the bathhouse warms up the slowest, and often remains cold, even when the steam room is heated hotly. It is especially uncomfortable to feel this in the washroom, where you have to leave the hot steam room with your bare feet. And the sharp difference in temperature in the lower and upper parts of the room does not have the best effect on the body. In addition, such conditions negatively affect the indoor microclimate and contribute to wood rotting. It is not difficult to get rid of these problems - it is enough to perform high-quality thermal insulation.
How to insulate the floor in a bathhouse in a washroom
Let's look at how to insulate the floor in a bathhouse in a washroom and what is needed for this.
Features of the washing room and floor requirements
The washing compartment is exposed to moisture and temperature changes more than other rooms in the bathhouse, especially in frosty winters. While bathing, a person can go from the steam room to the wash room several times and vice versa, letting hot air into the room. A lot of water is used for dousing, and all of it goes through the floor, simultaneously penetrating into the pores of the wood.
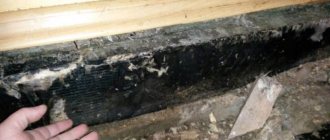
Excess moisture can damage wood
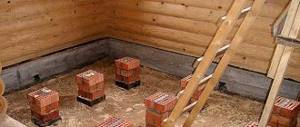
Since the bathhouse is heated only periodically, the water remaining in the floor boards or concrete base either freezes or melts again, gradually destroying the materials.
If there is no heating in the bathhouse, water accumulates in the materials of the walls and floor, and after cycles of freezing and thawing, gradual destruction occurs
Such features of the room determine certain requirements for floors:
- they should facilitate efficient drainage of water - by sloping towards the drain or by allowing moisture to pass through themselves;
- have increased strength and low absorbency;
- be resistant to rotting and sudden temperature changes;
- not be slippery when wet;
- heat up and dry quickly.
The floor in the washing room is laid with ceramic tiles
To ensure the necessary conditions, even at the construction stage it is necessary to provide for the correct design of the floor structure, ventilation of the entire room and underground space, perform high-quality thermal insulation and select materials correctly.
Types of floors in the washroom
Three types of floors are optimally suitable for a washing room: solid wood, leaking wood and concrete tiled. The insulation of each of them has its own nuances, due to the design features.
Solid wood flooring
This is the most traditional option for a bath, and also the warmest. Natural wood has a pleasant texture, environmental safety and low thermal conductivity, which means a lot for such a room. The wood used is predominantly coniferous: it is least susceptible to rotting and other negative influences. The resin contained in the boards does not protrude outward, since the air in the washing room does not heat up as much as in the steam room.
Solid wood flooring
Installing a solid floor is quite labor-intensive. There are no removable elements provided here, and therefore special requirements are put forward for the organization of the ventilation system. The base of the floor can be compacted soil or concrete screed.
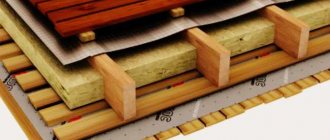
The floor system consists of joists, sheathing and the flooring itself, with mandatory waterproofing between these elements. The insulation is located between the logs, which are installed strictly in a horizontal plane, and the required slope is created using the sheathing.
Floor with joists. Insulating materials are laid between the joists
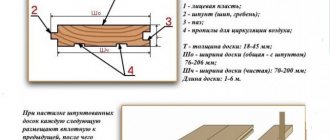
Expanded clay, dense foam plastic, mineral wool can be used as insulation - the hygroscopicity of the material does not play a special role if it is reliably waterproofed on both sides. To prevent water from penetrating through the flooring, it is recommended to use tongue-and-groove boards and treat them with a water-repellent compound before using the floor.
Tongue and groove boards for floors
To ventilate the underground space, a plastic pipe with a diameter of 50 to 100 mm is installed from the outside.
Leaking floor
A leaking, or pouring, floor is easier to make and will cost less. Unlike solid floors, the floorboards here do not slope, and water flows over the entire area through narrow gaps between the floorboards. To drain used water, a pit is made at the base under the floor, from which a pipe is laid at a slope towards the sewer.
Shower floor in the bathhouse
If the bathhouse is used irregularly, the base of the floor can be compacted soil or a sand-crushed stone cushion through which water will seep into the ground. The floor joists are laid on concrete pillars to protect the wood from negative influences.
Scheme of laying a columnar foundation under logs
With frequent use, the floor structure must be more reliable, so the base is filled with a concrete screed with a slope towards the drain.
Concrete floor with a slope towards the ladder
The flooring itself cannot be insulated, because there must be space under the boards for water to drain, but if desired, you can insulate the base of the floor. To do this, use concrete with a heat-insulating filler or fill it with expanded clay under the screed.
Floor insulation with expanded clay under screed
Only a few vents are left around the perimeter of the base for ventilation; the rest of the space is closed to prevent drafts.
If the bathhouse is built on pillars or piles, insulation is carried out without adding expanded clay. To do this, make a rough flooring from boards and lay mineral wool or other insulation between the joists, which must be covered on both sides with waterproofing material. Next, the sheathing is installed at a slope towards the drain, stainless steel sheets are fixed on top with an overlap, and then the leaking flooring is installed. This design requires more cost and effort, but the floor is reliably protected from blowing and cold.
Concrete floors with lining
This option is the most durable and reliable. The tiles are excellent for washing, they are easy to clean, do not require special care and always look aesthetically pleasing, and the concrete screed provides the necessary strength to the floor. The disadvantage of these materials is that they are cold, so you can’t do without insulation.
Tiling the shower room
Bathhouse interior
Traditionally, such a floor is installed in the following order:
- a layer of broken brick, crushed stone or gravel at least 15 cm thick is poured onto the compacted soil;
- pour the rough screed;
- lay a layer of waterproofing and insulation;
- cover the insulation with another layer of waterproofing and lay the reinforcing mesh;
- pour the finishing screed;
- tiling is carried out.
Floor Pie
Reinforced screed on the ground
The organization of drainage is carried out at the initial stage of arranging the screed, and the foundation is poured at a slope towards the drainage ladder. Expanded clay or penoplex are most often used as insulation; mineral wool is not intended for such loads.
Features of insulation in a bathhouse on stilts
Considering that in bathhouses built on screw piles, a wooden floor is installed, the technology for its insulation is practically no different from the technology for insulating a log wooden floor
Considering that in bathhouses built on screw piles, a wooden floor is installed, the technology for its insulation is practically no different from the technology for insulating a log wooden floor.
- The pile heads are tied with screw beams, which will later serve as a support for the floor covering.
- A layer of waterproofing - roofing felt or mastic - is laid on the existing foundation made of wooden beams.
- Inside the contour of the upper part of the foundation - the grillage - load-bearing beams are installed on which the subfloor will be laid. In this case, you need to maintain a step of 30-40 cm.
- A skull beam is attached to the underside of the beams, on top of which the subfloor is laid.
- A layer of waterproofing and insulation itself are laid on top of the floor. On top it is covered with a film or waterproofing material.
- Installation of a finished wooden floor.
Choice of insulation
The choice of insulation for a washroom should be approached very responsibly, taking into account the specific operating conditions of the room. Preference should be given to materials with low hygroscopicity and resistance to decay, even if reliable waterproofing is installed. There are several types of insulation that are best suited for bathhouse floors.
| Material | Characteristics |
Foamed polystyrene | This slab insulator is suitable for both wood and concrete floors. It is moisture resistant, easy to install, and has an affordable price. Polystyrene boards have very low thermal conductivity, so the floor does not freeze and warms up quickly when the bathhouse starts to be heated. The only negative is that this material is easily damaged by mice, so if there are rodents, you should use a different insulation |
Penoplex | This material is an improved version of foam plastic, therefore it is significantly superior to it in all respects. It is absolutely not afraid of moisture, retains heat perfectly, has a long service life and does not emit harmful substances. It is more expensive than polystyrene foam, but the cost of the material is fully compensated by its reliability and durability |
Mineral wool | This material is used for insulating wooden structures. For greater effect, it is recommended to use foil-coated cotton wool. Since cotton wool tends to absorb water, special attention should be paid to waterproofing the insulating layer. It must be completely sealed, otherwise the material will lose its heat-insulating properties |
Perlite | Bulk insulation, often used as a filler for concrete screed. It has high thermal insulation properties and low weight, which allows you to effectively insulate a concrete floor without large loads on the base. Does not rot, is not damaged by rodents, has a long service life |
Expanded clay | The most environmentally friendly insulation. Available in the form of porous granules of various fractions, suitable for both concrete and wooden floors. Needs high-quality waterproofing. This insulation does not burn, does not rot, and is not damaged by mice. When installing a floor with a slope, it is backfilled using guides |
Specifics of thermal insulation of bathhouse walls with penoplex
When the structure is put together according to all the canons, but the hot air still quickly leaves the building, it is time to choose the appropriate insulation for the bathhouse ceiling. Why should you think about this part of the room first?
It is no secret that heated air masses are lighter than cold ones and rise rapidly. If the steam room cools down quickly, then there is a problem in the roof.
- Competent calculation. This is the first and most important rule for ensuring the most effective insulation results. Only an experienced specialist will be able to correctly calculate thermal insulation depending on the total area of the bathhouse or sauna, the number of rooms, building material, heating system, number of people who can simultaneously visit the steam room, etc.
- Complex insulation. According to professional builders and bathhouse experts, insulation should be both external and internal. Thermal insulation work begins with insulation of the foundation, walls and roof, and only then can you safely proceed to the internal insulation of the ceiling, walls and floor.
- Effective insulation. The requirements for insulation for baths and saunas are: high thermal insulation properties, durability, resistance to temperature fluctuations and direct exposure to moisture.
Calculator for calculating floor insulation on the ground
Go to calculations
Explanations for using the calculator
First, using the proposed map diagram, you need to determine the normalized heat transfer resistance for your region. Moreover, the indicator is for floors (these values are shown on the map in blue).
Map-scheme for determining the values of normalized heat transfer resistance for your region in Russia.
Next, the general insulation scheme is determined.
Explanation No. 1.
— Floors on the ground can be insulated exclusively with expanded clay. True, the thickness of the layer has to be made serious.
— Insulation using other materials may also involve the use of expanded clay as a primary thermal insulation “cushion” under the rough screed. But it can also be done without expanded clay, only with the selected insulation.
Explanation No. 2
It is worth taking into account only the coating that will make some sensitive contribution to the overall “ensemble” of floor thermal insulation. For example, it could be a solid board or thick plywood. Laminate, linoleum, ceramic cladding - in fact, they do not add any insulation - their thermal resistance is too low. Therefore, they are ignored - the default layer thickness field is left at “ZERO”.
Explanation No. 3
Expanded clay bedding under the screed can reduce the thickness of the main insulation. In this case, the thickness of this auxiliary “pillow” is indicated in the corresponding regiment. If you decide to do without expanded clay completely, the default thickness is left in this field, equal to “ZERO”.
Calculation results
If previously a calculation with only expanded clay was chosen, then the result of the calculation is the thickness of the expanded clay layer, which ensures complete insulation of the floor.
If some kind of insulating material is selected, then exactly its thickness after pressing the button will be shown as a result of calculations. It is given in millimeters, is the minimum level, and this value is then rounded up to some standard value characteristic of this material.
Insulation using perlite
Perlite solution is convenient to use for insulating concrete floors. In this case, a layer of heat-insulating material is placed in the space between the rough floor screed and the final leveling fill.
Expanded perlite sand is a highly effective insulation material.
Qualitative characteristics of perlite
Insulation using perlite
Important! Dusty volcanic sand scatters even from slight blows of wind, so a carefully insulated room without the slightest drafts should be chosen for preparing the solution. Having tightly closed the doors and windows, proceed to preparing the mixture and performing the main stages of the work. Recommendations in this regard are given in the following table.
Table. Floor insulation with perlite
| Work stage | Description |
Preparation of the solution | Note! The unit of measurement in this example is a bucket. Based on the given proportions, you can prepare the required amount of solution, measuring the original ingredients in fractions, kilograms, bags, etc. Pour 2 buckets of perlite into any deep container of a suitable size, add a bucket of water to it and give the mixture time to completely shrink. Add half a bucket of cement at least M300 into the resulting solution, and then half a bucket of water. Important! Stir the mixture thoroughly after adding each component. Finally, you need to add a little more water (about half a liter) to the solution. The result will be a dry, crumbly mixture. Knead the semi-finished product until it becomes plastic. |
Laying thermal insulation mortar | The resulting plastic solution is evenly distributed over the rough screed. The recommended thickness of the insulating layer is up to 100 mm. You can level it in any suitable way, for example, using a long rule. If you are insulating a large area, for convenience, using self-tapping screws/anchors, you can attach several guides to the floor, for example, from a profile for drywall or a wooden beam with a step corresponding to the length of the rule you are using. |
Pouring the finishing leveling layer | 5-7 days after applying the perlite solution (this is exactly how long it needs to harden), a finishing leveling screed is poured over the insulation. The most convenient and easy-to-use option is a modern ready-made self-leveling floor mixture. Reinforced mortars are available for sale, allowing you to create coatings with a layer of up to 8 cm or more. The developer can only prepare the mixture and apply it to the base in accordance with the manufacturer’s instructions. Helpful advice! Before pouring the final leveling layer, the surface can be covered with waterproofing material and a reinforcing mesh can be laid, but, as practice shows, the structure feels great even without such inclusions. After the leveling layer has dried, you can finish the insulated floor, for example, tiling it with suitable tiles. |
Prices for perlite
perlite 5l
Video - The whole truth about perlite
Do-it-yourself floor insulation
Let's consider two options for insulating the floor in a washroom - making a floating screed on a wooden base and pouring a concrete floor.
Floating screed
As an example, we took a standard wooden floor on joists in a log bathhouse. What you will need for work:
- sheets of waterproof plywood with a thickness of 15 mm;
- bars with a section of 50x50 mm;
- wood mastic;
- dense polyethylene film;
- high density foam sheets;
- polyurethane foam;
- damper tape;
- reinforcement 12 mm;
- reinforcing mesh;
- cement mortar.
Step 1. Measure the floor area and cut the plywood. The logs should be laid in increments of about 40 cm so that the plywood does not sag under loads.
Step 2. Plywood sheets are laid on the joists and screwed with self-tapping screws. A gap of 2-3 mm should be left between the sheets to compensate for thermal expansion. It is necessary to make cutouts for communications and bring pipes into them.
Plywood sheets are laid on joists
Step 3. It is necessary to make a structure in the form of a box, that is, not only sheathe the floor, but also make plywood sides around the perimeter of the washroom. To do this, a sheet of plywood is cut into strips 12 cm wide, the timber is placed flush with the side cut and secured with 50 mm screws along the entire length. The length of the blanks themselves must correspond to the width and length of the floor, since they will be located around the perimeter of the room.
Step 4. Install the sides along the walls so that the plywood is pressed tightly against the walls, and then screw the beam to the floor.
Plywood sides
Advice. The structure cannot be attached to the walls to prevent any deformation of the screed during shrinkage of the bathhouse or foundation.
Step 5. Apply a layer of mastic to the plywood, carefully covering all seams and recesses. It is especially important to seal the joints between the sides and the horizontal plane. Next, a plastic film is laid on top, extending about 15 cm onto the walls.
Step 6. A damper tape is secured around the perimeter of the box (you can use penofol cut into strips), and polystyrene foam boards 50 mm thick are laid. The plates must be in close contact with each other and also tightly adjacent to the sides.
Insulation boards laid
Advice. To prevent penofol from hanging down and interfering with work, the upper edge of the strips can be secured to the plywood side with ordinary clothespins. It is not advisable to fasten with a stapler so as not to violate the integrity of the waterproofing film.
Step 7. Take polyurethane foam and carefully blow out the slightest gaps between the insulation. The more monolithic the thermal insulation layer is, the better.
The joints of the slabs are filled with polyurethane foam
Step 8. Sections of reinforcing bars and masonry mesh with large cells are laid on top of the slabs. In this case, the reinforcement serves as a substrate and can be replaced with something else, for example, pieces of plastic pipe or broken tiles.
Reinforcing mesh laid
Step 9. Mix the solution and pour a 4 cm thick layer of screed. To avoid the solution getting inside the drain, be sure to cover the hole in the drain pipe with something. The screed itself is made at an angle to the drain.
Floor screed
After the screed has dried, the surface is treated with a primer and tiled.
Concrete floor in washing room
Pouring a concrete floor is not particularly difficult and can be done by any beginner. The main thing is not to rush and perform each stage efficiently - from preparing the base to pouring the solution. In this example, the plank subfloor rests on a foundation and beams, and is covered with a layer of clay on top. It should be noted that clay is also a good heat insulator, especially in combination with sawdust or straw.
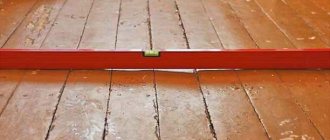
Step 1. Level the floor. To do this, mix a semi-dry cement-sand mortar (in a ratio of 1:8) and apply it in an even layer to the surface. The mixture is carefully compacted and the plane is checked using the rule to avoid the appearance of unevenness.
Checking the levelness of the floor
Preparation of the solution
Spread the mixture with a trowel
Leveling the solution
Using a semi-dry mortar to level the floor. The mixture is stretched using the rule
Checking the levelness of the base
Step 2. After the surface has dried, the floor is covered with two layers of plastic film with the strips overlapping by 10 cm and overlapping the walls by at least 30 cm.
Flooring film
Step 3. Damper tape or strips of foil insulation are attached around the perimeter using a stapler. The width of the stripes should be about 7-10 cm.
Advice. If the layer of clay on the subfloor is not enough to insulate the floor, at this stage you can lay an additional heat insulator, for example, dense polystyrene foam or polystyrene foam boards. The main thing is to correctly calculate the total height of the screed so that the floor in the washing room does not turn out higher than in other rooms of the bathhouse.
Step 4. Scraps of plastic pipe 1.5-2 cm wide are laid on the floor, on which reinforcing rods with a cross-section of 12 mm are placed. The reinforcement should lie in parallel rows with a pitch of 25 cm.
Step 5. A second layer of reinforcement is laid on top, perpendicular to the first, so as to form a lattice with a cell of 25x25 cm. At the intersections, the rods are tied with wire.
Laying and knitting of reinforcement bars
Step 6. A chain-link mesh is spread over the reinforcing grid and also tied with wire.
Laying chain-link
Step 7. Mix the solution and pour in the rough screed so that it covers the mesh. This will be a rough screed, without beacons, since the chain-link mesh does not allow the guide profile to be installed evenly.
Pouring rough screed
Dried screed
When the layer is completely dry, you can install the beacons and fill in the finishing screed with the required slope.
Cleaning the base (work on plastering the walls was carried out at this site)
Surface priming
Mixing the screed mortar
Throwing mortar with a trowel
Aligning the screed with the rule
At the final stage, all that remains is to prime the surface and cover the floor with washable ceramic tiles.
Floor finishing with ceramic tiles with SVP system
Wall tiling
Wash room finishing
Prices for expanded clay in bags
expanded clay in bags
Choosing material
When purchasing a construction gasket, take into account the technical properties of the raw materials and look at the integrity and quality of the block itself. There are a number of mandatory and additional criteria.
Modern hardware stores offer a fairly wide range of foamed polystyrene. At first glance, the product from different manufacturers differs only in color and packaging. Very often, during production, the cheapest reagents are used, which leave a large amount of harmful impurities in the finished product.
Important! It is best to insulate the floor in a bathhouse with penoplex from a trusted manufacturer with a minimum level of toxic compounds.
Polystyrene is produced especially for rooms with high temperatures, one or both edges of which are covered with a special layer of foil. Such insulation will provide better reflection and reduce evaporation during critical heating. In addition, there are products with a special polymer coating - despite the higher price, they will maximize the safety of the material at high temperatures.
Foil material is best suited for bath floors
Another important point when choosing penoplex for a bathhouse floor is its size. In shopping centers you can find sheets with a thickness of 2 to 15 cm or more. Since polystyrene is superior to glass wool and mineral wool in its thermal insulation properties, it is best to focus on 10 cm by 15 cm floor heights.