Today everyone can afford to have their own steam room on their plot or dacha. But, in addition to the pleasant prospects provided by the bathhouse, a number of questions arise about how to organize the wiring in the bathhouse with your own hands. The main stumbling block in this matter is the high humidity and temperature in the room, classifying it as particularly dangerous according to clause 1.113 of the PUE.
Under such unfavorable conditions, electrical appliances and other elements of the electrical network very quickly break down and fail, and dielectric materials become covered with a layer of conductive moisture. This creates a significant risk of electric shock in emergency situations. Therefore, in order to carry out electrical wiring and other electrical installation work in the bathhouse in accordance with current standards, it is necessary to study the requirements of the PUE.
Requirements according to PUE 7
According to clause 2.1.4 of the PUE, installation of electrical wiring can be carried out in an open or hidden way. This separation of the wiring in the bathhouse is relevant for various types of walls, when it is possible to develop grooves or in the absence of them.
Due to the fact that some rooms are fire hazardous, and wet rooms contain a large amount of condensate, when laying wires in an open or hidden way, all lines must be protected from non-combustible material in accordance with clause 2.1.42 and from moisture in clause 2.1.43 of the PUE.
When wires are placed openly, for example, on wooden walls, the non-combustible lining under them should protrude 10 mm in each direction. It is also necessary to maintain a 10 mm gap from the wire to flammable materials in accordance with clause 2.1.37 of the PUE. For hidden wiring, a fireproof coating is located along the entire length in accordance with clause 2.1.38 of the PUE. But placing wiring in a metal pipe or corrugation is strictly prohibited in accordance with the requirements of 7.1.40 PUE.
In order to maintain safety, all metal structures - housings of lamps, heating stoves, household appliances, etc. must be connected to the protective grounding in the bathhouse wiring, the conductors must be double insulated, the circuit elements must be inaccessible. To protect a person from electric shock, an RCD must be installed in the electrical panel. These measures are specified by the requirements of clauses 1.7.50 and 1.7.51 of the PUE. It should be noted that when lighting devices and other devices are powered with low voltage in accordance with clause 1.7.53, the Electrical Electrical Installation can be carried out without installing protective grounding.
Types of lighting fixtures
Each type of device has its own characteristics - pros and cons. To make the final choice, you need to take into account the dimensions of the room, the amount of lighting required in the steam bath and other rooms. Before purchasing, you should familiarize yourself with the advantages of each type, calculate the required power of the devices (it is always better to take them with a reserve) and their number.
Traditional
LED bath lamp
Despite their advanced age, the classic “Ilyich bulbs” remain the most popular option. They are easy to find in stores, replace or replace them with completely different ones. The cost is the lowest among all available options. However, you need to remember that due to the specifics of the room (high humidity and temperature), they will have to be changed frequently. It is better to purchase spare ones immediately.
LED
Fiber optic lamp for sauna and bath Cariitti SCA
Such lamps are attractive due to their efficiency and functionality. Small sizes – in particular “spot” ones – allow you to create interesting compositions and unique designs. The main thing is to choose heat-resistant materials for the housing (the markings are indicated on the outside).
Fiber optic
The safest for lighting in a bathhouse or steam room. Their internal elements withstand aggressive humid environments and long-term heating. Even after several years, the base and body will not deform or crack. A little more expensive than others, but worth the price. Reviews from professional builders confirm their high quality and appropriateness of use.
An interesting option are salt lamps. In addition to the soft glow, they create special pairs. They are used in combination with other lamps because the lighting is too dim.
What mains voltage should I choose?
Due to the different needs for providing the required level of power, the wiring in the bathhouse can power both lighting fixtures, and then in small spaces, and powerful equipment. Because of this, the type and level of voltage used differs:
- Single-phase network e - used at an average level of load on the wiring in the bath from 1 to 14 kW. In this case, the entire bathhouse is powered from single-phase networks with a voltage of 220 V.
- Three-phase network - used for a wiring load in a bathhouse from 20 to 40 kW, when an electric stove, heated floor and other powerful electrical appliances (water heating boilers, pumps, etc.) are connected to the bathhouse.
- Single-phase low - allows you to power the bathhouse with a safe voltage of 12 V or 36 V, which can be used to illuminate the steam room in the bathhouse without endangering people. Relevant for small baths with low ceilings, in which the only consumer for the leash is the lighting system.
After selecting the voltage level, a wiring diagram is drawn up taking into account the locations of all consumers.
Arrangement of elements
When arranging light in a bathhouse, you need to choose a place for the lamps:
- It is prohibited to place lighting fixtures near the stove, chimney, or heater. Even heat-resistant lampshades are not able to withstand strong heat.
- Instrument lights should not strain your eyes. Therefore, it is better to install lamps in the corner of the room.
- It is recommended to make lighting from an LED strip under the canopies in the steam room.
- It is not recommended to install too many lighting fixtures, bright sources of cold or warm light. It should be diffused, soft, so as not to strain your eyes when visiting the bathhouse.
You can make two levels of lighting - at waist height and just above the head. For the first option, an LED strip is suitable, for the second - standard lamps that can be mounted on vertical surfaces.
Circuit design
To draw up a wiring diagram for a bathhouse, you need to decide on the number of connection points to it - lighting devices, sockets for specific equipment, switches, etc. It should be noted that switches, like distribution boxes, are strictly prohibited from being installed in the steam room; they must be located in the locker room or dressing room. Washing is also not suitable for this due to the presence of moisture. The wiring in the steam room cannot be closer to the stove or chimney than 80 cm; these requirements must be taken into account at the design stage.
Figure 1: simple wiring diagram in a bathhouse
Look at the picture, here is one of the simple examples of electrifying a bathhouse. The wiring is connected to two independent terminals, each powering its own socket and a group of lighting lamps. This option will help you calmly leave the room if a short circuit occurs in one of the sections, since there are often no sources of natural light.
If you plan to install specific equipment, for example, a water heating boiler or a washing machine, you should provide a separate line for them in the wiring diagram with a larger cross-section than for a lamp. The washing machine and boiler must be installed in dry conditions. In this case, they should also be shown separately on the wiring diagram.
Internal wiring
If you still decide that you can do the electrical wiring in the bathhouse yourself, then take into account the following rules. First of all, it must be resistant to high humidity and high temperatures.
Advantages of open wiring:
- All electrical wiring is visible, and in case of any damage it will be much easier to detect.
- Any damaged area can be easily dismantled and replaced with a new one.
- Exposed wiring, even if you think it doesn't fit into the overall design, can be given an original retro look with porcelain insulators.
For electrical wiring in the bathhouse, it is necessary to use double-insulated wires. In a wooden frame bath, asbestos plates with a thickness of at least 0.3 mm must be placed under the wire. If the wire is damaged, this measure will prevent the wood surface from catching fire.
Install horizontal sections of wiring at a distance of 20 cm from the ceiling.
In the dressing room and washing room, install the wiring under the ceiling in cable ducts, in the steam room - only on roller insulators. Alternatively, you can run the wire from the washing room to the steam room through the wall in a steel sleeve.
Then a lamp should be located at the conductor entry point, that is, the wire coming out of the sleeve will be immediately inserted into the lighting apparatus.
All wiring in the bathhouse is carried out in metal or flexible corrugated pipes, or special plastic boxes. They are made of a material that, in the event of a fire, does not support an open fire, but only melts.
It is necessary to route wires from one room to another through steel pipes, which are inserted into holes made in the center of the log.
It is recommended that all wiring be done through the attic.
Very important! When wiring in a bathhouse, do not use conductors with vinyl or rubber braiding.
If you plan to install a washing machine in the bathhouse, then place it only in a dry room and run a separate supply line from an individual machine. There should also be a separate line for the heating tank.
Selection of wires, switches, lamps
For the completed wiring diagram in the bathhouse, all its components are selected: wires, sockets, switches and lamps. The cable brand is selected in accordance with the conditions in each of the bathhouse rooms (high temperature and humidity).
Depending on the material of the current-carrying conductor, the wiring in the bathhouse can be copper or aluminum, but due to the much better mechanical and electrical parameters, the choice should be made in favor of copper wires. The main parameter for any cable brand is the wire cross-section. The cross-sectional area is selected based on the load connected to the corresponding section of the wiring.
How to choose wires and sockets based on load?
For example, you are going to connect two 100 W light bulbs, plug in a 1 kW electric kettle and a 4 kW electric heated floor. Thus, to calculate the cross-section, add up the power consumption of all consumers P = 0.1 + 0.1 + 1 + 4 = 5.2 kW. To the resulting power value it is necessary to add a 20 - 30% safety margin, for our example we get 6.24 kW. To select a specific cross-sectional value for wiring based on consumer power or electric current, you need to use our calculator or table data:
Table 1: selection of wire cross-section
Look at the table; for a power of 6.24 kW, copper wiring with a core cross-section of 4 mm2 or aluminum wiring of 6 mm2 is suitable. If you have drawn up a power supply diagram with separation of wiring for different consumers, then it is advisable to perform the procedure for calculating the cross-section for each individual section, but the material of the conductor for the wiring must be the same.
The socket, like the wiring, has a certain current carrying capacity. Therefore, the selection of connection points to the mains voltage should be made in accordance with the devices being connected. For example, for a refrigerator it is enough to install a 10 A socket, but for a boiler, depending on the power, you will need 16 or 24 A.
For the steam room
The requirements of GOST R 50571.12-96 establish the following division of the steam room into zones:
Rice. 2: division of steam rooms into zones
Look at the picture, all zones are built in accordance with the location of the stove, be it electric or solid fuel. In relation to laying wiring cables and installing other equipment, these areas have the following requirements:
- The first is intended exclusively for the stove, if it is an electric heater, then the wiring for connecting it;
- The second is considered the most loyal in terms of wiring requirements; no standards are provided for it;
- For the third zone, there are requirements for equipment that must normally withstand temperatures of 125°C or more, and wiring of 170°C or more;
- Only lamps, sensors and regulators can be installed in the fourth zone, but their wiring is selected as for the previous bath zone.
For internal electrical wiring in the steam room, heat-resistant cables should be used, for example, flexible copper RKGM, PVKV, PRKS or PMTK.
Lamps in the steam room must have a metal body to which grounding is connected, a sealed glass shade with a degree of protection of at least IP24. You should not choose models with a plastic body or parts to connect lamps, as they can melt and deform, causing moisture to penetrate inside.
Rice. 3: steam room lamp
For dressing room, locker room, rest room
These premises are characterized by much less stringent requirements for location and wiring characteristics. But they must also comply with all the requirements of the PUE for saunas.
It is also better to use lighting devices that are sealed with a degree of protection of at least IP24, but you can also use models with a polymer body or made of plexiglass, since the temperature in these rooms is much lower. VVGng-LS brand wires are quite suitable for wiring. Sockets must have a protective locking device that prevents the free penetration of moisture from the environment.
Precautions when wiring
- All devices and shields must be located in a separate room, which is reliably protected from moisture. In conditions of excessive humidity, structures can fail and rust in a short time. This also applies to plastic devices - there are metal elements inside the structures. There is no need to worry about modern models of shower cabins with built-in water heating. The manufacturer cares about safety, so such devices can also be placed in a washing room.
- The body of the lighting fixtures should be aluminum, and the lampshade should be glass. It is recommended to mount them on the walls, since steam escapes to the ceiling, as a result of which an elevated temperature is established there, which is unacceptable for such devices.
- The transformer device to which the supply voltage will be supplied must be designed for 220 V. It must be installed in a dry place. Only 12 V can be wired through the wall. If 36 V light bulbs are installed, then the permissible voltage will be 42 V.
In the steam room, it is recommended to install 12 V lamps, and place the power supplies for them behind the wall, in other rooms
- If you want to install a washing machine in a steam room, then do not forget that it should be placed in a dry room. You will need to make a separate cable for the electric heater.
- A grounding loop should be laid around the steam room. A circuit breaker or RCD must be installed in the panel. The devices must be located in a container that is protected from moisture.
- If there is a need to install sensors to an electric heater, then you should know that they must be low-voltage and located at a distance of 1 m from the floor base. The control panel is mounted outside the steam room. The heater is installed without sockets.
- It is recommended to mark all elements on the shield with a marker.
Video: types of bath lamps
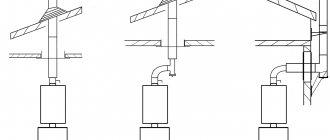
Wiring entry into the bathhouse: overhead or underground?
Depending on the method of introducing the cable into a stone or wooden sauna, a distinction is made between overhead and underground installation.
Rice. 4: example of laying an overhead line
The first option has a number of advantages - installation by air is carried out quite quickly and at a lower cost, except in cases where you need to install supports before a wooden building. For overhead installation, it is most important to use self-insulating wire (SIP), the number of cores in which is determined by the choice of three-phase or single-phase electrical wiring. The following distances must be observed:
- Between supports no more than 25 m;
- The height of the SIP cable entry into the building is at least 2.75 m;
- The sag distance of the boom to the ground is not less than 3.5 m.
Due to the fact that underground entry requires the development of a trench for laying the cable, this procedure takes much longer than aerial installation. But when laying the cable entry underground, the line itself is much less exposed to atmospheric factors and wind loads, and therefore lasts much longer.
Rice. 5: example of laying cable underground
When laying an underground input, the following requirements must be met:
- Electrical wiring is inserted through a metal bushing;
- In the trench, the cable is located freely, and not under tension;
Rice. 6: cable in ground - Laying depth of at least 0.8 m;
- An armored grade is used, for example, VBBShV.
In addition to the lengthy installation process, underground cable placement also requires additional measures to protect against accidental damage during excavation work near its route.
Wiring method: open or hidden?
The advantages of open wiring in a bathhouse include simplicity and speed of installation, the absence of labor-intensive preparatory work, and accessibility for repairs. The disadvantages of the open method of laying wiring include its damage and interference with the interior of the bathhouse.
The advantages of hidden wiring include much higher reliability and security of the wires along their entire length. Disadvantages of internal wiring include lengthy preparatory work and wall gating, which is not always possible.
Installation and connection step by step
The entire process of installing wiring in a bathhouse can be divided into three main stages. Compliance with the given sequence will allow you to complete the work efficiently and without unnecessary loss of time. Get started with installation:
Distribution panel
- Route the supply inlet to the location where the distribution panel is intended to be installed.
- Before installing the shield, install circuit breakers and RCDs into it according to the operating current ratings. For a bathhouse, the RCD is selected based on the leakage current from 10 to 30 mA.
Rice. 7: dial machines - Install the shield at a height of 1.4 - 1.8 m from the floor level to its cover.
Figure 8: Install the shield - Run the cable to the input machine and route it along separate lines. And in the absence of sectioning, immediately proceed to wiring from the input panel to the consumers.
- Wiring in the bathhouse must be done with a three-wire wire (phase, neutral and ground).
- Connect the protective grounding to the housing to a common PE bus, which is connected to the ground loop.
Sockets and switches
- In places where sockets and switches are installed, develop holes for boxes for indoor installation or install a lining of non-combustible material in wooden baths under open wiring.
Rice. 9: Design the holes - Install the boxes on putty or cement mortar for hidden wiring; for external wiring, you will only need distribution boxes.
Rice. 10: Install the boxes on the cement mortar - All sections of wiring are carried out with solid cores; connection of wires is allowed only in boxes (moisture-resistant clamps) and when connecting sockets, switches and other equipment.
Rice. 11: connection of wires in the box - Install sockets and switches in socket boxes when wiring is hidden or on a non-flammable stand when wiring is open.
Rice. 12: Install the socket
Lighting devices
- Route the wiring to the lighting fixtures.
- Install the lamps in the bathhouse according to the previously drawn up diagram.
Rice. 13: Install the light - Connect the wiring to the socket.
- Ground the housing to a protective PE conductor.
- Install lighting lamps.
Rice. 14: Screw in the lamps - Close the lamps.
Rice. 15: close the lamp
Before starting operation, be sure to check the functionality of all devices in dry conditions. Make sure that the automatic protection system is in working order, this will protect you from the consequences of mistakes even before you start using both the bathhouse itself and the wiring in it.
Bathhouse projects
Number of projects 687
- 3 rooms
- 1 bathroom
Log bathhouse project BO-030
- To favorites
- 80² Total area
- 6 x 8m Construction area
from 1,080,000 rub.
Construction period 90 days
- 1 bathroom
Log bathhouse project BO-022
- To favorites
- 35² Total area
- 5 x 8m Building area
from 472,500 rub.
Construction period 90 days
- 1 room
- 1 bathroom
Bathhouse Mylenka project
- To favorites
- 26.5² Total area
- 6 x 6m Construction area
from RUB 357,750
Construction period 30 days
Log bathhouse project BO-029
- To favorites
- 38² Total area
- 5 x 8m Building area
from 513,000 rub.
Construction period 90 days
- 2 rooms
- 2 bathrooms
Bani Harbor project
- To favorites
- 110² Total area
- 11 x 9m Construction area
from 1,100,000 rub.
Construction time individually
- 1 room
- 2 bathrooms
Bath Kamenka project
- To favorites
- 65² Total area
- 5 x 13m Construction area
from 815,700 rub.
Construction time individually
Log bathhouse project BO-001
- To favorites
- 17² Total area
- 4 x 5m Building area
from 229,500 rub.
Construction period 90 days
3m barrel sauna project
- To favorites
- 6.6² Total area
- 3 x 2m Building area
from 179,000 rub.
Construction time individually
- 1 bathroom
Bathhouse Pasechnik project
- To favorites
- 26² Total area
- 6 x 6m Construction area
from 351,000 rub.
Construction time 22 days
- 2 rooms
- 1 bathroom
Bathhouse Serduchka project
- To favorites
- 72² Total area
- 8 x 6m Construction area
from 972,000 rub.
Construction time 42 days
- 1 room
- 1 bathroom
Project Baths 6B-B
- To favorites
- 17² Total area
- 4 x 5m Building area
from RUR 259,529
Construction period 15 days
- 1 room
- 1 bathroom
Bani Lisa project
- To favorites
- 51² Total area
- 6 x 9m Construction area
from 674,000 rub.
Construction time individually
- 1 room
- 1 bathroom
Project Baths 14B-B
- To favorites
- 27.1² Total area
- 5 x 6m Construction area
from 334,065 rub.
Construction period 18 days
- 1 room
- 1 bathroom
Bathhouse Mylnya project
- To favorites
- 29² Total area
- 5 x 6m Construction area
from RUB 391,500
Construction period 30 days
- 3 rooms
- 2 bathrooms
Caravel Baths Project
- To favorites
- 107² Total area
- 17 x 11m Construction area
from 1,444,500 rub.
Construction period 50 days
Bathhouse project Standard No. 3
- To favorites
- 15.3² Total area
- 4 x 4m Building area
from 470,000 rub.
Construction time individually
- 1 room
- 2 bathrooms
Bathhouse project "Riga"
- To favorites
- 81.5² Total area
- 12 x 10m Construction area
from 1,630,000 rub.
Construction time individually
- 1 bathroom
Barrel sauna project 6m
- To favorites
- 13.2² Total area
- 6 x 2m Building area
from 259,000 rub.
Construction time individually
- 1 room
- 1 bathroom
Bath Sakura Project
- To favorites
- 80² Total area
- 11 x 7m Construction area
from 1,080,000 rub.
Construction period 35 days
- 1 bathroom
Log bathhouse project BO-005
- To favorites
- 20² Total area
- 5 x 6m Construction area
from 270,000 rub.
Construction period 90 days
View all projects
Construction of a bathhouse in a country house or on the site of a country house is one of the mandatory tasks for most owners. One of the most critical elements of the arrangement is the power connection and general energy supply work. Since the wiring in the bathhouse operates in difficult conditions and is installed in a hidden way, it is necessary to ensure maximum care in the installation. Read to the end, and you can avoid mistakes, eliminate the risk of short circuits and other problems.
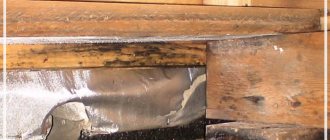
Wiring in the bathhouse installed on wooden walls Source www.remontnik.ru