Is it possible to build a Russian stove with your own hands?
This is really possible, but first you should carefully study the instructions, carefully analyze all the diagrams, but most importantly, it would be a good idea to undergo an internship with a professional. The best option would be to carry out all the necessary work under the supervision of a qualified stove-maker, who will prevent possible errors when reading the order during the laying process.
[contents]
The problem is that just one incorrectly placed brick can ruin everything.
There are often cases when, due to such an oversight, the masonry had to be completely redone, since the stove either had no draft at all, or it was too strong.
If you are not afraid of warnings and are not afraid of possible difficulties, and you decide to test yourself as a stove maker without making irreparable mistakes, it is important to follow the instructions exactly and follow the rules of work. In addition, the choice of material should be approached with full responsibility.
You need to know the necessary parameters for the design of capital heating devices so that they fully comply with specially developed standards: this is the only way to avoid claims from fire inspectors.
Stove power selection
Good advice from an experienced stove maker
Before buying a stove, you need to decide on the power. Be sure to take into account the square footage of the heated space and the power consumption when heating the incoming fresh air. “Rus” stoves are ideal for small and large steam rooms, as they are capable of heating rooms with a volume of 4 to 18 cubic meters.
When choosing power, calculate the volume of the steam room and add for each square. meter of glass door or window 1 cubic meter. meter of the estimated volume of the furnace. You should not buy sauna stoves with more power than you need. In this case, it may turn out that the miser pays twice. Those bathhouse owners who purchased a unit that is too powerful will experience overheating of the steam room, which will make it difficult to create the desired microclimate.
How to find out the weather forecast from a Russian stove.
0
Villagers knew how to predict the weather using their stoves. There was a whole set of folk signs, according to which peasants noticed various details and then interpreted their meaning. If the wood in the stove burns with a bang, there will be frost, and if it burns with a humming noise, expect a snowstorm. The firewood burns sluggishly or goes out - a thaw will come in the coming days. The wood in the stove flares up well and burns with a slight crackle, and the smoke from the chimney rises - a sure sign of a sunny and windless day. The smoke bends like a rocker and spreads along the ground - confirmation of the impending bad weather.
The role of the steam generator in the furnace
To prevent the air in the steam room from overheating above a comfortable 95°C, a steam generator is simply necessary. This is a metal chamber that is generally installed on the side of the firebox. Thanks to this installation, the steam generator heats up much faster than the stones. They do not fit closely to the firebox and conduct heat much more slowly than metal.
“Rus-Panorama” stoves of modifications 12 LNZP, 22 LNZP and 27 LNZP have steam generators that help achieve ideal temperature conditions and moisture levels in the steam room. Bath stove “Rus-Panorama” 18 Pro with a steam generator is considered the best heater for a Russian bath.
The main advantages of this model.
- Has 2 operating modes. Regular steam generation mode, when steam is generated from water hitting an open heater. Another option is the “Russian bath”: steam arises from water dripping dropwise from the tank onto the hot walls of the firebox.
- It has the lowest heating rate for the steam room and the lowest operating temperatures, ranging from 80 to 90°, which creates a comfortable and mild climate in the Russian bath.
A wood-burning stove for professionals is “Rus” 18 LNZP. It is designed for large rooms with a volume of 10-18 cubic meters. m, weight of stones – 90 kg, tank capacity – 55-80 l, oven weight – 61 kg. With the same parameters, a gas-wood-burning unit for a bathhouse weighs 12 kg less. The size of the stove and the required mass of stones depend on the square footage of the heated room.
History of the stove in Rus'
0
See all photos in the gallery
Scientists estimate the age of the ancestor of the Russian stove to be many millennia. Man first placed fire under a clay vault back in the Stone Age. In Rus', adobe vaulted ovens were built in the 10th–11th centuries, and they acquired their familiar, traditional appearance by the 18th century. When starting to build a hut, they first determined where to put the stove, and only after that did the layout of the remaining rooms. This is where the famous proverbs and sayings came from: “Dancing from the stove” and “The clever peasant built a hut on the stove.” The stove was built on the flooring of a massive log house - a guardhouse, and an empty space was left under it - a podpechka. All stove utensils were kept in the guardhouse: grips, pokers, shovels for baking bread. Chickens were placed in the oven in winter to keep them warm and lay eggs better.
The presence of convection is very important
Convective air flows occur when the air between the firebox and the casing heats up and rushes upward, and a cold flow flows down under the furnace. Then it heats up between the firebox and the protective casing and also goes up. This pattern of air current movement is called convection.
Efficient convection oven
Thanks to this phenomenon, layers of warm and cold air inside the steam room are mixed, equalizing the temperature, which prevents your feet from getting cold. Convective currents heat air more efficiently in the vertical direction. In summer, 50-60 minutes are enough to heat a steam room to 95°, in winter – from an hour to an hour and a half. And if the stove has a steam generator, the room heats up even faster.
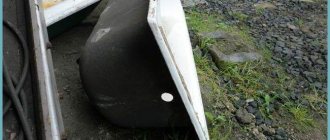
Metal stoves are made from sheet iron 4-5 mm thick. The water tank can be located on different sides. A special open thermal chamber is provided for laying stones. These ovens are very economical. They heat up quickly, but also cool down.
Russian brick oven: choosing a location
An extremely important point is the competent choice of location for the construction of the structure. If it is intended to be installed in a wooden building, then there must be an appropriate distance from it to the walls of the building, the minimum value of which is at least twenty centimeters. Walls made of wood materials should certainly be protected with special non-combustible materials.
For this purpose, non-combustible asbestos boards are usually used. The presence of free space (gap) between the walls and the stove is also necessary for mandatory regular inspection of the walls of the device. The stove can be installed between two different rooms. In this case, the opening in the wall must be lined with reliable brickwork with a thickness of at least twenty centimeters. You can strengthen it by installing an asbestos gasket between it and the wood of the wall.
How to fold the stove? Required Tools
Regardless of which design of the Russian stove is chosen, the same available means and tools will be needed to equip it. They should be taken care of in advance.
- A trowel or trowel will be needed to apply mortar to the bricks, to clean up the masonry, and to remove excess cement.
- A hammer-pick is needed for splitting and trimming bricks, since the work will require masonry elements of different shapes and sizes;
- Joining. If the product does not have a decorative coating, then this tool will be needed to ensure a neat appearance of the masonry. With its help, the seams are neatly formed.
- With the help of a mooring cord, they ensure proper evenness of the rows. True, modern craftsmen prefer the usual plumb line and building level;
- Ordering is a device that allows you to ensure the verticality of the masonry and equal thickness of the seams;
- The plumb line can be quickly and easily installed in the desired location. They determine the verticality of the wall;
- The building level is a necessary thing when laying. The master should always have it at hand;
- Rule - usually used only once, to level the foundation;
- Container for solution and spatula;
- Special measuring strip for measuring the thickness of seams.
Russian stove with stove: required materials
Each type of stove requires a certain amount of materials, which depends on its model and size. Building materials are needed not only for laying out the walls and interior of the furnace, but also for making the foundation. The Russian stove is a very impressive and massive structure, and needs a strong, reliable foundation.
It is better not to skimp on materials, choosing low-quality and cheap ones. After all, any master wants the resulting structure to be not only attractive and respectable, but also to properly perform its functions.
To build a furnace you will need red hardened brick, purified sand, fatty clay, a hob, combustion doors, grates, blower and cleaning doors, a water heating tank, a damper for the furnace, a smoke damper; steel sheets, angles and strips. To arrange the foundation, you will need to purchase sand, crushed stone, cement, formwork boards and reinforcement. The amount of materials depends on the width and depth of the base.
Russian stove: foundation
A Russian stove is a solid and solid structure that requires an appropriate foundation. You will have to dig a pit for it. The dimensions of the pit should be 12-15 centimeters larger than the perimeter of the future structure on all four sides. Its depth depends on the density and reliability of the soil: the average ranges from 50 to 70 centimeters.
Well-compacted sand (15-20 cm) is placed at the bottom, broken brick or crushed stone is placed on top, which are also compacted (layer 10-15 cm), and then everything is leveled with another layer of sand. Then a double layer of roofing material is laid there, on which board formwork is placed. To ensure tightness, its walls are lined with dense polyethylene (so that the solution does not seep through the cracks).
The concrete mixture is prepared from crushed stone, cement, sand and water, in given proportions, until a semi-liquid consistency is obtained. The solution is poured into the installed formwork with a primary layer 20-22 cm thick. To avoid the formation of voids, bubbles and cavities, the mass is compacted with a bayonet shovel, piercing it to the full depth.
The reinforcement bars are installed vertically into the solution that is beginning to harden so that they rise 5-7 centimeters above the surface.
Then another layer is poured, more massive: its thickness is 10-15 centimeters. When it begins to set, a metal mesh is placed on the surface.
The formwork is filled to the very top with concrete mixture, the top is leveled according to the rule according to a predetermined horizon. This is often the top edge of the formwork itself. When the concrete has completely hardened, the mass has acquired the necessary strength, and another layer of roofing material is spread on top.
Russian stove Kamenka: mortar for masonry
The stove has many complex functions, and therefore there are special requirements for the mortar for its laying. It must be thin and elastic enough to seal seams well and not form cracks. Properly preparing the mixture is not an easy task, and every stove master has his own secrets.
Today in specialized stores you can find a ready-made heat-resistant product necessary for masonry. But experienced craftsmen are confident that traditional homemade mortar made from sand and clay is much better than ready-made cement mixtures. This is probably partly true. Well, as for the environmental friendliness of the composition, this is the honest truth.
The main difficulty in preparing the right solution lies in the selection of ingredients. Clay can be either too oily or too lean. For laying stoves, a richer material is preferred, which gives the mixture the elasticity necessary for the seams. It is difficult to determine the optimal ratio of elements, which is important for preparing a composition of proper quality.
Before preparing the mixture, the soaked clay is rubbed through a mesh with a mesh size of 0.5 cm to obtain the most homogeneous mass. When moving on to the firebox stack, fireclay powder is often used instead of sand, in the proportion of three parts clay to one part fireclay.
Russian stove: masonry
To avoid becoming a source of danger in your home, the oven must be completely sealed. You cannot use low-quality materials, for example, bricks with cracks. The brick size should be from 5 to 8 millimeters.
To ensure tightness, you should not coat the inner surface of the furnace with a clay composition, as this mixture will aggravate soot deposition and also help reduce the thermal conductivity of the device.
Masonry is carried out in different sections of the structure in different ways - the length of a brick, a quarter of a brick and half a brick. Bandaging stove corners is done in different ways, but the main principle is the interweaving of a brick poke and a spoon. The building is laid out according to special instructions: the order of Russian stoves describes in detail how, and in what row, the brick should lie, and what additional parts are needed at each specific stage.
Ceramic bricks must be well soaked before laying so that they do not absorb water from the solution. Next, the mortar and brick will lose moisture evenly, with good mutual adhesion, ensuring reliable tightness. The mortar protruding from the seams is immediately removed both from the inside and outside of the masonry. This way the structure will be as functional and neat as possible.
Internal walls are usually laid in half a brick, external ones in half or a whole stone. Thick outer walls increase the heating time of the furnace and also require more fuel. Therefore, the optimal option is most often used - half a brick for both walls.
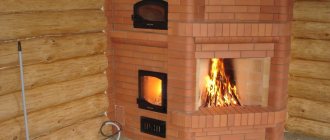
Furnace combustion tunnel
It is very convenient when the stove in the bathhouse has a combustion tunnel that runs through the wall. In this case, you need to add firewood from the next room. What are the advantages of having a combustion tunnel?
- Saving breathing air, which is released when wood burns in a steam room.
- Cleanliness in the steam room. When using firewood, dirt always appears, but due to the presence of a tunnel, it will remain in another room.
- Adjustment of the ventilation system, since to maintain combustion a lot of air from the steam room will go into the firebox.
- The combustion tunnel has a fireplace window. This is an excellent solution for a relaxation room, allowing you to create a unique atmosphere and a great mood. The living flame fascinates and fills you with vital energy in addition to the healing effect of the steam room.
The wood-burning heater “Rus” 9 is equipped with a combustion tunnel. The number next to the model name corresponds to the volume of the heated room. This stove is capable of filling the steam room with steam in a fairly short period of time. Thanks to this, the heater itself can be located in the steam room, and the firebox can be located in the relaxation room.
Metal stove with chimney
This heater can hold about 25 kg of stones. It is small, its dimensions are 672x308x469 mm. Heat distribution in the steam room occurs evenly. Reviews from many experts indicate that this model is optimal in all respects and is ideal for small Russian baths.
Do-it-yourself stoves and fireplacesIvan Zorin, 2020
History of the stove in Rus'
The prototype of a modern oven, according to archaeological data, appeared about four thousand years ago. And already in the 6th century AD. e. The Slavs overwhelmingly used a stove rather than a hearth. The smoke hearth became the prototype of the Russian stove. In the XV–XVI centuries. chicken stoves began to be built with a chimney. Initially, chimneys, which were called chimneys, were made of wood in the form of thick planks, which was a fire hazard.
Archaeological finds indicate that throughout the entire territory of the settlement of the Eastern Slavs at that time, the design of the stove remained approximately the same. It was a stove-heater, like those that can still be found today in old village baths. Such stoves were low, rectangular in shape, usually a little more than 1x1 m in size. The lower part of the stove walls was laid out from large stones, trying to select flat ones. Smaller stones were used for the top. No binder solution was used. In some cases, the cracks between the stones were covered with clay mixed with shards of broken pots. The shards were not from damaged dishes - a brand new, whole pot was deliberately broken. This is probably due to the magical functions of the stove, fire in general, the hearth.
There were no special requirements for the type of stone - they took whatever was at hand: limestone, sandstone, granite, sometimes even pieces of iron ore. If there were no suitable stones, lumps of baked clay were used instead.
The very top of the oven was covered with large flat stones, and when such a stone could not be found, a vault of small stones was skillfully laid out. If the vault turned out to be fairly even, a clay brazier was placed on it.
On the left bank of the Dnieper (the territory of the northerners tribe), as well as in the territory of present-day Romania and Bulgaria, there was another type of stove. In these places, the main dwelling was a half-dugout, and the oven appeared directly when the pit was dug; it was cut out of the mainland outcrop. Scientists believe that this tradition developed no later than the 7th century.
The stove vault was solid, the smoke came out, directly into the living space, through the mouth of the stove. Dwellings with such stoves were called “kurns” or “black”, because a thick layer of soot settled on the inside of the roof and on the upper rims of the walls. Because of this, ceilings were not made in Slavic dwellings for a very long time, so that with a relatively small area, the huts were quite high - according to some researchers, up to 1.5 “normal” floors. This is so that the rising smoke floats at least above people's heads and does not eat their eyes.
The smoke in such a hut came out through a fiberglass window, which was specially cut into the upper crowns of the log house. The smoke that was formed during combustion came out through the mouth of the furnace and rose upward. Once under the ceiling, he began to look for a way out. At the same time, he fumigated the ceiling and several upper crowns of the log hut. Having found a drag window, he bent downwards to get into it, and when he came out, he turned sharply upwards. Making one revolution directly in the hut, the smoke left its heat in the room, emerging into the wild already cooled. Thus, the black-fired stove was quite economical.
When burning in black, soot covered mainly the ceiling with a protective layer, and the walls only up to the voronets - shelves running along the walls and so named for their black color. Located high under the ceiling, the Voronets served as a border between the smoky upper and lower clean parts of the hut.
Due to the fact that during the fire the hut was not only fumigated and at the same time ventilated, dampness was constantly removed from it. When the firebox was finished, the window was closed, and the stove began to release the accumulated heat, heating the already clean air. The chicken stove produced no fumes at all; it dried the walls and roof so well (this is very important in damp forest areas) that they practically did not rot. The black stove not only preserved the house, it effectively disinfected it. Epidemics of plague and malaria that raged in towns and cities, villages with smoking huts, as a rule, were bypassed. The chicken huts did not harbor bedbugs and mice; in them, people were reliably protected from midges. That is why chicken huts were built almost until the beginning of the 20th century.
When the huts began to be heated “in white,” we had to worry about the material for the pipes. Since hot gases flowed through the pipe directly from the firebox, it was forced to be made of fire-resistant material - broken clay or brick. In order to capture the smoke coming out of the furnace as best as possible, the pipe expanded immediately in front of the mouth of the furnace, forming a so-called casing. Due to its resemblance to a piece of women's clothing, it was also nicknamed epancha. Subsequently, for stability, the epancha began to be supported from below by two racks, which rested on the stove. It is possible that it was these sixes that gave the new name to the pripechka, which began to be called the pole. In a simple Russian stove, the hearth is mainly intended for pots and cast iron, which are brought from here into the stove using grips.
During cooking, the cast iron pots are placed on a rack from time to time to check the degree of readiness of the brew and to add anything. The hostess pushes them here at the end of cooking before sending them to the table.
Although the hearth mainly served as a support for stove dishes, in some cases it was used as an open fireplace. For example, you need to heat up the brew, but the stove has long cooled down - don’t heat it up again. The six came to the rescue. A small forged tripod called a Taganka was placed on it. A cast iron pot, saucepan or kettle was placed on top of the Taganka rim. The mouth of the stove was closed with a damper so that its handle was turned towards the firebox. Having opened the view, a small fire of short chicks was lit under a tripod. If it was not necessary to acquire a taganka, two bricks were taken out of the oven and placed on the edge at some distance from each other. A fire was also built between the bricks, and a bowl of food or a kettle of water was placed on top.
Once upon a time, the stove in the hut was the central element: it warmed the house, baked bread in it, dried mushrooms and grain, etc. Even the stove could treat various colds. The patient was pushed into the oven on a special bed so that he could sweat thoroughly. The outside of the stove was sprayed with water or kvass, and the thick “bread” steam was a kind of inhalation and had a beneficial effect on the patient. Infants were also treated for rickets in the ovens. The babies were coated with clay and placed in a warm oven. This general warming of the body led to the correction of the bones.
Building a good white stove was not an easy task. First, a guardianship was installed right on the ground - a small wooden frame that served as the foundation of the furnace. Boards were laid on the stove, on which the bottom of the stove was laid out - underneath. A furnace vault was built above the hearth of stone or brick.
A shelf is a shelf in front of the mouth of the stove, on which the housewife could keep cooked food warm. On a pole to the side, hot coals were raked, intended for the next fire. Shallow niches were made in the side wall of the stove - stoves, where wet mittens and a kindling stick were usually dried. Poultry was kept in a warm shelter during cold times.
In peasant huts, the stove was located in the corner of the hut, to the left or right of the entrance. This did not exclude the installation of additional stoves, but they were used only for heating.
There are three traditional options for furnace mouth orientation.
The most ancient is South Russian. The stove is located in one of the corners farthest from the entrance. The stove corner (not to be confused with the corner in which the stove itself stands) occupies the space from the mouth to the wall opposite it. If it is separated by a curtain or partition, then it will be a “kitchen”. The angle lying diagonally from the mouth is called large, or red. There is a table, a chest, long benches and icons hanging here. In the fourth corner, under the ceiling, there is a bed (flooring made of boards for sleeping). Fenced off with a curtain, it becomes a “bedroom”. The washstand, buckets of water and all kitchen utensils are located in the stove corner. The red corner is at the same time an entrance hall, dining room, living room and work area. This layout of peasant houses is common from the southern Moscow region to the middle reaches of the Don.
The second option is Northern Russian. The mouth (“brow”, “whole”) of the main bread oven faced the wall opposite the entrance and was illuminated by a side window. The stove stood almost close to the side wall. There was 20–30 cm between them, where kitchen utensils were stored. Between the stove and the end wall, above the entrance, wooden floors were installed. A similar layout can be classified as North-Central Russian. In cross houses and five-walled houses with a truss, the stove was located so that it was possible to heat either all the rooms or several of them. In this case, they made a stove with a firebox or fireplace. The significance of the hut space increased from the entrance to the opposite wall, where the “front corner” with icons and a table was located. The least honorable place was the part of the hut near the entrance, located between the bed and the stove - “under the threshold.” Rules of politeness forced those who came to the house to stop at the entrance and wait for an invitation to move on. The space between the stove and the wall, where the “front corner” was located, was called “kut”. It traditionally belonged to a woman and was intended mainly for cooking and sewing. There was a “box” with the owner’s things - a chest with a dowry taken from her parents’ house. Near the stove there was an entrance to the underground. There was a small bench adjacent to the stove on the side of the front door.
In the third option, the axis of the stove is perpendicular to the longitudinal axis of the house. In the north, this variant is called “Finnish”, since it is found in the homes of Russified Finns, in the south - Ukrainian. The stove is located next to the door, but the mouth does not look at the one opposite the entrance, but at the side wall. Accordingly, the red corner is located in the same way as in the Northern Russian hut, but the stove corner is at the entrance, all in sight, so it is both a kitchen and a hallway.
The middle location of the stove in the house is completely unusual for the dwellings of the East Slavic peoples. Archaeologists, however, have identified a fairly extensive area - from the Dnieper left bank to the upper reaches of the Western Dvina, where dwellings with a hearth in the middle once predominated, but these were pre-Slavic settlements in which they used mainly an open fire (a pit covered with clay or lined with stones). The appearance of a chamber hearth (furnace) required its movement from the center to the periphery, which is observed during excavations of cultural layers of the 6th–8th centuries. Secondly, until the 19th century, the living part of the peasant hut was one-room and only later began to turn into two or three rooms, which is why in order to uniformly heat all the rooms the stove had to be placed closer to the middle of the house.
An important stage in the construction of the house was the construction of the stove. Sometimes the stove had to be installed not only when a new house was built, but also moved several times if it somehow did not suit the owners or burned out. But such trouble did not happen with the adobe stove. Clay or “broken” stoves are more reliable than brick stoves, they retain heat better, do not become damp, and over time they only gain strength, turning into a single shaped brick that is difficult to break even with a crowbar. They took clay (“earth”) for the kiln not far from the village, and sometimes, if the clay layers came close to the surface of the earth, then in their cellar. We used ordinary red clay, plastic, but not greasy. The builders timed the beating of the stove to coincide with the full moon, so that later it would not crack or become damp.
The Russian stove in the peasant hut was heated every day in winter and summer. She heated the hut and prepared food for the family. Even for dinner everything remained hot. It was also used to prepare feed for the livestock. The dimensions of the Russian stove were very impressive. Two-bucket cast iron passed freely through the wide mouth. A clay pot with malt for beer ran along the height.
The secret of the taste of food cooked in a Russian oven is that the heat of the oven is distributed evenly and the temperature does not change for a long time. Dishes with food do not have direct contact with the fire, allowing the contents to heat up evenly on all sides without burning. In addition, mushrooms, berries, and fish were dried in the oven.
They also steamed in the oven. The Russian stove could easily accommodate two adults. They covered under the stove with a sheaf of rye straw to prevent burning. A clean rug was placed on the pole. Then the man climbed into the oven and sat down on the straw. You could splash it from the ladle onto the hot walls, or you could simply wet the broom and shake it behind your back. If you want to breathe in fresh air, you can lie with your head towards the mouth. The men were the first to steam, then the mother and children.
A lit stove in winter was one of the main sources of light, and the most important women's handicraft in those days was spinning. Sitting on a bench near the mouth of the stove, the woman rotated the spindle with her right hand, twisted the thread with her left hand and, of course, glanced in that direction every now and then. If the stove was located to the left of the entrance, the light was not convenient for work. Even at the beginning of the 20th century, there were many smoking huts in the Russian village, and home craftswomen worked at the stove. It is no coincidence that in V.I. Dahl’s dictionary a hut with a left-hand stove is called a “slob hut” because in such a dwelling a woman cannot spin by hand.
In the 8th–10th centuries, stoves were still placed in the corner farthest from the entrance, and the right-hand arrangement predominated. Kamenki were built in the old traditions, but stoves made entirely of clay appeared and spread. To prevent the soft clay from collapsing under its own weight during the construction of the oven, a wicker frame was first made. When the oven began to be heated, the frame burned out, but the clay was already fired and hardened. Pieces of clay with holes left over from the burnt-out frame were found during excavations. The height of the mouth in such ovens was no more than 20–30 cm. To cook food, holes with a diameter of about 20 cm were made in the roof of the oven. Having lit a fire in the oven, a pot was inserted into the openings of the roof and the food was cooked, as on a stove. The bread was baked in special ovens with a wide mouth.
End of introductory fragment.
Mortar for laying the stove
The thinness and elasticity of the composition and the absence of cracks after drying are important. You can use a ready-made mixture from the store or make it yourself. For this you need purified clay. It needs to be soaked in water, and after a day kneaded with sand - first, several variations of the solution are made for testing, changing the proportions. From each they form cakes, 1 cm thick. After 2-3 days they are examined - where there are fewer cracks, the composition is better.
To ensure uniformity of the clay, after soaking it is wiped through a mesh with 0.5 cm cells. When preparing the solution for the firebox, it is better to replace ordinary sand with fireclay powder. Mix it with clay 1:3(4).
We are ready to order:
- Sauna stove (with or without heater);
- kitchen stoves with the required number of burners, with a built-in oven, water heating tank, etc.;
- heating shields (both thin-walled and thick-walled);
- heating and cooking stoves or heating stoves.
You can see the stove projects we have implemented in the photo album.
We work in Moscow, Moscow and Sverdlovsk regions. Travel to other regions by agreement. More detailed information and advice can be obtained by contacting us by phone or email.
List of tools
In the process of building a Russian stove with a fireplace, in addition to consumables and components, you will need working tools. Here is the minimum set:
- Kiln hammer (pick) - used to cut and break bricks into pieces (sometimes you need halves or quarters of bricks). Also useful for straightening wire. It is better to choose a one-sided hammer, it is more convenient to work with.
- Trowel (another name is trowel or plaster spatula). They stir it, lay the solution, level it, remove the remains. It is better to choose a medium-sized steel spatula (20x15 cm with a knee height of 5 cm).
- Rule, square, level - steel or wooden measuring devices help control the evenness of laying the bricks of a Russian stove. To control the verticality of the parts, you will need a plumb line (looks like a sinker on a rope) and guide posts (when laying the stove, it is better to use 4 pieces).
- Scraping - a device is needed to clean smoke exhaust and ventilation ducts that may become clogged with building material during installation of the structure.
- It is useful to have a sieve for sifting bulk materials used in preparing the solution.
- Bucket, trough or mortar boxes - any container where it will be convenient to dilute the solution.
- Benches where the stove maker climbs to work on the upper parts of the Russian stove, as well as lower supports where they place dishes with mortar, are placed with tools.
- Scouring brush – used for grouting the finished surface of the stove.
- Grinder or abrasive for grinding the surface of facade bricks.
- A hand mixer is a steel rod with coils at the end. Convenient for mixing the solution.
Stove with stove and stove bench, its dimensions
The main distinguishing feature of such a device is the large dimensions of the furnace. In order for an adult to fit on the floors, the length of the entire structure must exceed two meters and the width one and a half meters. The bed itself is located above an elongated furnace, which ensures a constant flow of heat.
Previously, in traditional models, the floors were located under the ceiling, at a height of about 1.8 m, and were climbed onto them using an attached ladder.
This ensured longer preservation of heat - when the hut cooled down in the morning, on the floors, due to the distance from the floor, the temperature was still quite high.
Nowadays, the bed is placed at a comfortable level of about one meter, because modern materials have better thermal insulation of the house.
Reference. In previous years, a high furnace was traditionally built - in addition to heating functions, it was used as a home mini-bath, so it had to accommodate a person, which also influenced the height of the floors.
The scheme, which includes both a hob and a bed, remains the most common. To build such a structure, lightweight schemes have been developed that even a not very experienced builder can handle. The disadvantage of such a stove will be the reduced efficiency of heating the room compared to other models.
Ordinary masonry of the stove
After preparing the base and familiarizing yourself with the drawings, you can move on
It is important to strictly follow the order indicating the correct position of the bricks and installation of stove fittings
With stove and bed
If you plan to bake a stove with your own hands, then the simple procedure looks like this:
- Make a continuous and even row.
- Lay out the internal compartments, design the cleaning channels and ash pan chamber.
- Place the door of the blower and cleaning chamber. Secure them with steel wire, placing the ends in the seams.
- Close the vault, block the entrances to the channels, form holes and decorate the ceiling of the bottom channel from the inside.
- Fix the grate in a large firebox. Carry out the internal masonry without mortar; it is better to use fireclay, cutting it in half in thickness. Place the door on the small firebox.
- Install the hot water tank.
- Place the grate on the small firebox and the door on the large firebox. Stretch the right wall with a strip of steel. There is no need for mortar behind a large firebox.
- Install and secure the small firebox door. Continue to output internal channels.
- This row is combined with the previous one.
- Lay out the bottom of the furnace, combine the combustion vaults. Bring the channel holes into the chamber and close the water heating tank.
- At the edge of the masonry, secure a 5x5 cm metal corner between the fireboxes. Cover the space of the large firebox behind the stove with a grate. There is no need to secure it.
- Form the chimney and the walls of the furnace. Install a damper on the left.
- Continue the algorithm.
- Form an entrance to the chimney. It will be opened by a valve (vertical). Remove the walls of the furnace and make a hole for the damper.
- Begin to narrow the masonry, blocking the roof of the chamber. Proceed with the removal of the chimney.
- Reinforce the walls with strips of metal.
- Secure the back wall with a strip of metal. Narrow the chamber vault further and prepare to lay the vault. Above the niche with the slab, lay a corner and a strip of metal - the basis for the masonry that creates the ceiling.
- Lay out the outer walls and roof of the furnace in the shape of a dome. You can install a template or weld an arch from strips of metal.
- Strengthen the wall above the entrance to the chamber with a strip of metal and surround the roof of the furnace with walls.
- Pour sand and compact it.
- Proceed to the base of the bed. Lay a sand embankment and narrow the slit in front.
- Narrow the overpipe and install a panel with a circular hole to change the direction of the smoke.
- Install the cleaning window door.
- Install the draft control valve.
- Continue to cover the space.
- Work according to the algorithm.
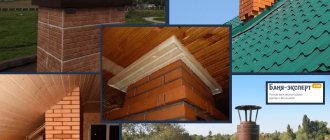
- Combine the overpipe and chimney on rows 27-29. Lay out the chimney before starting to form the groove. In the place where the chimney passes the attic floor, use cement mortar.
When the pipe is brought to the roof, make an otter - an extension above the roof in the form of an overlap. Close the gaps between the roof and the chimney with waterproofing.
The Russian stove with a fireplace and a stove bench is multifunctional. It gives warmth, they cook food on it, and they rest on top. Any things will dry on it instantly.
With a stove for a cauldron
Both the components and the masonry resemble a Russian stove with a fireplace and a stove bench. Refusal of the latter is beneficial due to the reduction in dimensions and a stove on which a large cauldron will fit. The order is:
- Make a level and continuous base.
- Install an ash chamber.
- Secure the cleanout doors.
- Place the grate.
- Form a flood chamber.
- Start lining the firebox.
- Start building the walls.
- Align the corners.
- Align under.
- Form a hailo.
- Place the stove.
- Build a combustion chamber.
- Close the smoke duct.
- Form the roof of a large firebox.
- Build walls.
- Continue the previous row.
- Connect the walls with the arches.
- Continue the row.
- Insulate the furnace.
- Take care of the general overlap.
- Continue the algorithm.
- Set the valves.
- Install cleanout doors.
- Continue the previous row.
- Follow the algorithm.
- Close the channel.
- Form a chimney.
- Install the valves.
All that remains is to build the pipe to the ceiling. Cover it with 2x1.5 bricks. To insulate the ceiling, non-combustible material is used - metal, asbestos.
You can build a stove with a firebox and a stove bench. In this case, the length of the combustion chamber is increased or an extension is built, inside of which there will be smoke channels.
Are you planning to build a Russian stove for yourself?
Not really
Construction techniques
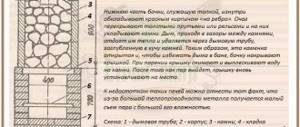
Opeche
The wooden guard supports a stove weighing up to 1600 pounds (approximately 750 kg), i.e. small or medium without baking. It is made in the form of a log house with two belts, backfilled with rubble and a flooring made of beams. The flooring is covered with felt, properly soaked in a liquid solution of fatty clay, and roofing iron is applied over it.
Arches and vaults
Arches and vaults are laid out from an ODD number of bricks on formwork on wooden templates - circles. First, a life-size cross-sectional drawing of the arch is made, then the castle bricks are hemmed onto the wedge. A do-it-yourselfer need not try to lay out a vault with a direct lock or without a lock; not every experienced mason can do this.
Next, the circles are prepared taking into account the thickness of the formwork boards and the vault is laid on them without a lock. Then you need to thickly lubricate the grooves of the locks with the solution and insert the locks into the groove. The next stage is to gradually hammer the locks into place one by one and in several passes. You can't get by with a mallet; you have to use a log. But you can’t beat like crazy; you need to use the inertia of a heavy log, and not the force of a sharp blow.
The quality of the vault closure is controlled by squeezing out the mortar sausages from the seams: it should be more or less uniform over the entire surface. The thick solution flows slowly, so you need to take breaks between passes. The result is a prestressed structure; Only such a vault will last for many decades.
Material consumption
The classic Russian stove described above, depending on the size, requires approximately the following amount of materials:
- Small - 1500 bricks and 0.8 cubic meters. m of solution.
- Average - 2100 bricks and 1.1 cubic meters. m of solution.
- Large - 2500 bricks and 1.35 cubic meters. m of solution.
Possible difficulties
When building it yourself and lacking experience, it’s easy to make some mistakes:
- Use of low-quality materials - cheap bricks often have defects or crack when heated to high temperatures.
- If you do not soak the brick before construction, it will draw moisture from the mortar, which will lead to uneven drying and deterioration of the strength and tightness of the masonry.
- The seams between the bricks are filled unevenly and not tightly enough - this later leads to a violation of the seal.
To avoid these and other mistakes, before starting work, it is better to seek advice from an experienced specialist.
Correct operation
To use the device correctly and safely, the following rules must be observed:
- Carefully monitor the condition of the chimney and clean it from ash in a timely manner.
- Before each kindling, check the quality of the draft - this will help prevent smoke from entering the room.
- If the stove has not been used for a long time, a thorough inspection is carried out for damage and cracks.
- You should not light a stove while intoxicated or very tired; it is not recommended to leave small children alone near a burning stove.
Precise construction and compliance with all operating rules will ensure high-quality operation of the stove, efficient heating of the house, and the preparation of delicious traditional dishes.