You can decorate the floors and walls in a bathhouse with different materials, and one of the most popular is tile. Its big advantage is that it is not afraid of constant exposure to moisture, so if installed correctly you will not have to replace it often. It is important to know that not every tile is suitable for a bathhouse, and in order to make the right choice, you should know in advance about all the properties and characteristics of a particular coating.
Bath tiles
What should the tiles for a bath be like?
In a bathhouse, as a rule, there are several rooms, and different types of tiles can be used in each of them - you just need to take into account the characteristics of the coatings. For example, in the locker room and rest room the humidity is the lowest, and there are no strong temperature changes. Here you can use “standard” tiles for both the floor and walls.
It is important to consider that in winter the bathhouse is usually used less often, so the tiles must be frost-resistant. Otherwise, due to too low temperatures, the material will most likely crack and will have to be replaced.
They also pay attention to such a criterion as wear resistance. You need to choose the material based on the approximate number of people who will regularly visit the bathhouse and the frequency of the procedures.
When choosing tiles for a bath, you need to pay attention to different criteria: frost resistance, resistance to high temperatures, wear, etc.
The shape and color of the tiles are chosen by each owner independently - everything here depends only on personal preferences.
As for the washing room, tiles are usually used for finishing both walls and floors. The humidity here during procedures is very high, so the coating should have low water absorption. In addition, it is worth paying attention to whether the tile has an anti-slip surface - if not, it is better not to purchase it, since the risk of injury is high. Matte options with a rough surface are more suitable.
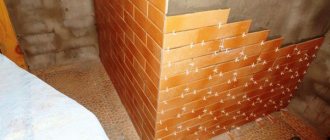
For a steam room, tiles are chosen less often - usually wood is used for its finishing. The thing is that the tiles usually get very hot at high temperatures, and it is very easy to get burned. But you can purchase it for cladding the stove, as well as for finishing the lower part of the walls (50-100 cm).
Features of concrete floor
In a steam room or washing room in a bathhouse, a concrete floor looks preferable to a wooden one.
When additives that increase water resistance are introduced into the solution, this structure does not rot and resists moisture well. It is important to correctly decide the question of how to fill the floor in a bathhouse under the tiles.
To ensure a smooth surface, the top layer should be poured using beacons
First of all, before constructing a concrete floor, a drainage system must be carefully thought out to allow waste liquid under the floor to be drained beyond the boundaries of the structure. The construction itself is carried out in the following order:
- thorough compaction of the soil and backfilling with a cushion of sand and crushed stone 12-18 cm thick with compaction (broken brick can be used);
- pouring the first layer of concrete 5-7 cm thick;
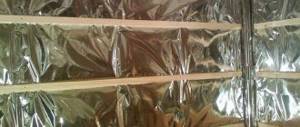
- laying a thermal insulation layer (expanded clay, felt, mineral wool, etc.) and waterproofing from roofing felt or thick polyethylene film;
- installation of a reinforcing element made of metal mesh or steel wire;
- pouring a second layer of concrete 10-15 cm thick, forming a slope in the direction of the drain;
- covering the surface with a primer with an adhesive base for better adhesion to ceramic tiles.
The floor in a bathhouse under tiles can be either wooden or concrete
. Important! When making a concrete floor, we must not forget about the drain hole; the place for it is planned in advance, taking into account the location of the drainage system.
The hole is formed using formwork or a vertically installed pipe with a diameter of at least 5 cm. To ensure a flat surface, the top layer should be poured using beacons.
Ceramic tiles have proven to be a very reliable and effective floor covering in bath rooms such as steam rooms and washrooms, where the highest humidity occurs. The floor in a tiled bathhouse can be either wooden or concrete, and all the work can be done independently. It is important to approach this important event correctly and take into account the features of the floor structure.
Types of tiles
Ceramic
Most often, ceramic tiles are chosen - they are inexpensive, and the range is quite wide. There are several varieties of it, which differ in shape, thickness, clay used for production, firing method, molding method, etc.
It can be produced in two ways: either extrusion or pressing. The almost finished product can be fired single, double or even triple, and the more of them, the more porous the tile will be. You can determine this by the markings on the package - look for the flame icon and the number next to it (1, 2 or 3). We recommend using single-fired tiles for steam rooms and washrooms - they have sufficient strength, but double-fired products, although more beautiful, are “weak”, so they are only suitable for a relaxation room.
Ceramic tiles for baths - the most popular option
As for sizes, you can choose from square, trapezoidal, octagonal, and rectangular tiles. Product sizes are indicated on the packages.
Prices for ceramic tiles
ceramic tiles
Ceramic mosaic
Mosaics can often be found in swimming pools, baths and saunas. Usually it is used to decorate the sides of the font or completely finish the washing area. It is also great for decorating the interiors of bathhouses - panels are assembled from mosaics.
As with large ceramic tiles, mosaic tiles are easy to care for, they are not afraid of moisture and temperature changes, and if installed correctly they will last a very long time. True, it is quite difficult to install it, so you will have to be patient.
You can also use ceramic mosaic - it looks very beautiful
Clinker
Clinker tiles are made from several types of clay. The products are fired at high temperatures, so that they have sufficiently high strength, resistance to various influences and heat resistance. It is also not afraid of water - it can be placed on the floor in the washroom. The thickness of such products varies from 8 to 12 mm.
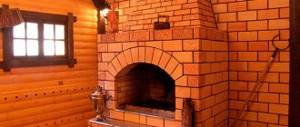
Note! Clinker tiles are used for cladding the stove itself, the walls, and the floor.
Clinker tiles look good in a bathhouse
Terracotta
Terracotta tiles are notable for the fact that they are not glazed, so they look natural, like stone or brick. It is usually brown in color, quite porous, so it is not afraid of high temperatures and temperature changes, does not crack or deform in any way.
Ideal for cladding stoves and walls. It is rarely used as a floor covering.
Terracotta tiles are perfect for a bath
From the coil
Coil is a popular decorative material with a rich green color. Tiles made from it have a fairly high price, but this is justified by its unique beauty: each product has a unique pattern. In addition, it is believed that this stone has healing properties that manifest themselves when heated - that is why it is used to decorate the stove and walls in the steam room.
Note! Unfortunately, coil tiles have a disadvantage - they cannot always withstand temperature changes. It is also better if a small amount of water gets on it - because of it, the products may collapse.
You can also choose tiles from a coil
From porcelain stoneware
Porcelain stoneware has a large number of advantages: it is very durable, completely resistant to moisture, durable, and has an aesthetic appearance. It is also not afraid of severe frosts, so this is an excellent option for a bathhouse.
The texture of porcelain tiles can be different: wood, marble, terracotta and other materials, often more expensive.
Porcelain tiles are used for different purposes: for lining a stove, mounting on walls or as flooring.
Porcelain tiles are particularly durable
Soapstone
Soapstone tiles are also very often used in baths, since they heat up very quickly, retain heat for a long time and successfully withstand even high temperatures, as well as their changes. Such products are very durable, but they are easy to work with and, if necessary, give the desired shape.
There is a big disadvantage - soapstone tiles are expensive, so they can only be used, for example, for finishing a stove. Thanks to this, the room will be heated many times faster.
Soapstone tiles retain heat for a long time, which is why they are ideal for baths
Prices for soapstone tiles
soapstone tiles
Features of floor preparation for tiles
The design of the bath floor has its own specifics in preparation for laying ceramic tiles. However, there are also general principles that must be followed when arranging the rough foundation:
1. Making a drain hole. The sauna tiled floor is a non-leakage structure, which means that water drains along the surface of the floor. To ensure drainage in the floor, it is necessary to equip drain holes, which should preferably be equipped with special drains. The location of the drain can be different: in the center of the room or against the wall. One of the common options is a longitudinal ladder along the entire wall (on one or both sides).
2. Formation of the floor slope. An important condition for removing water from a room is to ensure its gravity flow in the direction of the drain hole. For this purpose, the floor has a slope of at least 10 degrees, for which it is necessary to ensure a level difference of at least 2 cm for every 1 m of floor.
To remove water from the bath room, make a floor slope of at least 10 degrees
3. Drainage system. The simplest option is to drain the water into a drainage hole located directly under the bathhouse. Such waste liquid discharge can be carried out in sufficiently loose soil, deep groundwater and in the absence of special environmental requirements. An important condition: the presence of a filter layer of sand and crushed stone. The discharged water should not accumulate under the bathhouse and create problems for the foundation. A more complex system involves the installation of trays and drainage pipes to collect wastewater and drain it outside the structure into special collectors (wells).
4. Waterproofing the floor in the bathhouse under the tiles. A layer of waterproofing material is an essential element of a bath floor covering. Moreover, it should be taken into account that moisture comes not only from above, but also from the soil, especially when the groundwater level is close and during floods. Most often, roofing material is used for these purposes. In addition, a vapor barrier must be included in the floor structure in the steam room.
Choosing glue and grout for laying tiles in a bathhouse
Usually, along with the tiles, glue is also purchased immediately. You cannot take the first one you come across - the composition must be waterproof, not afraid of temperature changes, and capable of firmly fixing the tiles. At the same time, the glue should not harden very quickly, otherwise the tile will not have time to stick, and there is a high risk that it will simply fall off under mechanical loads and high temperatures.
Remember that if you are laying a new layer of tiles on top of an old one, you need to purchase an adhesive that has high bonding properties.
Glue for laying tiles in a bathhouse must have certain properties
Let's look at the most popular glue options suitable for use in a bathhouse.
| Products | Description |
Fixator | Fixator is an adhesive that is suitable for installing any tiles in any conditions. Therefore, it can be successfully used for laying such material in a bathhouse. Fixator adhesive is resistant to excessively high and low temperatures, is not afraid of moisture, and is suitable for any surface. The main thing is to prepare the foundation in advance. |
Ceresit CM 17 | Ceresit CM 17 is also suitable for all types of tiles - it belongs to the “super elastic” category of adhesives. Moreover, it is reinforced with microfibers, so its adhesion is quite high. Excellent for laying on floors, walls in bathhouses, as well as lining stoves. |
| BOTAMENT M 22 HP | Premium glue. Despite the high cost, the consumption of this composition is very economical. Can be used for both interior and exterior work, is not afraid of high temperatures and moisture, and is suitable for almost all types of tiles. |
If we talk about choosing a grout, then you need to focus on the purchased glue. It’s great if both compositions are from the same manufacturer. As in the previous case, you need to look at the moisture resistance of the grout and its resistance to temperature changes. It is also important to pay attention to the width of the seams - this criterion is indicated on the packaging. Sometimes these gaps are 0.4 mm wide, and in some cases - 2 cm.
Note! It is better if the color of the grout is darker than the tile itself - after several months of use, the material usually becomes lighter.
It is better to choose a grout that is darker than the tile itself
Prices for tile grout
tile grout
If you are looking for tiles, there is a large selection of similar products here
Markings to pay attention to
When choosing tiles for a bath, you need to pay special attention to the markings on product packaging. What exactly do you need to know?
- The “T” marking indicates that the tiles are resistant to high temperatures.
- The designation “R” indicates whether the tile in front of you is glossy or matte. Next to the letter there will be a certain number, and the higher it is, the less slippery the tile is. For example, glazed tiles will be designated R9, R10, but matte tiles will be designated R11, R12, etc. Also, if the product is slip-resistant, you can see on the packaging an image of a foot stepping on the tile.
- Frost resistance and resistance to temperature changes are also important. The first criterion is indicated by a snowflake (sometimes two), and the second by a sun icon. It is also possible to indicate additional information, which is indicated by the letters “A” and “B”: the mark A I and B I indicates the possibility of using the tile even for the exterior cladding of a building, that is, it has high frost resistance. The A II and B II marks indicate average frost resistance, but tiles with the A III and B III marks can only be laid indoors.
- It is also worth paying attention to the abrasion resistance of the tiles - this criterion is indicated by the letters PEI and the image of a saw blade. If there is a number next to such a mark, it will be easier to determine whether the tile is suitable for you: 1 indicates the possibility of use in a bathroom, toilet (not suitable for a bathhouse), 2 – for use in corridors, a dressing room, 3 is suitable for any room in a bathhouse, and 4 and 5 can be found less frequently, since these are industrial options.
Markings that can be seen on tile packages
Installation of tiles in the bath
First of all, you need to prepare the coating. Note that laying tiles in a bathhouse is not too different from installing it in an apartment. You just have to remember that there is a need for a slope for drainage on the floor, but it is usually installed at the stage of laying the subfloor.
Remember that the surface should be as clean and level as possible. Clean, remove all debris and dust.
The surface must be properly prepared before laying tiles.
To install tiles you will need the following tools:
- building level;
- plastic crosses;
- tile cutter (you can also use a regular glass cutter, but it will be more difficult to work with);
- spatula for applying glue (a serrated one is more suitable);
- container for adhesive solution;
- construction mixer.
| Sequencing | Description |
Step 1 | If the tiles are laid on the floor, it must be waterproofed and treated with a primer. This is usually done in advance. It’s quite easy to prime the walls, but sometimes they are waterproofed, about half a meter from the floor. |
Step 2 | Installing tiles on the floor should start from the corner - this way all the products will most likely be laid evenly. If you are laying it in a washing room or steam room, you can start from the drain. You can check how correctly the tiles are placed using a building level. If the tiles are laid on the wall, a support is pre-installed - it can be a wooden board, a metal profile, a piece of lining, etc. The main thing is to attach this stop correctly, at a right angle relative to the perpendicular wall. It is necessary so that the tiles do not slip and are laid evenly. |
Step 3 | Experienced builders recommend using a little glue - the thicker the layer, the longer it will take to dry and the greater the chance that the tile will “move off”. Usually the glue packaging indicates how much is needed for each product. Apply the adhesive with a notched trowel either to the tile itself or to both the tile and the wall. The product is applied to the surface, trying to do it as evenly as possible, and then tapped with a rubber mallet to increase the adhesion of the tile to the base and get rid of excess glue. Usually, all solid tiles are laid first, and then, if necessary, they are cut and the cut pieces are additionally installed. In this case, plastic crosses are inserted between the tiles - this is necessary so that the seams between all products are the same width. Work continues until the entire prepared surface is covered with tiles. |
Step 4 | After laying the tiles, you need to leave them to dry. This ideally takes several days, but after a day you can start grouting the joints. |
Step 5 | The grout is applied over the seams, and then filled with a special trowel, moving it diagonally. There is no need to press hard - the composition will already fill the space. There will definitely be excess grout on the tiles, which you need to try to remove as quickly as possible - after a few hours this will be much more difficult to do. To do this, just wipe the tiles with a damp sponge without touching the seams. One such cleaning may not be enough, so you will have to do this procedure several times until the stains and marks disappear completely. |
Note! It is better to leave the tiles for another day, and then you can use the room for its intended purpose.
Features of a wooden floor
Despite certain difficulties, ceramic tiles can be laid on a wooden floor in a bathhouse.
Attention! The main problem is the relative mobility of wooden elements when walking on the floor, which negatively affects the reliability of fastening the tiles.
Taking this into account, when deciding how to make a tiled floor in a bathhouse when it is made of wood, it is necessary to ensure the following conditions: eliminating mobility, i.e. strengthening the subfloor and leveling the surface.
The most common method of laying tiles is considered to be “dry”
When preparing a wooden base for laying tile coverings, the following basic technologies are used:
1. “Dry” method. It is considered the most common and is based on installing sheet material on top of a wooden floor. It can be used as waterproof plywood, OSB, gypsum board. It is not recommended to use chipboard in a steam room, because its impregnating composition contains harmful substances that are released when heated. Before laying the sheets, it is necessary to strengthen the base as much as possible, i.e. if necessary, replace the logs and install additional support posts. Reliable waterproofing must be provided on top of the rough structure. The most common way to make it is to apply a layer of bitumen and lay down roofing felt. The seams between the sheets of coating are sealed with sealant and then carefully sanded. They are fastened to the base using self-tapping screws, and their caps must be recessed. The surface of the sheet covering is coated with a primer that will ensure reliable adhesion to the adhesive and tiles. When installing the floor, you should not forget about the thermal insulation that is placed between the joists. It is made of expanded clay, mineral wool or other heat-insulating modern materials.
When installing the floor, do not forget about thermal insulation
2. “Wet” method. In this case, a concrete floor screed is carried out in the bathhouse under the tiles on top of a wooden base. It is carried out with a special solution, and the thickness of the poured layer is 3-5 cm. The wooden base may not withstand a thicker layer. A damper gap of 1-2 cm wide must be left along the perimeter of the floor along the walls. The floor is made in this order. Waterproofing is laid on a rough wooden base in the form of a layer of bitumen, roofing felt, paraffin paper or thickened polyethylene film. The edges of the insulation are placed on the walls to a height of 10-12 cm and secured using a furniture stapler. A damper tape about 10 cm wide is fixed along the walls. A reinforcing metal mesh is laid on top. Filling is best done with a ready-made leveling mixture, but you can prepare a leveling solution yourself. To do this, mix liquid glass and sand with water in a ratio of 2:2:1.
3. Express technology. Sometimes a simpler technique is used, which consists of gluing sheets of plasterboard with increased water resistance to the surface of a wooden plank floor. As a rule, polyurethane glue is used, and the sheets are applied in 2 layers.
Before constructing a concrete floor, the drainage system must be carefully thought out