Bathhouse made of foam blocks at the dacha: advantages and disadvantages
Advantages of foam concrete blocks:
- High speed of construction;
- During operation, the building does not shrink;
- Suitable for construction on very small plots;
- Possibility of self-construction of a bathhouse without the involvement of professional builders;
- The premises can be used immediately after completion of the work;
- High fire resistance compared to wooden buildings;
- The relatively low mass of the bathhouse, which makes it possible to avoid the use of powerful foundations and makes it possible to build on difficult soils;
- Ease of transportation. If desired, foam blocks can be transported even in a passenger car;
- Relatively low cost of work.
The construction of such a bathhouse will not take much time.
However, a bathhouse made of foam blocks also has a number of disadvantages:
- During operation, condensation will accumulate, which without a well-equipped ventilation system will lead to the appearance of mold and mildew.
- When condensate freezes, structural destruction may occur.
- The need for additional insulation and waterproofing work.
- Relatively low environmental friendliness compared to buildings made of wood.
- Formation of “cold bridges” due to poor quality finishing.
- Shorter service life compared to brick and wooden baths.
Building a foundation with your own hands
A bathhouse in a country house is a capital structure, so it is impossible to do without a reliable foundation. Let's look at how to do this with step-by-step instructions.
Which is better
The best option is a shallow strip foundation. You can, of course, use a monolithic slab or a pile foundation, but in this case it will simply be a waste of money.
How to choose the right type of foundation:
How to build
Required tool:
- concrete mixer or container for mixing mortar;
- welding inverter;
- hammer;
- bayonet shovel;
- building level;
- roulette;
- angle grinder (“grinder”);
- Master OK;
- hacksaw;
- rule;
- scrap;
- axe.
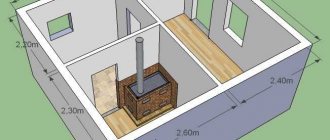
Example of a project with an attic and dimensions
You will also need consumables: cutting wheels, electrodes (1.8 mm), nails (60–80 mm).
Click to enlarge
How to build a foundation: step by step
The foundation installation process step by step:
- Clear the area of everything unnecessary, level it, mark the perimeter of the bathhouse using wooden stakes.
- Dig a pit around the entire perimeter of the future bathhouse, 50–60 cm deep and 30–35 cm wide.
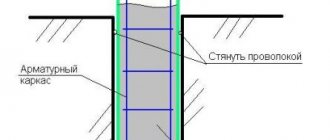
- Stick steel pins (rebar) into the corners of the foundation and tie a thick thread to them.
- Using a level, accurately mark the upper horizontal line of the foundation (the thread will serve as a visual boundary).
- Manufacture and weld a steel frame from reinforcement with a diameter of 10–12 mm. It will be enough to place three rows of reinforcement at the top and bottom so that the total height of the foundation is 70 cm. For vertical elements, thinner reinforcement can be used, the step between them should be 1.5 m.
- Put together formwork from boards 25 cm wide around the entire perimeter. In the washing room, provide a hole for the sewer drain in advance by placing a receiving pipe with a diameter of 100 mm.
- Prepare concrete mortar by mixing cement with OPGS in a ratio of 1 to 4.
- Pour the solution into the formwork, align the top edge using the rule according to the level of the tensioned thread.
- Cover the foundation with a tarpaulin or thick burlap, take a break from working until the concrete has completely dried (14–21 days, depending on weather conditions).
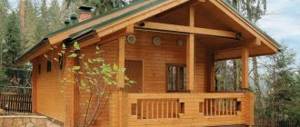
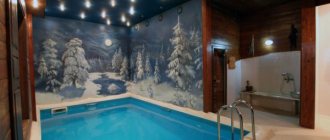
A beautiful and elegant building that will decorate your site
At the stage of pouring the base of the bathhouse, a foundation for the bathhouse stove can be constructed in a similar way if it is planned to be built of brick. We also recommend that you familiarize yourself with the projects of brick baths.
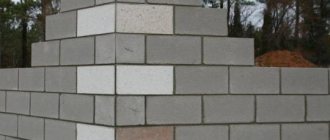
Construction of foam block walls
The process of constructing walls from blocks is no different from similar actions when using ordinary bricks. However, due to the fact that the dimensions of the foam blocks are larger, the work goes faster. The best option for building walls is M25 blocks.
What designs of frame houses for baths there are are indicated in this article.
What the design of a bathhouse and a utility block garage looks like is detailed in this article.The article indicates projects of bathhouses made of timber with an attic, as well as the technology for their construction: https://2gazon.ru/postroiki/bani/proekty-iz-brusa-s-mansardoj.html
Important to remember!
- When calculating the number of foam blocks, you need to take into account that the block dimensions included in the program are 600x300x200 mm. Our company also produces blocks of other sizes, but preliminary estimates are based on these settings.
- By default, the masonry is made in 1 row, the thickness of the walls is 300 mm. In this case, window and door openings are not taken into account, i.e. a small supply of materials will remain. The calculator also does not take into account the consumption of sand, cement and spare foam blocks in case of damage during construction.
To find out more precisely the volume of materials, call a company specialist and tell him the number of windows, doors and gables.
Features of masonry
No matter how well the foundation is leveled, its upper edge will still have some roughness.
To correct this drawback, the first row of walls is laid out using cement-sand mortar, and all subsequent rows are formed using special glue for foam blocks.
Before work, 2–3 layers of rolled waterproofing must be laid on the foundation. You will need the following tool:
- Master OK;
- rubber hammer;
- building level for walls;
- putty knife;
- electric drill with a whisk attachment.
Laying begins from the highest corner of the base, the blocks are laid on the edge, the seams are made as thin as possible.
After the row is formed, the horizontalness is carefully checked using a building level; if necessary, the blocks are leveled by knocking them with a rubber hammer. A metal reinforcing mesh is laid every 2–3 rows. Read about an extension to a wooden tree made of foam blocks here.
How to build walls correctly
Before use, the adhesive mixture for foam blocks is stirred with a whisk for 10 minutes. The glue is applied to the surface of the block in a layer of no more than 5 mm. There is no need to wait for the adhesive mixture to dry completely. During the work, check the horizontality and verticality of each row of blocks. In openings for doors and windows, the blocks are laid on steel beams of appropriate sizes. But what projects there are for two-story bathhouses made of timber can be seen in this article.
Bathhouse with attic:
How to use the calculator?
The procedure is as follows: you need to enter the height, width and length of the future house in the empty cells (in meters). Then click on the “Calculate” button. Almost immediately you will see 3 numbers: the number of blocks in m³, in pieces, as well as their approximate cost.
Example. According to the project, the width of the building on the outside is 20 m, length – 30 m and height – 2.8 m. You will get the following result: 60 m³ (1,662 foam blocks) are needed for construction. The estimated cost will be 156,000 rubles.
Seam processing
Seams are the weakest point in the construction of a foam block bathhouse. To prevent heat leaks during operation, only an adhesive composition is used for laying walls, and not ordinary cement mortar. Read about the pros and cons of a house made of foam blocks here.
After completing the construction of the walls, all seams are additionally treated with glue. To apply it, use a narrow spatula.
How to make a utility block with a bathhouse and toilet is detailed in the article.
what it looks like and how to build a house with an attached bathhouse and a gazebo is detailed at this link.
You can see what a bathhouse with a summer kitchen looks like in the photo in this article here:
Phased construction
Even a completely inexperienced person in this topic can build a bathhouse from foam blocks on their own. However, it is still necessary to find out the correct sequence of work - this will allow you to avoid frequent mistakes that people make out of ignorance. Therefore, pay attention to the step-by-step demonstration of the construction of such a bathhouse from foam blocks in our detailed instructions.
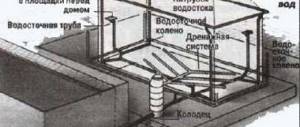
Construction of the foundation
- pour a bed of fine gravel and sand onto the prepared area and compact it with water, the optimal foundation depth is 30-40 centimeters;
- equip removable or monolithic formwork;
- reinforce the area with metal rods and pour the prepared concrete mixture, be sure to pierce the poured mass in several places to release the air that inevitably gets inside;
- cover the foundation with any waterproofing material and give it time to dry and harden (2-3 weeks), then cover it with roofing felt and proceed to the next stage of construction.
Walling
- make sure the foundation is even and start laying foam blocks: the first row is bonded with a traditional mortar based on sand and cement, it is very important to lay it out without deviations, so use a rubber hammer and a level to correct masonry errors;
- the bricks are not laid flat, as you might think at first, but on an edge;
- the second row is already fixed with a special glue, which is sold in any store, but you should not overdo it with the amount - a thin layer is enough;
- Be sure to lay a reinforcing mesh through every third row of the structure - this will make the walls much more durable and monolithic.
Erection of the roof
The photo below shows all the work on constructing the roof as part of the project for self-construction of a bathhouse from foam blocks.
Exterior finishing
To ensure that your foam block bathhouse does not lose its attractive appearance, be sure to take care of the finishing. Most often, siding , giving the building a beautiful and modern look.
However, there are many other options that may suit you much better. Take a look at what other materials are used for exterior finishing.
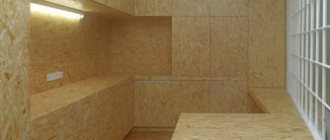
Insulation from the inside
Insulating the inside of foam block baths is a severe necessity, which is due to the very high water absorption of the material. High-quality work in this direction will help protect the walls from moisture penetration and fill the room with comfort. Which is very important if you are going to use the sauna not only in the summer. What can you take as insulation?
- mineral wool;
- glass wool;
- vapor barrier film;
- foil, etc.
Interior decoration
Here, as they say, everything is purely to your taste. Just don’t forget that you are building a bathhouse, which means that the material must withstand permanent exposure to high temperatures.
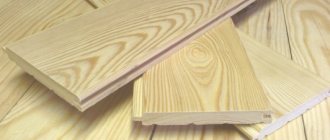
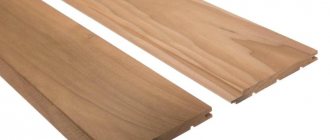
- lining;
- block house;
- tile;
- stone, etc.
The following video will tell you how to build a bathhouse using foam blocks. This is a fairly cursory, but very succinct and convincing story from a specialist competent in his field, who has built dozens of such objects with his own hands.
How to make a vapor barrier on walls
Foam blocks absorb moisture very well, so installing a vapor barrier on the walls is mandatory. First, the foam blocks are treated with water-repellent compounds on the inside and outside. Then the insulation is attached inside. The best option is basalt or stone wool, as it does not absorb moisture well.
For mineral wool, a special frame is made from wooden beams impregnated with an antiseptic. The fastening step of the beams and their diameter depend on the size of the heat-insulating material; dowels are used as fasteners. Then the finishing finishing material, for example, lining or decorative facing slabs, is attached to the wooden frame.
The insulation is laid in 2 layers to avoid through joints. For vapor barrier, special film membranes are used, and the joints are covered with reflective tape. As additional vapor and thermal insulation, you can use foil penofol, securing it on top of the vapor barrier film.
Roof
The roof of the bathhouse must not only be reliable, but also withstand steam shock from the inside
A gable rafter roof is the best choice for a bathhouse made of foam blocks. The roof is installed after the laying of the stove and chimney is completed.
We recommend detailed material about the rafter system of the attic roof.
Roof installation sequence:
- Place a mauerlat - a beam with a cross-section of at least 180 mm - on the longitudinal walls. Secure it with anchor bolts.
- Make a rafter template: take 2 boards, connect them with the edges to form a kind of “scissors”, nail them.
- Place the free ends of the rafters on the mauerlat, select the desired angle of the slope and fix it by attaching the transverse board with self-tapping screws.
- Take beams 150x500 mm, attach them to the template, make the necessary markings and cut the rafters.
- Fasten the rafters with self-tapping screws (3 pieces for each connection).
- Raise the rafters to the edge of the bathhouse, mark the places where they join the Mauerlat.
- Hem the junctions of the rafters and the mauerlat so that they fit tightly together.
- Connect the rafters and the mauerlat using steel angles, staples, overlays and self-tapping screws.
- Make rafters for the opposite end of the roof using a similar pattern and secure them.
- Pull the cord between the two installed rafters, secure their trusses with oblique supports.
- Cut the remaining trusses and fasten them in increments of 500 mm strictly along the stretched cord.
- Take 100x400 mm boards and secure them with self-tapping screws or nails as roof sheathing at a pitch suitable for subsequent fastening of the insulation.
- Make a rough ceiling from 25 mm thick boards, securing them between the rafters.
- Lay 190 mm thick foam on top.
- Lay the finished attic floor from boards 20–25 mm thick.
- Lay the roofing material (corrugated sheeting or metal tiles).
- Secure the ridge and make a galvanized collar around the pipe.
Do not forget about the ventilation equipment for the interior of the bathhouse, for which leave 2 holes with a diameter of 100 mm at opposite ends of the floor. The gap between the rafter leg and the chimney must be at least 400 mm.
The last stage of wall construction and the reinforced sauna belt: