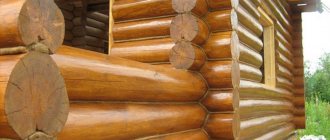
Wood is a building material that has deservedly been adorned with the winner's laurel wreath for many centuries. How will he captivate people? Esotericists claim that it has powerful energy that has a very positive effect on humans.
In addition, people, having tasted all the “delights” of life in brick-and-block multi-storey buildings, say with a blissful smile that a log house is a voluptuous bliss that pampers with the desired coolness in the heat and gentle warmth in the cold. In addition, wooden structures have a long service life and stunning appearance, however, with proper processing. Ordinary polishing of the log structure will preserve and enhance the presentability and aesthetics of a log structure. How, when and with what to sand wood raw materials? Let's find out now.
Recognized advantages and disadvantages of a log house
Once upon a time, people built houses exclusively from wood, decorated the walls with fragrant flowers, and the floors with herbs, because they believed that Mother Nature would appreciate their efforts, rewarding them with priceless gifts - good health, inexhaustible wealth, fiery love. Today, of course, no one believes in this, but, nevertheless, log houses are in great demand, as they are known for a number of advantages:
Wooden design
- environmental friendliness;
- security;
- durability;
- wear resistance;
- resistance to deformation;
- low thermal conductivity;
- frost resistance;
- excellent sound insulation;
- natural ventilation;
- ease of care;
- healing aroma;
- amazing appearance;
- favorable energy.
A wooden structure also has disadvantages - these are:
- change in natural shade;
- biological activity;
- flammability.
The disadvantages are quite serious, however, proper processing of raw materials will not allow them to overshadow your life in such a beautiful structure.
Benefits of grinding
What benefits will a house made of timber that has been sanded receive:
- Revealing the natural beauty of wood. After removing the top layer by sanding a simple or profiled timber, the wood is transformed for the better.
- Long-term protection of the material and removal of fungus, including mold.
- Sanding is performed before finishing work, which means that there will be improved absorption of various antiseptics.
- Do not despair if the timber receives the slightest damage, because grinding eliminates the defects received by the timber.
- The wall becomes smooth, and this is the ideal moment for applying varnish or paint.
Sanding timber before or after shrinkage
The main question that beginners ask is “When to grind the wall of timber, before or after shrinkage.” Usually, when building a house from laminated veneer lumber, sanding is started after assembly, but if the wood has natural moisture, then you should wait for the completion of shrinkage and drying. If you neglect this, then you can only dream of a smooth surface.
Advantages of log sanding
Sanding timber is a rather labor-intensive and time-consuming process, but, as they say, “If you’re afraid of the wolf, don’t go into the forest.” Before you start work, you need to realize the importance of the matter so that the mosquito does not undermine your nose.
Sanding logs:
- perfectly levels the surface;
- ideally cleans raw materials;
- helps maintain the original shade;
- provides high adhesion to paints and varnishes;
- reduces the cost of finishing materials;
- allows antiseptic impregnation to be evenly distributed over the surface without the formation of pigment spots;
- prevents wood aging;
- protects the material from rotting, mold and insects;
- increases resistance to the negative effects of climatic, thermal, mechanical, and chemical factors.
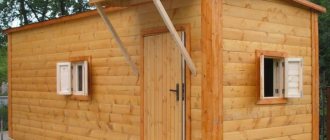
The result of the work is walls, as in advertising photographs of presentable construction companies.
What are the goals of sanding laminated timber?
Residential buildings made of wood are distinguished by a high level of comfort, environmental friendliness and durability. However, despite the fact that wood has many advantages, over time wooden structures lose their attractiveness and manufacturability. The thing is that wood, of all building materials, is very susceptible to external influences. Even though laminated veneer lumber is fundamentally different in its technological characteristics from ordinary “living” wood, it requires constant care.
The material darkens over time, its surface layer loses its strength and integrity. In appearance, the house continues to remain strong and reliable, but from a technological point of view, the process of transformation of the main structural elements has already begun. To slow down the effect of negative processes, grinding of walls assembled from timber is used as a preventive measure.
In other words, holding such events will solve the following problems:
- the sanded timber becomes like new, having a fresh appearance with a clear texture;
- Mold and fungal formations are removed from the surface of walls and other structural elements;
- reveals the surface structure of the timber before treating it with antiseptic solutions;
- improves the quality of the surface of the material for its subsequent painting;
- surface defects that appeared on the walls during the operation of the facility are eliminated.
Some nuances at work
The technology for polishing a log frame is not as scary as it is made out to be. The main thing is to stock up on quality tools, materials and patience. In addition, you should pay attention to some nuances. That is, the work is performed after:
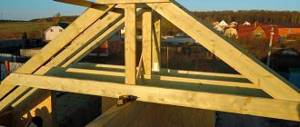
- installing the roof to prevent rain from soaking the walls;
- drying the wood, otherwise the abrasive grinding wheel (wheel) will clog and the wood will become “ruffled” (the nominal drying period is about 12 months from the date of construction of the structure);
- treating the material with a bleaching antiseptic, since the log house darkens during the drying process.
In addition, if the frame is not treated with paint or antiseptic within 7 days after sanding, the surface will darken and the entire work will have to be done again. Here is an article about how to paint a log bathhouse.
It is also not recommended to delay the finishing, otherwise you can forget about a uniform, attractive shade. And yet, the work is done before installing windows, ceiling and floor coverings. I think you understand why: there will be dust - “mother, don’t worry.” So, let's go.
Glued laminated timber grinding technology
The grinding process has been worked out to the smallest detail and, with a detailed study of the technology, will allow you to complete the work yourself, without involving specialists in the work.
It should be immediately noted that laminated veneer lumber does not require processing with coarse sandpaper during sanding. It is better to use fine-grained abrasives for secondary processing. It would be appropriate to say that it will not be possible to treat the entire house using electric tools. This is simply due to technical difficulties. In hard-to-reach places, manual work will be required.
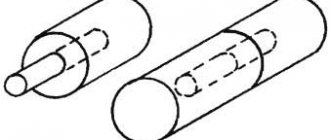
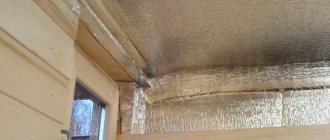
During grinding, special attention must be paid to the end part of the beam. This part is the weakest of this building material. The ends are constantly exposed to precipitation and sunlight. The end part will need to not only be sanded again with special care, but also treated with special compounds based on wood resins. Such thoroughness in work will ultimately ensure smooth shrinkage of the house and savings in paint and varnish materials during the subsequent finishing of house structures.
Regarding the turning of the main wooden massif, there are a number of recommendations that should be followed:
- First, grinding is carried out instrumentally using 120-grit sandpaper;
- the ends and grooves are processed using a grinder equipped with a special attachment;
- corners and hard-to-reach places are cleaned manually or using a drill equipped with an attachment;
- After completing mechanical work, dust must be removed from all treated surfaces.
When grinding, do not set the maximum speed on power tools. A high rotation speed leads to the fact that visible radial defects remain on the surface of the beam, which will be more difficult to get rid of.
Required set of tools
We arm ourselves with a tool for polishing the log house. During the work we will need:
Flap attachment for grinder Multifunctional tool
- grinder (angle grinder);
- belt sander or eccentric;
- grinding attachments (discs);
- bars with an emery base;
- chisel for processing hard-to-reach places;
- industrial vacuum cleaner;
- glasses;
- respirator;
- gloves;
- protective substances - fire retardants, antiseptics, acrylates, etc.;
- brushes or spray gun for applying products intended for wood processing;
- sealant for wood, warm seam (if there are cracks or such ideas);
- decorating paint or special oil impregnations (if desired).
Please note that for a structure made of timber, the ideal option is a belt sander (or eccentric), and for walls made of rounded logs, the ideal solution is a small grinder with special petal attachments.
Lesson #9. How to properly sand a wooden house? How to remove old paint from wood?
Bagretsov Alexey Vladimirovich project manager Moscow
Hello. In the ninth lesson we will look at such an important topic as sanding a wooden house before painting and removing old coating from wood.
You will learn about which tools are best to use for this purpose, which abrasive is suitable and in which cases it is necessary to remove the old paint layer.
What will you learn about in the article?
- How to properly sand a wooden house?
- What abrasive should I use? It depends on the task
- What is wood pile
- What if your home has already been painted? How to remove old paint layer? And is it necessary to sand off old paint at all?
- How to remove a layer of paint?
If you are interested in the paint not only laying down perfectly evenly, but also serving for a long enough period of use so that the funds spent on purchasing paintwork materials are not thrown away, then such a procedure as sanding a wooden house before painting should be included in your plans .
How to properly sand a wooden house?
Today we will not only tell you, but also show you.
So. If the material has not been previously painted, then you can take an eccentric machine, something like the one in the photo below.
Photo 1. Random orbital sander
What abrasive should I use? It depends on the task
If our task is to deeply open the pores of the wood in order to ensure deep penetration of the primer, and this is necessary for painting wood materials for external use, then we take these wheels with 80-grit abrasive. We grind, we get a surface that is rough and uneven to the touch.
Photo 2. Sanding a wooden facade
Such wood cannot yet be painted, otherwise we will not see any aesthetics: the paint will lie unevenly, and if it is oil or translucent varnishes, glazes, then there will be stains and everything that was scratched by a coarse abrasive will appear.
Photo 3. Grinding wheels grain 80
Therefore, we take 150 grit and grind it again. Yes Yes! Again. Exactly. In order for the primer to penetrate deep into the wood, we opened the wood with coarse grain, and in order for our paint to lay beautifully and evenly, we leveled the surface with 150, a more gentle abrasive.
Photo 4. Painting a wooden house
For wood inside the house, you can safely use only 150 grain. After all, there are no aggressive factors inside (for example, seasonal temperature changes, rain, etc.), so adhesion (adhesion of paint to the surface) is not important, but aesthetics are important. This is what we will achieve by sanding with 150 grit. So, let's polish...
Photo 5. Eccentric pneumatic sanders
The preliminary stage was completed, the primer was applied, dried, and then we applied another coat of paint. What can we observe?
What is wood pile
Raised pile in some places. Especially on pine needles. Especially in the area of the knot. Yes, and there is fluff on larch.
Photo 6. Raised pile on wood
What does this mean? Paint, oil or glaze contains coloring particles called pigments. When re-painting, pigment particles linger on the wood fibers and where there are more of them there will be either a rough, unsightly place, with a covering scheme, or a stain when painting with translucent compounds.
Photo 7. Stains as a result of improper sanding
Therefore, it is mandatory to do intermediate sanding with a stone like this with 150 abrasive, which very easily “shake off” the pile that has risen after painting.
Photo 8. Abrasive stones for intermediate grinding
What if your home has already been painted? How to remove old paint layer? And is it necessary to sand off old paint at all?
Photo 9. LesoBirzha taking measurements
It is necessary to sand off old paint when repainting an old house in the following cases:
- if the old paintwork begins to flake off and peel off;
- if under the coating the wood has acquired a gray tint (which means it has become loose, which means there is no longer adhesion of the paint to the wood);
- if we repaint the facade with a different type of paintwork.
How to remove a layer of paint?
A grinder will do it best
. A powerful tool with a lot of revolutions will easily remove the old coating. But, be careful. The work is dusty, if you press a little harder with an angle grinder you will leave a very ugly dent.
Photo 10. Grinder for removing old paint
It is best to use 80 grain for an angle grinder. Do not buy expensive wheels; when you remove the old paint, they fly just as fast as cheap ones.
Photo 11. Removing old paint with a grinder
After working with an angle grinder, you need to go through an eccentric machine with 150 grit to remove scratches from the coarse one. Otherwise, after painting the house, especially with translucent, glaze paints, all the “jambs” will still appear!
So. Let us remember: if we want quality, if we want it to look beautiful, then all stages of sanding when painting wood must be followed. How else? Everything good takes effort.
Photo 12. Correctly painted facade
And if you don’t want to put in the effort or don’t have time for these operations, then entrust this matter to us, we love our work.
See how we can
December 03, 2018719
Restoration of the facade of a house made of beveled larch planks
The building had to be repainted again, since paint is not just a beautiful “clothing” for the house, it is also its protection, and remaining “stripped” the main structure is at risk of the dominance of fungus, mold and the formation of rot. So all the operational work to “reanimate” the facade was carried out on site.
Restoration of the facade of a house made of beveled larch planks
December 03, 2018
719
05 September 20181039
Painting a house made of laminated veneer lumber in the village of Shulgino with oil
Today's topic of conversation was a question from one of the customers
How to properly paint a house made of laminated veneer lumber with oil.
Let's look at an example at a recently completed facility in the cottage village of Flowers, Shulgino village. Renner YS M300
oil .
Painting a house made of laminated veneer lumber in the village of Shulgino with oil
September 05, 2018
1039
March 26, 20173018
Painting the frame of a house and the frame of a bathhouse with Renner YS M046 oil is aerobatics!
We have carried out the following work:
- visiting the site, drawing up estimates;
- polishing the frame of the bathhouse and house;
- painting the log house and bathhouse with Renner oil;
- treating the ends with sealant.
Painting area of the log house: 386 m2 Material: - Renner YS M046 oil.
Painting the frame of a house and the frame of a bathhouse with Renner YS M046 oil is aerobatics! March 26, 2017
3018
View other works