Installing concrete floors in a bathhouse is the most optimal option, thanks to which it is possible to create a strong, reliable, resistant to various influences and durable coating in a fairly humid room. Despite the fact that a concrete floor requires quite complex and time-consuming work, it is quite possible to complete the task yourself.
For rooms with high humidity levels, a wooden floor is often chosen, which requires regular maintenance, repair and replacement. At the same time, the concrete floor in the bathhouse is of high quality, warm, and can last as long as possible without any manipulation.
Why is concrete flooring preferable?
Concrete floors in a bathhouse on the ground today are considered the most appropriate option.
For a bathhouse, one of three floor options is usually chosen: adobe, wood and concrete. To understand why the latter option is preferable, it is worth taking a closer look at the features of all materials.
What kind of floors can be made in a bathhouse:
- Clay - the oldest option, made in the format of a compacted dense layer of clay and acting as a water seal, where a drain was created outside the building. A layer of wood was laid on top of the clay, which had to be dried and ventilated after each visit to the bathhouse. Today, clay is no longer relevant, as it is not very comfortable to use.
- Wooden floors are made from species that are resistant to water. They are easy to install, warm, and make it easy to install a water drainage system. But in any case, wood and water interact poorly - wood is susceptible to the spread of insects, rodents, and microorganisms. It would be possible to protect the material from these influences with special impregnations, but they can be dangerous to human health.
- A concrete floor on the ground in a bathhouse is the most relevant option today: it demonstrates excellent strength, resistance to moisture, lasts a very long time, provided that a layer of thermal insulation is installed or a floor heating system is installed, it is comfortable to use. You can lay any coverings on concrete or leave the surface in its original form by installing wooden flooring.
Drainage system in the bathhouse
As mentioned earlier, the drainage system and the necessary slope of the floor in the bathhouse must be provided in advance and without fail.
There are two options for installing drainage systems.
Directly under the bathhouse, if the screed is done on joists
This option is good because it does not require large energy costs on the part of the customer. In this case, a drainage hole meter by meter and about a meter deep is dug under the concrete base of the floor. The pit is filled with construction sand and large crushed stone.
It is important to provide an air exhaust system in the drainage pit so that accumulating wastewater does not create an unpleasant odor around the bathhouse building.
You can dig a drainage hole away from the bathhouse building. In this case, you will have to install a special drainage pipe.
This option is only good in cases where the concrete screed is raised above the ground surface. If concrete is poured directly onto the ground, this option for a drainage system is excluded.
Floor Pie Composition
Before pouring the floor in a concrete bathhouse with your own hands, you need to thoroughly study the technology. In order for the floor to be durable and warm, a structure is made of several layers: the compacted soil is covered with a layer of sand, then gravel, a dense polyethylene film is laid, a rough screed is applied, a layer of waterproofing and thermal insulation is installed, and the process is completed with a finishing screed. This option is suitable for arranging a floor on any type of soil.
Today, there are two methods by which a concrete floor in a bathhouse is poured: directly on the ground or on special logs (creating a ventilated subfloor). The choice of technology depends on the budget, requirements and conditions of the work.
Installation of a concrete floor on the ground
You can make a concrete floor in a bathhouse on the ground with your own hands directly on the base, having first removed a layer 40-50 centimeters thick. After compaction, gravel is poured into the hole in a layer of 15 centimeters, compacted, then sand is poured in a layer of up to 50 centimeters and compacted again. A screed is poured onto the sand at a certain slope, in accordance with the design and markings.
Usually two layers of screed are poured - one rough, the second finishing, always laying layers of thermal insulation and waterproofing between them.
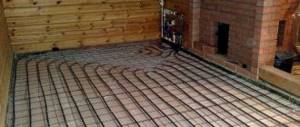
Concrete floor with ventilated subfloor
The concrete floor on wooden joists in the bathhouse is made to create a ventilated space under the floor. Thus, there is no need to install additional ventilation systems in the concrete screed. Wooden logs are pre-treated with special antiseptics, and then mounted in a system of beams with a diameter of 10x20 centimeters in the form of a grid.
A plank subfloor made of boards 2-4 centimeters thick is attached to the joists. A layer of waterproofing and thermal insulation is also performed. Only after this is the concrete screed reinforced with steel mesh poured.
Stage two. Pouring concrete
Prepare materials, tools and equipment. For pouring you will need gravel, sand, cement, a concrete mixer, usually a container for mortar, a trowel and a level. The amount of materials depends on the size of the bathhouse and the thickness of the concrete. The minimum pouring height cannot be less than 10 cm. To increase the stability of the structure, it is recommended to use building reinforcement of a periodic profile with a diameter of 6–8 cm or metal mesh.
Preparatory work
Step 1. Remove fertile soil and large construction debris from the site. If possible, treat the soil with special products to prevent weed growth.
It is necessary to remove grass and large stones
Prepared base
Step 2. Using a laser or water level, make a zero floor mark along the perimeter of the foundation. It is from this mark that the depth of concrete placement and the thickness of all layers will be controlled. Calculate the parameters and, if necessary, deepen the pit. The soil can be removed manually, but you should constantly check the horizontal surface of the bottom.
Step 3. Begin filling the pit with gravel.
Beginning of backfilling, first layer
The thickness of the material is within 15–20 cm. It should be filled in layers of approximately 10 cm, then the gravel is leveled and compacted. Leveling is much easier with an ordinary metal rake.
Backfilling in layers of 10 cm
It is recommended to use screenings with fine crushed stone for the first layer; it compacts better and holds loads. If the floors are poured in several rooms of the bathhouse, then work should begin with the most distant one; the material can be transported along wooden ladders. Due to this sequence, the need to re-level the bedding is eliminated.
Step 4. Each layer of bedding must be compacted separately. This can be done manually or using a special unit. Working manually is long and difficult, and the quality may be unsatisfactory; professionals recommend using vibrating plates.
Tamping with a vibrating plate
You should go over one place at least three times, fill large depressions immediately, and remove the mounds. The smoother the bedding, the less expensive concrete will be needed to fill the floor.
Step 5. After tamping, you need to pour a layer of crushed stone of fraction No. 10–20 with a thickness of 10–15 cm. After leveling, tamping follows, the algorithm for performing the work is the same as for fine crushed stone with screenings.
Loading crushed stone
Another layer is filled
Practical advice. You should not use crushed stone of large fractions, it is much more difficult to work with, and there is no noticeable positive effect.
The thickness of each layer should be controlled according to the marks previously made on the foundation tape.
Leveling the crushed stone layer
Step 6. Prepare the last layer; you can use sand or fine screenings for it. Choose the material that is cheaper in your region; from a practical point of view, there is no difference. After leveling, tamp down thoroughly. It is advisable to moisten the last layer with water and let it sit for at least one day, during which time the bedding will shrink and gaps and other problem areas will be revealed. They must be removed immediately and compacted again.
Sand filling
Elimination, backfilling
Step 7. Install the beacons according to the selected thickness of the screed. Beacons are much easier to install using a laser level. Drive wooden pegs or pieces of metal rod into the bedding along the beam line. If there is no laser level, then the outer beacons can be set at the water level, then stretch a rope between them and adjust the height of all the remaining ones. The distance between the beacons is 40–50 cm. The width of the lines should be 15–20 cm less than the dimensions of the plaster.
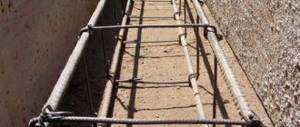
Step 8. To increase the strength of the concrete floor, use reinforcing mesh. Raise it above the bedding; the mesh should be located approximately 1/3 of the height of the concrete. Building codes prohibit placing it in the middle of concrete; in this position it does not strengthen the structure. To raise the mesh, you can use various supports or pour a little concrete under it with a shovel and lift it off the ground with your hands.
Welded mesh laid
Step 9. Place concrete on a row of pegs.
Concrete is carried with a shovel
Important. Concrete must be mobile, but not liquid. Follow the recommended proportions of components; in most cases, the mass requires one part cement to three parts gravel and two parts sand. But this is an optional recipe; if a more durable coating is required, then the amount of cement increases by 15–20% and vice versa. There are marks on the foundation of the bathhouse, opposite which the pegs of the lighthouses were hammered. Use a trowel to smooth out the concrete a little and make lines above the pegs; they will help guide you when laying the slats.
Leveling concrete with a trowel
Step 10. Put the metal or wooden slats in place, carefully check their position; the quality of the concrete floor depends on its correctness. Move the rivers left/right until they completely shrink. Raise the reinforcing mesh and adjust the position of the slats again.
Profile laying
The master lifts the mesh so that it is located in the thickness of the concrete
Practical advice. In our case, the water will be drained in the middle of the steam room or wash room. Such a device requires that the floor be angled towards the drain. This condition will be met during laying of ceramic tiles. Concreting floors sloping towards the center is very difficult, keep this in mind when performing work.
To avoid damaging the driven pegs during concreting, it is recommended to cover them with bricks on both sides.
Pouring the floor with concrete
How to pour a concrete floor faster and easier? There are several recommendations from experienced builders.
To facilitate the process, make a chute for the concrete mixer , along which the mass will be directed to the right place. To prevent the gutter from pressing the reinforcing mesh against the bedding, place a piece of brick under it and lift it up.
Gutter
Pouring concrete
During work, constantly move the mesh inside the concrete layer , tear it off the ground. Using a shovel, alternately throw concrete between the two lines; the thickness of the material should be slightly greater than the height of the beacons.
We recommend that you first perform a rough edit of the mass using a shovel and trowel . Due to this rule, less concrete is removed, the work is much easier, the surface is even even after one pass. If the network is deep, then pour the mixture into them and go through the rule again.
Pouring a concrete floor by hand is physically difficult; you have to constantly work in an inclined position. knee pads on sale , we advise you to buy them and use them. They will allow you to change your body position as you get tired.
Do not spread the mixture over a large area - it is very difficult to correct. The width of the area should allow you to easily reach the edges with your hands in a kneeling position.
Master laying concrete with a shovel
After each leveling, lift the net again. While walking, it constantly lowers; if the reinforcement rests on the bedding, then there will be no increase in the strength of the floor, remember this. Use the same method to screed the entire room.
Experienced builders use the rule of 2.5–3 meters in length; beacons are made at approximately the same distance. Due to this, not only does the pouring speed significantly increase, but the surface also becomes smoother. An additional condition is that the rule must be quite rigid and not sag in the middle while pulling together excess concrete, otherwise small depressions will form between the lines. This is unacceptable for precise pouring, but it is not a problem for finishing leveling screed.
Leveling the concrete layer
While working with the rule, you need to constantly clear the slats from stones; the plane of the tool should not bounce. Remember that following recommendations always takes much less time than eliminating defects. Do not try to simplify the technology yourself; such experiments do not lead to anything good.
Do not pull together a large lump of concrete. The rule will definitely bend, the surface will have to be trimmed several times. If you made a slight mistake with the amount of concrete poured between the beacons, it doesn’t matter. As soon as the rule has collected a large volume, spread the mass with a trowel over the free spaces and only after that continue to pull it together.
Leveling the solution using the rule - photo
According to existing standards, it takes approximately 14 days for concrete to harden , during which time it gains at least 50% of its maximum strength, which allows construction work to continue. Inexperienced builders try to continue working on the floor after a few days, once the structure can support their weight. We categorically do not recommend doing this. The fact is that weak concrete produces microcracks, which are initially invisible to builders. But then, over time, microcracks will certainly increase in size, and the strength of the structure will not correspond to the expected parameters. The consequences of haste can be most unpleasant.
Concrete floors do not remain in this condition; they definitely need to be finished. There are several finishing coating options.
- Wooden logs or slats are laid on the concrete, and boards are laid on top.
- The floors are finished with ceramic tiles. If the concrete is poured correctly and evenly, then a screed is not required. If the technology was violated during the work or the craftsman does not have enough practical experience, then a leveling screed will have to be made.
Video - DSP screed with a slope towards the ladder
We will briefly look at the option of a concrete floor covered with ceramic tiles.
Preparing the base
Before pouring concrete on the bathhouse floor, it is necessary to properly prepare the base. Otherwise, the floor will have low strength and reliability characteristics, will last much less and is unlikely to provide adequate comfort.
Alignment
Before starting work, remove a layer of soil from the base along with any remaining organic matter. Usually 40-50 centimeters is enough. Then the surface is leveled, making sure to make a pit in the center of the room where the water from the bathhouse will go.
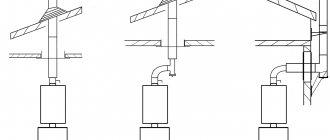
Drainage from the pit is carried out beyond the foundation and is realized through a drainage pipe with a cross-section of 10-20 centimeters dug in the corner under a slope. Thanks to this design, it will be possible to ensure maximum comfort in the operation of the bath and avoid the accumulation of large volumes of water.
Seal
Before concreting, the surface must be compacted with a vibrating plate or a manual tamper made from scrap timber or logs. Sand is poured onto the compacted soil in a layer of 5-10 centimeters, then a layer of gravel 10 centimeters thick.
Both layers must be thoroughly compacted. They will protect the concrete floor in the bathhouse from rising moisture from the soil and other troubles.
Video description
From the video, using the example of German products, you can learn about the use of wax for processing lining:
Processing lining in a steam room
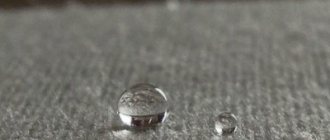
The solution to how to treat the inside of a sauna steam room lies in its resistance to high temperatures and humidity. Environmental friendliness is also taken into account. Previously, wax and oils were used for this purpose: sunflower, hemp, linseed. Less commonly considered is rose, lavender or anise. All options create a barrier to dirt and moisture, protection from rotting.
Today, trading floors offer a variety of impregnations and coatings suitable for harsh operating conditions. So, in order to treat the lining in a steam room, the property of deep penetration and the formation of a wear-resistant film is important. Preference, as a rule, is given to water-soluble heat-resistant compounds with minimal water absorption and breathability.
Regarding technology, the procedure is similar to working with floors. First, an antiseptic with a fire retardant is applied, then oil, impregnation, varnish or paint. The manufacturer's recommendations regarding the number of layers and drying time must be followed.
Applying impregnation to the lining Source isu.org.ua
Rough screed
Before making a concrete floor in a bathhouse, it is necessary to perform a rough screed. Typically, the thickness of such a layer is no more than 10 centimeters (optimally 5-7).
Mixture recipe
To prepare the mixture, you will need sand, cement, gravel, crushed stone. When wondering what kind of concrete is needed for the foundation of a bathhouse (base), it is better to choose M400. Saving on materials can cause poor quality coatings.
Concrete mortar recipe:
- Cement M400 – part
- River sand – 1.2 parts
- Crushed stone, gravel fraction 5-10 millimeters - 2.7 parts
If M500 cement is used for pouring, the volume of gravel and sand can be increased to 3.2 and 1.6 parts.
Mixing
All components must be carefully measured and then mixed. The volume of water is determined during the process: the solution must be of optimal consistency: exceeding the permissible volume of water prolongs the hardening period and leads to cracks, while reducing it makes leveling the surface impossible.
When pouring the floor in a bathhouse with concrete with your own hands, you usually add water in portions and mix the mixture until a thick, plastic, evenly moistened consistency is obtained.
Insulation
Before pouring the rough screed, a polyethylene film with a density of 200 microns is laid on the gravel. It will not allow water and solution to penetrate into the gravel, eliminating the risk of a bridge for capillary moisture and reducing the strength level of the concrete screed.
After the insulation layer has been laid, the floor in the concrete bathhouse can be poured. Filling is carried out layer by layer and quickly, carefully leveling the surface with the desired slope. Then they pause in work, waiting for the screed to harden and gain strength (2-3 days). These days the floor is moistened by spraying water or covered with a damp cloth.
Drain and its principle of operation
The main characteristic of a bath room is high humidity. This is what you should use as a starting point when installing the floor yourself. A proven drainage technology is to arrange the surface at an angle, so that water easily collects at one point in the room. Waste water is removed through a special drain. You lay a background pipe from it, connect it to the sewer, or you can use a crushed stone filter placed under the bathhouse.
The quality of the drainage system also depends on:
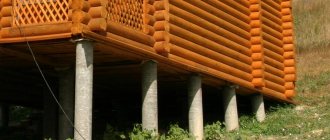
type of foundation;
- type of ladder;
- seasonality of the bath.
Important! The main advantage of a self-leveling floor with a slope is the ability to avoid damage to the concrete screed due to the rapid evacuation of waste water.
Performing hydro- and thermal insulation
When studying the issue and trying to understand how to properly pour a concrete floor in a bathhouse, you cannot ignore the laying of layers of insulation. Without proper protection, the floor will not last long and will not provide comfort. Protection is needed both inside the room itself from moisture and from the ground.
Laying roofing felt
Waterproofing is usually made of roofing felt, which is laid in two layers. The roofing material is rolled out over the entire area of the room, overlapping with a bend on the walls of 3-5 centimeters. Where the sheets adjoin the walls and overlap, they are coated with bitumen mastic.
The second layer of waterproofing is laid in the same way, slightly moving it tangent to the first. The bottom and walls of the pit must also be covered with two layers of waterproofing.
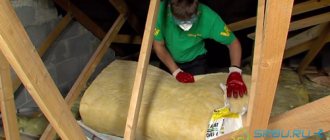
Installation of EPS
Before pouring a concrete floor in a bathhouse, you also need to take care of thermal insulation. It is best to choose extruded polystyrene foam, which comes in slabs 5 centimeters thick. The material is not afraid of moisture and demonstrates good mechanical strength and density. Along the perimeter, the slabs have tongue-and-groove projections, thanks to which you can easily and quickly create a continuous thermal insulation layer.
Work begins from the pit, then the walls are lined flush with the floor, then the slabs are mounted on the floor itself. Any gaps between the material are carefully filled with polyurethane foam to create a monolithic layer of thermal insulation.
Preparatory work for the installation of a rough foundation with a slope
Before screeding the floor, drain and supply lines are laid.
In a private house, the first step is to dig a pit for a vertical drain pipe in the place where it is planned to place an analogue of the piping - a ladder with a vertical supply. Smaller diameter pipes are laid to the main fan pipe as wiring for plumbing fixtures.
Type of drain with direct connection to the sewer pipe
When installing a shower in an apartment that drains onto the floor, a drain with a side supply is connected by a pipe directly to the sewer riser.
Finishing screed
To properly fill the floor in a bathhouse with concrete, two screeds are made. After the rough and insulating layers, the finishing coating is poured. The solution is prepared in the same way as for a rough screed; the layer is made up to 10 centimeters, remembering the need for a floor slope towards the water drainage.
Reinforcement
To strengthen the screed, a reinforcing mesh of steel rods with a cross section of 5 millimeters is used. In some cases, it is possible to replace the steel mesh with fiberglass, which is explained by the absence of serious loads on the floor of the bathhouse. The screed is made 7-10 centimeters thick, the reinforcement frame should be located in the middle, and be filled with a layer of concrete of at least 3 centimeters on all sides.
Preparation of the solution
When choosing a brand of concrete for the foundation for a bathhouse (finishing layer of the floor), preference is given to M400 or M500. The proportions are the same as when preparing the mixture for rough filling. It is better to prepare the mixture in a concrete mixer.
You can use a mixture of cement and sand in a ratio of 1:3 for pouring, or ready-made dry mixtures created for use in rooms with high humidity levels.
Work progress
The installation of a concrete floor in a bathhouse (finishing layer) begins with a pit. First, a finishing screed is made on the bottom, then wooden formwork is created and the walls are poured at the level of the thermal insulation layer. Here, be sure to ensure that the mixture does not get inside the drainage pipe (it must be covered with a lid or a rag).
Next, the mixture must be distributed evenly over the entire surface of the floor in a layer up to 7 centimeters thick, lay out the reinforcing frame, and fill it with a solution of the required thickness (at least 3-4 centimeters).
Drying and removing imperfections
The final screed takes 2-3 days to dry, with the layer always being moistened during the process. If cracks begin to appear as the concrete dries, it is most likely due to the rapid evaporation of moisture. In this case, the coating can be repaired - carefully open the cracks, fill with a special repair composition of sand and cement mixed in equal volumes.
Concrete floor screed: advantages and disadvantages
Advantages of concrete screed:
- strength. In terms of this indicator, it is significantly superior to other materials used for installing bath floors;
- durability. The concrete screed will serve you for many years;
- moisture resistance. At first, under the influence of water, concrete only becomes stronger, but then it has a slight effect on it. In this case, the tree is destroyed under the influence of moisture;
- hygiene. Concrete is a material that is not susceptible to mold, mildew, and does not harbor insects;
- does not require drying. Wooden floors must be dried after bathing procedures; concrete screed does not need this.
Disadvantages of concrete screed:
- heavy weight. Concrete is a heavy material, so it needs a strong foundation;
- long hardening time. It takes about 1-1.5 months for the moisture to dry completely;
- shrinkage. Its duration depends on the amount of water in the solution;
- price. The construction of a concrete floor will cost more than the installation of a wooden floor, but if you take into account the shelf life, the overpayment is justified.
At the moment, concrete floors are considered the best option. They are significantly superior to other types of bath floors in terms of strength, and also have a long service life and can withstand high loads.
Finishing options for further use
When studying the question of how to make concrete floors in a bathhouse, every master thinks about further finishing. Concrete allows you to implement any option - leave the screed in its original form and arrange wooden pallets or cover the floor with any material.
Ceramic tiles (an ideal choice in terms of durability, environmental friendliness, and resistance to moisture), a wooden false floor, or simply wood flooring (a less durable option) are perfect for a bathhouse.
When planning to create concrete floors in a bathhouse with your own hands, you need to study the whole process very carefully. Subject to compliance with technology and established rules, as well as the selection of high-quality materials, it will be easy to create a durable and durable floor covering.
What are the reasons for making a concrete floor?
Understanding this issue in more detail, the known flooring options in a bath room can be divided into three main groups:
- adobe;
- wooden;
- concrete.
The first option has been used since ancient times. The clay layer was compacted tightly, turning into an excellent seal for absorbing moisture. A drain was installed in such a floor, discharging used water outside the structure. For free movement on such a floor, a flooring of boards was provided, which, after washing, should be taken out into the air, giving it the opportunity to be thoroughly ventilated and dry.
It should be noted that such designs are often used in our time for any type of floor. Today, modern building materials are so high quality and convenient that clay floors are almost never used.
A wooden floor in a bathhouse is an excellent and quite convenient solution. And if the wood is also laid, which is not afraid of the effects of water, that’s absolutely good. This group of floors is easy to install on your own, retains heat well, and allows you to arrange water drainage without any problems. But it’s not for nothing that they say that “water wears away stones.” At the same time, we should not forget that any tree provides a convenient habitat not only for microorganisms, but also for insects and rodents.
Many owners try to protect a wooden floor using special antiseptic impregnating compounds, but at the same time they worsen the natural environmental friendliness of the material. No matter what you do, you will not be able to create 100% protection for a wooden floor from the effects of the aquatic environment, and dampness after a certain time will “launch” its rotting processes that decompose wood materials.
And even if you used certain types of wood that are highly resistant to water, over time, sharp and not entirely pleasant odors will still appear that can cause a lot of discomfort.
Installing a concrete floor in a bathhouse is the most optimal solution to the problem. There is probably no point in talking about its strength indicators. If the base is prepared correctly and the floor in the bathhouse is poured with concrete at a high quality level, there is no reason to worry - the operational period will be very long. Many owners feel that concrete floors are quite cold. But if you provide for the installation of a thermal insulation layer (there are many ways to solve this issue), then the problem will be solved once and for all. Yes, and it is possible to build a heating system into such a floor without much difficulty, which will be turned on as soon as necessary.
In a word, insulating a concrete floor in a bathhouse is a completely doable task (for more details: “Insulating the floor in a bathhouse with your own hands - what insulation to choose and how to install it”). The versatility of a floor made of concrete material also lies in the fact that if you don’t want to walk on a bare surface, you can lay tiles or porcelain stoneware on it, or install fixed or removable wood flooring. There are many finishing methods, and you won’t have to think long about how to cover the concrete floor in a bathhouse.