How to make a strip foundation for a bathhouse with a brick base: device, installation
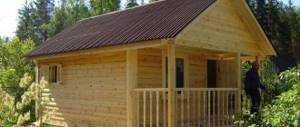
In this article we will look at a specific example of the construction of a strip foundation for a bathhouse with a brick base.
A strip foundation is a solid foundation erected under the wall of a building (structure). In Rus', the bathhouse has long been an indispensable attribute of both the peasant courtyard and the noble estate. Tsars, boyars, and commoners loved to take a steam bath in the bathhouse. Of course, the main purpose of the bath is sanitary and hygienic, but our ancestors were well aware of the health-improving functions of bath procedures, knew many secrets of enhancing the beneficial effects of bath steam, and used all kinds of herbs for steam, brooms, ointments, and teas. Even the following proverb was invented: “The day you take a steam bath, the day you don’t grow old!”
In addition to knowledge about the benefits and necessity of bathing and washing procedures, a hard-working Russian man could also build this very bathhouse with his own hands, which cannot be said about the majority of modern city residents, who in recent years, tired of the bustle and noise of megacities, are increasingly thinking about purchasing country houses, garden plots, or at least small dachas, but construction work is entrusted to third-party organizations and teams. After all, the townspeople themselves simply do not know either the old “old-fashioned” construction techniques or modern technologies.
Meanwhile, you can build a bathhouse yourself, according to your needs and capabilities, while significantly saving the family budget.
Before you start building a bathhouse, you need to think about its layout and placement on the site. You can see detailed information about this in our article on designing a bathhouse.
Having decided on the size of the building, you need to prepare the construction site, and you can begin building the foundation of the bathhouse. The foundation for a bathhouse can be columnar, strip or pile, including screw piles.
If you have chosen a strip foundation for your bathhouse, then our article will help you implement your project in the shortest possible time and with the lowest financial costs.
Screw pile foundation
If the building site has weak soils, a high level of groundwater and deep freezing of the soil in winter, it is best to build a pile foundation of screw support elements under the log house of the bathhouse.
The foundation on screw piles is excellent for heaving soils
The helical support is a hollow metal rod with welded (or cast) blades and a pointed end.
The piles are easily screwed into the ground with your own hands using a special device threaded into a hole in the upper part of the rod, so this foundation for a bathhouse can be built without the involvement of expensive installation equipment and qualified specialists.
A log house for a bathhouse can be erected on a site with difficult terrain, immersing the screw supports to a considerable depth. The core of screw piles can be easily extended to the required length, so the support can be easily screwed deep enough so that the ends of the piles rest against soil with a high load-bearing capacity.
We invite you to familiarize yourself with: Installation of a bathhouse made of metal sandwich panels
The use of piles in wet soils is also possible, but in this case, the supports should be treated with anti-corrosion compounds before screwing in, because any scratch on the metal can cause rapid corrosion.
Before you start screwing the screw supports into the ground, you should clear the area of debris, uproot trees and shrubs, carefully selecting the roots. It is very important that the trees growing next to the building do not damage the root system of the piles immersed in the soil. Uprooting trees and shrubs is usually easy to do with your own hands.
Proper marking is one of the keys to the reliability of the foundation
Then they begin to mark the places for screwing in the piles, for which the perimeter of the future bathhouse is marked on the site, for which pegs are driven into the corners of the building, along which the cords are pulled. It is absolutely not difficult to do this work with your own hands.
After marking the pile field (screw supports are installed under external and internal load-bearing walls, under stoves, boilers and hearths that have significant weight, it is worth installing separate foundations), they begin to screw in the piles. Two people drive the pile into the ground by rotating the device in the eye clockwise.
When all the piles are immersed to certain marks, supports of different heights with eyelets remain above the ground. It is necessary to cut all piles to the same height, monitoring this process using measuring instruments. Hollow supports can be easily cut with your own hands using a specialized power tool.
The internal cavity of the screw piles is filled with concrete mortar, which must harden within a few days. Until the mortar inside the rod gains strength, it is best to suspend other work on the foundation supports.
After the concrete has completely hardened, you can begin installing the headers, which are welded to the top of the supports; they serve to protect the metal rods from moisture penetration. The piles are tied with timber or a channel - the grillage combines the supports into a single foundation belt, which guarantees a more even distribution of the load on the ground.
Watch the video to see what a log house on a screw base looks like.
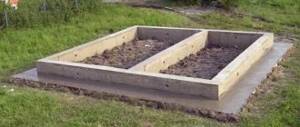
Stages of construction of a strip foundation for a summer residence
Place of construction of the strip foundation: summer cottage in a garden society.
Foundation dimensions: 6x6 m. Including: locker room (rest room) - 3x6m, sink - 3x4m, steam room - 2x3m.
Features of the building site: the previous owners of the site began to build a strip foundation on three sides along the perimeter of the bathhouse, the size of one side is 6 m, two sides are 4 m each, the width of the foundation is 300 mm, the height is 300 mm. Another important feature of this site is that at the time of construction work there was no possibility of connecting to electrical networks.
Task: to complete the remaining strip foundation (perimeter and under internal partitions).
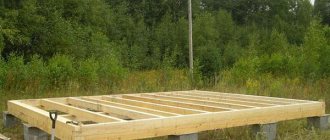
1. Preparing the construction site. The building site must be cleared of debris and any foreign objects, the plant layer of soil must be removed, and the site must be leveled. 2. Layout of the site according to the planned plan. In order to set out the axes, a geodetic instrument, a theodolite, was used. Wooden pegs were installed along the perimeter of the future strip foundation and a cord was pulled. In the absence of a theodolite, we recall the Pythagorean theorem that in a right triangle the sum of the squares of the legs is equal to the square of the hypotenuse, take a tape measure and a cord, and make a breakdown. 3. Creation of a trench. In order to build a strip foundation, it is necessary to dig a trench, the depth of which can be individual, depending on the characteristics of the soil in the area. In our case, the site had previously been backfilled, so a layer of fertile soil was removed to a dense layer of sand, and the depth of the trench was 250 mm. When constructing a strip foundation, a layer of sand and a layer of crushed stone are poured into the trench; each layer can reach a thickness of 100 mm. But, since we did not need to pour a layer of sand, only crushed stone was filled in. 4. Arrangement of formwork. For the installation of formwork, a 50x150 mm board and reinforcement with a length of 700 mm and a cross-section of 14 mm were used. The reinforcement is driven vertically into the ground every 2-3 meters along the perimeter of the dug trench, then boards are installed along the edges. We nail a picket fence (bar) measuring 25x40 mm and 400-450 mm long on top. The distance between the bars is 1-1.5 m. After installing the formwork, we carry out leveling with a geodetic device - a level on a picket fence, and place “beacons” in the corners, using nails for this. 5. Laying reinforcement. It is necessary to lay reinforcement with a cross-section of 12-14 mm in the trench, 2 pieces on each side. The length of the reinforcement is calculated as follows: there should be 0.04 m left on each side; if the length of the wall is, for example, 6 m, then the length of the reinforcement is 5.92 m. You need to cut the reinforcement with an angle grinder (grinder), therefore, in the absence of electricity, this needs to be taken care of in advance. Since we had a part of the strip foundation poured, along the edges of which reinforcement outlets were left, the reinforcement was overlapped with steel tying wire. We place broken bricks under the reinforcement, the quantity can be any, the main thing is that the reinforcement does not sag. It is possible, of course, to perform longitudinal and transverse reinforcement, but this is usually performed when constructing foundations for heavier structures. For a light one-story bathhouse made of timber, there is no need for this kind of reinforcement; it will simply be an extra waste of metal. 6. Preparation of concrete mortar and its laying. The concrete mixture can be prepared mechanically, using a concrete mixer, or manually, mixing the composition in an iron container suitable for these purposes. In our case, the manual method was used, using a “solution jar” with a capacity of 0.13 cubic meters.
Alternative ways to build a plinth
Sometimes craftsmen use non-standard designs for the installation of a bathhouse plinth, for example, from sand-lime brick, ordinary ordinary brick, wall stones, slate, etc. It is worth noting that any wall materials as plinths are undesirable, since they are not designed for direct contact with the ground .
If the foundation ends at a level equal to the ground level, additional brickwork can be made as a plinth for the construction of wooden walls of the bathhouse. It is better to use silicate type bricks, as they interact well with a humid environment. It is necessary to raise the level by 500-600 mm from the ground surface (but not less than 250 mm). The thickness of such a wall will be 400 mm for a large bathhouse and 250 mm for a small one-room building.
Ventilation outlets must be made. To do this, vents are left approximately in the middle part of the masonry in height. It is advisable to make a reinforcing belt of reinforcement and concrete on top of the masonry. Waterproofing is laid under the brick and under the wall, since in this case we use three types of materials for the foundation, plinth and walls.
The following instructions are intended for construction on a ready-made foundation.
One of the most important rules for laying a plinth is the correct alignment of the corners, because incorrectly aligned corners will lead to further curvature of the walls and, accordingly, defects in the construction of the building.
Place a row of dry bricks in all corners, determining the width of the planned base. Angles are set according to level.
Using a tape measure or twine, measure the lengths of all sides and both diagonals - the dimensions must coincide down to centimeters and be correspondingly equal.
It is also worth checking future walls for possible curvature, using the same twine along the inside of the line from corner to corner.
Insulation is necessary to further protect the base from groundwater.
Two layers of roofing felt are laid on the foundation in the following ways:
- on bitumen mastic or heated bitumen;
- connection with a burner, treating the surfaces of roofing material.
You can use rubemast, glass roofing material (stekloizol), euroroofing material.
After setting the corners, it’s time to start laying the base. To create it, bricks are usually used, bonded with cement-sand mortar. Only solid red brick is used for construction.
It is advisable to start the laying from the corners, then lay the rows opposite each other on one side with a thickness of the applied mortar of about 20-25mm.
A plumb line checks the accuracy of laying the vertical surface after 3-4 rows of bricks.
After the final check of the corners, the wall laying begins. To make the row even, a thick fishing line is stretched between two corners.
The minimum height is at least 4 laid rows, finishing in the form of natural stone, finishing tiles or siding is allowed.
If the house has basements, ventilation holes are left in each side of the base at a height of 10-15 cm from the soil, measuring from 7 x 25 to 15 x 25 cm. If the length of the building exceeds 3 meters, the vents are in increments of 2.5 meters and covered with nets or small gratings.
To protect against moisture penetration, you need to lay waterproofing materials, making a distinction between the plinth and the brick wall; for cheap construction, you can use, for example, roofing felt, folded in half. Of course, you don’t have to make do with only them; the choice of materials for insulation is now quite extensive. Double waterproofing is necessary in order to protect the house not only from the external influence of the elements, but also from the influence of groundwater on the foundation.
Composition of concrete mixture per 1 cubic meter. m.
- medium crushed stone (fraction 20-40 mm) - 1900 kg. clean sand (content 5%) - 1140 kg.
- Portland cement PC 500 - 380 kg.
- water (from a well or tap)
The required amount of concrete mixture can be easily calculated based on the size of the future strip foundation. In our case: height - 0.3 m, width - 0.3 m, length - 19 m (6+2+2+6+3). Therefore, we need V=0.3×0.3×19=1.71 cubic meters.
In our case, construction work was carried out when the air temperature at night dropped to minus 5°C, so we additionally used the anti-frost plasticizing additive “Benotech PMP - 1”, which is sold in liquid form. At temperatures from 0 to −5°C, it is necessary to add 1% additive by weight of cement to the concrete mixture. The amount is calculated based on the mass of dry matter, of which one liter of additive contains approximately 453.4 g. At 380 kg. Portland cement requires 8.38 liters. additives.
You can use another additive that accelerates the hardening of the concrete mixture and has antifreeze properties.
If it is possible to connect to the electrical network, the concrete structure can be heated using heating formwork, which uses heating cables, heating elements, mesh heaters and other heating elements. In addition, the concrete mixture can be heated to a temperature of 40-60 °C before laying.
Foam insulation - quickly and economically
With polystyrene foam, the base of the bath will be protruding - and well protected from moisture and cold. For this purpose, it is better to take material with a density of at least 25 kg/cubic meter, and any thickness, unless the base protrudes more than 40 cm.
Stage I. Marking the new base
The polystyrene foam will slightly increase the volume of the base, and therefore it needs to be marked in advance. To do this, pull the string just above the waterproofing and draw a horizontal line on the wall.
Stage II. Preparing the surface
We clean the surface of the dirt and prime it with a deep penetration compound.
Stage III. Styrofoam fastening
We start gluing the foam plastic from the corner - to do this, we make markings with a marker and cut off a couple of pieces with a knife. Now we apply glue to the wall with a notched trowel, apply foam boards and lubricate the ends. So, having glued several plates, we make holes with a drill, fix the sheets and hammer in nails.
Stage IV. Reinforcement
Now the foam needs to be treated with primer. Next, use cement glue to glue the metal slope corner around the perimeter and corners. We also attach the reinforcing mesh to the foam with glue, having previously cut it into the same pieces as the foam.
Here's how to attach it: apply glue to the foam, spread it with a wide spatula, apply the mesh and go over it with the spatula again.
Stage V. Finishing the base
After the glue has dried, we move on to finishing the base. Apply the putty solution with a wide spatula on top of the glue-cement. The dried putty is already primed and can be painted. And you need to paint the base with special acrylic facade paint.
Natural and artificial stones are also excellent for cladding the base of a bathhouse - they can be attached with ordinary glue for installation work. And this finish looks simply gorgeous!
Technology for preparing concrete mixture for strip foundations
The required amount of sand is poured into the container, a depression is made in it and cement is poured in, everything is thoroughly mixed with a shovel. Crushed stone is added to this mixture and mixed well again. Then water is gradually added, preferably from a watering can, so as not to wash away sand particles with a strong stream.
In the garden plot there may not be containers on hand to accurately measure the required amount of material, so buckets are often used for these purposes.
Amount of material in one bucket (10 l):
- crushed stone - 15-17 kg
- sand - 14-17 kg
- cement - 13-15 kg
The amount of crushed stone depends on its fraction, the amount of sand depends on humidity, and the amount of cement is affected by the density of its compaction during backfilling.
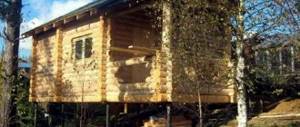
Columnar support base for a bathhouse
A columnar foundation, despite its simplicity, is capable of supporting a significant weight of log baths and light panel buildings that do not create a significant load on the foundation.
Columnar base perfectly resists soil heaving
The log house is installed on poles, which are erected on a plot allocated for construction. It is possible to make a columnar base for a bathhouse from stone or concrete; you can use red clay bricks or make pillars from asbestos-cement pipes and then fill them with concrete mortar.
The installation of pillars should be provided at the intersection of walls and partitions, as well as under external load-bearing walls. The distance between individual pillars ranges from 120 cm to 200 cm.
Columnar supports perfectly resist the forces of frost heaving of the soil, so such a foundation is quite suitable for a log bathhouse, which is being built in the northern regions.
To strengthen the columnar supports, it is necessary to provide a strapping device that will sequentially connect all the supports into a single foundation. For a bathhouse made of wooden materials, a beam made of natural wood can be used as a frame, which is laid on top of the pillars. The strapping beam is also the bottom crown of the bathhouse.
Installing a columnar base does not take much time; the foundation is easy to build with your own hands.
Tags: bathhouse, log house, basement
« Previous entry
Laying concrete mortar
- The finished solution is poured into the formwork, leveled, pierced with a probe or bayonet shovel (to remove excess air), and tapped from the outside of the formwork with a wooden hammer.
- If it is possible to connect to the electrical network, then an internal vibrator can be used to compact the concrete mixture.
- At sub-zero temperatures, the strip foundation is covered on top with a film and a layer of sawdust or any insulation.
- After three days, the formwork can be carefully removed.
Strip foundation - work order
1. A layer of roofing felt (or other waterproofing material) is laid on the concrete foundation. Roofing material can be easily cut with a knife into strips of the required width. 2. For brickwork, a single-row (chain) ligation method was used. A layer of masonry mortar is laid on top of the waterproofing material, then, across the longitudinal axis of the foundation, a brick is laid to form a bonded row of masonry. We lay a masonry mesh on top of the first row of bricks. The second row of masonry is a spoon row (along the axis). 3. The number of rows of masonry will depend on the desired height of the strip foundation for the bathhouse. In our case, 4 rows of masonry were completed (see information on methods of masonry). 4. The required amount of brick is calculated as follows: the standard size of one brick is 250 × 120 × 65 mm, the length of the base is 35 m, two rows of masonry with a butt side are 120 mm each, two rows are 250 mm each, seams are 10 mm. We make a simple calculation: 3500×2:13+3500×2:26=807.69. Therefore, we will need approximately 808 bricks. 5. In the third row of masonry (bonded) it is necessary to make ventilation ducts. To do this, we use scraps of a metal or plastic pipe, which is mounted across the axis of the foundation in a horizontal position. The diameter of the pipe is not of fundamental importance; we used the one that was available. 5 vents were made for the entire foundation. 6. A row of masonry mesh is again laid on top of the third row of bricks, then the last row of bricks (spoon). 7. The final stage is the installation of a cement screed from a thick mortar 1:2-3. The recommended height of the cement screed is 20 mm. 8. Wait for the solution to dry completely.
That's all, our strip foundation has been successfully completed, and we can proceed to the next stage of building the bathhouse.
Wooden log bathhouse: pros and cons
A log bathhouse is a classic Russian version; such buildings are being built in all regions of our vast country.
The popularity of wooden baths partly depends on the fairly economical material, which is not in short supply throughout Russia. There are also plenty of disadvantages to wooden baths: the log house has significant weight, there is a high risk of fire and the occurrence of foci of biological damage (rot, mold and fungus can render a wooden building (log bathhouse) unusable in a very short time).
In order for a bathhouse built from logs with your own hands to serve for many years, it is necessary to carefully construct a support base that can withstand the loads from the weight of the bathhouse, the water boiler, the weight of human bodies, snow loads in winter and other factors affecting the foundation.
Brick plinth laying
The basement is the above-ground part of the house above the foundation. Its top mark is usually the floor mark of the 1st floor. It turns out that the base is part of the wall of the house that encloses the underground space.
The underground, basement or technical floor can be cold or warm. For the so-called warm underground, the base must be additionally insulated. But in this article we will consider a cold basement, because for a simple, seasonal bathhouse or a country house, there is no need for a warm underground.
Material for the base of the house
Now there are two opinions about the design of the plinth, when the question arises of what material to choose for the plinth of the house:
- the basement part is made of concrete, as a continuation of the monolithic foundation
- the base is made of brick
Laying a brick plinth was not even discussed in the past. The plinth must be brick, period. Just 10 years ago it was not fashionable to raise the foundation higher than 150mm above the ground.
If we compare concrete and brickwork, then in terms of thermal properties, without a doubt, the brick plinth wins. Because, for a residential building, a brick plinth with a masonry thickness of 510-640 mm is laid out. This thickness of a brick wall does not require additional insulation in snowy regions of Russia.
But recently, the technology of insulating concrete walls has come into fashion. And this plinth technology is now preferable when constructing a permanent residential building, because, simultaneously with the insulation of the plinth, horizontal insulation of the blind area is done, which provides an advantage as a protective measure for foundations from freezing.
If you are not going to insulate the basement part of the wall and the blind area of the house from the outside of the house, then without any options, laying a brick base is suitable for you:
- easier
- warmer
- cheaper
- does not require additional finishing
But this is a subjective opinion.
If it is easier for you to monolith the base, then, of course, choose this option. Because in both options, the bathhouse is a structure that does not require a high underground. The maximum height of the base for a bath is 300-400mm.
And if you choose a brick base for a bathhouse, all the same, its thickness will be no more than 250 mm (in brick), due to the fact that it is not necessary to make a wide foundation for a log house from 200-240 mm logs. And this thickness of brickwork is not much warmer than a concrete wall. And during seasonal use (in summer), warm material for the base is not of great importance at positive outside temperatures.
Brick plinth manufacturing technology
The most widely used insulation material is solid thermal insulation. This can be slab polystyrene foam, which has the best characteristics. It holds its shape perfectly, does not allow moisture to pass through, and is easy to install. Therefore, the question of whether to insulate the base with more traditional materials can be answered in the negative.
The base in the photo is insulated with extruded polystyrene foam.
We invite you to familiarize yourself with a simple relaxation room in a bathhouse
Expanded polystyrene has different thicknesses - from 30 mm to 120 mm, so before you insulate the base, you first need to decide on the best option. It all depends on the climate zone in which the bathhouse is built: the colder it is, the thicker the insulation should be.
Insulation of the base with polystyrene foam occurs in several steps:
- Preparing the base. We clean the surface of the base from debris, and then thoroughly treat it with a primer.
- Preparation of polystyrene foam. Using a special knife, cut out the necessary pieces of material.
- Installation. On the prepared polystyrene foam we apply an adhesive mixture that does not contain harmful and flammable substances (bitumen-polymer mastic or polyurethane glue), and using a spatula with slots we level it over the entire surface. We apply a sheet of polystyrene foam to the base and, lightly tapping with our palms, achieve an even fit.
- Final works. After gluing the entire surface of the base, we seal the seams and putty the surface with a moisture-resistant mixture for external use.
- After insulation, the base must be given an aesthetic appearance. The cheapest thing would be to simply plaster it, but everyone, of course, wants to decorate the base to their own taste.
If you are thinking about whether to insulate the base yourself or call specialists to do this work, we advise you to contact our company or order a turnkey bathhouse in Kazan.
It will be interesting to read:
- How to attach a veranda to a bathhouse?
- Ventilation in the bathhouse is a necessity.
- How and with what to insulate the floor in a bathhouse?
Material selection
- clinker is the most durable of existing analogues, has a long service life, does not require finishing, is absolutely waterproof, but is too expensive, so it is rarely used;
- clay - more often called ordinary, has minimal aesthetics of perception, decoration is necessary, the material is chosen according to frost resistance (M 150 - M 250 for 50 - 100 seasons, respectively), this is a budget brick that allows you to reduce the construction budget;
- ceramics – average price, excellent decorative properties, solid and hollow modifications are available;
- porous - minimally loads the foundation structure, does not require cladding, is an improved analogue of ceramics, therefore costs more, there are large-format modifications with non-standard sizes;
- dry, semi-dry pressing - looks like ceramics, but does not fire, has lower frost resistance, is inexpensive, the masonry does not need lining;
Solid clay brick is the most suitable material for the plinth.
When choosing a brick other than the walls, the plinth by default becomes an independent element of the facade design.
To build a brick plinth, you will need a standard trowel, a level, a mooring, a plumb line, a cord, and a pick. When using facing bricks, cutting is best done with an angle grinder (grinder) with a diamond blade or stone equipment. For the solution you will need a bucket with a shovel or a bucket with a drill or mixer. Professionals can make do with a piece of roofing felt or a sheet of iron; it is better for a home craftsman not to risk the quality of the batches.
For facing masonry, special devices are produced that make it easier to level the pastels in each row. The only drawback of the Bricky device is its adaptation to foreign bricks, the dimensions of which are somewhat different from their domestic counterparts.
The brick plinth has a width depending on the type chosen (flush, protruding, recessed) and the thickness of the walls. For example, for a masonry of 51 cm, this value is in the range of 45-57 cm. There are options when the base is wider than the foundation - in this case, the release of brick on any side is limited to ¼ of its length (6 cm).
Due to the lack of regulatory documentation for the installation of the foot of the house, the brick plinth can be of any height. Experts do not recommend building it higher than half of the first floor - this will disrupt the architecture of the building and the exterior of the facades.
Without a project, only garden houses can be built; in all other cases, the necessary marks for all structures are included in the documentation. Self-builders solve the problem of foot height as follows:
- if the foundation is poured at ground level, choose a masonry height of 0.7-1 m;
- if a plinth is needed for a technical underground, they are guided by the dimensions of the engineering systems (usually pumping equipment, valves) that must fit in it;
- if a footstool is needed to complete the basement, choose a comfortable ceiling height in the lower level.
In the last two options, insulation is often placed into the base structure (if the brick is facing) or external insulation is performed, taking into account its thickness.
Unlike the external soil, the ground under the house does not freeze in any frost. It contains moisture absorbed by the concrete and transferred to the upper structures. Therefore, the foundation is necessarily cut off from them with a waterproofing layer.
In order to waterproof the foundation efficiently, it is enough to lay two layers of rolled material, a membrane or a film along its perimeter. The side surfaces of the concrete strip also need to be treated to protect against flood, groundwater, and melt water. In this case, deep penetration primers that change the structure of the material are much more effective.
The top waterproofing is laid overlapping at the joints, protrudes 2-3 cm beyond the perimeter, and is cut off upon completion of the masonry.
Do you need a brick base?
Do you need a brick plinth? This is a question that plagues every developer. You will find part of the answer in the previous section.
But the base has another function - protective. As you know, the foundation located in the ground absorbs moisture. Especially if the concrete was prepared manually, then its hygroscopicity leaves much to be desired. Therefore, it is always necessary to lay roofing material between the concrete and the brickwork of the base as a waterproofing layer, which will protect the brick from absorbing ground moisture.
Everything depends on communications
When deciding whether to use a plinth for a brick bathhouse, you need to understand that much will depend on the correct arrangement of communications of all types.
How to make ventilation
On a floor such as the basement of a bathhouse, it is extremely important to provide good exhaust hood, which should be planned at the design stage of the building. Taking into account the peculiarity of the room, its location, ventilation should be of the so-called forced action .
It will help you avoid:
- excessive dampness;
- mold formation;
- the appearance of an unpleasant odor.
At the initial stage of construction
Advice. It is better to entrust planning the ventilation of the basement to an experienced specialist who is familiar with all the features of this process, otherwise you risk getting expensive, but not functional communication.
As experts note, it is best to use the so-called plinth deflector, the price of which is quite reasonable, and the device itself will provide:
- natural ventilation;
- forced ventilation;
- influx of fresh air into the free space of the room;
- vent for the fireplace.
In general, if we talk about the main functions of such a deflector, then it should be noted:
- the ability to remove any gases, including those that penetrate the room from the ground;
- it can be connected to a regular duct fan.
Arrangement of dehumidifiers
The dehumidifier is an important element.
In particular, it is extremely necessary if, in addition to the bathhouse itself, you plan to do:
- pool;
- jacuzzi;
- font.
During the wood cladding process
This equipment looks like a monoblock type air conditioner.
The fan and radiator present in it allow the air to cool:
- air conditioning is provided;
- moisture settling on the radiator flows into a tray specially designed for this purpose;
- the air, dry and slightly heated, is again redirected into the room.
Tip: Instead of a dehumidifier, you can use a small window air conditioner and install it indoors. However, it should be remembered that its efficiency will be low, but the noise from operation will be significant.
Sewerage installation
It is also a very important stage of creating communication, but also very difficult. This is due to the fact that in any case it will be much lower than the one created in the house. This may cause the wastewater to not move on its own, and it will be necessary to install special equipment to pump it.
Specialized pumping stations, which are:
- a sealed tank into which all waste flows by gravity;
- a special pump that lifts wastewater into the main sewer system.
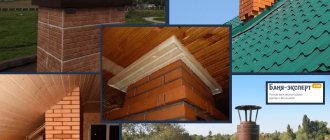
Chimney installation
Wall cladding
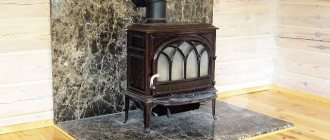
A properly constructed chimney is especially important if you decide to install a wood-burning stove in your bathhouse. Naturally, it also needs to be thought through at the stage of designing the entire structure.
Advice. The best option would be to create a ceramic chimney - this will allow you to warm up not only the bathhouse itself, but the entire house.
Brand of brick for the plinth
The grade of brick for the basement should be no lower than M200 for a brick house with several floors and no lower than M150 for other lighter wall structures of 1 floor. Why? Because the base is the most loaded structure after the foundation itself. The base will carry everything above it:
- walls
- overlap
- roof
- snow on the roof
- furniture and people in the house
In accordance with SNiP II-22-81 “Stone and reinforced masonry structures”:
It is recommended to use fired clay brick of plastic formation in accordance with GOST 530-2007 “Ceramic brick and stone” M-150 and more, F-50, where:
- M – strength and resistance to bending, compression
- F – frost-resistant (resistance against sudden temperature changes)
Calculation of bricks for the plinth
The calculation of a brick per plinth for its purchase and delivery is as follows:
- First, the volume of the brickwork is calculated. To do this, we multiply the perimeter of the foundation by the width of the masonry and its height. For example, the dimensions of the foundation are 4x3 m. with a foundation width of 300mm. The perimeter is 14 m. The masonry will be brick-width (250mm) and 4 rows high (70*4=280mm). We obtain the volume of the future masonry equal to: 14m*0.25m*0.28m=0.98 m3.
- In 1 m3 of brickwork, the average consumption of bricks is 400 pcs. We multiply our masonry volume by 400 pieces, we get: 0.98 m * 400 pieces = 392 pieces.
There are 300-330 pieces in a pallet (depending on the manufacturer). This means you need to buy 2 pallets. With reserve. The brick will remain, but it is never superfluous during construction. You can, in the future, make a simple brick grill.
How to lay a brick plinth
A few recommendations on how to lay a brick plinth:
- Before the brickwork, a horizontal waterproofing layer of roofing felt must be placed on the surface of the foundation to prevent moisture from penetrating from below. According to regulatory documents in construction, it must be made of 2 layers of roofing felt, with each layer sealed with mastic.
- If the base structure is massive (in width and height), then a leveling screed must be made of a 20mm thick cement-sand mortar over the waterproofing layer, on which a masonry mesh with 50x50mm cells made of 4mm wire is laid. This reinforcing layer will give additional rigidity and strength to the base of the overlying brick plinth.
- For a log bathhouse, the above condition is not so important, because the log house is much lighter than the brick walls of the house and the bathhouse does not require a high base.
- The first row of brickwork must be bonded
- It is necessary to carefully fill horizontal and vertical joints with mortar, because if moisture penetrates, the mortar in the joints will begin to collapse over time.
- if the base is high, then you need to reinforce the masonry every 3 or 5 rows, or at least in the corners.
- Horizontal waterproofing from roofing felt is again performed on top of the top row of brickwork of the plinth.
Since the brickwork of the plinth is that part of the walls that is especially susceptible to the influence of atmospheric influences (rain, snow, ground moisture) and works almost all the time in a humidity regime, then for permanent buildings it must be additionally protected. The best protection is natural stone cladding. Other options are possible: ceramic tiles, artificial stone, plaster).
Construction in stages
After erecting the foundation and leveling it, you can proceed directly to the masonry. This is an interesting business, and the work is not so physically difficult. Here's a short list of tools:
- Trowel, trowel for mortar;
- Bushhammer;
- Concrete mixer or hand-held construction mixer for preparing the solution;
- Level, plumb line, tape measure;
- An auxiliary tool for carrying mortar and bricks, such as a bucket.
For each item, you can purchase more advanced options. Instead of a level and tape measure, you can use a laser level and a rangefinder. Nowadays this electronics is inexpensive. With these devices, the accuracy of laying rows will increase significantly. The laser level is also useful in the construction of any other elements in the bathhouse. It is convenient to buy it in advance.
Important! If for masonry, in addition to solid bricks, you purchased ½ and 3/4 shares, then the mason’s hammer can be neglected.
One or more layers of waterproofing are applied to the leveled surface of the foundation. Both roll and liquid (mastic) materials are used here. How to make waterproofing - see other articles on our site.
The first row of bricks is laid on top of the waterproofing on a layer of masonry mortar.
This is done strictly according to the level. A cord is pulled across it. Before this, beacons should be placed in the corners of the bathhouse.
It is convenient to use wooden or metal bars as beacons. They must be firmly fixed to ensure a cord tension of several tens of kg. Brickwork in the bathhouse is done in one row. That is, they begin laying the next row only after the entire previous one has been laid out and checked for level and plumb.