In previous articles we paid a lot of attention to the roofs of bathhouses. Still would! About 35% of all heat loss in the room occurs through it. And if we figured out the roof, then it was the turn of window and, especially doorways. In addition to their significant share in the process of heat loss, they also serve as the main route of access to the bathhouse and communication in the internal volume between individual functional areas. The topic of our conversation today is the installation of doors in a bathhouse, what you need to pay special attention to, and what mistakes you should not make in the first place.
General stages of installing doors in a bathhouse
Regardless of whether your door is purchased from you or made yourself, whether it is made of glass or wood, or even metal, there are some basic points that apply to all of them. Below we will take the time to consider the nuances of installing a bath door made of each material.
Preparing the doorway
We will have only a couple of requirements for the opening:
- it must match the dimensions of the door frame plus a couple of centimeters of gap between them ;
- the geometry of the opening must correspond to the verticals and horizontals in level.
If the opening is not 2 cm larger than the box on each side, it can be narrowed . Since we are talking about a bathhouse, you should not use chipboard and similar materials for this . Use the boards.
BUT! Please note that the platbands will cover no more than 4 cm, so the narrowing should be within these limits. If you need more, change the door.
Get your geometry in order before proceeding further.
Box assembly
Produced separately on a flat surface. To do this, you can use either the floor or a table , or better yet, two tables of the same height, which can be placed at a distance of up to a meter.
The box can be completely ready for fastening with self-tapping screws - its ends are cut at 45 degrees and its dimensions are 2 cm smaller than the opening . In this case, you just need to screw in the screws as shown in the picture below:
If the box beam is not edged at 45 degrees or is longer than required, you will have to cut it first. a miter box or miter saw for this .
Installation of hinges
ADVICE! The loops should be placed like this: step back 20 cm down from the top edge of the fabric - this is the mark of the top edge of the loop, 20 cm up from the bottom edge of the fabric - this is the bottom edge of the second loop. If a third loop is needed, it is placed 20-30 cm below the top one.
For butterflies, a recess can be made only in the door or only in the jamb
There are several types of loops, which you can read about in this article. Any of them can be installed on bath doors of different sizes.
There should be no problems with external invoices They are screwed on with self-tapping screws from the outside - just make the markings.
Screw-in ones are included in the design of hinges for glass doors for saunas and baths, but there shouldn’t be any problems with them either - the frame comes with a glass panel and screwing a couple of parts on each hinge won’t be difficult.
But mortise card loops and awnings may require creating a recess under the flags (or cards) so as not to create an extra gap between the canvas and the box. To make the cut, you will have to work either with a hand router or with a chisel. It is better to take on the latter by those who already have work experience.
IMPORTANT! When choosing a cut area with a chisel, you cannot increase the depth.
The recess is made by 2.2-2.7 mm over the area of the flag.
GENERAL RULE! Before screwing in the screws, be sure to pre-drill a hole 0.75 from the diameter of the screw. The screws themselves must be threaded all the way to the head.
Installing a box in an opening: methods of attaching to a wall
How to properly install a door to a bathhouse so that it does not lose its thermal insulation properties, not to mention that it does not simply fall out of the opening one day? To do this, it must be properly attached to the wall. We will look at several methods, but we will immediately say that their effectiveness is unequal. In addition, of course, there are more than three of them, but it all comes down to mounting tricks.
ON A NOTE! First, about polyurethane foam: there are several rooms in the bathhouse, but only in the steam room you should not fill the gaps between the frame and the wall with it . Therefore, we will talk about it, but for the steam room, instead of it, you can put jute - the kind that is placed between the logs of a log house.
Method one: foam
This is the most unreliable method . It does not involve any other fastening of the box in the opening other than polyurethane foam. The method is suitable only for the lightest doors.
WARNING! Foam breaks down over time. Factors leading to this are: moisture, sunlight, ultraviolet radiation. However, moisture alone is enough. If the box is supported only by it, then first there will be drafts, and then the door may simply become loose and fall out!
However, we have our own example of the longevity of foam in a bathhouse. We made our own video proving that foam is different from foam. Here is a practical example of how it has lasted for three years and has only turned yellow from ultraviolet radiation:
Therefore, we present the technology. Firstly, the frame is placed either with a door leaf and spacers (for example, cardboard) between the door leaf and the frame, or with spacers . Both are necessary to counteract the deforming force of the foam, which increases in volume, puts pressure on the box beam and is capable of deforming it.
The frame (with a door or spacers!) is inserted into the opening, first fixed movably with wooden wedges to align the verticals and horizontals with a level. When everything is in order, the fixation with wedges is made rigid and checked again with a level.
All that remains is to foam the gaps. The hardening time depends on both the brand and the “professionalism” of the foam (there is household foam, there is PRO - the first with a straw, the second requires a gun). Household ones have a large expansion, professional ones have less. PRO hardens in about 15 minutes.
ADVICE! Foam is difficult to remove, so protect surfaces with cloth, film, or masking tape.
Useful video
This video demonstrates the installation of a door using foam only:
Unfortunately, the sound is “walking”. If you want, you can watch the installation and location of the wedges in another video:
Method two: with staples or direct hangers
Direct hangers for drywall have long been used for other purposes than their intended purpose.
They are successfully used for hidden fastening of doors. The idea is extremely simple: the middle part of the suspension is screwed to the box with self-tapping screws. And when the box is installed in the opening, the folding parts move onto the wall on both sides.
It is enough to fix them on the wall, and cut off the excess (here you need to focus on the platbands and extensions) to get a fairly strong mount .
Of course, the box is first wedged , adjusted with a level or plumb, and only after that (with constant monitoring) is it fixed.
In some cases, sections of walls for suspensions are slightly recessed . Subsequently, it can be disguised with plaster, for example (if not with platbands). But this means that installation is carried out before the walls are finished .
The result is foaming the gaps, installing platbands and, if necessary, extensions.
A visual demonstration of how installation on hangers is implemented is in this video, here it was done for a heavy door:
Method three: on anchor bolts
Let’s clarify right away: anchor bolts are only an option. Some people consider it too thorough and are content with self-tapping screws with dowel plugs, screws, and frame dowels. The main thing is that the principle is the same.
True, there is a hidden fastening , when the box is drilled under the hinges and lock, which makes it possible to cover them with metal parts, and there is a conventional installation , when the holes with fasteners are masked with simple plugs. In the first case, the fastening goes only to three points , in the second, usually to six .
Of course, the space under the plates of the hinges and the striker (the counter part of the lock) is marked so as not to interfere with the fixation of the plates themselves.
With the three-point option, the bottom of the door remains free, not secured. Therefore, it must be secured with a spacer. It is clear that with a hidden fastening, the door cannot be hung immediately and serve as a spacer.
The six-point method does not look so nice - the places of the plugs are visible , the plugs themselves can fall out (they are glued so that they do not fall out), but the strength of this method is such that the door stands quietly for a long time without repairs or additions.
First you need to drill holes in the box for the plugs. This is done with a drill with a diameter of 14 mm and a depth of 10 mm. After this, another through hole with a diameter of 10 mm for the anchor (the anchor can be thinner, but the hole must correspond to its diameter).
The box is placed in the opening, and a continuation of the hole for the anchor is drilled opposite the holes in the wall. After this, the anchor is carefully inserted and twisted. When twisted, the sleeve expands, securely fixing into the wall. All that remains is to install the plugs.
GENERAL RULE! You need to wedge the door and check the geometry in both cases. The wedges remain with any fastening method. You can foam the gaps with polyurethane foam, or you don’t have to foam them.
Useful video:
The first video shows a hidden three-point mount:
https://youtu.be/P_w6LX1-Lng
Second roller – mount with plugs:
And we couldn’t pass by the video, which combines the advantages of using direct awnings and hidden fastening with three-point screws. No plugs, and high reliability:
Installation of platbands
They are installed at the final stage of installation , when the door is already in the opening. After marking directly on the jamb, the trims are trimmed at 45 degrees either in a miter box or with a miter saw.
IMPORTANT! The cutting sequence matters: first you make the left casing, then the top, then the right.
If the platbands are shaped, they are secured using headless nails or flat pins.
ADVICE! Check immediately whether the platband does not interfere with the movement of the canvas.
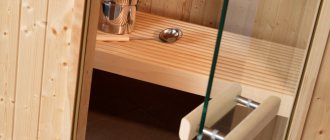
Installation of glass doors
Installing a glass door in a bathhouse with your own hands requires following the following rules:
- do not skimp on gaskets - cardboard, slats;
- Apply tape around the perimeter of the glass to avoid chipping;
- The glass sheet is installed by 2 people.
Glass is a fragile material, so the question arises of how to properly install a glass door in a steam room. This will require a little more time and effort. Care and consistency must be observed.
Proceed step by step:
- install the frame - before installation, remove the bar from it (on the back side);
- the frame must be fixed with wooden pegs and leveled;
- the box is secured with screws;
- hang the canvas, first using spacers;
- install the handle.
If the glass panel is without a frame:
- Before installation, remove all fittings from the canvas.
- You will need wooden supports that will create a gap from the floor of 10-20 cm. Spacers create a gap between the frame and the canvas of 10 mm.
- Carefully install the door and align the gaps.
- Places for hinges are marked on the frame and mounted.
- Glass is mounted in the hinges using gaskets.
- The last step is to install the handle and magnetic shutter.
Installation of glass doors is carried out step by step, carefully, with an assistant.
The nuances of installing doors in a bathhouse made of logs or timber
The walls in a bathhouse made of logs need additional strengthening when openings for windows or doors are cut into them. For this purpose, the installation of doors in a bathhouse made of timber or a log house is preceded by the creation of a frame , to which either the door frame will be attached, or, if a quarter is cut out on the frame, then it will be the finished door frame.
There are two ways to make a socket, both based on tongue-and-groove joints . However, in the first case, the groove is made in the logs or timber, and the ridge is made on the insert strip, and in the second case, on the contrary, the ridge is cut out on the logs, and the groove on the plank. Such a connection is necessary in order to give the log the ability to slide (shrinkage lasts for years).
ATTENTION! Be sure to leave an empty space above the door, which is given to the log to shrink.
We highly recommend watching the following video, where all the principles and variations of the frames are shown on simple blocks (which applies to both windows and doors):
Features of timber casing
Scheme of installing a door into a casing box.
An equally popular method today for installing a door in a wooden house is installing a casing made of timber. Getting started with cutting out the opening is no different from the first method. Just as in the first option, it is necessary to make a spike, the width of which should be 50 mm and the height – about 38 mm. For casing it is necessary to use timber measuring 100x100. In the middle of the block it is worth cutting a groove 50 mm wide and 40 mm deep. In order to make a groove, it is best to use a cutter. The height of the block should also be selected depending on the shrinkage of the house. If the structure has not completely shrinked, then you should retreat 5 cm from the top of the opening. If the structure has given maximum shrinkage, then the gap between the block and the top can be no more than 2 cm.
At the top, the casing can be fixed in two different ways. The first option is to use a board with a cross-section of 50x200 mm, which is installed by surprise. To secure it, you should use self-tapping screws. The second option involves installing the top bar above the side bars. Thus, there is no need to use screws and other fasteners.
How to install a door to a wooden bathhouse
A wooden door can be installed in any or all areas of the bathhouse. They install either a solid wood or a frame door with cladding , for example, clapboard.
Hinges or canopies are mainly used either internal (butterfly) or external , or mortise (card).
The sequence of installation operations is described entirely above - everything was about wooden doors.
The difference between indoor and outdoor ones can only be in the number of hinges (for a heavier one, three are installed) and a more complex lock. Locks inside the bathhouse are made simple : roller, magnetic, etc.
In a Russian bath there is usually a high threshold at the entrance to the steam room , in a sauna there is no threshold, there is a gap between the sheet and the floor . Therefore, an important point is to determine the size of the door to the steam room of a Russian bath.
IMPORTANT! Wood impregnations can be used everywhere except doors in the steam room.
Installation of a metal bath door
An iron door is, of course, heavier than any other. Therefore, it should definitely be placed on anchor bolts .
Such doors are purchased, so installation instructions will be included with them. It is not much different from the one described above, it’s just less work - the hinges are already ready, the holes are made in the box. You just need to screw it to the opening and foam it.
If difficulties arise, you can watch a video in which the author goes through all the stages of installing a metal front door together with the audience:
How to make a frame for openings in a log house
The table below describes the main stages of installing a casing box:
| After assembling the log house, using a level and tape measure, the openings are marked in accordance with the project. They are cut out and leveled with a saw. A tenon (or groove) is made at the ends of the logs. | |
| In the side jambs of the casing, a groove (or tenon, depending on the chosen connection method) is selected for the previously made tenon (or groove). The jambs are installed in openings without rigid attachment to the walls of the log house. Platbands, when used, are attached only to the frame of the openings. | |
| The jambs are slotted onto the tenons and are pushed apart first by the lower frame, then by the top. between the top of the casing (4) and the overlying log (5 - 6% of the height of the door or window (3) ). The upper gap and seats are filled with moss, linen or other sealant (1) . After trimming the openings, windows (doors) can be inserted into them. (2 - platband). |
How to properly install a glass bath door
Glass doors are installed in the steam room and washing room. They come to the consumer already with everything they need. On site, the door is unpacked, the panel is removed and the frame is mounted in the opening after preliminary wedging.
Next, the canvas is returned to its place and secured. The handle is installed and installation is completed. To confirm the ease of installation of a sauna door, watch the video:
The advantages and disadvantages of each material allow you to determine which door is best to install in the bathhouse.
***
We think we coped with the task and told you quite clearly and in detail about how to install a door to a bathhouse. A separate article is devoted to important aspects of door insulation. Now we are waiting for your feedback and comments. Did you manage to install the doors yourself? What were the difficulties?
Reasons for deformation of the entrance door in a log house
Entrance door in a log house
A wooden log house or a log house assembled from timber must withstand, and this will take quite a lot of time. Experts say that no less than 3 years. A house or bathhouse will definitely shrink. In addition, the Viennese can play a little in one direction or another. Looking from the outside, it is almost impossible to notice these changes, but from the condition of the door, if it is installed incorrectly, this will become clear over time. To the point where the door will simply fall apart and you will have to completely redo the entire doorway.